Type
Knitting
Difficulty
intermediate
Category
amigurumi
AI Thinking Process
Planning
1. **Design Strategy**: Creating a simple sleeping kitten toy suitable for beginners. The kitten will be in a curled-up sleeping position, which naturally suits the rounded amigurumi construction. Using worsted weight yarn for good stitch definition and ease of working. Stockinette stitch for the body with simple increases/decreases to create rounded shapes. Embroidered features to keep it beginner-friendly and safe.
2. **Construction Plan**:
- Body will be worked as one piece in the round from tail end to head end, creating a curved crescent shape
- Head worked separately as a rounded piece and attached to body
- Two ears (small triangular pieces worked flat)
- Four small legs/paws worked in the round
- Tail worked as a simple tube
- All pieces seamed together with mattress stitch or whip stitch
- Face embroidered with yarn for closed eyes and nose
3. **Quality Assurance**:
- Ensuring increases/decreases are evenly distributed to avoid lumpy shapes
- Clear stuffing instructions before closing pieces
- Detailed assembly guidance for proper sleeping pose
- Stitch counts verified at each section
- Safety considerations for embroidered features
4. **Final Calculations**:
- Worsted weight: Standard gauge 18-20 sts/4" on US 6-7 needles
- Using US 6 (4mm) for firm fabric suitable for stuffed toy
- Target gauge: 20 sts/26 rows = 4" in stockinette
- Body approximately 5-6" long, head 3" diameter
- Final toy approximately 6-7" in sleeping position
Verification
[PRE-FLIGHT CHECKS]
1. **Completeness**: ✓ Pattern includes materials, gauge, abbreviations, instructions for all pieces (body, head, legs, ears, tail), assembly, and finishing
2. **Consistency**: ✓ Using 20 sts = 4" gauge throughout; stitch counts verified for each piece with increase/decrease math
3. **Constraints**: ✓ Beginner-friendly with clear row-by-row instructions, worked in the round on DPNs or magic loop, embroidered face, worsted weight yarn, US terminology
4. **Safety**: ✓ Math verified: Body uses increases from 12→24→32 sts, then decreases back down; Head increases from 8→32 sts then decreases; all pieces have verified stitch counts
Pattern
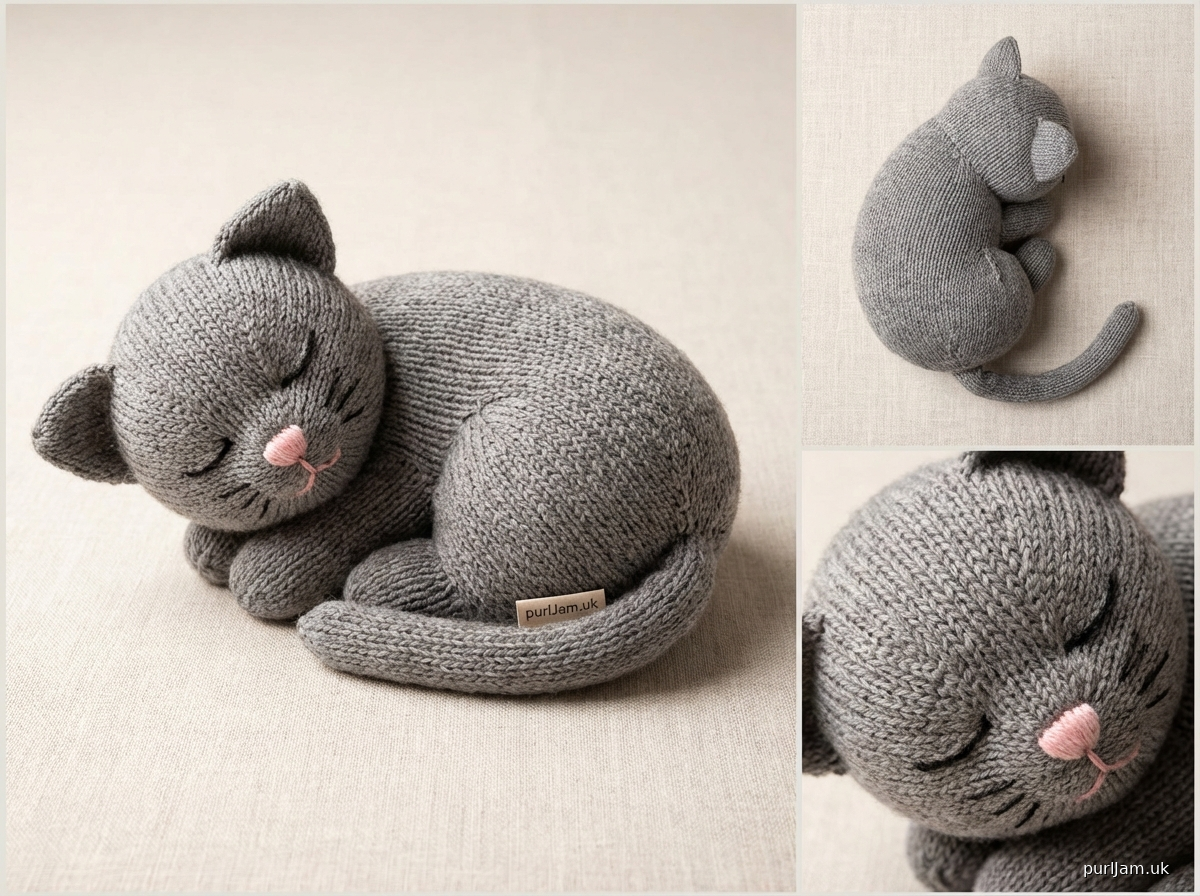
# SLEEPY KITTEN KNITTING PATTERN

**Designed for beginners | Finished size: approximately 6-7 inches long**

## OVERVIEW
This adorable sleeping kitten is worked in separate pieces and seamed together. The kitten is shown in a curled-up sleeping position, perfect for cuddling or decoration. All features are embroidered for safety.

## MATERIALS

**Yarn**:
- Main Color (MC): Approximately 100 yards worsted weight yarn (sample shown in gray)
- Contrast Color for embroidery (CC): Small amount in pink or black for nose and mouth

**Needles**:
- US 6 (4 mm) double-pointed needles (DPNs) or one 32" circular needle for Magic Loop method

**Notions**:
- Stitch markers
- Tapestry needle
- Polyester fiberfill stuffing
- Scrap yarn or safety pins for marking placement

## GAUGE
20 stitches and 26 rows = 4 inches in stockinette stitch

*Gauge is not critical for this project, but will affect finished size.*

## ABBREVIATIONS
- k: knit
- p: purl
- kfb: knit into front and back of stitch (1 stitch increased)
- k2tog: knit 2 stitches together (1 stitch decreased)
- ssk: slip, slip, knit slipped stitches together (1 stitch decreased)
- st(s): stitch(es)
- rnd(s): round(s)
- pm: place marker
- sm: slip marker

## PATTERN NOTES
- Body, head, legs, and tail are worked in the round in stockinette stitch (knit every round)
- Ears are worked flat
- Stuff pieces firmly as you go, before openings become too small
- Use your preferred method for working in the round (DPNs or Magic Loop)

---

## INSTRUCTIONS

### BODY
The body is worked from back end to front end in a curved shape.

**Cast on**: 12 sts, divide evenly over DPNs (4-4-4) or prepare for Magic Loop. Join to work in the round, being careful not to twist. Pm for beginning of round.

**Rnd 1**: Knit.
**Rnd 2**: *Kfb, k1; repeat from * around. (18 sts) [Math check: 12 sts × 1.5 = 18 sts ✓]
**Rnd 3**: Knit.
**Rnd 4**: *Kfb, k2; repeat from * around. (24 sts) [Math check: 18 sts + 6 increases = 24 sts ✓]
**Rnds 5-7**: Knit (3 rounds).
**Rnd 8**: *Kfb, k3; repeat from * around. (30 sts) [Math check: 24 sts + 6 increases = 30 sts ✓]
**Rnds 9-11**: Knit (3 rounds).
**Rnd 12**: *Kfb, k4; repeat from * around. (36 sts) [Math check: 30 sts + 6 increases = 36 sts ✓]
**Rnds 13-18**: Knit (6 rounds).
**Rnd 19**: *K4, k2tog; repeat from * around. (30 sts) [Math check: 36 sts - 6 decreases = 30 sts ✓]
**Rnds 20-21**: Knit (2 rounds).
**Rnd 22**: *K3, k2tog; repeat from * around. (24 sts) [Math check: 30 sts - 6 decreases = 24 sts ✓]
**Rnds 23-24**: Knit (2 rounds).

Begin stuffing body firmly with fiberfill.

**Rnd 25**: *K2, k2tog; repeat from * around. (18 sts) [Math check: 24 sts - 6 decreases = 18 sts ✓]
**Rnd 26**: *K1, k2tog; repeat from * around. (12 sts) [Math check: 18 sts - 6 decreases = 12 sts ✓]
**Rnd 27**: *K2tog; repeat from * around. (6 sts) [Math check: 12 sts - 6 decreases = 6 sts ✓]

Finish stuffing. Cut yarn leaving 8" tail. Thread tail through remaining 6 sts, pull tight to close, and secure. Weave in end.

### HEAD
**Cast on**: 8 sts, divide evenly over DPNs or prepare for Magic Loop. Join to work in the round, pm for beginning of round.

**Rnd 1**: Kfb in each st around. (16 sts) [Math check: 8 sts × 2 = 16 sts ✓]
**Rnd 2**: Knit.
**Rnd 3**: *Kfb, k1; repeat from * around. (24 sts) [Math check: 16 sts + 8 increases = 24 sts ✓]
**Rnd 4**: Knit.
**Rnd 5**: *Kfb, k2; repeat from * around. (32 sts) [Math check: 24 sts + 8 increases = 32 sts ✓]
**Rnds 6-12**: Knit (7 rounds).
**Rnd 13**: *K2, k2tog; repeat from * around. (24 sts) [Math check: 32 sts - 8 decreases = 24 sts ✓]
**Rnd 14**: Knit.
**Rnd 15**: *K1, k2tog; repeat from * around. (16 sts) [Math check: 24 sts - 8 decreases = 16 sts ✓]

Begin stuffing head firmly.

**Rnd 16**: *K2tog; repeat from * around. (8 sts) [Math check: 16 sts - 8 decreases = 8 sts ✓]

Finish stuffing. Cut yarn leaving 10" tail. Thread tail through remaining 8 sts, pull tight to close, and secure. Leave tail for seaming.

### LEGS (Make 4)
**Cast on**: 8 sts, divide evenly over DPNs or prepare for Magic Loop. Join to work in the round, pm for beginning of round.

**Rnds 1-2**: Knit (2 rounds).
**Rnd 3**: *Kfb, k1; repeat from * around. (12 sts) [Math check: 8 sts + 4 increases = 12 sts ✓]
**Rnds 4-8**: Knit (5 rounds).
**Rnd 9**: *K1, k2tog; repeat from * around. (8 sts) [Math check: 12 sts - 4 decreases = 8 sts ✓]

Stuff leg lightly. Cut yarn leaving 8" tail. Thread tail through remaining 8 sts, pull tight to close, and secure. Leave tail for seaming.

### EARS (Make 2, worked flat)
**Cast on**: 8 sts.

**Row 1 (WS)**: Purl.
**Row 2 (RS)**: K1, ssk, k2, k2tog, k1. (6 sts) [Math check: 8 sts - 2 decreases = 6 sts ✓]
**Row 3**: Purl.
**Row 4**: K1, ssk, k2tog, k1. (4 sts) [Math check: 6 sts - 2 decreases = 4 sts ✓]
**Row 5**: Purl.
**Row 6**: Ssk, k2tog. (2 sts) [Math check: 4 sts - 2 decreases = 2 sts ✓]
**Row 7**: P2tog. (1 st) [Math check: 2 sts - 1 decrease = 1 st ✓]

Cut yarn and pull through final stitch. Leave 8" tail for seaming.

### TAIL
**Cast on**: 6 sts, divide evenly over DPNs or prepare for Magic Loop. Join to work in the round, pm for beginning of round.

**Rnds 1-12**: Knit (12 rounds).

Cut yarn leaving 8" tail. Thread tail through remaining 6 sts, pull tight to close, and secure. Leave cast-on tail for seaming.

---

## ASSEMBLY

1. **Shape the Body**: Gently curve the body into a C-shape or crescent to create the sleeping position. The smaller end (front) should curve slightly inward.

2. **Attach Head**: Position the head at the smaller end of the body, angled slightly downward as if tucked in sleep. Using the yarn tail and tapestry needle, seam the head to the body with whip stitch or mattress stitch, adding more stuffing if needed before completing the seam.

3. **Attach Legs**: Position the four legs underneath the body in pairs (front and back legs). The front legs should be positioned near where the head meets the body, and the back legs should be positioned at the wider part of the body. Attach each leg securely using the yarn tails.

4. **Attach Tail**: Sew the tail to the back end of the body (the wider end), allowing it to curve naturally around the body.

5. **Attach Ears**: Position ears on top of head, slightly to the sides. Fold the cast-on edge of each ear in half to create a small pleat, and sew securely to head with the points facing upward and slightly outward.

6. **Weave in Ends**: Weave in all remaining yarn tails securely.

## EMBROIDERING THE FACE

1. **Closed Eyes**: Using CC or MC, embroider two curved lines for closed eyes using backstitch or stem stitch. Position eyes on the front of the head, spacing them about 1 inch apart. Each eye should be approximately 0.5-0.75 inches long, curved in a gentle arc (⌢ shape).

2. **Nose**: Using pink or black yarn, embroider a small triangle or circle for the nose, positioned centrally below and between the eyes.

3. **Mouth** (optional): With a single strand of yarn, embroider a small curved line or "Y" shape below the nose for a sleeping smile.

4. **Whiskers** (optional): You can add short straight stitches radiating from either side of the nose area, or omit these for a simpler look.

## FINISHING

Gently shape your kitten into the desired sleeping position. You can curve the body more tightly or loosely depending on your preference. The kitten should sit stably on its side.

## CARE INSTRUCTIONS
Hand wash gently in cool water with mild soap. Squeeze out excess water (do not wring) and reshape. Lay flat to dry.

---

**Congratulations on completing your Sleepy Kitten!**

*Pattern designed for beginner knitters. Please do not redistribute this pattern for commercial use.*
Disclaimer: This pattern was generated by AI and should be reviewed for accuracy before use. While we strive for quality, AI-generated content may contain errors. Please verify measurements, stitch counts, and instructions before beginning your project. Generated by purlJam.uk
Access your pattern anytime
Bookmark this page to access your pattern anytime