Type
Knitting
Difficulty
intermediate
Category
tank
AI Thinking Process
Planning
Verification
Pattern
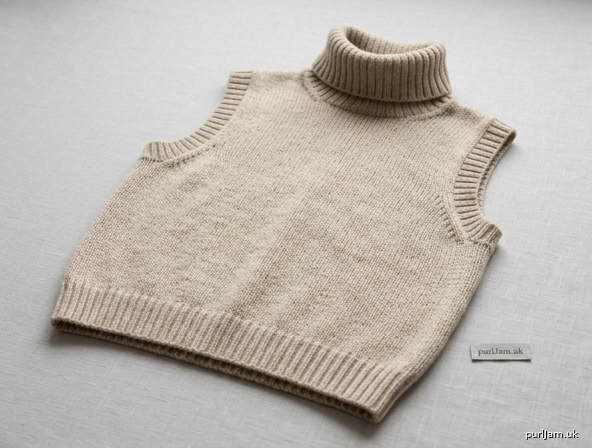
Sleeveless Turtleneck Top
Beginner Knit Pattern
A simple, classic sleeveless top with a cozy fold-over turtleneck. Worked flat in pieces in stockinette stitch with 1×1 rib edges, then seamed. Perfect for layering or cool summer evenings.
Difficulty
Beginner – basic knit/purl, simple decreases, binding off, seaming, and picking up stitches.
Sizes
XS (S, M, L, XL) To fit bust: 30–32 (34–36, 38–40, 42–44, 46–48)" Finished bust: 34 (38, 42, 46, 50)" Finished length: 22 (22.5, 23, 23.5, 24)"
Shown in size S. Choose size based on finished bust with 2–4" positive ease for standard fit.
Yarn
Worsted weight yarn (CYC 4) Approximately 650 (750, 850, 950, 1100) yards Sample uses a smooth wool or wool-blend for good stitch definition and elasticity in the turtleneck; cotton or cotton-blend also works for a cooler summer version (note: cotton has less stretch).
Needles
- US 8 (5 mm) straight or circular needles for body
- US 6 (4 mm) straight or circular needles for ribbing
- Or sizes needed to obtain gauge
Notions
- Stitch holders or waste yarn
- Yarn needle
- Stitch markers (optional)
- Scissors
Gauge
18 sts and 24 rows = 4" (10 cm) in stockinette stitch with larger needles, blocked. Take time to check gauge.
Abbreviations (US)
- BO: bind off
- CO: cast on
- dec: decrease
- k: knit
- k2tog: knit 2 stitches together (right-leaning dec)
- p: purl
- p2tog: purl 2 stitches together
- pm: place marker
- RS: right side
- ssk: slip, slip, knit (left-leaning dec)
- st(s): stitch(es)
- St st: stockinette stitch (knit RS, purl WS)
- WS: wrong side
- wyib: with yarn in back
- wyif: with yarn in front
Notes
- The top is worked flat in two identical-width pieces, then seamed.
- Armhole and neck shaping use simple bind-offs and paired decreases.
- Turtleneck is worked in the round after shoulders are seamed for a clean finish; if you prefer, it may be worked flat and seamed.
- When picking up stitches, pick up 1 st for every BO st and approximately 3 sts for every 4 rows along vertical edges.
- Slip the first stitch of every row purlwise wyif for neat edges (optional but recommended for beginners).
- Block pieces before seaming for best results.
- Inline stitch counts are confirmed after key shaping steps.
BACK
With smaller needles, CO 76 (86, 96, 106, 116) sts.
Ribbing: Row 1 (RS): *K1, p1; repeat from * to end. Row 2 (WS): *K1, p1; repeat from * to end. Repeat Rows 1–2 until ribbing measures 2" from CO edge, ending after a WS row.
Switch to larger needles. Work in St st (k on RS, p on WS) until piece measures 14 (14.5, 15, 15.5, 16)" from CO edge, ending after a WS row.
Shape Armholes BO 4 sts at beginning of next 2 rows. 68 (78, 88, 98, 108) sts remain ✓
Next row (RS dec row): K1, ssk, knit to last 3 sts, k2tog, k1. 2 sts decreased. Next row (WS): Purl. Repeat the last 2 rows 4 (5, 6, 7, 8) more times. 58 (66, 74, 82, 90) sts remain ✓
Work even in St st until armhole measures 7 (7.5, 8, 8.5, 9)", ending after a WS row.
Shape Neck and Shoulders Mark center 22 (24, 26, 28, 30) sts for neck.
Row 1 (RS): BO 6 (7, 8, 9, 10) sts, knit until 18 (21, 24, 27, 30) sts are on right needle (this is the right shoulder as worn), place next 22 (24, 26, 28, 30) sts on holder for back neck, join a second ball of yarn, knit to end. Row 2 (WS): BO 6 (7, 8, 9, 10) sts, purl to neck edge; on second side, purl to end. Row 3 (RS): BO 6 (7, 8, 9, 10) sts, knit to neck edge; on second side, knit to end. Row 4 (WS): BO 6 (7, 8, 9, 10) sts, purl to neck edge; on second side, purl to end. Row 5 (RS): BO remaining 6 (7, 8, 9, 10) sts; on second side, knit to end. Row 6 (WS): BO remaining 6 (7, 8, 9, 10) sts.
Fasten off. Each shoulder total: 18 (21, 24, 27, 30) sts bound off in three equal steps ✓
Place held back neck sts on a spare needle or keep on holder for later.
FRONT
Work exactly as for Back until armhole shaping is complete and you have 58 (66, 74, 82, 90) sts, then continue in St st until armhole measures 4.5 (5, 5.5, 6, 6.5)", ending after a WS row. (Note: front neck begins lower than back for a comfortable turtleneck base.)
Shape Front Neck Mark center 12 (14, 16, 18, 20) sts.
Row 1 (RS): Knit to center marked sts, place center 12 (14, 16, 18, 20) sts on holder, join a second ball of yarn, knit to end. 23 (26, 29, 32, 35) sts each side ✓
Working both sides at once with separate balls: Next row (WS): Purl both sides. Next row (RS dec row): On first side, knit to last 3 sts, k2tog, k1; on second side, k1, ssk, knit to end. 1 st decreased each neck edge. Next row (WS): Purl both sides. Repeat the last 2 rows 4 more times. 18 (21, 24, 27, 30) sts remain each side ✓ (Neck total now matches back: 12 (14, 16, 18, 20) + 5 + 5 = 22 (24, 26, 28, 30) ✓)
Work even on both sides until armhole measures same as Back to start of shoulder shaping, ending after a WS row.
Shape Shoulders Work shoulder bind-offs exactly as for Back on each side (BO 6 (7, 8, 9, 10) sts at each shoulder edge three times). Fasten off.
FINISHING
Block pieces to measurements:
- Width: 17 (19, 21, 23, 25)"
- Length to underarm: 14 (14.5, 15, 15.5, 16)"
- Armhole depth: 7 (7.5, 8, 8.5, 9)"
- Total length: 22 (22.5, 23, 23.5, 24)"
Shoulder Seams With RS together and yarn needle, mattress-stitch or whip-stitch shoulder seams.
Side Seams Mattress-stitch side seams from hem to underarm, leaving armholes open.
Armhole Bands With smaller needles and RS facing, beginning at underarm seam, pick up and knit 64 (68, 72, 78, 84) sts evenly around armhole. Join to work in the round if using circular needle (or work flat and seam later). Work 1×1 rib (*k1, p1; repeat from *) for 1". BO loosely in rib. Repeat for second armhole.
Turtleneck With smaller needles and RS facing, beginning at left shoulder seam, pick up and knit sts as follows:
- 5 sts down left front neck edge,
- 12 (14, 16, 18, 20) sts from front neck holder,
- 5 sts up right front neck edge,
- 3 sts down right back neck edge,
- 22 (24, 26, 28, 30) sts from back neck holder,
- 3 sts up left back neck edge. Total: 50 (54, 58, 62, 66) sts ✓
Distribute sts evenly on circular needle (or dpns). Pm for beginning of round. Work 1×1 rib (*k1, p1; repeat from * around) until turtleneck measures 6" from pick-up round. BO very loosely in rib (use a larger needle for bind-off if needed so the edge stretches easily over the head and folds neatly).
Fold turtleneck in half to outside (or inside for a different look) and tack lightly in place at shoulder seams if desired, or leave free to fold naturally.
Final Touches Weave in all ends securely. Steam or wet-block the finished garment gently, taking care not to flatten the ribbing. Allow to dry flat.
Schematic Measurements (approximate, blocked)
- A. Finished bust: 34 (38, 42, 46, 50)"
- B. Total length: 22 (22.5, 23, 23.5, 24)"
- C. Length to underarm: 14 (14.5, 15, 15.5, 16)"
- D. Armhole depth: 7 (7.5, 8, 8.5, 9)"
- E. Shoulder width (each): 4 (4.75, 5.25, 6, 6.75)"
- F. Neck width: 5 (5.25, 5.75, 6.25, 6.75)"
- G. Turtleneck height (unfolded): 6"
Tips for Beginners
- Count stitches after every shaping row—the ✓ numbers are there to help you stay on track.
- Use stitch markers on either side of the center neck stitches before binding them off.
- When seaming, pin pieces first and use mattress stitch for nearly invisible seams.
- If the turtleneck feels tight when trying on, frog the bind-off and re-bind with a larger needle or a stretchy sewn bind-off.
- Try the top on before weaving in ends so you can adjust armhole band or collar height if needed.
Enjoy your new sleeveless turtleneck top!
Disclaimer: This pattern was generated by AI and should be reviewed for accuracy before use. While we strive for quality, AI-generated content may contain errors. Please verify measurements, stitch counts, charts, and instructions before beginning your project. Generated by purlJam.uk
Love this pattern?
Save this pattern to your free PurlJam libraryAccess your pattern anytime
Bookmark this page to access your pattern anytime