Type
Knitting
Difficulty
beginner
Category
toy_accessory
Pattern
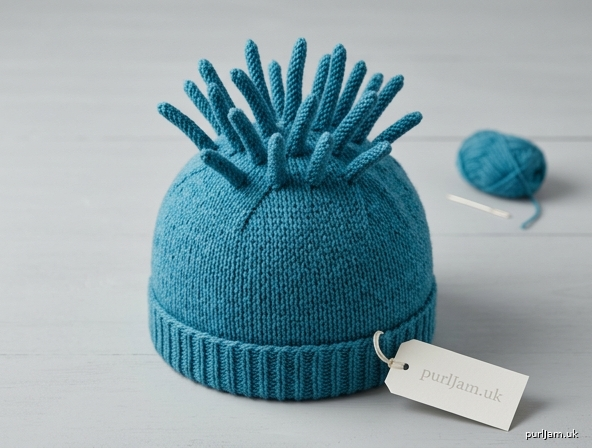
# Spiky Doll Hair Cap

A cheerful, beginner-friendly knitted "hair cap" for a doll, worked seamlessly in the round from the crown down, then finished with a crop of jaunty knitted spikes. The cap slips neatly over a doll's head and can be stitched in place. Perfect for a punky little character!

**Finished size:** Fits a doll head of approximately 20 cm (8 in) circumference.

---

## Materials

- **Yarn:** Worsted (Aran) weight yarn in your chosen hair colour. Approx. 25 m (27 yd) for the cap and spikes. A small amount goes a long way!
- **Needles:** Set of 3.5 mm (UK size 9–10 / US 4) double-pointed needles (DPNs), or a short circular for magic-loop.
- **Notions:** Tapestry/yarn needle, stitch marker, small amount of toy stuffing (optional, to plump spikes), scrap yarn for marking spike positions.

---

## Tension (Gauge)

20 sts × 28 rounds = 10 cm (4 in) over stocking stitch (st st) worked in the round on 3.5 mm needles.

*Tension is not critical for a doll accessory, but a tighter fabric keeps the cap neat and prevents the doll's head showing through.*

---

## Abbreviations (UK)

- **k** – knit
- **p** – purl
- **st(s)** – stitch(es)
- **st st** – stocking stitch (k every round)
- **kfb** – knit into front and back of stitch (1 st increased)
- **k2tog** – knit two stitches together (1 st decreased)
- **rnd(s)** – round(s)
- **pm** – place marker
- **rem** – remaining
- **rep** – repeat
- **DPN(s)** – double-pointed needle(s)

---

## Pattern Notes

- The cap is worked **top-down in the round**, beginning at the crown with a small number of stitches and increasing to fit.
- Spikes are knitted separately as tiny **I-cords** and sewn on afterwards, so beginners can work the cap first, then add as many spikes as desired.
- If your doll's head is larger or smaller, simply add or remove one increase round (each round changes the circumference by approx. 4 cm).

---

## Instructions

### Part 1 — The Cap (Crown)

Cast on **8 sts**. Divide evenly over 3–4 DPNs, join in the round being careful not to twist. **pm** to mark the beginning of the round.

**Rnd 1:** *kfb; rep from * to end. → **16 sts**
*(8 sts × 2 = 16 sts ✓)*

**Rnd 2:** k all sts. → 16 sts

**Rnd 3:** *kfb, k1; rep from * to end. → **24 sts**
*(8 increases added: 16 + 8 = 24 ✓)*

**Rnd 4:** k all sts. → 24 sts

**Rnd 5:** *kfb, k2; rep from * to end. → **32 sts**
*(8 increases: 24 + 8 = 32 ✓)*

**Rnd 6:** k all sts. → 32 sts

**Rnd 7:** *kfb, k3; rep from * to end. → **40 sts**
*(8 increases: 32 + 8 = 40 ✓)*

**Validation:** 40 sts ÷ 20 sts per 10 cm = **20 cm circumference** ✓ (matches target doll head).

### Part 2 — The Sides

Work straight in st st (k every round) on these 40 sts until the cap measures **5 cm (2 in)** from the crown, or until it covers the doll's head as desired. At 28 rounds = 10 cm, this is approximately **14 rounds**.

### Part 3 — The Edge

**Next rnd:** *k1, p1; rep from * to end. → 40 sts
Work this k1, p1 ribbing for **3 rounds** to create a tidy, non-curling brim.

Cast off loosely in pattern (k the knits, p the purls as you cast off).

---

### Part 4 — The Spikes (make 15)

Each spike is a tiny 4-row I-cord.

Using 2 DPNs, cast on **3 sts**. Leave a 15 cm tail for sewing.

**I-cord rows:** *k3, do not turn. Slide the sts back to the right-hand end of the needle and bring the yarn firmly across the back. Rep from * for **6 rows**, pulling the yarn snug each time so the cord forms a tube.

*(6 rows on 3 sts produces a spike approx. 2 cm long.)*

**Finish the tip:** k3tog (slip remaining loop), or k1, k2tog → break yarn and thread through the rem sts, pull tight to close the point.

Make a total of **15 spikes**. For varied "spiky" texture, work some spikes at 4 rows (shorter) and some at 8 rows (taller).

---

## Finishing

1. **Weave in** the crown cast-on tail and the brim cast-off tail neatly on the inside of the cap.

2. **Mark spike positions:** Using scrap yarn, lightly mark 15 evenly spaced points across the top and upper sides of the cap — roughly 3 rings of 5 spikes (centre crown, mid-cap, upper side), leaving the ribbed brim free.

3. **Attach the spikes:** Thread the cast-on tail of each spike onto the tapestry needle. From the **right side**, push the needle through the cap fabric at a marked point and back up close by, anchoring the spike base firmly with 2–3 small stitches. Knot off on the inside. Optionally tuck a tiny wisp of stuffing into taller spikes to keep them standing proud.

4. **Place the cap** on the doll's head. Stitch the brim discreetly to the doll's head with matching thread if you'd like it permanently fixed.

5. **Style** the spikes by gently teasing them upright and outward for maximum punk attitude!

---

**Tips:**
- Keep I-cord stitches snug at the join to avoid a ladder gap; a firm tug after each row does the trick.
- Mix two shades of yarn for a streaked, multi-tonal hair effect.
- For a softer "tufted" look, replace I-cord spikes with simple loop stitches: pull a 3 cm loop of yarn through the cap and knot at the base.

Enjoy your doll's bold new hairstyle!
Disclaimer: This pattern was generated by AI and should be reviewed for accuracy before use. While we strive for quality, AI-generated content may contain errors. Please verify measurements, stitch counts, and instructions before beginning your project. Generated by purlJam.uk
Access your pattern anytime
Bookmark this page to access your pattern anytime