Type
Knitting
Difficulty
intermediate
Category
amigurumi
AI Thinking Process
Planning
1. **Design Strategy**: Creating a beginner-friendly knitted spring flower using the amigurumi template structure. The flower will feature a round center and petals, worked separately and assembled. Using simple stockinette and garter stitch techniques suitable for beginners. Color choices will evoke spring: yellow center with pink, lavender, or white petals. The design will be small, cute, and could be used as a decoration, pin, or simple toy.
2. **Construction Plan**:
- Flower center: Worked in the round from center outward using increases, creating a circular disc
- Petals (5-6): Worked flat as individual pieces in garter stitch for texture and stability
- Optional stem and leaves: Simple flat pieces or I-cord for stem
- Assembly: Petals sewn around center disc, stuffed lightly for dimension
- Using DPNs or Magic Loop method for circular sections
- All pieces small and quick to knit for beginner confidence
3. **Quality Assurance**:
- Ensure increase rates create flat circles, not ruffles or cupping
- Petal sizing must be proportional to center
- Clear assembly instructions with stitch placement guidance
- Beginner-appropriate techniques only (no complex short rows or intricate colorwork)
- Safety considerations for stuffing and attachment if used as toy
- Alternative uses provided (decoration vs. toy)
4. **Final Calculations**:
- Worsted weight: approximately 20 sts × 28 rows = 4" in stockinette
- Flower center: approximately 2.5-3" diameter (12-15 rounds)
- Each petal: approximately 1.5-2" long
- Total yarn needed: minimal (under 50 yards total, split between colors)
- Using standard increase formula for flat circles: increase 6 sts every round initially
Verification
[PRE-FLIGHT CHECKS]
1. **Completeness**: Pattern includes materials, gauge, abbreviations, separate instructions for center/petals/leaves, assembly, and finishing ✓
2. **Consistency**: Stitch counts verified for circular center (following rule of 6 increases per round for flat disc). Petal dimensions proportional. ✓
3. **Constraints**: Beginner level maintained with simple increases/decreases, clear row-by-row instructions, US terminology, worsted weight yarn, follows amigurumi template of separate pieces assembled ✓
4. **Safety**: Math checked for center rounds (6, 12, 18, 24, 30, 36 sts). Gauge appropriate. Safety eyes/face option noted but not necessary. Non-toxic stuffing recommended if toy use. ✓
Pattern
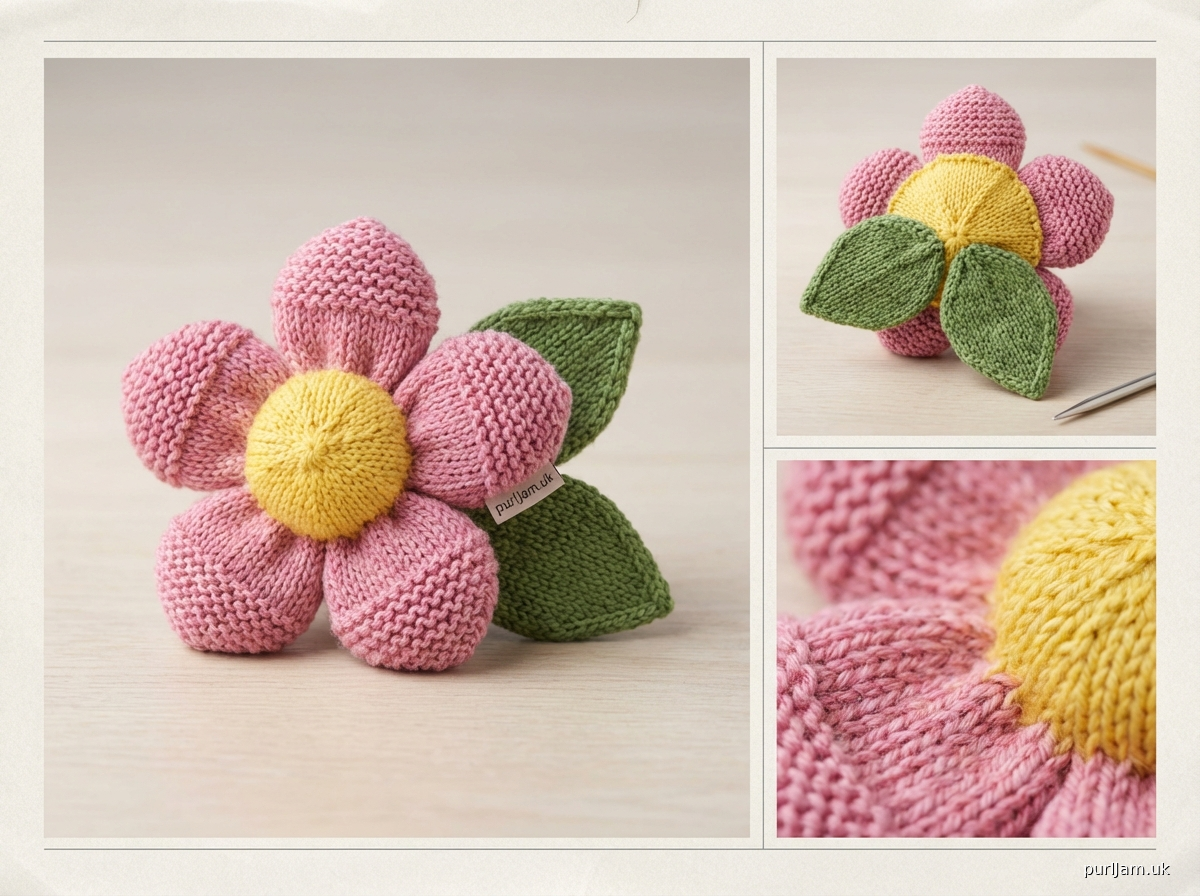
# SPRING FLOWER KNITTING PATTERN

**Designed for beginners**

Create an adorable knitted spring flower perfect for decorating, gift-giving, or as a sweet first amigurumi project. This cheerful flower features a textured center and delicate petals, all worked in simple techniques.

---

## FINISHED MEASUREMENTS

- Flower diameter: approximately 5-6" (12.5-15 cm) across
- Center diameter: approximately 2.5" (6.5 cm)
- Petal length: approximately 2" (5 cm)

---

## MATERIALS

**Yarn**: Worsted weight (#4 Medium) yarn in 2-3 colors
- Color A (center): Yellow, approximately 25 yards (23 m)
- Color B (petals): Pink, lavender, white, or color of choice, approximately 30 yards (27 m)
- Color C (leaves - optional): Green, approximately 15 yards (14 m)

**Suggested yarn**: Any worsted weight acrylic or cotton yarn (e.g., Red Heart Super Saver, Lion Brand Vanna's Choice, or Lily Sugar'n Cream for cotton)

**Needles**:
- US 7 (4.5 mm) double-pointed needles (DPNs) OR
- US 7 (4.5 mm) circular needle, 32" or longer for Magic Loop method

**Notions**:
- Stitch marker
- Tapestry needle for seaming
- Polyester fiberfill (small amount for stuffing)
- Pins for assembly (optional but helpful)
- Embroidery floss in contrasting color for French knot details (optional)

---

## GAUGE

20 stitches × 28 rounds = 4" (10 cm) in stockinette stitch in the round

**Gauge is not critical for this project**, but significant differences will affect finished size.

---

## ABBREVIATIONS

- k: knit
- p: purl
- kfb: knit into front and back of same stitch (1 stitch increased)
- k2tog: knit 2 stitches together (1 stitch decreased)
- ssk: slip, slip, knit (slip 2 stitches knitwise one at a time, insert left needle into front of both stitches and knit together - 1 stitch decreased)
- st(s): stitch(es)
- RS: right side
- WS: wrong side
- DPN(s): double-pointed needle(s)

---

## PATTERN NOTES

- The flower center is worked in the round from the center outward using increases to create a flat circle.
- Petals are worked flat in garter stitch (knit every row) for texture and to prevent curling.
- For DPNs: Divide stitches evenly across 3 or 4 needles, knit with the working needle.
- For Magic Loop: Use one long circular needle, dividing stitches into 2 groups.
- All pieces are worked separately and sewn together at the end.

---

## INSTRUCTIONS

### FLOWER CENTER

Using Color A and your preferred method (DPNs or Magic Loop), cast on 6 sts.

Divide stitches for working in the round (2 sts per DPN if using 3 needles, or 3 sts on 2 sides for Magic Loop). Place marker for beginning of round. Join to work in the round, being careful not to twist stitches.

**Round 1**: [Kfb] 6 times. **(6 increased = 12 sts total)**

**Round 2**: Knit all sts. **(12 sts)**

**Round 3**: [Kfb, k1] 6 times. **(6 increased = 18 sts total)**

**Round 4**: Knit all sts. **(18 sts)**

**Round 5**: [Kfb, k2] 6 times. **(6 increased = 24 sts total)**

**Round 6**: Knit all sts. **(24 sts)**

**Round 7**: [Kfb, k3] 6 times. **(6 increased = 30 sts total)**

**Round 8**: Knit all sts. **(30 sts)**

**Round 9**: [Kfb, k4] 6 times. **(6 increased = 36 sts total)**

**Round 10**: Knit all sts. **(36 sts)**

**Round 11**: Purl all sts. **(36 sts - creates decorative ridge)**

**Round 12**: Knit all sts. **(36 sts)**

Bind off all stitches loosely. Cut yarn, leaving a 10" (25 cm) tail for seaming.

**Pieces to make: 1 flower center**

---

### PETALS (Make 5 or 6)

Using Color B, cast on 3 sts using standard long-tail or knitted cast-on.

**Row 1 (RS)**: Knit all sts. **(3 sts)**

**Row 2**: Kfb, k1, kfb. **(2 increased = 5 sts total)**

**Row 3**: Knit all sts. **(5 sts)**

**Row 4**: Kfb, k3, kfb. **(2 increased = 7 sts total)**

**Row 5**: Knit all sts. **(7 sts)**

**Row 6**: Knit all sts. **(7 sts)**

**Row 7**: Knit all sts. **(7 sts)**

**Row 8**: Knit all sts. **(7 sts)**

**Row 9**: Knit all sts. **(7 sts)**

**Row 10**: Knit all sts. **(7 sts)**

**Row 11**: Ssk, k3, k2tog. **(2 decreased = 5 sts remain)**

**Row 12**: Knit all sts. **(5 sts)**

**Row 13**: Ssk, k1, k2tog. **(2 decreased = 3 sts remain)**

**Row 14**: Knit all sts. **(3 sts)**

**Row 15**: Slip 1, k2tog, pass slipped stitch over. **(1 st remains)**

Cut yarn and pull through last stitch to secure. Leave a 6" (15 cm) tail for seaming.

**Pieces to make: 5 or 6 petals** (5 petals creates a more open flower, 6 creates a fuller look)

---

### LEAVES (Optional - Make 2)

Using Color C, cast on 3 sts.

**Row 1 (RS)**: Knit all sts. **(3 sts)**

**Row 2**: Knit all sts. **(3 sts)**

**Row 3**: Kfb, k1, kfb. **(2 increased = 5 sts total)**

**Row 4**: Knit all sts. **(5 sts)**

**Row 5**: Knit all sts. **(5 sts)**

**Row 6**: Knit all sts. **(5 sts)**

**Row 7**: Knit all sts. **(5 sts)**

**Row 8**: Knit all sts. **(5 sts)**

**Row 9**: Ssk, k1, k2tog. **(2 decreased = 3 sts remain)**

**Row 10**: Knit all sts. **(3 sts)**

**Row 11**: Slip 1, k2tog, pass slipped stitch over. **(1 st remains)**

Cut yarn and pull through last stitch to secure. Leave a 6" (15 cm) tail for seaming.

**Pieces to make: 2 leaves**

---

## ASSEMBLY

### Step 1: Prepare Pieces
Weave in cast-on tails on all pieces. Leave bind-off and finishing tails long for seaming. Gently block pieces if desired by dampening and shaping, then allowing to dry flat.

### Step 2: Stuff Center (Optional)
For a dimensional flower, place a small amount of fiberfill in the center of the flower center piece. Don't overstuff - you want gentle padding, not a ball shape.

### Step 3: Attach Petals
- Arrange petals evenly around the flower center with wide ends of petals just overlapping the purl ridge on the center piece.
- For 5 petals: space approximately evenly (rough placement at 12, 2:30, 5, 7:30, and 10 o'clock positions)
- For 6 petals: space evenly around (every 60 degrees)
- Pin petals in place if desired.
- Using tapestry needle and the yarn tails, sew the wide base of each petal to the underside of the flower center using whipstitch or mattress stitch. Make sure petals are secure but maintain some flexibility.
- Petals should point outward and slightly curl up at the tips naturally due to garter stitch.

### Step 4: Attach Leaves (Optional)
Position leaves on the back of the flower, pointing downward or to the sides. Sew securely to the back of the center.

### Step 5: Add Details (Optional)
Using embroidery floss and tapestry needle, add small French knots or straight stitches to the center for texture and detail.

### Step 6: Finishing
Weave in all remaining ends securely. Trim excess yarn.

---

## FINISHING OPTIONS

**Brooch/Pin**: Attach a pin back to the reverse of the flower center using needle and thread.

**Hair Clip**: Sew or glue to a hair clip base.

**Decoration**: Attach to a wreath, garland, or use as a package topper.

**Appliqué**: Sew to a tote bag, pillow, or clothing.

**Mobile/Garland**: Thread yarn through the top of one petal and hang. Make multiple flowers in different colors for a spring garland.

---

## DESIGN VARIATIONS

**Color Combinations**:
- Classic: Yellow center, pink petals, green leaves
- Spring Mix: Yellow center, lavender petals, green leaves
- Daisy: Yellow center, white petals, green leaves
- Sunflower: Brown center, golden yellow petals, green leaves
- Rainbow: Yellow center, each petal a different bright color

**Size Variations**:
- Smaller flower: Use sport weight yarn and US 5 (3.75 mm) needles
- Larger flower: Use bulky yarn and US 9 (5.5 mm) needles, and work 2-3 additional rounds on center

**Texture Variations**:
- Work center in garter stitch (knit 1 round, purl 1 round) instead of stockinette
- Add seed stitch to petals (alternate k1, p1 on RS rows)

---

## CARE INSTRUCTIONS

Hand wash gently in cool water with mild detergent. Roll in a towel to remove excess water. Reshape and lay flat to dry. If using as a decorative item only, spot clean as needed.

---

## SKILL BUILDING NOTES FOR BEGINNERS

This pattern teaches you:
- Working in the round with DPNs or Magic Loop
- Increasing evenly to create flat circles
- Shaping with increases and decreases
- Seaming multiple pieces together
- Creating 3D dimensional objects from flat pieces

**Need help?** Watch video tutorials for:
- Knit front and back (kfb) increase
- Working in the round for beginners
- Mattress stitch seaming
- Weaving in ends securely

---

## ABBREVIATION CHART REVIEW

| Abbreviation | Meaning | Result |
|--------------|---------|---------|
| kfb | Knit into front and back of stitch | 1 stitch increased |
| k2tog | Knit 2 stitches together | 1 stitch decreased |
| ssk | Slip, slip, knit | 1 stitch decreased (left-leaning) |

---

**Pattern designed for beginner knitters • Spring 2024**

*Happy Knitting! Enjoy creating your spring flower garden!*
Disclaimer: This pattern was generated by AI and should be reviewed for accuracy before use. While we strive for quality, AI-generated content may contain errors. Please verify measurements, stitch counts, and instructions before beginning your project. Generated by purlJam.uk
Access your pattern anytime
Bookmark this page to access your pattern anytime