Type
Crochet
Difficulty
beginner
Category
hat
AI Thinking Process
Planning
Verification
Pattern
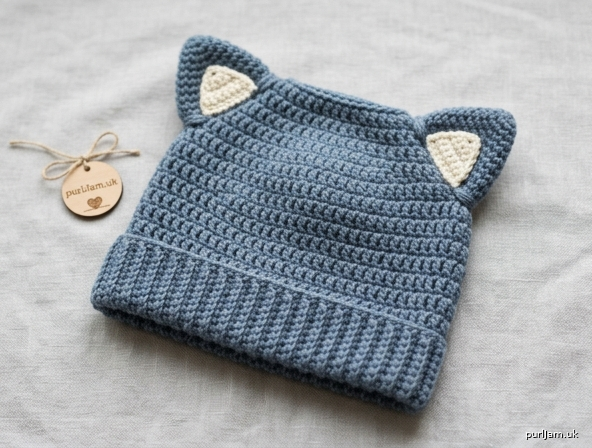
Squared-Off Cat Ear Baby Beanie
A boxy, squared-off baby beanie whose two top corners stand up as cat ears. The brim is a stretchy single-crochet rib; the body is a simple hdc tube with no crown decreases. Instead of gathering the top, you flatten the hat and seam it shut — that straight seam is what creates the ears. Optional inner-ear triangles and a short corner cinch make the ears read more clearly as cat ears.
Skill level: Intermediate (BLO ribbing, working in the round, mattress-stitch seaming, optional appliqué)
Sizes
Newborn (0–3 months, 3–6 months, 6–12 months)
Instructions are written for Newborn with changes for larger sizes in parentheses. When only one number is given, it applies to all sizes.
To fit head circumference: about 14 (16, 17, 18)" [35.5 (40.5, 43, 45.5) cm]
Finished hat circumference (unstretched): 13 (14½, 16, 17½)" [33 (37, 40.5, 44.5) cm] — about 1–1½" (2.5–4 cm) negative ease
Finished height, laid flat (brim to ear tip): 6½ (7½, 8, 8½)" [16.5 (19, 20.5, 21.5) cm]
Materials
- Worsted weight yarn (CYC 4), 100 (120, 140, 160) yd [91 (110, 128, 146) m] MC (main color)
- Small amount of worsted weight yarn CC (contrast color) for optional inner ears — about 8 yd (7.5 m)
- US H/8 (5 mm) crochet hook, or size needed to obtain gauge
- Stitch marker
- Yarn needle
- Scissors
- Tape measure
Suggested fibers: acrylic, superwash wool, or a soft washable blend. Avoid novelty yarns and anything with sequins or beads for baby items.
One typical 3.5 oz / 170–200 yd (100 g / 156–183 m) skein of worsted is enough for any size, with leftover for inner ears if you use the same color.
Gauge
16 hdc and 12 rnds = 4" (10 cm) in hdc, worked in the round, unstretched.
Ribbing gauge (for reference): 16 sc BLO and 16 rows = 4" (10 cm), unstretched. Ribbing stretches more than the hdc fabric.
Check your gauge. Work a 5" (12.5 cm) swatch in hdc, in the round or flat. Measure the center 4" (10 cm). If you have too many stitches, go up a hook size; if too few, go down a hook size. Hat circumference is locked to stitch count × gauge, so an off gauge will change the fit.
Abbreviations (US)
- BLO — back loop only
- CC — contrast color
- ch — chain
- hdc — half double crochet
- MC — main color
- rep — repeat
- rnd(s) — round(s)
- RS — right side
- sc — single crochet
- sl st — slip stitch
- st(s) — stitch(es)
- WS — wrong side
Pattern Notes
- US crochet terminology throughout.
- The hat is worked brim-up, then the crown is seamed flat. A magic-ring circular crown will not produce cat-ear corners.
- Body is worked in joined rounds, without turning. Join with a sl st to the first hdc of the rnd; ch 1 at the start of each rnd does not count as a stitch. The first hdc of every rnd goes in the same st as the join.
- Keep the join in a straight column — this column is center back.
- Stitch count stays at 52 (58, 64, 70) from the first body round through the last. There are no crown decreases. (52 (58, 64, 70) sts ÷ 4 sts per inch = 13 (14½, 16, 17½)" ✓)
- Counts must stay even so the hat folds exactly in half for a straight top seam: 26 (29, 32, 35) sts per layer ✓
- The two fold-edges of the flattened hat become the ears. Always flatten with the back join running center back, not at one ear.
- Do not add buttons, beads, bells, or safety eyes. Sew any appliqué through all layers and weave ends in securely.
Special Techniques
Mattress stitch (square crown seam) Thread the yarn needle with the long tail. Hold the hat flattened. Working from the RS, insert the needle under the top loop of the corresponding stitch on each layer, pulling snug but not so tight that the seam cup. The seam should lie flat and measure 6½ (7¼, 8, 8¾)" [16.5 (18.5, 20.5, 22) cm] — that is half the circumference: 13 ÷ 2 = 6½" (14½ ÷ 2 = 7¼", 16 ÷ 2 = 8", 17½ ÷ 2 = 8¾") ✓
Ear cinch (optional, defines the ears) After the top seam is done, wrap the yarn 4–5 times tightly around each corner, about ¾–1" (2–2.5 cm) down from the tip, and fasten off on the WS. This nips a small triangle so the corner reads as an ear rather than a square box.
Pattern
Ribbed Brim
With MC, ch 7.
Row 1 (RS): Sc in 2nd ch from hook and in each ch across, turn — 6 sc. (6 sc at 4 sc per inch = 1½" brim height ✓)
Row 2: Ch 1, sc BLO in each st across, turn — 6 sc.
Repeat Row 2 until you have 52 (58, 64, 70) rows total. Do not fasten off. The unstretched strip should measure about 13 (14½, 16, 17½)" [33 (37, 40.5, 44.5) cm] along the long edge (1 row per body stitch ✓). It will stretch.
Join the brim into a loop With WS together (RS facing out once joined), match Row 1 to the last row. Sl st through the BLO of the last row and the remaining loop of the foundation chain, working 6 sl sts to close the short ends. You now have a ribbed ring. Do not fasten off. Turn the ring so the sl-st join is on the inside and the next working edge is the long edge of the ribbing (the row-ends).
Place a marker in the sl-st column — this is center back.
Body
Rotate the brim to work into the row-ends. You will work 1 hdc in each ribbing row-end.
Rnd 1: Ch 1 (does not count as a st here and throughout), hdc in each row-end around, join with sl st to first hdc — 52 (58, 64, 70) hdc. (1 hdc per ribbing row → 52 (58, 64, 70) sts ✓)
Rnd 2: Ch 1, hdc in each st around, join with sl st to first hdc — 52 (58, 64, 70) hdc.
Repeat Rnd 2 until the body measures 5 (6, 6½, 7)" [12.5 (15, 16.5, 18) cm] from the top edge of the ribbing, or 15 (18, 19, 21) hdc rounds total.
Height check:
- 15 rnds × 4" / 12 rnds = 5"; 5" + 1½" brim = 6½" ✓
- 18 rnds × 4" / 12 rnds = 6"; 6" + 1½" brim = 7½" ✓
- 19 rnds × 4" / 12 rnds = 6⅓"; 6⅓" + 1½" brim = 8" ✓
- 21 rnds × 4" / 12 rnds = 7"; 7" + 1½" brim = 8½" ✓
Stitch count remains 52 (58, 64, 70) every round. Do not decrease.
Fasten off, leaving a 18 (20, 22, 24)" [45.5 (51, 56, 61) cm] tail for seaming.
Square Off the Crown (this creates the cat ears)
-
Turn the hat WS out or work from the RS — mattress stitch looks clean from the RS. Lay the hat flat so the center-back join is exactly in the middle of one face, not on a fold. The two fold-edges are the left and right sides of the head. Those two corners will be the ears.
-
Match stitch to stitch across the top opening: 26 (29, 32, 35) sts on the front layer to 26 (29, 32, 35) sts on the back layer. (52 ÷ 2 = 26, 58 ÷ 2 = 29, 64 ÷ 2 = 32, 70 ÷ 2 = 35 ✓)
-
Using the long tail and mattress stitch, seam the top closed from fold to fold. Pull snug enough that no gaps show, but do not cinch the seam into a gather — a gathered crown will kill the square/cat shape.
-
At each end of the seam you now have a pointed corner. That is an ear.
-
Weave in the seaming tail on the WS. Weave in the brim join tail.
Try-on check: The brim should sit at the eyebrows / mid-ear with about 1–1½" (2.5–4 cm) of stretch. The two corners should stand above the ears, not over the forehead and nape. If the ears sit front-to-back, the hat was flattened on the wrong axis — take out the seam and rotate 90 degrees so the back join is centered between the ears.
Optional: Defined Cat Ears (cinch)
With MC, fasten on at the WS of one top corner. Wrap the yarn tightly 4–5 times around the corner, ¾–1" (2–2.5 cm) down from the tip, gathering a small triangle. Tie off on the WS and weave in. Repeat on the other corner. This is the difference between a plain squared hat and a hat that clearly reads as cat ears.
Optional: Inner-Ear Appliqués (make 2)
With CC:
Row 1: Ch 5, sc in 2nd ch from hook, hdc in next ch, dc in next ch, hdc in last ch. Fasten off, leaving a 12" (30.5 cm) tail — 4 sts; a small elongated triangle.
Make a second triangle.
Pin one triangle to the inside face of each ear, centered on the corner, with the wide end toward the head and the point toward the ear tip. Using the tails, sew around the edges with small whipstitches, taking the needle through the inner layer only if you do not want stitches to show on the outside, or through all layers for maximum security (recommended for babies). Weave in all CC ends on the WS. Tug-test each appliqué.
Finishing
- Weave in every remaining end on the WS.
- Block lightly if the seam wants to curl: steam-hover or spritz, pat the flattened hat into a neat rectangle, and let dry. Do not stretch the ribbing.
- Do not add a pom-pom on a cat-ear crown; it sits on the seam and flattens the ears.
Care: Follow the yarn label. For acrylic, machine wash gentle, tumble low or lay flat. For wool, hand wash cold and lay flat to dry.
Schematic (laid flat)
        ear                         ear
          *-----------------------*
          |                       |
          |                       |  height 6½ (7½, 8, 8½)"
          |                       |  [16.5 (19, 20.5, 21.5) cm]
          |                       |
          |----- ribbed brim -----|

          <---- 6½ (7¼, 8, 8¾)" ---->
               [16.5 (18.5, 20.5, 22) cm]
               = half of circumference
- Laid-flat width = finished circumference ÷ 2 = 13 (14½, 16, 17½)" ÷ 2 = 6½ (7¼, 8, 8¾)" [16.5 (18.5, 20.5, 22) cm] ✓
- Top seam runs the full laid-flat width.
- Ears are the two upper corners. After the optional cinch, each ear is a triangle about ¾–1" (2–2.5 cm) tall.
Fit Notes
If the hat is too loose, go down a hook size or work the next size down. If it is too tight, go up a hook size or work the next size up. Because there is no shaped crown, length is the main fit control after circumference: add or subtract hdc rounds in ⅓" (1 rnd) steps before seaming. Adding rounds makes taller ears as well as a deeper hat; if you only want more ear, add 1–2 rnds. If you only want more coverage without taller ears, add rounds, then take a slightly deeper ear cinch.
Disclaimer: This pattern was generated by AI and should be reviewed for accuracy before use. While we strive for quality, AI-generated content may contain errors. Please verify measurements, stitch counts, charts, and instructions before beginning your project. Generated by purlJam.uk
Love this pattern?
Save this pattern to your free PurlJam libraryAccess your pattern anytime
Bookmark this page to access your pattern anytime