Type
Crochet
Difficulty
beginner
Category
hat
AI Thinking Process
Planning
Verification
Pattern
Striped Christmas Santa Hat
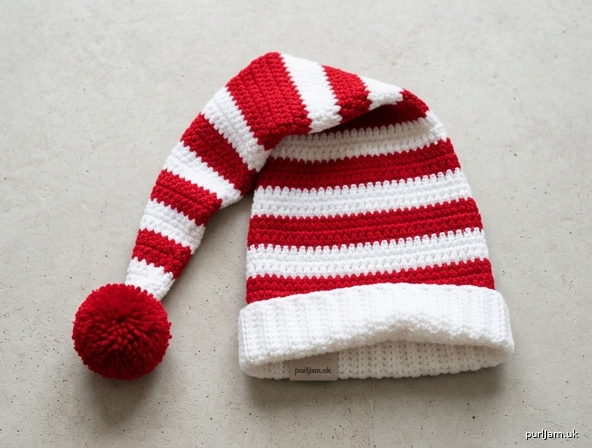
A classic long, floppy, pointed Santa hat worked in bright red and white horizontal stripes, finished with a white fold-up brim and a large round pom-pom at the tip. The slow taper is designed to curve and drape — a handmade costume hat, not a close-fitting beanie.
Difficulty: Easy
Skills used: Magic ring, hdc, working in joined rounds, simple increases, color changes, pom-pom
Construction: Top-down, seamless (pom-pom sewn on)
Materials
Yarn: Worsted weight (4), acrylic or wool-blend
- Color A (Christmas red): 175 (250, 280) yd / 160 (229, 256) m — includes pom-pom
- Color B (white): 140 (200, 220) yd / 128 (183, 201) m
One standard 364 yd / 333 m skein of each color is enough for all three sizes (Large uses most of Color A once the pom-pom is made).
Suggested yarns: Red Heart Super Saver, Lion Brand Vanna’s Choice, or any worsted that matches gauge.
Hook: US I-9 (5.5 mm), or size needed to obtain gauge
Notions:
- Stitch marker
- Yarn needle
- Scissors
- 3½–4" (9–10 cm) pom-pom maker, or two cardboard circles 4" (10 cm) across with a 1" (2.5 cm) center hole
Gauge
14 hdc and 12 hdc rounds = 4" (10 cm) in joined hdc, unblocked.
Work a 6" (15 cm) swatch, measure the center 4" (10 cm). If you have too few stitches, go down a hook size; if too many, go up. Gauge mainly controls the opening fit; length is forgiving.
Sizes
Instructions are for Child (Adult, Large).
| Child | Adult | Large | |
|---|---|---|---|
| To fit head circ. | 19–20" (48–51 cm) | 21–22" (53–56 cm) | 23–24" (58–61 cm) |
| Finished opening (unstretched) | 18¾" (47.5 cm) | 20½" (52 cm) | 22¼" (56.5 cm) |
| Cone length, tip to brim | 14¾" (37.5 cm) | 17¼" (44 cm) | 17¼" (44 cm) |
| Brim, worked | 4" (10 cm) | 4" (10 cm) | 4" (10 cm) |
| Wearing length, brim folded | ~16¾" (42.5 cm) | ~19¼" (49 cm) | ~19¼" (49 cm) |
| Stitches at opening | 66 | 72 | 78 |
The hat is meant to be slightly smaller than the head at the brim (negative ease) and much longer than a beanie so the striped tail flops and curves.
Abbreviations (US)
| Abbreviation | Meaning |
|---|---|
| BLO | back loop only |
| ch | chain |
| hdc | half double crochet |
| inc | increase — 2 hdc in the same stitch |
| MR | magic ring |
| rnd(s) | round(s) |
| sl st | slip stitch |
| st(s) | stitch(es) |
| FO | fasten off |
| WS | wrong side (inside of hat) |
Notes
- US crochet terms throughout.
- Hat is worked top-down from the pointed tip to the brim, in joined rounds.
- Ch 1 at the start of a round does not count as a stitch. Work the first hdc in the same stitch as the join.
- Join every round with a sl st to the first hdc. Move a stitch marker to the join each round — this is center back. Keep color changes here so the jog sits at the back.
- Color change: On the joining sl st of the last round of a color, drop the old color and pull the new color through to complete the join. Ch 1 with the new color and continue. Cut the old color, leaving a 6" (15 cm) tail, and weave in as you go (you will have several ends).
- Stripe rhythm is 4 rounds per color, starting with Color A (red). The cone always ends on red so the white brim reads as a separate cuff.
- Do not stuff the hat. Worsted hdc on an I-9 hook drapes; the tail is supposed to flop.
- For a traditional Santa look you may make the pom-pom in Color B (white) instead of red.
Pattern
Tip and striped cone
With Color A (red), make a magic ring.
Stripe 1 — Color A (red)
Rnd 1: Ch 1, 6 hdc in MR, join. Pull ring closed. [6]
Rnd 2: Ch 1, 2 hdc in each st around, join. [12] (6 increases → 6 + 6 = 12 ✓)
Rnds 3–4: Ch 1, hdc in each st around, join. [12]
FO A. Join Color B (white) at the join.
Stripe 2 — Color B (white)
Rnds 5–7: Ch 1, hdc in each st around, join. [12]
Rnd 8: Ch 1, (hdc in next st, 2 hdc in next st) 6 times, join. [18] (6 increases → 12 + 6 = 18 ✓)
FO B. Join Color A.
Stripe 3 — Color A (red)
Rnds 9–11: Ch 1, hdc in each st around, join. [18]
Rnd 12: Ch 1, (hdc in next 2 sts, 2 hdc in next st) 6 times, join. [24] (6 increases → 18 + 6 = 24 ✓)
FO A. Join Color B.
Stripe 4 — Color B (white)
Rnds 13–15: Ch 1, hdc in each st around, join. [24]
Rnd 16: Ch 1, (hdc in next 3 sts, 2 hdc in next st) 6 times, join. [30] (6 increases → 24 + 6 = 30 ✓)
FO B. Join Color A.
Stripe 5 — Color A (red)
Rnds 17–19: Ch 1, hdc in each st around, join. [30]
Rnd 20: Ch 1, (hdc in next 4 sts, 2 hdc in next st) 6 times, join. [36] (6 increases → 30 + 6 = 36 ✓)
FO A. Join Color B.
Stripe 6 — Color B (white)
Rnds 21–23: Ch 1, hdc in each st around, join. [36]
Rnd 24: Ch 1, (hdc in next 5 sts, 2 hdc in next st) 6 times, join. [42] (6 increases → 36 + 6 = 42 ✓)
FO B. Join Color A.
Stripe 7 — Color A (red)
Rnds 25–27: Ch 1, hdc in each st around, join. [42]
Rnd 28: Ch 1, (hdc in next 6 sts, 2 hdc in next st) 6 times, join. [48] (6 increases → 42 + 6 = 48 ✓)
FO A. Join Color B.
Stripe 8 — Color B (white)
Rnds 29–31: Ch 1, hdc in each st around, join. [48]
Rnd 32: Ch 1, (hdc in next 7 sts, 2 hdc in next st) 6 times, join. [54] (6 increases → 48 + 6 = 54 ✓)
FO B. Join Color A.
Stripe 9 — Color A (red)
Rnds 33–35: Ch 1, hdc in each st around, join. [54]
Rnd 36: Ch 1, (hdc in next 8 sts, 2 hdc in next st) 6 times, join. [60] (6 increases → 54 + 6 = 60 ✓)
FO A. Join Color B.
Stripe 10 — Color B (white)
Rnds 37–39: Ch 1, hdc in each st around, join. [60]
Rnd 40: Ch 1, (hdc in next 9 sts, 2 hdc in next st) 6 times, join. [66] (6 increases → 60 + 6 = 66 ✓)
FO B. Join Color A.
Child only — finish the cone
Stripe 11 — Color A (red)
Rnds 41–44: Ch 1, hdc in each st around, join. [66]
FO A. Cone measures about 14¾" (37.5 cm) from tip. Skip to White brim.
Adult and Large — continue the cone
Stripe 11 — Color A (red)
Rnds 41–43: Ch 1, hdc in each st around, join. [66]
Rnd 44: Ch 1, (hdc in next 10 sts, 2 hdc in next st) 6 times, join. [72] (6 increases → 66 + 6 = 72 ✓)
FO A. Join Color B.
Stripe 12 — Color B (white)
Rnds 45–47: Ch 1, hdc in each st around, join. [72]
Rnd 48:
- Adult: Ch 1, hdc in each st around, join. [72]
- Large: Ch 1, (hdc in next 11 sts, 2 hdc in next st) 6 times, join. [78] (6 increases → 72 + 6 = 78 ✓)
FO B. Join Color A.
Stripe 13 — Color A (red)
Rnds 49–52: Ch 1, hdc in each st around, join. [72 (78)]
FO A. Cone measures about 17¼" (44 cm) from tip.
White brim
Join Color B (white) at the center-back join.
Work the brim in BLO hdc for a ribbed cuff. Same stitch count as the last cone round: 66 (72, 78).
Rnds 1–12: Ch 1, hdc BLO in each st around, join. [66 (72, 78)]
(12 rounds × 4" / 12 rounds = 4" / 10 cm ✓)
FO B. Leave a 12" (30 cm) tail if you want to tack the folded cuff at the back.
Large red pom-pom
Using Color A (red) and a 3½–4" (9–10 cm) pom-pom maker (or two 4" / 10 cm cardboard rings):
- Wrap yarn around the maker 100–120 times (more wraps = denser pom-pom). If using cardboard, wrap through the center hole around the rings until the hole is nearly full.
- Tie a 12" (30 cm) length of Color A very tightly around the center (through the maker’s gap, or between the two cardboard rings). Knot twice. Do not trim these tails — they attach the pom-pom.
- Cut the loops around the outer edge. Remove the maker / cardboard.
- Fluff, then trim into a round ball about 3½–4" (9–10 cm) across. Leave the two long center tails.
Finishing
- Weave in all remaining ends on the WS. Tug the magic-ring tail extra tight so the tip cannot open, and weave it through the first two rounds several times.
- Thread both pom-pom tails onto a yarn needle. Pass them down through the magic-ring center, out the inside of the tip. Tie a surgeon’s knot (knot twice, then twice more) against the inside of Rnd 1. Weave each tail through 6–8 stitches of Rnds 1–3 and back again. The pom-pom is a pull-point — it must be anchored, not just knotted once.
- Fold the white brim up 2" (5 cm) to the outside so a double-layer 2" cuff shows and the fold is the bottom edge. Optional: with the long brim tail, make 2–3 small tacking stitches at center back through both layers of the cuff so it stays folded. Do not tack the front if you want the option to unfold.
- Shape the floppy tail: roll a bath towel into a log, drape the striped cone over it in a gentle curve, and mist lightly with water. Let dry. The hat will hang to one side when worn — that is the classic look.
- Fluff the pom-pom again after attaching and trim any long stragglers.
Stripe cheat sheet
| Rnds | Color | Stitch count (end of stripe) |
|---|---|---|
| 1–4 | A red | 12 |
| 5–8 | B white | 18 |
| 9–12 | A red | 24 |
| 13–16 | B white | 30 |
| 17–20 | A red | 36 |
| 21–24 | B white | 42 |
| 25–28 | A red | 48 |
| 29–32 | B white | 54 |
| 33–36 | A red | 60 |
| 37–40 | B white | 66 — Child stops increasing |
| 41–44 | A red | Child 66, done; Adult/Large 72 |
| 45–48 | B white | Adult 72; Large 78 — Large last increase |
| 49–52 | A red | Adult 72 / Large 78, done |
| Brim 1–12 | B white, BLO | 66 (72, 78) |
After Stripe 1, the last round of every stripe is the increase round, until your size stitch count is reached. Then work even, still changing color every 4 rounds, and always end the cone on red.
Customizing
- Longer, floppier tail: Add extra 4-round stripes (one red, one white, ending on red) before the brim. Each pair of stripes adds about 2¾" (7 cm).
- Shorter hat: Stop 4 or 8 rounds earlier, still ending on a red stripe.
- Traditional white pom-pom: Make the pom-pom in Color B instead of Color A.
- Thicker cuff: Work 16 BLO rounds (about 5¼" / 13.5 cm) and fold up 2½" (6.5 cm).
- Other sizes: Continue the same (3 even rnds + 1 increase rnd) pattern until the opening matches your gauge × desired circumference, then work even to length. Opening stitches should be a multiple of 6.
Fit check
Lay the hat flat. Opening width should be about 9⅜ (10¼, 11⅛)" / 24 (26, 28) cm (half of 18¾ (20½, 22¼)"). Try on before attaching the pom-pom. The brim should sit at the eyebrows/ears with light negative ease; the striped cone should fall backward or to one side with the pom-pom hanging well off the crown. If the opening is snug, re-work the brim with a J-10 (6 mm) hook; if it is loose, use an H-8 (5 mm) for the brim only.
Disclaimer: This pattern was generated by AI and should be reviewed for accuracy before use. While we strive for quality, AI-generated content may contain errors. Please verify measurements, stitch counts, charts, and instructions before beginning your project. Generated by purlJam.uk
Love this pattern?
Save this pattern to your free PurlJam libraryAccess your pattern anytime
Bookmark this page to access your pattern anytime