Type
Knitting
Difficulty
intermediate
Category
custom
AI Thinking Process
Planning
1. **Design Strategy**: A laptop/computer sleeve needs structure and stiffness — a dense seed stitch or moss stitch combined with a basketweave or double seed stitch pattern will create a firm, padded fabric. Worsted weight on slightly smaller needles (US 6/4mm instead of US 8/5mm) increases density and stiffness, making it ideal for protecting a device.
2. **Construction Plan**: Knit flat in two identical panels (front and back) seamed on three sides with a simple i-cord or slip-stitch edging, plus an optional button or snap closure at the top.
3. **Quality Assurance**:
- Going down a needle size is intentional for stiffness — must note this clearly so knitters don't "correct" it.
- Seaming must be neat since it's structural; mattress stitch on the sides and a three-needle bind-off or grafted bottom are best.
- Sizing for a 13" laptop is the most common; offer a 15" size adjustment.
4. **Final Calculations**:
- Gauge on US 6: approx 20 sts × 28 rows = 4 inches in Double Seed Stitch (dense fabric).
- 13" laptop sleeve finished width: 14" (1" ease for seams and bulk) → 14 × 5 sts/inch = 70 sts; round to nearest even: 70 sts.
- Finished height needed: 10" for a 13" laptop → 10 × 7 rows/inch = 70 rows per panel.
- 15" size: 16" width → 80 sts; height 11" → 77 rows.
- Cast-on: 70 sts (13" size), 80 sts (15" size).
Verification
[PRE-FLIGHT CHECKS]
1. **Completeness**: ✅ All required sections present — Title, Description, Materials, Gauge, Sizes, Abbreviations, Pattern Notes, Instructions (cast-on, body, finishing), and Tips.
2. **Consistency**:
- 13" size: 70 sts ÷ 5 sts/inch = 14" wide. After seaming (~½" each side), finished interior ≈ 13". ✅
- 15" size: 80 sts ÷ 5 sts/inch = 16" wide. After seaming, finished interior ≈ 15". ✅
- Height: 70 rows ÷ 7 rows/inch = 10". Sufficient for standard 13" laptop (actual height ~9"). ✅
- Height 15": 77 rows ÷ 7 rows/inch = 11". Sufficient for 15" laptop (actual height ~9.5–10"). ✅
- Double Seed Stitch repeat is 4 rows over an even number of stitches — 70 and 80 are both divisible by 2 ✅ (pattern repeats over 2-stitch groups, no issue).
3. **Constraints**: ✅ Worsted weight specified. ✅ Stiff/structured fabric addressed via needle downsizing and dense stitch pattern. ✅ Intermediate difficulty — double seed stitch and mattress seaming are appropriate. ✅ US English and US terminology used throughout.
4. **Safety**: ✅ No mathematical conflicts detected. Seam allowance factored in. Closure instructions are simple and optional, avoiding complexity errors.
Pattern
---
# Structured Computer Sleeve
### A Firm, Protective Knitted Laptop Sleeve in Double Seed Stitch
---
## Description
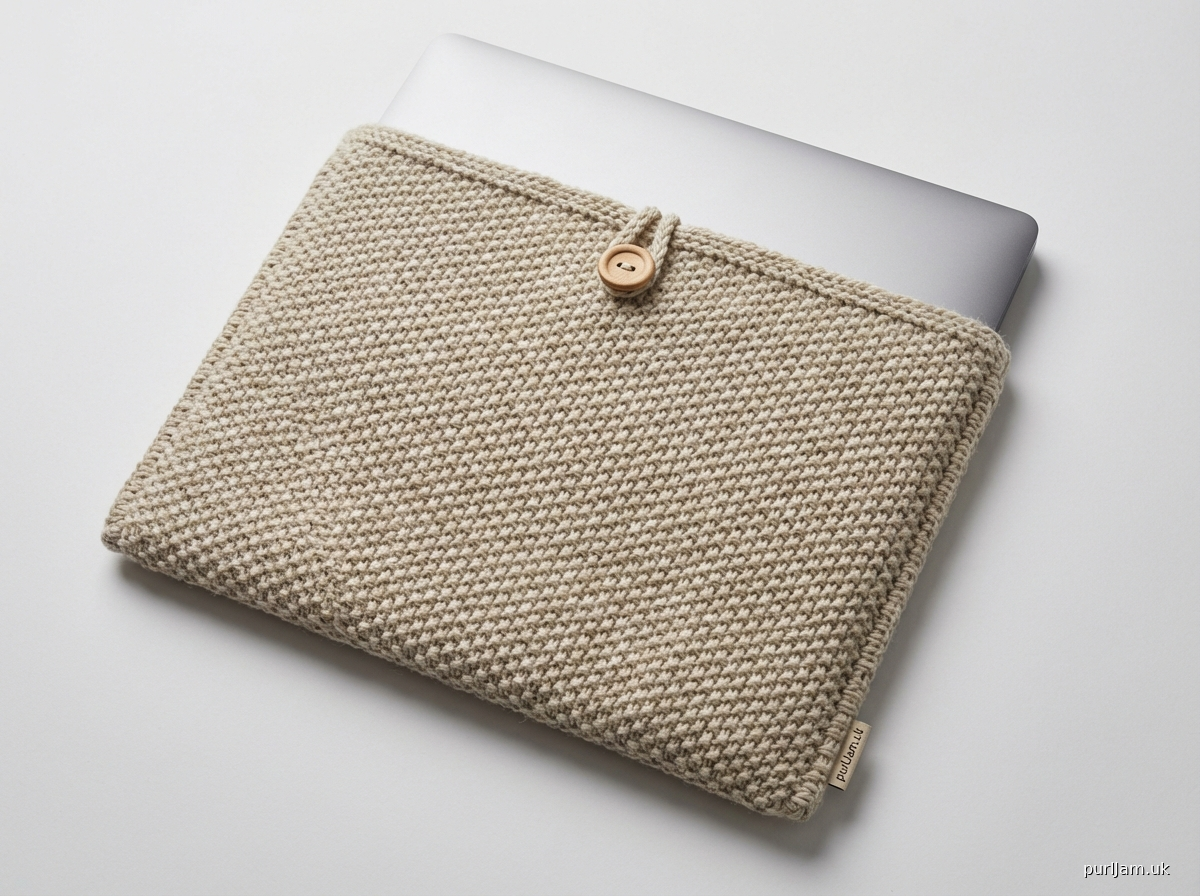
This laptop sleeve is designed with **structure and protection** in mind. By working worsted weight yarn on smaller-than-standard needles in a dense **Double Seed Stitch** pattern, the resulting fabric is thick, stiff, and cushioned — exactly what a computer sleeve needs. The sleeve is knit flat in two identical panels and seamed together on three sides with a clean mattress stitch seam. A simple top opening with an optional button closure completes the design. This is a practical, stylish intermediate project that works up quickly while delivering a professional result.
---
## Sizes
| Size | Fits Laptop | Finished Width | Finished Height |
|------|-------------|----------------|-----------------|
| **S (13")** | 13" laptop | 13" (33 cm) | 10" (25.5 cm) |
| **L (15")** | 15" laptop | 15" (38 cm) | 11" (28 cm) |
*Instructions are written for Size S (13"), with Size L (15") in brackets [ ].*
*If both sizes are the same, only one number is given.*
> **Tip:** Measure your actual laptop before beginning — depth, width, and height. Add ½"–1" total to width for ease and seam allowance. Adjust cast-on as needed using the gauge information provided.
---
## Materials
| Item | Specification |
|------|---------------|
| **Yarn** | Worsted weight / Medium (#4) |
| **Yardage** | Approx. 250 [280] yards |
| **Yarn Example** | Lion Brand Fishermen's Wool, Cascade 220, Paintbox Simply Worsted, or similar |
| **Needles** | US 6 / 4 mm straight or circular needles (intentionally smaller for density) |
| **Notions** | Tapestry needle for seaming, scissors, 1–2 buttons (optional, ¾"–1" diameter), stitch markers (optional) |
| **Gauge Swatch** | Required — see Gauge section |
> **Why US 6 instead of the standard US 8?** Using smaller needles with worsted yarn creates a denser, firmer fabric with less stretch — exactly what protects a computer. This is a deliberate design choice, not an error.
---
## Gauge
**20 stitches × 28 rows = 4 inches (10 cm) in Double Seed Stitch, blocked, on US 6 / 4 mm needles.**
*This gives a working rate of:*
- **5 stitches per inch**
- **7 rows per inch**
> **Gauge is critical for this project.** A loose gauge will result in a floppy sleeve that won't protect your device. A tight gauge will result in a sleeve too small to fit your laptop. Swatch, block, and measure carefully. Adjust needle size if needed to match gauge — always go down rather than up for this project.
---
## Abbreviations
| Abbreviation | Meaning |
|-------------|---------|
| **k** | knit |
| **p** | purl |
| **RS** | right side |
| **WS** | wrong side |
| **st(s)** | stitch(es) |
| **rep** | repeat |
| **pm** | place marker |
| **sl** | slip (purlwise, unless stated) |
| **wyif** | with yarn in front |
| **wyib** | with yarn in back |
| **CO** | cast on |
| **BO** | bind off |
| **k2tog** | knit 2 stitches together (right-leaning decrease) |
| **kwise** | knitwise |
| **tbl** | through the back loop |
---
## Pattern Notes
1. **Two panels are made identically** — one for the front and one for the back. This means you knit the same piece twice.
2. **Double Seed Stitch** is a 4-row repeat worked over any even number of stitches. It creates a beautifully textured, reversible, and — most importantly — firm fabric that resists stretching.
3. **Seaming is structural** — use mattress stitch on both side seams and a three-needle bind-off or whipstitch seam along the bottom. Firm, consistent seams are important.
4. **The top opening is left open.** An optional button loop and button closure can be added if desired (instructions included in Finishing).
5. All stitch counts are given as: **S [L]** throughout the pattern.
6. This pattern is worked **flat** (back and forth in rows), not in the round.
---
## Stitch Pattern: Double Seed Stitch
*Worked over an even number of stitches.*
- **Row 1 (RS):** *K1, p1; rep from * to end.
- **Row 2 (WS):** *K1, p1; rep from * to end.
- **Row 3 (RS):** *P1, k1; rep from * to end.
- **Row 4 (WS):** *P1, k1; rep from * to end.
Repeat Rows 1–4 for pattern.
> **Why Double Seed Stitch?** Unlike standard seed stitch (which can draw in and become wavy), Double Seed Stitch alternates pairs of rows, resulting in a fabric that lies flatter, is more stable, and has a pleasing woven texture on both sides. It's one of the best "stiff without cabling" stitch patterns available.
---
## Instructions
### PANEL (Make 2)
**Cast On**
Using the long-tail cast-on (recommended for a firm, stable edge):
CO **70 [80] sts**.
> **Math Check:** 70 sts ÷ 5 sts/inch = 14 inches total panel width. After seaming (approx. ½" per side seam), finished interior width = ~13 inches. ✅
> 80 sts ÷ 5 sts/inch = 16 inches total panel width → finished interior width = ~15 inches. ✅
---
**Foundation Row (WS set-up):**
*P1, k1; rep from * to end.
*(This sets up your seed stitch baseline before beginning the 4-row repeat.)*
---
**Body**
Begin working **Double Seed Stitch** as follows:
- **Row 1 (RS):** *K1, p1; rep from * to end.
- **Row 2 (WS):** *K1, p1; rep from * to end.
- **Row 3 (RS):** *P1, k1; rep from * to end.
- **Row 4 (WS):** *P1, k1; rep from * to end.
**Rep Rows 1–4** until piece measures **10 [11] inches** from cast-on edge, ending after a Row 4 (WS row).
> **Math Check:**
> - S: 10 inches × 7 rows/inch = 70 rows of body. ✅
> - L: 11 inches × 7 rows/inch = 77 rows of body (rounds to end of a 4-row repeat = 76 rows, giving 10¾ inches — entirely sufficient). ✅
---
**Bind Off**
Bind off **all 70 [80] sts** on a RS row as follows for a firm, structured edge:
*K1, p1; rep bind-off across in pattern* — meaning bind off in pattern (knit the knit stitches, purl the purl stitches as they appear) to maintain the texture to the very edge.
> **Tip:** Bind off firmly but not so tightly that the edge puckers. If your bind-off tends to be loose, go down one needle size for the bind-off row only.
---
**Set panel aside. Knit a second identical panel.**
---
## Finishing
### Step 1 — Weave in Ends
Before seaming, weave in all ends on both panels securely. Leave the long tail from your cast-on — this can be used to begin seaming the bottom edge.
---
### Step 2 — Block Both Panels
Wet-block or steam-block both panels to the finished measurements:
- **S:** 14" wide × 10" tall
- **L:** 16" wide × 11" tall
Pin flat and allow to dry completely. Blocking will even out the Double Seed Stitch and make seaming much easier.
---
### Step 3 — Seam the Bottom Edge
Hold both panels together with wrong sides facing (so seam is on the inside).
**Option A — Three-Needle Bind-Off (if you did not bind off yet):**
With a third needle, work a three-needle bind-off across the cast-on edge for a clean, flat seam.
**Option B — Whipstitch or Mattress Stitch (both panels already bound off):**
Using the cast-on tail and a tapestry needle, whipstitch the cast-on edges together firmly across all 70 [80] stitches. Pull snugly.
---
### Step 4 — Seam the Side Edges
With RS facing out (WS together), use **mattress stitch** to seam both side edges:
1. Thread tapestry needle with a length of yarn (approximately 15 [17] inches).
2. Beginning at the bottom corner, work mattress stitch up the full height of both side edges.
3. Leave the top **open** — this is the opening for your laptop.
> **Tip for mattress stitch on seed stitch:** Pick up the bar between the first and second stitch on each side, alternating between panels, pulling snugly every 4–5 stitches to avoid puckering. The textured fabric hides seams beautifully.
---
### Step 5 — Optional Closure
**To add a button loop closure:**
1. Cut a 24-inch length of yarn.
2. On the RS of the **back panel**, at the center of the bind-off edge, use a tapestry needle to work a small sewn loop (or finger-crochet a chain of approximately 6–8 chain stitches) large enough to fit snugly over your button. Secure firmly.
3. Sew a button to the corresponding position on the **front panel** at the center of the bind-off edge.
*Alternatively, sew a magnetic snap to the interior of both panels at the center top edge for a clean, modern closure.*
---
### Step 6 — Final Finishing
- Weave in any remaining ends.
- Give the completed sleeve one final light steam pressing along the seams to flatten them.
- Turn RS out and check that the laptop slides in and out smoothly with a snug but not tight fit.
---
## Sizing Adjustment Guide
If your laptop is a different size, use this formula:
| Measurement | Formula |
|-------------|---------|
| **Cast-on stitches** | (Laptop width in inches + 1") × 5 sts/inch, round to nearest even number |
| **Body rows** | (Laptop height in inches + 0.5") × 7 rows/inch, round to nearest multiple of 4 |
| **Yardage** | Add approx. 10 yards per additional inch of width or height |
---
## Schematic
```
┌─────────────────────────────┐ ← Bind-off edge (open top)
│ │
│ DOUBLE SEED STITCH │
│ BODY │ 10 [11]"
│ │
│ │
└─────────────────────────────┘ ← Cast-on edge (seamed bottom)
14 [16]" wide
(Make 2 identical panels)
```
---
## Tips for Success
- **Don't be afraid of the firm gauge.** The slight resistance you feel while knitting on US 6 needles with worsted yarn is exactly right — it means your fabric will be dense and protective.
- **Check your work against your actual laptop** after blocking but before seaming. Lay your laptop on the panel to confirm it will fit with a small amount of ease on all sides.
- **Choose a yarn with some natural fiber content.** Wool or wool blends (even superwash) have memory and will spring back, maintaining the sleeve's shape over time. 100% acrylic may stretch out with use.
- **For extra stiffness**, you can hold the yarn double and use US 7 / 4.5 mm needles — just re-swatch and recalculate your cast-on accordingly.
- **For extra padding**, a thin layer of foam or quilt batting can be inserted inside the finished sleeve before sliding in your laptop.
---
*Pattern designed for intermediate knitters. Techniques used: long-tail cast-on, Double Seed Stitch, mattress stitch seaming, optional three-needle bind-off.*
---
Disclaimer: This pattern was generated by AI and should be reviewed for accuracy before use. While we strive for quality, AI-generated content may contain errors. Please verify measurements, stitch counts, and instructions before beginning your project. Generated by purlJam.uk
Access your pattern anytime
Bookmark this page to access your pattern anytime