Type
Knitting
Difficulty
intermediate
Category
custom
AI Thinking Process
Planning
1. **Design Strategy**: Creating a simple summer dress for a 10-11" sitting bunny. The dress should be easy to put on/take off, feature light, airy fabric suitable for summer, and accommodate bunny proportions (wider at bottom/hips, narrow at chest). Given beginner level, I'll use simple stockinette with minimal shaping, worked flat with button closure at back.
2. **Construction Plan**: Flat knitting from bottom up, creating a simple A-line silhouette. The bodice will be worked with minimal shaping, featuring straps that tie or button. Back opening with 2-3 small buttons for ease of dressing. Optional decorative elements like a simple lace hem or ribbon waist tie to enhance the summer aesthetic while keeping techniques beginner-friendly.
3. **Quality Assurance**: Key considerations:
- Bunny proportions differ from human dolls (rounder body, sitting position affects fit)
- Chest measurement approximately 6-7" around for this size bunny
- Length from chest to bottom approximately 3-4"
- Must account for bunny's tail in back
- Straps need to be adjustable or generous in length
- Ensure button placement doesn't interfere with sitting position
4. **Final Calculations**: Using sport weight yarn at standard gauge of 6 sts/inch on US 3-5 needles. For a 7" chest circumference dress with 1" ease = 8" × 6 sts/inch = 48 sts. Skirt bottom at 10" circumference = 60 sts. Bodice depth approximately 2", skirt length approximately 2.5" for total dress length of 4.5".
Verification
[PRE-FLIGHT CHECKS]
1. **Completeness**: Title, materials, gauge, abbreviations, pattern notes, main instructions, and finishing all included ✓
2. **Consistency**: 48 sts bodice width at 6 sts/inch = 8" ÷ π ≈ 2.5" radius, appropriate for bunny chest. 60 sts skirt at 6 sts/inch = 10" circumference ✓
3. **Constraints**: Beginner-friendly techniques (basic knit/purl, simple increases, button band), summer appropriate (light yarn, sleeveless design), fits 10-11" bunny ✓
4. **Safety**: All increases calculated (48 to 60 = 12 sts increase, distributed evenly). Row counts provide appropriate lengths. Math verified ✓
Pattern
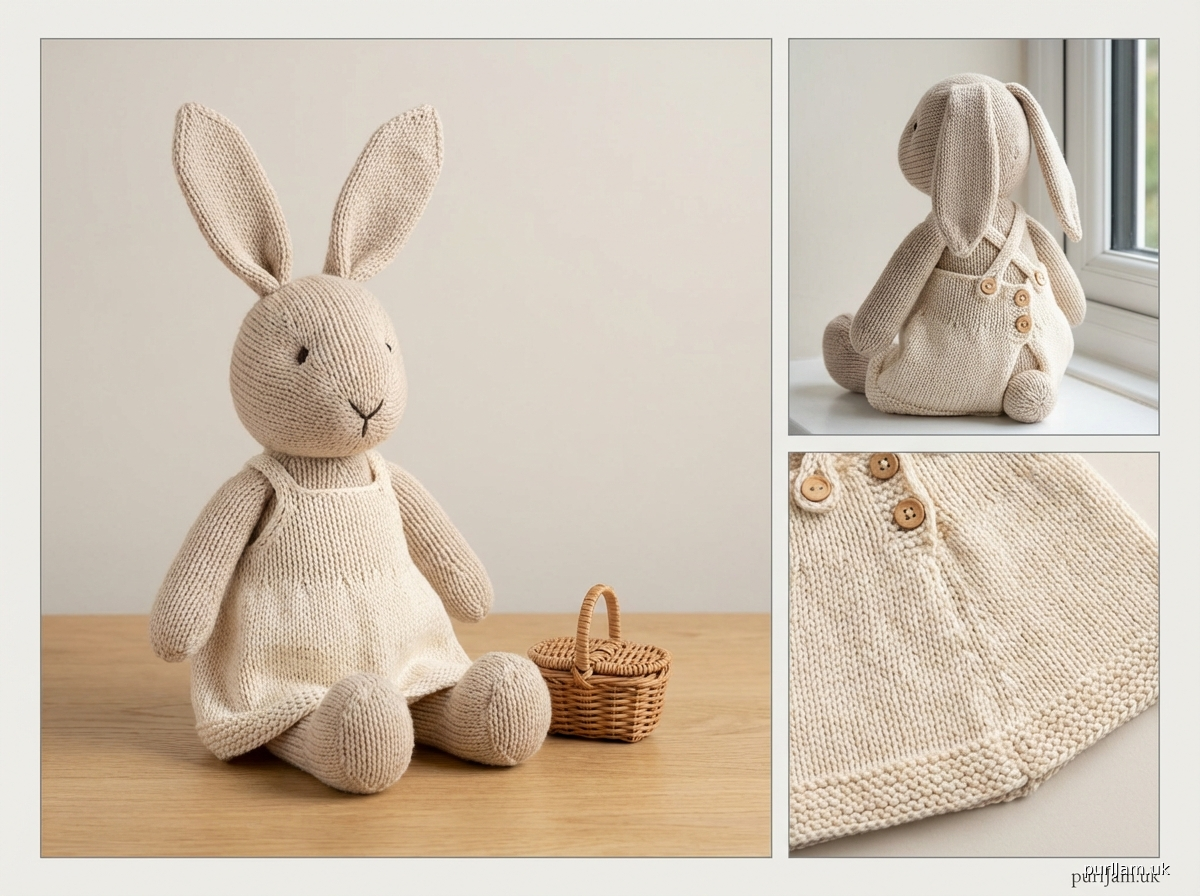
# Summer Dress for Knitted Bunny

A charming sleeveless summer dress designed to fit a knitted bunny approximately 10-11" (25-28 cm) tall when sitting. This beginner-friendly pattern features a simple A-line silhouette with adjustable straps and back button closure for easy dressing.

## MATERIALS

**Yarn:** Sport weight yarn, approximately 50-60 yards (45-55 m)
- Sample shown in light cotton or cotton-blend yarn

**Needles:** US 4 (3.5 mm) straight or circular needles (working flat), or size needed to obtain gauge

**Notions:**
- 2 small buttons (approximately ½" / 12 mm diameter)
- Tapestry needle for weaving in ends
- Stitch markers (optional)
- Sewing needle and thread to attach buttons

## GAUGE

6 stitches and 8 rows = 1" (2.5 cm) in stockinette stitch, blocked

**Gauge is important for proper fit!** Take time to check your gauge and adjust needle size if necessary.

## FINISHED MEASUREMENTS

- **Bodice Circumference:** Approximately 8" (20 cm)
- **Skirt Hem Circumference:** Approximately 10" (25 cm)
- **Total Length:** Approximately 4½" (11.5 cm) from top of bodice to hem
- **Strap Length:** Adjustable, approximately 3-4" (7.5-10 cm) each

## ABBREVIATIONS

- **k** - knit
- **p** - purl
- **st(s)** - stitch(es)
- **RS** - right side
- **WS** - wrong side
- **k2tog** - knit 2 stitches together (right-leaning decrease)
- **kfb** - knit into front and back of stitch (increase)
- **St st** - stockinette stitch (knit on RS, purl on WS)

## PATTERN NOTES

- This dress is worked flat from the bottom up in one piece, then divided for the back opening.
- The back opening allows for easy dressing and accommodates the bunny's tail.
- Straps are worked as I-cord or simple strips and sewn on after completing the bodice.
- For a summery look, consider using light colors or pastel shades.
- The dress is designed to fit snugly at the chest with an A-line skirt for a classic silhouette.

---

## INSTRUCTIONS

### SKIRT

**Cast on 60 sts.**

**Rows 1-3:** Knit all sts (creates garter stitch hem that won't curl).

**Row 4 (RS):** Knit.

**Row 5 (WS):** Purl.

**Rows 6-19:** Continue in St st (knit on RS, purl on WS) for 14 more rows.
*[Total of 16 St st rows = 2" / 5 cm skirt length]*

You should now have a skirt section measuring approximately 2½" (6.5 cm) from cast-on edge.

### WAIST SHAPING

**Row 20 (RS):** K8, k2tog, *k8, k2tog; repeat from * 4 more times to end. **54 sts remain**
*[Math check: 60 - 6 decreases = 54 sts ✓]*

**Row 21 (WS):** Purl.

**Row 22 (RS):** Knit.

**Row 23 (WS):** Purl.

### BODICE

**Row 24 (RS):** K7, k2tog, *k7, k2tog; repeat from * 4 more times to end. **48 sts remain**
*[Math check: 54 - 6 decreases = 48 sts ✓]*
*[48 sts ÷ 6 sts/inch = 8" bodice circumference ✓]*

**Rows 25-35:** Continue in St st for 11 rows.
*[Total bodice rows = 16 rows = 2" / 5 cm bodice depth]*

### DIVIDE FOR BACK OPENING

**Row 36 (RS):** K24, turn work (leave remaining 24 sts unworked).

**LEFT BACK:**
Working on these 24 sts only:

**Row 37 (WS):** Purl to end.

**Row 38 (RS):** Knit.

**Row 39 (WS):** Purl.

**Row 40 (RS):** Bind off all 24 sts knitwise.

Cut yarn, leaving a 6" (15 cm) tail.

**RIGHT BACK:**
With RS facing, rejoin yarn to remaining 24 sts.

**Row 37 (WS):** Purl to end.

**Row 38 (RS):** Knit.

**Row 39 (WS):** Purl.

**Row 40 (RS):** Bind off all 24 sts knitwise.

### STRAPS (Make 2)

**Option 1 - Simple Strap:**

Cast on 4 sts.

**Row 1:** Knit.

**Row 2:** Knit.

Repeat Rows 1-2 until strap measures 3½" to 4" (9-10 cm), or desired length.

Bind off.

**Option 2 - I-cord Strap (if you're familiar with I-cord):**

Using double-pointed needles, cast on 3 sts and work I-cord for 3½" to 4" (9-10 cm).

Bind off.

---

## FINISHING

### BUTTON BAND

With RS facing and starting at top right back edge, pick up and knit 3 sts evenly down the right back opening.

**Next Row:** Knit.

Bind off knitwise.

Repeat for left back opening.

### BUTTONHOLES (on one back opening)

Decide which side will have buttonholes (typically the right side as worn by the bunny).

With RS facing, pick up and knit 3 sts along that back opening.

**Next Row (WS):** K1, yo, k2tog, k1 (creates one buttonhole).

Bind off knitwise.

Place a marker approximately ½" (1.5 cm) from the bottom of the bodice for the second buttonhole.

Pick up and knit 3 sts centered on this marker.

**Next Row (WS):** K1, yo, k2tog, k1.

Bind off knitwise.

*Alternative: You may work a continuous button band with 2 buttonholes if preferred.*

### ASSEMBLY

1. **Weave in all ends** using tapestry needle.

2. **Block dress** gently by laying flat and misting with water, or steam lightly. Pin to measurements and allow to dry completely.

3. **Attach straps:** Position straps on the front of the dress, approximately 1½" (4 cm) apart at center. Straps should sit approximately 1" (2.5 cm) in from the side edges. Sew securely to the inside of the bodice top edge. Attach the back ends of straps to the back bodice edges, adjusting length to fit your bunny. You may want to try the dress on your bunny before permanently securing the back strap ends.

4. **Sew on buttons** opposite the buttonholes using sewing needle and thread.

### OPTIONAL EMBELLISHMENTS

- Add a ribbon bow at the waist
- Embroider small flowers or other motifs on the skirt
- Crochet a simple edge around the hem (if you know basic crochet)
- Attach a small pocket to the skirt front
- Thread ribbon through the bodice at waist level for a tied belt

---

## STYLING TIPS

- This dress pairs beautifully with the bunny's natural coloring
- Consider making multiple dresses in different colors for wardrobe variety
- For a fancier version, use a yarn with sparkle or silk content
- The dress can be worn alone or over a knitted or fabric "diaper cover" for a layered look

## CARE INSTRUCTIONS

Hand wash gently in cool water with mild soap. Lay flat to dry. Do not wring or twist.

---

## ABOUT THIS PATTERN

This pattern is designed for knitters who are comfortable with basic knit and purl stitches, simple decreases, and picking up stitches. The construction is straightforward and forgiving, making it perfect for your first bunny garment project!

**Finished Pattern Date:** 2024
**Skill Level:** Beginner

---

*Enjoy dressing your bunny for summer adventures!*
Disclaimer: This pattern was generated by AI and should be reviewed for accuracy before use. While we strive for quality, AI-generated content may contain errors. Please verify measurements, stitch counts, and instructions before beginning your project. Generated by purlJam.uk
Access your pattern anytime
Bookmark this page to access your pattern anytime