Type
Crochet
Difficulty
beginner
Category
blanket
AI Thinking Process
Planning
Verification
Pattern
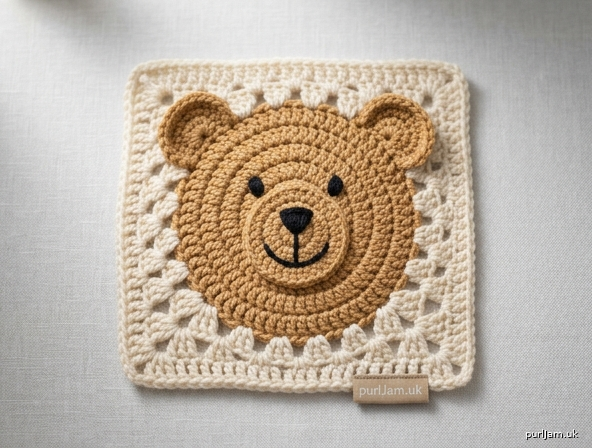
Teddy Bear Granny Square Blanket
A beginner-friendly blanket made of individual granny squares, each featuring a cuddly teddy bear head with round ears in the center, framed by classic granny square rounds. Make as many squares as you like, then join.
Skill Level
Beginner
Finished Measurements
- Individual square: approx. 6 in × 6 in (15 cm × 15 cm)
- Sample blanket: 4 squares wide × 5 squares tall = approx. 24 in × 30 in (61 cm × 76 cm) before border
- Adjust blanket size by making more or fewer squares.
Materials
- Worsted weight (Medium / #4) yarn:
- Color A – Bear (brown or tan): approx. 40 yd per square
- Color B – Background: approx. 35 yd per square
- Small amount of Color C – Black (for face embroidery)
- Crochet hook: US H/8 (5 mm)
- Yarn needle (tapestry needle)
- Scissors
- Stitch marker
Gauge
- 4 dc = 1 in (2.5 cm)
- 2 rounds of granny = approx. 1 in in depth
- Gauge is not critical for a blanket, but consistent gauge keeps squares matching.
- Math check: finished square side = 24 dc ÷ 4 dc/in = 6 in. ✓
Abbreviations (US Terms)
- ch = chain
- st(s) = stitch(es)
- sl st = slip stitch
- sc = single crochet
- hdc = half double crochet
- dc = double crochet
- 2dc / 3dc = 2 or 3 double crochet in same stitch/space
- sp = space
- rnd = round
- inc = increase
PART 1: The Teddy Bear Head (Center)
Worked in the round with Color A. Do not turn between rounds unless stated.
Begin with a magic ring (or ch 4 and join with sl st to form a ring).
Rnd 1: Ch 2 (does not count as st), work 8 dc into ring. Join with sl st to first dc. (8 dc)
Rnd 2: Ch 2, 2 dc in each st around. Join with sl st. (16 dc)
- Math check: 8 × 2 = 16. ✓
Rnd 3: Ch 2, 1 dc in next st, 2 dc in next st; repeat from * around. Join with sl st. (24 dc)
- Math check: 16 + 8 = 24. ✓
Fasten off Color A, leaving a 6 in tail. The bear head is now a flat circle approx. 3 in across.
- Math check: 24 dc ÷ 4 dc/in ≈ 6 in circumference-ish edge; diameter ≈ 3 in. ✓
PART 2: The Round Ears (Make 2 per square)
Worked in the round with Color A.
Begin with a magic ring.
Rnd 1: Ch 1, work 6 sc into ring. Join with sl st to first sc. (6 sc)
Rnd 2: Ch 1, 2 sc in each st around. Join with sl st. Fasten off, leaving an 8 in tail for sewing. (12 sc)
- Math check: 6 × 2 = 12. ✓
Each ear is a small round disc.
Attaching the Ears
- Lay the bear head flat like a clock face. The two ears attach at the 10 o'clock and 2 o'clock positions along the top edge.
- Using the long tails and a yarn needle, whip stitch each ear onto the top edge of the head circle, covering about 4 stitches of the head edge per ear.
- Make sure both ears are the same distance from center for symmetry. Weave in tails.
PART 3: Framing the Bear into a Square
Now we build the granny square rounds around the bear head using Color B (background). You will crochet directly around the outer edge of the bear head circle (Rnd 3 edge = 24 sts).
Join Color B to any st on the outer edge of the bear head with a sl st.
Rnd 4 (establish square corners): Ch 3 (counts as first dc), 2 dc in same st (first corner start)... To turn a circle into a square, we place 4 corners evenly. With 24 edge sts, corners fall every 6 sts.
Work as follows:
- 3 dc in next st (corner made), ch 2, skip nothing — place next corner 6 sts along.
Detailed: Ch 3, 2 dc in same st, ch 2 (corner 1 complete: this counts as first 3-dc corner).
- 1 dc in each of next 5 sts.
- (3 dc, ch 2, 3 dc) in next st = corner 2.
- 1 dc in each of next 5 sts.
- (3 dc, ch 2, 3 dc) in next st = corner 3.
- 1 dc in each of next 5 sts.
- (3 dc, ch 2, 3 dc) in next st = corner 4.
- 1 dc in each of next 5 sts.
- 3 dc in the same first st (completes corner 1), ch 2, join with sl st to top of ch-3.
Stitch count Rnd 4: 4 corners × 6 dc = 24 corner dc, plus 4 sides × 5 dc = 20 side dc = 44 dc + 4 ch-2 corner sps.
- Math check: 24 + 20 = 44. ✓
Rnd 5: Sl st into first ch-2 corner sp. Ch 3, (2 dc, ch 2, 3 dc) in same corner sp.
- 1 dc in each dc along the side to next corner, (3 dc, ch 2, 3 dc) in corner sp; repeat from * around.
- Join with sl st to top of ch-3.
Stitch count Rnd 5: Each side now has 5 previous side dc + 6 corner dc from adjacent = 11 dc between corners. Corners = 6 dc each.
- Side dc per side = 11; 4 sides = 44 side dc + 24 corner dc = 68 dc.
- Math check: Rnd 4 total 44 + 24 new (6 per side × 4) = 68. ✓
Rnd 6: Repeat Rnd 5 pattern:
- Corner: (3 dc, ch 2, 3 dc); Sides: 1 dc in each dc across.
- Join with sl st.
Stitch count Rnd 6: Each side gains 6 dc. Total = 68 + 24 = 92 dc.
- Side length: side dc = 17; 17 dc + 3 corner dc each side ≈ 23–24 sts wide.
- Math check: 92 ÷ 4 dc/in ≈ 23 sts per side ÷ 4 = ~6 in per side. ✓
Fasten off Color B. Weave in ends. Your square is complete at approx. 6 in.
PART 4: Embroider the Face
Using Color C (black) and a yarn needle:
- Eyes: Two small satin-stitch dots or French knots, placed about 1 in apart, just above center of the head.
- Nose: A small filled triangle or oval at center.
- Mouth: A short vertical line down from the nose, then a small curved smile.
Keep the face on the lower half of the head circle so ears frame the top. Weave in all ends.
PART 5: Making Multiple Squares
Repeat Parts 1–4 to make the number of squares needed:
- Sample = 20 squares (4 × 5).
- Math check: 4 × 5 = 20 squares. ✓
PART 6: Joining the Squares (Whip Stitch Method)
- Lay out all squares in your desired grid, bears facing up.
- Place two squares right sides together (bears facing each other).
- Thread a yarn needle with Color B.
- Insert the needle through the back loops only of matching stitches along one edge, whip stitching from corner to corner.
- Tip: Match stitch-for-stitch (about 23–24 sts per side) so corners line up.
- Join all squares into rows first, then join the rows together the same way.
- At corner intersections, take an extra stitch to close any gap.
Alternative (Join-As-You-Go): On the final round (Rnd 6) of each new square, replace the corner/side ch-2 or dc spacing with a sl st into the corresponding space of the neighboring finished square to join while crocheting.
PART 7: Border (Optional)
With Color B, join yarn to any corner of the joined blanket.
Rnd 1: Ch 3 (counts as dc), work dc evenly around the entire outer edge, placing (3 dc, ch 2, 3 dc) in each outer corner. Join with sl st.
- Work approx. 1 dc per stitch along edges to keep it flat.
Rnd 2: Ch 1, sc in each dc around, working (sc, ch 1, sc) in each corner ch-2 sp. Join with sl st. Fasten off.
Rnd 3 (optional decorative): Reverse single crochet (crab stitch) around for a neat finish.
Finishing
- Weave in all remaining ends securely.
- Gently block the blanket to even out the squares: pin to size, spritz with water, and let dry flat.
- Final size check: 4 squares × 6 in = 24 in wide; 5 squares × 6 in = 30 in tall (before border). ✓
Quick Reference — Per Square Round Counts
| Round | Color | Stitch Count |
|---|---|---|
| Head Rnd 1 | A | 8 dc |
| Head Rnd 2 | A | 16 dc |
| Head Rnd 3 | A | 24 dc |
| Ear Rnd 1 (×2) | A | 6 sc |
| Ear Rnd 2 (×2) | A | 12 sc |
| Square Rnd 4 | B | 44 dc + 4 corners |
| Square Rnd 5 | B | 68 dc |
| Square Rnd 6 | B | 92 dc |
Enjoy your cuddly teddy bear granny square blanket!
Disclaimer: This pattern was generated by AI and should be reviewed for accuracy before use. While we strive for quality, AI-generated content may contain errors. Please verify measurements, stitch counts, and instructions before beginning your project. Generated by purlJam.uk
Access your pattern anytime
Bookmark this page to access your pattern anytime