Type
Crochet
Difficulty
beginner
Category
hat
AI Thinking Process
Planning
Verification
Pattern
The "A" Beanie — Classic Fitted Beanie with Monogram
A cosy, close-fitting beanie worked seamlessly from the crown down, finished with a bold letter A on the front. This is a lovely first hat project — it uses only basic stitches, simple increases and working in the round. The monogram is added at the end using an easy duplicate-stitch technique, so you don't have to change colour while crocheting the hat.
Note: This pattern uses UK crochet terminology (UK dc = US sc, UK tr = US dc).
Sizing
Written for Adult Medium (head circumference 54–56 cm / 21–22").
- Finished circumference (relaxed): ~47 cm, stretching comfortably to fit 54–56 cm.
- Finished height: ~20 cm (8").
Materials
- Yarn: Worsted weight (Aran/weight 4), approx. 100–120 g in your main colour (MC).
- Contrast yarn: Small amount (approx. 5–10 g) of the same weight in a contrasting colour (CC) for the letter A.
- Hook: 5.5 mm (metric) — US I-9.
- Stitch marker (to mark the beginning of each round).
- Yarn needle (for the duplicate-stitch letter and weaving in ends).
- Attached stitch chart (see the Attached Stitch Chart section below).
- Optional: pompom maker or cardboard circles.
Tension (Gauge)
14 tr x 8 rows = 10 cm (4") using 5.5 mm hook.
Tension check: work a small swatch of 16 tr for 9 rows and measure the centre 10 cm. Adjust hook size if needed — a smaller hook if your fabric is loose, a larger hook if it is tight.
Abbreviations (UK terms)
- ch – chain
- st(s) – stitch(es)
- dc – double crochet (UK) = US single crochet
- tr – treble crochet (UK) = US double crochet
- 2tr – 2 trebles worked into the same stitch (increase)
- sl st – slip stitch
- FLO – front loop only
- MC / CC – main colour / contrast colour
Construction Notes
This beanie is worked top-down, in continuous joined rounds. Each round begins with ch 2 (does not count as a stitch) and ends with a sl st into the first tr. Move your stitch marker up each round to keep track of the start.
The letter A is not crocheted in as you go — it is added at the very end using duplicate stitch with the contrast yarn, following the attached chart. This keeps the hat itself completely beginner-friendly.
CROWN
Start with a magic ring in MC.
- Rnd 1: Work 12 tr into the magic ring. Sl st to first tr. Pull ring closed. [12 sts]
- Rnd 2: Ch 2. 2tr in each st around. Sl st to first tr. [24 sts] (12 increases → 12 + 12 = 24 ✓)
- Rnd 3: Ch 2. 1 tr, 2tr in next st; repeat around. Sl st to first tr. [36 sts] (12 increases → 24 + 12 = 36 ✓)
- Rnd 4: Ch 2. 2 tr, 2tr in next st; repeat around. Sl st to first tr. [48 sts] (12 increases → 36 + 12 = 48 ✓)
- Rnd 5: Ch 2. 3 tr, 2tr in next st; repeat around. Sl st to first tr. [60 sts] (12 increases → 48 + 12 = 60 ✓)
- Rnd 6: Ch 2. 9 tr, 2tr in next st; repeat around (6 times). Sl st to first tr. [66 sts] (6 increases → 60 + 6 = 66 ✓)
Your crown should now measure approximately 21–22 cm across and lie flat. If it is cupping, your tension is tight; if it is ruffling, it is loose.
BODY
Work even (no increases) on 66 sts.
- Rnds 7–15: Ch 2. 1 tr in each st around. Sl st to first tr. [66 sts each round]
Continue until the hat measures approximately 17.5 cm (7") from the crown — this is usually 9 even rounds, but add or remove a round to reach the length. This leaves room for the FLO edge to bring the total to ~20 cm.
Before finishing the brim, add your letter A now (see the Attached Stitch Chart section) while the fabric is still open and easy to lay flat. You may also add it after the brim if you prefer.
BRIM (Simple FLO Ribbed Edge)
- Rnd 16: Ch 2. Working in the front loop only (FLO) of each st, 1 tr in each st around. Sl st to first tr. [66 sts]
- Rnd 17: Ch 2. Working in FLO again, 1 tr in each st around. Sl st to first tr. [66 sts]
- Edge round: Ch 1. Work 1 dc in each st around. Sl st to first dc. [66 sts]
Fasten off, leaving a 15 cm tail. This creates a subtle ridged edge that hugs the head. Total height should now be approximately 20 cm (8").
(For a warmer fold-up brim, work 4 extra even tr rounds before the FLO rounds so the edge can be folded up.)
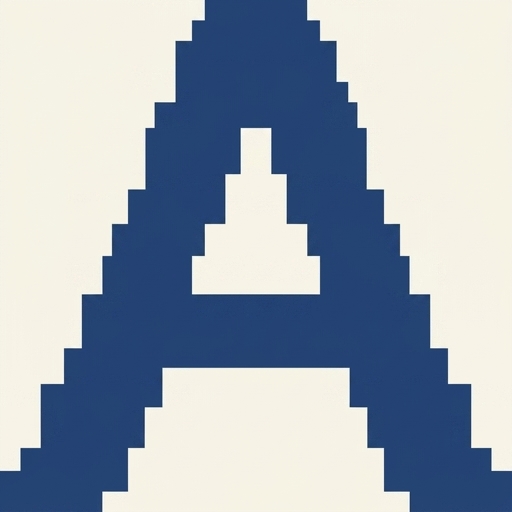
Attached Stitch Chart — The Letter "A"
Do not look for a chart grid printed in this text. The visual grid for the letter A is provided as a separate attached chart panel included with this pattern.
Where it is placed: The attached chart panel sits alongside this pattern as its own asset, immediately after the written instructions. Refer to it now for the Body / finishing step.
How to read the chart (for crochet duplicate stitch):
- Each square = one treble stitch on your beanie.
- The chart is read to match the front of the hat as it faces you: read every row from right to left (the direction you will place stitches while looking at the front), working from the bottom row upward so the letter sits upright.
- Filled squares = contrast colour (CC) — these are the stitches you cover with duplicate stitch.
- Blank squares = main colour (MC) — leave these untouched.
How to apply the A (duplicate stitch):
- Lay the beanie flat with the front facing you. The chart is designed to sit centred across the front, roughly over Rnds 9–14 of the body.
- Centre it: Count 66 sts around. The chart width tells you how many stitches wide the A is (for example, a 9-st-wide chart). Place the chart so equal blank stitches sit on each side: for a 9-st-wide letter, that is (66 ÷ 2) = st 33 at centre, so begin the chart 4 sts to the right of centre and it will end 4 sts to the left — 9 sts total, centred (4 + 1 + 4 = 9 ✓).
- Thread CC onto the yarn needle. Bring the needle up at the base of a marked stitch, follow the shape of the "V" of that treble, and back down — each duplicate stitch covers exactly one treble.
- Work one filled square at a time, following the chart rows, keeping your tension loose so the fabric does not pucker.
Colour / yarn management notes:
- Because the A is added afterward, no colour changes are made while crocheting — a big advantage for beginners.
- Cut a generous length of CC (about 1.5 m) to reduce joins; if you run out, weave in the old end and start fresh on the wrong side.
- Weave all CC tails into the wrong side (inside) of the hat, threading under same-colour stitches only so they stay hidden.
Finishing
- Weave in all MC and CC ends securely on the inside using the yarn needle.
- Gently block the hat to shape — stuff with a rolled towel and lightly steam or mist, then leave to dry.
- Optional pompom: Wrap worsted yarn around a pompom maker or cardboard circles 80–100 times, tie tightly through the centre, cut the loops, trim to a neat 8–10 cm (3–4") ball, and stitch securely to the crown.
- Add a label or tag if desired.
Quick Reference — Stitch Counts
| Round | Instruction | Stitch Count |
|---|---|---|
| 1 | 12 tr in ring | 12 |
| 2 | 2tr in each | 24 |
| 3 | (1 tr, 2tr) ×12 | 36 |
| 4 | (2 tr, 2tr) ×12 | 48 |
| 5 | (3 tr, 2tr) ×12 | 60 |
| 6 | (9 tr, 2tr) ×6 | 66 |
| 7–15 | tr even | 66 |
| 16–17 | tr FLO even | 66 |
| Edge | dc even | 66 |
Enjoy your finished monogrammed beanie!
Disclaimer: This pattern was generated by AI and should be reviewed for accuracy before use. While we strive for quality, AI-generated content may contain errors. Please verify measurements, stitch counts, and instructions before beginning your project. Generated by purlJam.uk
Access your pattern anytime
Bookmark this page to access your pattern anytime