Type
Knitting
Difficulty
intermediate
Category
toy
AI Thinking Process
Planning
Verification
Pattern
THE BROOMSTICK WITCH
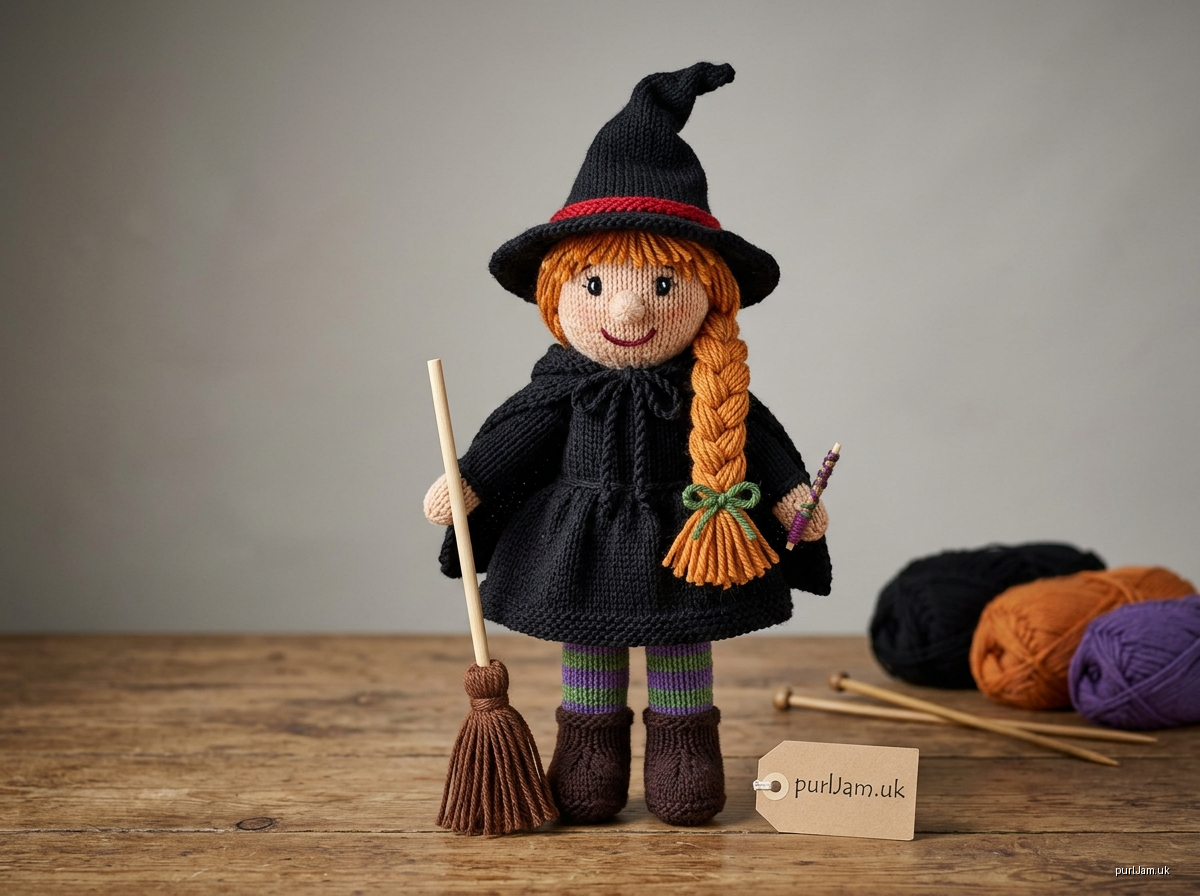
A flat-knitted character doll inspired by Room on the Broom
Level: Intermediate • Construction: Knitted flat on two straight needles throughout, then seamed
This design is a fan-made doll inspired by the friendly witch of the picture book. It interprets her silhouette in simple shapes: a tall pointed hat, a long ginger plait, a black dress and cloak. It does not reproduce the book's illustrations.
FINISHED SIZE
- Height: 30 cm (12 in) standing, from the soles to the top of the head. The hat adds about 12 cm (4¾ in).
- Proportions (stylised):
- Head: about 1/3 of the height (10.8 cm).
- Body: about 1/3 (10.4 cm).
- Legs: about 1/3 (10 cm).
- Size depends on tension. A thicker yarn or larger needles will make a bigger doll; a 4ply/DK yarn will make a smaller one (about 22–25 cm).
MATERIALS
Yarn: Worsted-weight (aran/10-ply) cotton or cotton-blend, for firm, defined stitches.
| Colour | Use | Approx. amount |
|---|---|---|
| A – Black | Bodice, sleeves, skirt, cloak, hat | 100 g (≈ 200 m) |
| B – Skin tone | Head, hands | 25 g |
| C – Dark brown | Boots | 10 g |
| D – Purple and E – Green (or any two contrasts) | Striped stockings | 10 g each |
| F – Ginger/orange | Hair | 15 g |
| Oddments | Black or dark brown (eyes), pink (cheeks), green (hair bow), red (hatband, optional) | – |
Needles and notions:
- 4 mm (UK 8 / US 6) straight needles. This is 1–2 sizes smaller than the ball band, so stuffing does not show through.
- Polyester toy stuffing (about 80 g).
- Poly pellets (about 40 g) in a small sewn fabric bag or nylon pouch.
- Tapestry needle.
- Long doll needle (12–18 cm) for jointing.
- Stitch markers.
- A 12 cm twig or dowel for the wand.
- Optional broom: a 20 cm dowel and brown yarn.
TENSION (GAUGE)
- 20 sts and 26 rows = 10 cm (4 in) over stocking stitch on 4 mm needles.
- Check your tension: if you get more stitches, the doll will be smaller; fewer stitches will make it larger and looser.
ABBREVIATIONS (UK)
| Abbreviation | Meaning |
|---|---|
| k | knit |
| p | purl |
| st(s) | stitch(es) |
| st st | stocking stitch (k on RS, p on WS) |
| RS / WS | right side / wrong side |
| m1 | make 1: lift the strand between stitches and knit into the back of it |
| k2tog | knit 2 together |
| ssk | slip, slip, knit the 2 slipped sts together through the back loops |
| BO | bind (cast) off |
| CO | cast on |
| rep | repeat |
Edge shaping: All increases and decreases are worked 1 stitch in from the edge. This keeps a clean selvedge stitch for the 1-stitch mattress-stitch seam allowance.
- Inc row: k1, m1, k to last st, m1, k1 (2 sts increased).
- Dec row: k1, ssk, k to last 3 sts, k2tog, k1 (2 sts decreased).
PIECE LIST
| Piece | Qty | Colour | Cast-on |
|---|---|---|---|
| Head panel | 2 | B | 8 sts |
| Body (bodice) panel | 2 | A | 14 sts |
| Leg | 2 | C, then D/E | 20 sts |
| Arm | 2 | B, then A | 6 sts |
| Nose bobble | 1 | B | 1 st |
| Skirt (sewn on) | 1 | A | 88 sts |
| Cloak (removable) | 1 | A | 60 sts |
| Hat (removable) | 1 | A | 72 sts |
| Hair, plait, bow, wand, broom | – | F, oddments | – |
HEAD (make 2)
Each panel is worked from the neck to the crown. Use B.
- CO 8 sts.
- Row 1 (WS): p.
- Row 2 (RS): Inc row. (10 sts)
- Row 3: p.
- Rows 4, 6, 8 and 10: Inc row, purling every WS row in between. (12, 14, 16, 18 sts)
- 8 + (5 × 2) = 18 ✓
- Rows 11–20: Work 10 rows st st straight. (18 sts = 9 cm wide)
- Rows 21, 23, 25 and 27: Dec row, purling every WS row in between. (16, 14, 12, 10 sts)
- 18 − (4 × 2) = 10 ✓
- Row 28: p.
- BO 10 sts.
Check: 28 rows = 10.8 cm ✓
BODY / BODICE (make 2)
Each panel is worked from the base up. Use A.
- CO 14 sts.
- Row 1 (WS): p.
- Rows 2, 4 and 6: Inc row, purling every WS row in between. (16, 18, 20 sts)
- 14 + 6 = 20 ✓ (20 sts = 10 cm hip width)
- Rows 7–19: Work 13 rows st st straight, ending with a WS row. (20 sts)
- Rows 20, 22 and 24 (shoulders): Dec row, purling WS rows in between. (18, 16, 14 sts)
- Row 25: p.
- Row 26: k1, (k2tog) 6 times, k1. (8 sts)
- 1 + 6 + 1 = 8 ✓
- Row 27: p.
- BO 8 sts. This edge is the neck, and it matches the head cast-on.
Check: 27 rows = 10.4 cm ✓
LEGS (make 2)
Each leg is worked from the sole up, then folded and seamed up the back.
Boot (C):
- CO 20 sts.
- Rows 1–4: st st, beginning with a p row.
- Row 5 (RS): k6, (k2tog) 4 times, k6. (16 sts)
- This shapes the toe: 6 + 4 + 6 = 16 ✓
- Rows 6–10: st st.
- Row 11 (ankle): Dec row. (14 sts)
- Rows 12–13: st st.
Stocking (stripes):
- Rows 14–26: Change to D. Work st st in stripes of 2 rows D, 2 rows E. Carry the yarn not in use loosely up the side edge, where it will be hidden in the seam. (14 sts)
- BO 14 sts.
Check: 26 rows = 10 cm; the boot is 13 rows (5 cm) ✓
ARMS (make 2)
Each arm is worked from the hand up.
Hand (B):
- CO 6 sts.
- Row 1 (WS): p.
- Row 2: k1, m1, k4, m1, k1. (8 sts)
- Row 3: p.
- Row 4: k1, m1, k6, m1, k1. (10 sts)
- Rows 5–8: st st.
Sleeve (A):
- Rows 9–24: Change to A and work 16 rows st st. (10 sts)
- BO 10 sts.
Check: 24 rows = 9.2 cm ✓
NOSE BOBBLE (make 1)
Use B.
- CO 1 st.
- Work (k1, p1, k1, p1) into the stitch. (4 sts)
- Work 3 rows st st.
- Pass the 2nd, 3rd and 4th sts over the first. Fasten off, leaving a tail.
- Use the tails to gather the bobble into a small round nose.
SEAMING AND STUFFING
General rules:
- Use mattress stitch throughout, with a 1-stitch seam allowance. Always work under the bar 1 st in from the edge.
- Stuff firmly, in small pieces, teasing each piece out before adding it.
- Warning: knitted fabric stretches, so over-stuffing makes lumps and gaps show far more than in crochet. Stop when the piece is firm and smooth, not taut.
- Close the final openings with ladder stitch.
Seam order: close each piece, stuff it, then attach it.
- Head.
- Place the two panels RS out.
- Mattress-stitch around the sides and across the crown, leaving the neck open.
- Embroider the face now (see Face and Features).
- Stuff into a smooth, rounded shape. Leave the neck open for now.
- Body.
- Mattress-stitch the side and shoulder seams, leaving the neck and base open.
- Place the poly-pellet bag in the base.
- Stuff the body above the pellets.
- Ladder-stitch the base closed. The pellets give a weighted, sit-and-stand base.
- Join head to body.
- Top up the stuffing in the neck of both pieces so the neck is firm and does not wobble.
- Ladder-stitch the head's neck edge (8 + 8 sts) to the body's neck edge (8 + 8 sts), stitch for stitch.
- Legs.
- Fold each leg lengthways, RS out.
- Seam up the back from the sole to the top.
- Seam the cast-on edge flat to form the sole, keeping the toe decreases at the front.
- Stuff firmly. Flatten the top and ladder-stitch it closed across the width.
- Arms.
- Fold and seam each arm from the hand to the top.
- Gather the cast-on edge closed.
- Stuff the hand lightly and the sleeve moderately.
- Close the top flat.
JOINTING
The arms and legs are movable, using thread jointing. Use a doubled length of A and the long doll needle.
Arms:
- Mark a point on each side seam 3 rows below the shoulder decreases (body row 17).
- Enter at the outside of the right arm, 1 cm below its top edge.
- Pass through the arm, then straight through the body at the marked point, and out through the left arm at the matching point.
- Go back through the left arm 2–3 mm away from your exit, back through the body, and out through the right arm.
- Rep 3 times. Pull firmly so the arms sit snugly against the shoulders, then knot the yarn and bury the ends inside.
Legs:
- Work in the same way through the lower body, 1.5 cm above the base and 2 cm in from each side seam.
- Pass through the top 1 cm of each leg, with the legs on the front of the body.
- The legs should swing forward so the doll can sit.
For very young children: you may prefer fixed limbs. Whip-stitch the limbs securely in place all round instead.
FACE AND FEATURES
All measurements are taken from the top seam of the head.
- Eyes:
- Position: 4.5 cm down, 2 cm either side of the centre front (4 sts apart from centre).
- Work in black satin stitch, each eye an oval over 2 sts × 3 rows.
- Add a tiny white straight stitch highlight in each eye for sparkle.
- Nose:
- Sew the bobble centrally, 6 cm down.
- Our witch has a friendly, slightly prominent nose, so give it a firm round shape.
- Mouth:
- Work a wide curved smile in dark brown or red backstitch, 7.5 cm down, 2 cm wide.
- Cheeks:
- Rub on a little pink pencil or blusher, or work 2–3 pink straight stitches just below and outside each eye.
- Safety eyes (optional):
- Use 9 mm safety eyes at the same placement.
- They must be fitted before stuffing, with the backs secured inside the head.
⚠ Safety: Any toy for a child under three must have embroidered features only. Do not use safety eyes, bobble-only attachments or removable small accessories (wand, broom, bow) on a toy for a child under three.
HAIR
- Fringe.
- Cut 15 cm lengths of F.
- Using a crochet hook, knot them as fringe loops across the forehead seam line, 3 cm down from the top seam.
- Trim to about 2.5 cm, sweeping them to the sides.
- Scalp coverage.
- Cut lengths of F 40 cm long.
- Backstitch them across the centre of the head, from the fringe line to the back of the neck, as a parting.
- Pull the strands back over the head and gather them at the nape.
- Tack them down along the sides of the head so no knitting shows.
- Plait.
- Divide the gathered strands into three equal bundles.
- Plait loosely to a length of about 18 cm.
- Tie the end firmly with F and trim the tail evenly.
- Hair bow.
- Tie a 20 cm length of green yarn (or a ribbon) into a bow over the plait tie.
- Stitch it in place.
CLOTHING AND ACCESSORIES
All clothing is in A at the same tension as the doll (20 sts × 26 rows = 10 cm).
- The skirt is sewn on.
- The cloak and hat are removable, with ease built in.
Skirt (sewn on)
Worked from the hem up, in one piece.
- CO 88 sts.
- Rows 1–4: k every row (garter-stitch hem).
- Rows 5–11: st st, beginning with a k row.
- Row 12 (RS): (k2, k2tog) 22 times. (66 sts)
- 88 ÷ 4 = 22 reps; 88 − 22 = 66 ✓
- Rows 13–23: st st.
- Row 24 (RS): (k1, k2tog) 22 times. (44 sts)
- 66 ÷ 3 = 22 reps; 66 − 22 = 44 ✓
- Rows 25–31: st st.
- Row 32: BO 44 sts knitwise. This edge is the waist: 22 cm, over a body circumference of 20 cm.
Making up:
- Mattress-stitch the back seam.
- Slip the skirt onto the doll, with the waist at body row 16 (just above the hips).
- Whip-stitch the waist all round to the bodice.
- The skirt hem falls to just above the boots.
Optional patches: Sew on small squares of a contrast yarn for a homespun, much-travelled look.
Cloak (removable)
Worked from the hem up. Keep 3 sts at each edge in garter stitch, knitted on every row.
- CO 60 sts.
- Rows 1–4: k.
- Rows 5–19:
- RS rows: k across.
- WS rows: k3, p to last 3 sts, k3.
- Row 20 (RS): k4, (k2tog, k1) 17 times, k5. (43 sts)
- 4 + 51 + 5 = 60; 60 − 17 = 43 ✓
- Rows 21–31: Work as Rows 5–19.
- Row 32 (RS): k3, (k2tog) 18 times, k4. (25 sts)
- 3 + 36 + 4 = 43; 43 − 18 = 25 ✓
- Rows 33–36: k.
- BO 25 sts. This edge is the neckline (12.5 cm). It sits around the shoulders with plenty of ease over the 8 cm neck.
Ties (fastening):
- Make two twisted cords from A, each 20 cm long.
- Sew one to each top corner of the neck edge.
- Tie in a bow at the centre front of the neck.
Alternative fastening: Use a 7 mm press snap at the neck corners.
Hat (removable)
Brim: Worked in garter stitch from the outer edge in.
- CO 72 sts.
- Rows 1–3: k.
- Row 4: (k2tog, k4) 12 times. (60 sts)
- 72 − 12 = 60 ✓
- Rows 5–7: k.
- Row 8: (k2tog, k3) 12 times. (48 sts)
- Rows 9–11: k.
- Row 12: (k2tog, k2) 12 times. (36 sts)
- 48 − 12 = 36 ✓
- Rows 13–14: k.
At 36 sts, the opening is 18 cm, matching the head's circumference at its widest point.
Crown: Now work in st st, starting with a k row.
- Rows 1–4: st st. (36 sts)
- Work the following decrease rows, working 3 rows st st between each one:
| Row | Instruction | Sts remaining |
|---|---|---|
| 5 | (k7, k2tog) 4 times | 32 |
| 9 | (k6, k2tog) 4 times | 28 |
| 13 | (k5, k2tog) 4 times | 24 |
| 17 | (k4, k2tog) 4 times | 20 |
| 21 | (k3, k2tog) 4 times | 16 |
| 25 | (k2, k2tog) 4 times | 12 |
| 29 | (k1, k2tog) 4 times | 8 |
| 33 | (k2tog) 4 times | 4 |
- Each decrease row removes 4 sts: 36 − (8 × 4) = 4 ✓
- Row 34: p.
- Break the yarn, thread it through the 4 sts and draw up tightly.
The crown is 34 rows (about 13 cm) tall.
Making up:
- Mattress-stitch the crown and brim seam, with the seam at the centre back.
- Stuff the top 4 cm of the point lightly.
- Bend the tip over at a jaunty angle and tack it in place.
- Hatband (optional): Sew a twisted cord of red yarn around the base of the crown.
- To keep the hat on: It sits over the hair and stays in place on its own. For a child's toy, tack it to the head with a few stitches.
Wand
- Wrap the 12 cm twig or dowel with brown yarn, gluing the ends.
- Stitch it into the right hand with several wraps of A through the hand.
Broom (optional)
- Wind brown yarn 30 times around a 10 cm card and cut along one edge.
- Fold the bundle around one end of the 20 cm dowel.
- Bind it tightly 1.5 cm from the top with matching yarn.
- Trim the bristles evenly.
FINISHING
- Weave in all ends inside the seams.
- Steam the cloak and skirt lightly. Do not press the stuffed parts.
- Arrange the plait over one shoulder and pose the doll seated or standing. The weighted base keeps her upright.
DESIGNER'S NOTES
- This pattern is intermediate. Edge shaping, matching neck widths, stuffing control and thread jointing all affect the finished shape.
- Mark the stripe changes and the decrease rows with stitch markers to keep your count accurate.
- To make a smaller witch, use DK yarn on 3.25 mm needles. Every stitch and row count stays the same; only the finished size changes.
Disclaimer: This pattern was generated by AI and should be reviewed for accuracy before use. While we strive for quality, AI-generated content may contain errors. Please verify measurements, stitch counts, charts, and instructions before beginning your project. Generated by purlJam.uk
Love this pattern?
Save this pattern to your free PurlJam libraryAccess your pattern anytime
Bookmark this page to access your pattern anytime