Type
Knitting
Difficulty
intermediate
Category
amigurumi
AI Thinking Process
Planning
Verification
Pattern
Simple Knitted Doll
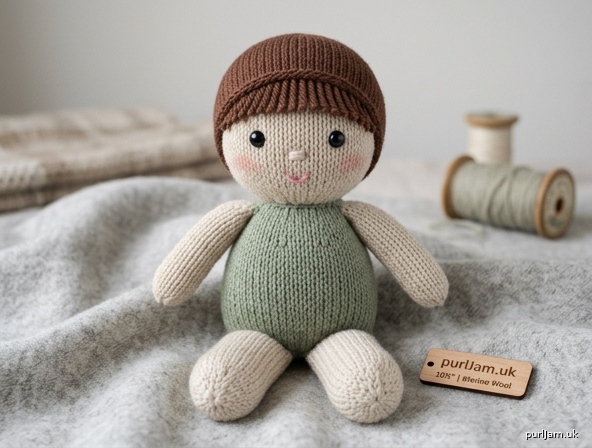
A huggable beginner doll worked in the round in stockinette stitch. The head, body, arms, and legs are knitted as separate tubes, stuffed firmly, and seamed. A snug hair cap and embroidered (or safety-eye) features finish the face. Only three stitches are used: knit, knit-front-and-back, and knit-two-together.
Skill level: Beginner
Skills used: Cast on, knit, kfb, k2tog, working in the round on DPNs or Magic Loop, stuffing, mattress stitch, binding off.
Finished size
Approximately 10½ inches (27 cm) tall and 3 inches (7.5 cm) across the head, after stuffing.
Size will vary slightly with stuffing firmness and yarn. A tight fabric matters more than matching the size exactly.
Materials
Yarn: Worsted weight (#4 Medium), wool, acrylic, or a blend.
- MC (skin): 60 yards (55 m)
- CC1 (body / onesie): 45 yards (41 m)
- CC2 (hair): 40 yards (37 m)
One skein of each is plenty. You may knit the whole doll in one color if you prefer.
Needles: US 5 / 3.75 mm double-pointed needles (set of 5), or a 32-inch (80 cm) circular needle for Magic Loop.
Use a needle 1–2 sizes smaller than the yarn label recommends so stuffing will not show.
Notions
- Stitch marker
- Tapestry needle
- Scissors
- Polyester fiberfill stuffing, approximately 2 ounces (55 g)
- 2 safety eyes, 9 mm (⅜ inch), or embroidery floss for eyes
- Embroidery floss or scrap yarn for the mouth (black, brown, or pink)
- Optional: pink colored pencil or dry pastel for cheeks
Safety note: Safety eyes are a choking hazard. Do not use them on a toy for a child under 3 years — embroider the eyes instead.
Gauge
20 stitches and 28 rounds = 4 inches (10 cm) in stockinette stitch in the round, on US 5 / 3.75 mm needles.
A tight, even fabric that does not show stuffing is more important than matching this gauge exactly. If you can see stuffing through the stitches, go down to US 4 / 3.5 mm.
Abbreviations (US)
- BO — bind off
- CC — contrasting color
- CO — cast on
- k — knit
- kfb — knit into the front and back of the same stitch (1 stitch increased)
- k2tog — knit 2 stitches together (1 stitch decreased)
- MC — main color
- rnd(s) — round(s)
- st(s) — stitch(es)
- St st — stockinette stitch (knit every round when working in the round)
Pattern notes
- All pieces are worked in the round in stockinette stitch (knit every round).
- The first 2–3 rounds on 6 stitches feel tight. Use a fifth DPN as your working needle, or switch to Magic Loop. After Round 3 the work opens up.
- Place a marker for the beginning of the round and slip it every round.
- Close each cast-on hole: thread the tail through the 6 cast-on stitches, pull tight, and weave in.
- Stuff in small pinches, firmly, as directed. Under-stuffed toys look wrinkled; over-stuffed toys strain the seams. The head and body should feel plump and round.
- Do not insert safety eyes after the head is closed — they must go in during the even section.
- Leave a 12-inch (30 cm) tail on every bound-off edge you will sew.
Head
With MC, starting at the crown.
CO 6 sts. Divide onto DPNs (2 sts per needle) or set up Magic Loop. Join to work in the round, being careful not to twist. Place marker.
Rnd 1: [kfb] 6 times. — 12 sts (6 increases → 6 + 6 = 12 ✓)
Rnd 2: Knit.
Rnd 3: [k1, kfb] 6 times. — 18 sts (6 increases → 12 + 6 = 18 ✓)
Rnd 4: Knit.
Rnd 5: [k2, kfb] 6 times. — 24 sts (6 increases → 18 + 6 = 24 ✓)
Rnd 6: Knit.
Rnd 7: [k3, kfb] 6 times. — 30 sts (6 increases → 24 + 6 = 30 ✓)
Rnd 8: Knit.
Rnd 9: [k4, kfb] 6 times. — 36 sts (6 increases → 30 + 6 = 36 ✓)
Rnd 10: Knit.
Rnd 11: [k5, kfb] 6 times. — 42 sts (6 increases → 36 + 6 = 42 ✓)
Rnd 12: Knit.
Rnd 13: [k6, kfb] 6 times. — 48 sts (6 increases → 42 + 6 = 48 ✓)
Rnds 14–20: Knit. (7 rounds even)
Place eyes now: Insert safety eyes between Rnds 16 and 17, 8 stitches apart, centered on the face (the face is the side you choose as front). If you are embroidering eyes instead, mark these two spots with pins and stitch them after stuffing.
Rnd 21: [k6, k2tog] 6 times. — 42 sts (6 decreases → 48 − 6 = 42 ✓)
Rnd 22: Knit.
Rnd 23: [k5, k2tog] 6 times. — 36 sts (6 decreases → 42 − 6 = 36 ✓)
Rnd 24: Knit.
Rnd 25: [k4, k2tog] 6 times. — 30 sts (6 decreases → 36 − 6 = 30 ✓)
Rnd 26: [k3, k2tog] 6 times. — 24 sts (6 decreases → 30 − 6 = 24 ✓)
Stuff the head firmly, filling the crown first and packing stuffing into a smooth oval. Embroider the mouth now, while the opening is still easy to reach (see Face, below), or wait until after assembly.
Rnd 27: [k2, k2tog] 6 times. — 18 sts (6 decreases → 24 − 6 = 18 ✓)
Rnd 28: [k1, k2tog] 6 times. — 12 sts (6 decreases → 18 − 6 = 12 ✓)
BO all 12 sts. Leave a 12-inch (30 cm) tail. Top up stuffing if needed so the neck feels full, not sunken. Head measures about 4 inches (10 cm) tall.
Body
With CC1, starting at the bottom.
CO 6 sts. Join to work in the round as for the head.
Rnd 1: [kfb] 6 times. — 12 sts (6 increases → 6 + 6 = 12 ✓)
Rnd 2: [k1, kfb] 6 times. — 18 sts (6 increases → 12 + 6 = 18 ✓)
Rnd 3: [k2, kfb] 6 times. — 24 sts (6 increases → 18 + 6 = 24 ✓)
Rnd 4: [k3, kfb] 6 times. — 30 sts (6 increases → 24 + 6 = 30 ✓)
Rnd 5: [k4, kfb] 6 times. — 36 sts (6 increases → 30 + 6 = 36 ✓)
Rnd 6: [k5, kfb] 6 times. — 42 sts (6 increases → 36 + 6 = 42 ✓)
Rnds 7–22: Knit. (16 rounds even)
Rnd 23: [k5, k2tog] 6 times. — 36 sts (6 decreases → 42 − 6 = 36 ✓)
Rnds 24–25: Knit. (2 rounds)
Rnd 26: [k4, k2tog] 6 times. — 30 sts (6 decreases → 36 − 6 = 30 ✓)
Rnd 27: Knit.
Rnd 28: [k3, k2tog] 6 times. — 24 sts (6 decreases → 30 − 6 = 24 ✓)
Stuff the body firmly, packing the bottom first so the doll can sit.
Rnd 29: [k2, k2tog] 6 times. — 18 sts (6 decreases → 24 − 6 = 18 ✓)
Rnd 30: Knit.
Rnd 31: [k1, k2tog] 6 times. — 12 sts (6 decreases → 18 − 6 = 12 ✓)
BO all 12 sts. Leave a 12-inch (30 cm) tail. The 12-st neck matches the head. Body measures about 4½ inches (11.5 cm) tall.
Legs (make 2)
With MC, starting at the foot.
CO 6 sts. Join to work in the round.
Rnd 1: [kfb] 6 times. — 12 sts (6 increases → 6 + 6 = 12 ✓)
Rnd 2: [k1, kfb] 6 times. — 18 sts (6 increases → 12 + 6 = 18 ✓)
Rnds 3–6: Knit. (4 rounds; this is the foot)
Rnd 7: [k1, k2tog] 6 times. — 12 sts (6 decreases → 18 − 6 = 12 ✓)
Rnds 8–22: Knit. (15 rounds; this is the leg)
Stuff the foot firmly and the leg firmly, leaving the last ½ inch (1.5 cm) a little softer so the top flattens against the body. BO all 12 sts. Leave a 12-inch (30 cm) tail. Each leg measures about 3 inches (7.5 cm) long.
Arms (make 2)
With MC, starting at the hand.
CO 6 sts. Join to work in the round.
Rnd 1: [kfb] 6 times. — 12 sts (6 increases → 6 + 6 = 12 ✓)
Rnds 2–16: Knit. (15 rounds)
Stuff lightly — arms should be filled but still able to rest against the body. BO all 12 sts. Leave a 12-inch (30 cm) tail. Each arm measures about 2¼ inches (5.5 cm) long.
Hair cap
With CC2, starting at the crown.
CO 6 sts. Join to work in the round.
Rnd 1: [kfb] 6 times. — 12 sts (6 increases → 6 + 6 = 12 ✓)
Rnd 2: Knit.
Rnd 3: [k1, kfb] 6 times. — 18 sts (6 increases → 12 + 6 = 18 ✓)
Rnd 4: Knit.
Rnd 5: [k2, kfb] 6 times. — 24 sts (6 increases → 18 + 6 = 24 ✓)
Rnd 6: Knit.
Rnd 7: [k3, kfb] 6 times. — 30 sts (6 increases → 24 + 6 = 30 ✓)
Rnd 8: Knit.
Rnd 9: [k4, kfb] 6 times. — 36 sts (6 increases → 30 + 6 = 36 ✓)
Rnd 10: Knit.
Rnd 11: [k5, kfb] 6 times. — 42 sts (6 increases → 36 + 6 = 42 ✓)
Rnd 12: Knit.
Rnd 13: [k6, kfb] 6 times. — 48 sts (6 increases → 42 + 6 = 48 ✓)
Rnds 14–18: Knit. (5 rounds)
BO loosely. Leave a 18-inch (45 cm) tail for sewing. Do not stuff. The cap is a shallow bowl that sits on the head like a bob.
Optional bangs: Cut 10–12 strands of CC2, each 8 inches (20 cm) long. Fold a strand in half. From the right side, insert the tapestry needle under one bound-off stitch along the front edge, catch the folded loop, pull the loop through, then pull the two ends through the loop (lark’s head knot). Repeat along 6–8 stitches at the forehead. Trim to length.
Face
Work with the head facing you, eyes already placed.
Mouth: With embroidery floss (4–6 strands) or a short length of yarn, stitch a small V, a shallow U, or two tiny horizontal stitches, centered 3 rounds below the eyes and about 3 stitches wide. Anchor the yarn inside the stuffing and weave the ends in firmly.
Embroidered eyes (if not using safety eyes): Make a small satin-stitch oval or a French knot at each marked spot, 8 stitches apart, between Rnds 16 and 17.
Optional cheeks: Rub a pink colored pencil or dry pastel lightly onto the fabric just below and outside each eye. Hold a steam iron 2 inches (5 cm) above the fabric to set (do not press).
Finishing and assembly
Assembly order matters. Pin every piece first and check both sides in a mirror before you sew.
1. Close cast-on holes. On head, body, arms, and legs, thread each starting tail through the 6 cast-on stitches, pull tight, and weave the tail into the stuffing.
2. Attach head to body. Nest the 12-st bound-off neck of the head against the 12-st bound-off neck of the body. Using the long tail and mattress stitch, sew all the way around, picking up one bound-off stitch from each edge. Add a pinch of stuffing at the neck if the join looks dented, then close. Weave the end inside the body.
3. Attach legs. Pin the bound-off edge of each leg to the bottom of the body. Place them slightly toward the front so the doll sits, with about 4 stitches of body fabric between the inner edges of the two legs. They should be mirror images. Using mattress stitch (or whip stitch), sew each bound-off edge firmly to the body. Weave ends inside.
4. Attach arms. Pin the bound-off edge of each arm to the side of the body, 2 rounds below the neck seam, on the same round as each other and in line with the side “seam” of the body (halfway between center front and center back). Sew with mattress stitch. Weave ends inside.
5. Attach hair cap. Slip the cap over the crown so the bound-off edge sits just above the eyes in front and covers the back of the head. Pin all around. With CC2, whip-stitch the bound-off edge to the head, catching a head stitch every time so the cap cannot be pulled off. Weave the end under the cap.
6. Weave in every remaining end securely into the stuffing. Give the doll a squeeze to settle the filling, and massage any lumps until the head and body are smooth.
Your doll is ready.
Disclaimer: This pattern was generated by AI and should be reviewed for accuracy before use. While we strive for quality, AI-generated content may contain errors. Please verify measurements, stitch counts, charts, and instructions before beginning your project. Generated by purlJam.uk
Love this pattern?
Save this pattern to your free PurlJam libraryAccess your pattern anytime
Bookmark this page to access your pattern anytime