Type
Crochet
Difficulty
beginner
Category
hat
AI Thinking Process
Planning
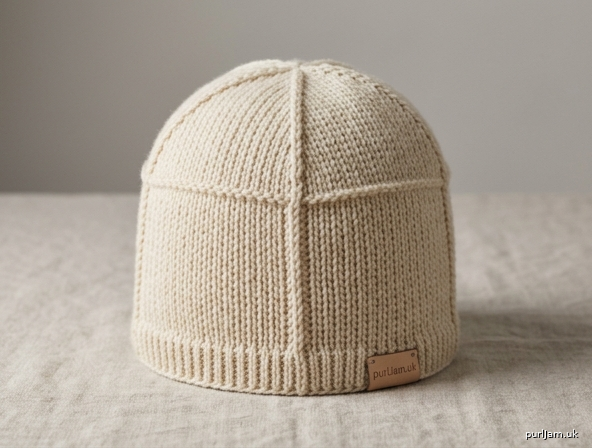
1. **Design Strategy**: Beginner-friendly adult beanie using Tunisian Simple Stitch (TSS), worked flat in 4 rectangular panels and seamed. TSS creates a dense, woven-look fabric perfect for warm hats.
2. **Construction Plan**: Four identical rectangles worked flat in TSS, seamed into a tube, then gathered at the crown.
3. **Quality Assurance**:
- TSS curls — emphasize blocking and a final slip-stitch row to reduce curl.
- Beginners need clear forward/return pass explanation.
- Seaming 4 panels must align; mark top edges.
4. **Final Calculations**: Gauge 14 sts × 13 rows = 4" in TSS. Adult head ~22" circumference; hat circumference 20" (negative ease). Each panel: 5" wide × 8" tall = 18 sts × 26 rows. Total circumference: 4 × 5" = 20" ✓.
Verification
1. **Completeness**: Materials, gauge, abbreviations, TSS tutorial, 4 panel instructions, assembly, finishing — all included.
2. **Consistency**: 18 sts ÷ 14 sts/4" × 4 = 5.14" ≈ 5" per panel × 4 panels = 20" circumference ✓. 26 rows ÷ 13 rows/4" × 4 = 8" height ✓.
3. **Constraints**: 4 pieces ✓, adult size ✓, TSS with directions ✓, beginner level ✓, worsted yarn ✓, US terminology ✓.
4. **Safety**: Math verified. Note: TSS "rows" count both forward + return as one row. Gauge swatch instructions included.
Pattern
# The Four-Panel Tunisian Beanie
### A Beginner's Introduction to Tunisian Crochet

**Skill Level:** Beginner (first Tunisian project friendly)
**Finished Size:** Adult, approx. 20" (51 cm) circumference, unstretched × 8" (20.5 cm) tall
**Construction:** Four flat rectangular panels seamed together, gathered at the crown

---

## MATERIALS

- **Yarn:** Worsted weight (CYC #4), approx. 200–230 yards (185–210 m)
  - Sample shown in a smooth, light-colored yarn so stitches are easy to see
- **Hook:** US J/10 (6.0 mm) **Tunisian/Afghan hook** — either a long straight hook (10"/25 cm minimum) or an interchangeable cable hook
  - *Note: A standard crochet hook will NOT work — you need a hook with a uniform shaft to hold the loops.*
- **Tapestry needle** (large eye, blunt tip)
- **Scissors**
- **Stitch markers** (4) — optional but helpful
- **Measuring tape**

---

## GAUGE

**14 sts × 13 rows = 4" (10 cm) in Tunisian Simple Stitch, lightly blocked**

*Gauge check is essential. Work a swatch of about 20 sts × 18 rows, block lightly, then measure.*

---

## ABBREVIATIONS (US Terms)

- **TSS** – Tunisian Simple Stitch
- **ch** – chain
- **st(s)** – stitch(es)
- **fwd** – forward pass
- **ret** – return pass
- **lp(s)** – loop(s)
- **sl st** – slip stitch
- **RS / WS** – right side / wrong side

---

## TUNISIAN SIMPLE STITCH (TSS) — STEP BY STEP

Tunisian crochet is worked **without turning**. The **right side (RS) always faces you**. Every "row" has two parts: a **Forward Pass** (pick up loops onto the hook) and a **Return Pass** (work them back off).

### Foundation Row
1. **Chain** the required number of stitches.
2. **Forward Pass:** Insert hook into the **back bump** of the 2nd ch from hook, yarn over (yo), pull up a loop — **leave it on the hook**. Repeat in each ch across. You should have the same number of loops on the hook as you had chains.
3. **Return Pass:** Yo, pull through 1 loop on hook (this makes the edge chain). *Yo, pull through 2 loops* — repeat across until 1 loop remains on the hook. **Do not turn.**

### Tunisian Simple Stitch Row (repeats for the body)
1. **Forward Pass:** Skip the first vertical bar (it's directly below your hook). *Insert hook from right to left, front to back, under the next vertical bar, yo, pull up a loop — leave on hook.* Repeat across to the last stitch.
   - **Last stitch:** Insert hook under BOTH strands of the final vertical bar (this firms up the edge), yo, pull up a loop.
2. **Return Pass:** Yo, pull through 1 loop. *Yo, pull through 2 loops* — repeat until 1 loop remains. **Do not turn.**

### Bind-Off Row (when finished)
**Sl st bind-off:** Skip first vertical bar. *Insert hook under next vertical bar, yo, pull through the bar AND the loop on hook (1 sl st made).* Repeat across. This helps reduce curling.

> **Tip for beginners:** Keep your tension loose on the return pass — that's where Tunisian work tends to tighten up. If the fabric is bowing into a "U" shape (curling), it's normal — blocking will fix it.

---

## PANEL (Make 4)

Each panel is a rectangle measuring approx. **5" × 8"** (12.5 × 20.5 cm).

**Ch 19.**

**Foundation Row:**
- Fwd: Pull up a loop in the back bump of the 2nd ch from hook and in each ch across — **18 lps on hook.**
- Ret: Work standard return pass — **1 lp remains on hook, 18 sts total.**

**Rows 1–25:** Work TSS as described above across all 18 sts. (18 sts each row)

*Math check: 26 total rows (foundation + 25) ÷ 13 rows per 4" × 4 = 8" ✓*

**Bind-Off Row:** Work sl st bind-off across all 18 sts. Fasten off, leaving a **long tail (about 18"/45 cm)** for seaming.

**Repeat to make 4 panels total.**

---

## ASSEMBLY

### Step 1: Identify Edges
Each panel has:
- A **bottom edge** (the foundation chain — this becomes the hat brim)
- A **top edge** (the sl st bind-off — this becomes the crown)
- Two **side edges**

Lay all 4 panels RS up, bottom edges aligned.

### Step 2: Seam the Side Edges
Using the tapestry needle and the long tail from each panel, **whip stitch** or **mattress stitch** panel sides together to form a tube. Match row-for-row carefully.

- Seam Panel 1 ↔ Panel 2
- Seam Panel 2 ↔ Panel 3
- Seam Panel 3 ↔ Panel 4
- Seam Panel 4 ↔ Panel 1 (closing the tube)

*Math check: 4 panels × 5" = 20" circumference ✓*

### Step 3: Gather the Crown
1. Cut a 24" (60 cm) length of yarn and thread the tapestry needle.
2. Run a **running stitch** through the top edge of the tube, about ¼" (0.5 cm) below the edge, all the way around.
3. Pull tightly to **cinch the crown closed**. Knot securely on the inside.
4. Weave the tail through the gathered hole once more to close any gap, then weave in.

---

## FINISHING

1. **Weave in all ends** on the wrong side.
2. **Block the hat:** Dampen with cool water, gently squeeze out excess (do not wring), and place over a balloon, bowl, or hat form roughly the size of the wearer's head. Smooth flat. Let air-dry completely. Blocking is what gives TSS its lovely even drape and eliminates curl.
3. **Optional:** Add a pom-pom to the crown for extra flair.

---

## SIZING NOTES & MODIFICATIONS

| Adjustment | How To |
|---|---|
| **Smaller hat** (teen ~19") | Ch 17 per panel (16 sts) |
| **Larger hat** (~22") | Ch 21 per panel (20 sts) |
| **Taller hat / slouchy** | Add 6–10 rows to each panel |
| **Shorter hat** | Work 20 rows instead of 25 |

**Stitch multiple:** Each panel can be any width you like, as long as all 4 panels match. Total stitches around = panel width × 4.

---

## TROUBLESHOOTING TIPS

- **My fabric curls a lot.** This is normal. Block firmly. The sl st bind-off row also helps.
- **My edges are uneven.** Make sure you're picking up BOTH strands of the last vertical bar at the end of each forward pass.
- **My fabric leans diagonally.** Your return pass tension is too tight. Loosen up — the return pass should match the forward pass in tension.
- **I can't tell where my row ends.** Place a stitch marker in the first and last stitch of Row 1 to identify your edge stitches.

---

Enjoy your first Tunisian project — and welcome to a beautiful new crochet technique! 🧶
Disclaimer: This pattern was generated by AI and should be reviewed for accuracy before use. While we strive for quality, AI-generated content may contain errors. Please verify measurements, stitch counts, and instructions before beginning your project. Generated by purlJam.uk
Access your pattern anytime
Bookmark this page to access your pattern anytime