Type
Crochet
Difficulty
intermediate
Category
custom
AI Thinking Process
Planning
Verification
Pattern
The Lancet Bolero
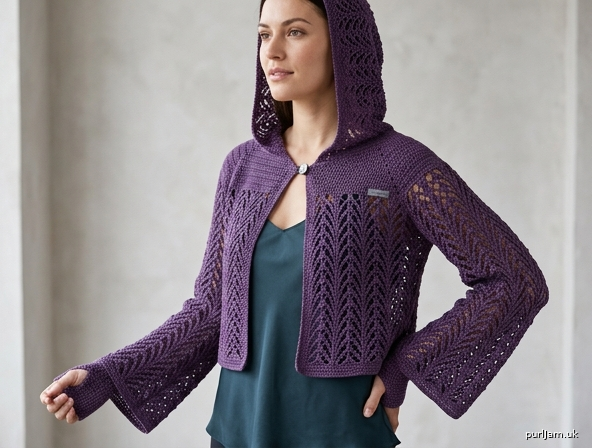
A cropped, open-front hooded bolero in lace-weight yarn. Columns of pointed arches — each crowned with a keystone picot — form a cathedral lancet lace on the sleeves, the lower body and the hood. The sleeves flare gently from a firm thumb-hole cuff and are set into a dropped armhole, so the lace repeat is never cut for a shaped sleeve cap. A short treble yoke across the shoulders gives the hood a stable sewing edge. Worn open over a dress or top, it fastens with a single button at the throat.
The pattern uses UK crochet terms and metric measurements. UK dc = US single crochet; UK tr = US double crochet; UK dtr = US treble.
Sizes
S (M, L)
To fit bust: 81–86 (91–97, 102–112) cm [32–34 (36–38, 40–44) in]
The bolero is worn open. The fronts meet only at the neck button, so back width is the measurement that decides fit. If the back width is comfortable across the shoulder blades and the armhole does not pull, the size is correct.
Finished measurements
| S | M | L | |
|---|---|---|---|
| Back width | 40.5 cm | 45.5 cm | 50.5 cm |
| Length, shoulder to hem | 31 cm | 34 cm | 36 cm |
| Side seam (sewn) | 15 cm | 13.5 cm | 15 cm |
| Armhole depth (each edge) | 15 cm | 20 cm | 20 cm |
| Shoulder seam | 10 cm | 12.5 cm | 15 cm |
| Back neck | 20.5 cm | 20.5 cm | 20.5 cm |
| Sleeve, top of cuff to underarm | 43 cm | 44 cm | 46 cm |
| Sleeve circumference at top | 30.5 cm | 38 cm | 40.5 cm |
| Thumb cuff circumference | 15 cm | 16 cm | 17 cm |
| Thumb cuff length | 7 cm | 7 cm | 7 cm |
| Hood, neck to crown | 28 cm | 28 cm | 28 cm |
| Hood, face edge to centre back | 30 cm | 30 cm | 30 cm |
A difference of about 1 cm after blocking is normal in lace.
Materials
- Yarn: Lace-weight yarn (CYC 0 / UK 2-ply), smooth and firmly plied so the arches stay open. Wool, wool-silk or a smooth cotton-silk blend. Avoid brushed or halo yarns; they blur the lancet pattern.
- 1100 (1300, 1500) m [1200 (1420, 1640) yd]
- About 140 (165, 190) g if the ball is 800 m per 100 g
- Yardage is an estimate for the tension given. Buy enough of one dye lot to finish the edging.
- Hooks: 3.0 mm (main fabric) and 2.5 mm (cuffs and edging). Match the tension, not the hook brand.
- Notions:
- Tapestry needle
- Stitch markers (at least 4)
- One button, 12–15 mm
- Pins for blocking
- Optional: 80 cm of narrow ribbon if you prefer ties to a button
Tension (gauge)
Measured after blocking.
Cathedral Lace and solid treble, 3.0 mm hook: 24 sts and 12 rows = 10 cm.
UK dc, 2.5 mm hook: 28 sts and 32 rows = 10 cm.
Tension swatch
Chain 44. Work Foundation Row as given below (43 dc; 43 = 6 × 7 + 1). Work Set-up Row, Arch Row, then repeat Crown Row and Return Row until the swatch is at least 14 cm tall. Block it. In the lace, 4 arches (24 sts of the repeat) should measure 10 cm, and 12 rows should measure 10 cm. If the swatch is too wide, use a smaller hook; if it is too narrow, use a larger hook. Work a few rows of solid treble on the same swatch: row height should be close to the lace. If the treble yoke is noticeably tighter, use the next larger hook for the yoke only.
Abbreviations
| Abbreviation | Meaning |
|---|---|
| ch | chain |
| dc | double crochet (UK) |
| tr | treble (UK) |
| dtr | double treble (UK): yoh twice, insert hook, yoh and pull through, (yoh and pull through 2 loops) three times |
| sl st | slip stitch |
| st(s) | stitch(es) |
| sp | space |
| RS | right side |
| WS | wrong side |
| rep | repeat |
| rem | remaining |
| foll | following |
| cont | continue |
| patt | pattern |
| yoh | yarn over hook |
| CF | Cathedral Fan (see below) |
Special stitches
Cathedral Fan (CF): Into the same 5-ch arch work (2 tr, 3 ch, 1 dc in 3rd ch from hook, 2 tr). The little dc-picot is the keystone at the top of the arch.
Picot: 3 ch, 1 dc in 3rd ch from hook.
How the lace rows fit together
The lace is always a multiple of 6 stitches + 1. That “+1” is a post; every 6 stitches after it are one arch of 5 missed stitches plus the next post.
- A Set-up Row or an Increase Row ends with treble posts separated by 5 ch.
- An Arch Row turns those into dc posts separated by 5 ch.
- A Crown Row (always RS) fills each 5-ch arch with a Cathedral Fan and puts a treble in each dc. This is the side that should face out.
- A Return Row skips each fan and puts a dc in each treble, back to dc posts separated by 5 ch.
So Crown and Return alternate. The only exception: the row immediately after a Set-up or an Increase is an Arch Row, not a Return Row, because there is no fan to skip yet.
Mark the RS with a scrap of yarn on the first Crown Row.
Pattern notes
- The 1 ch at the start of a dc row does not count as a stitch.
- The 3 ch at the start of a treble row does count as 1 tr.
- The 8 ch at the start of an Increase Row counts as 1 tr and 5 ch.
- Turn at the end of every row unless told otherwise.
- Stitch counts at the end of a row are in parentheses. For lace rows the count is given as posts, arches, and the equivalent stitch count.
- “Work even” means continue the established row type without increasing or decreasing.
- The lower body is lace. From the restoration row upward, the yoke is solid treble so the neck, shoulders and hood can be sewn without cutting through arches.
- Block lace before you judge the fit. Unblocked lancet lace looks narrow and curly; that is not the finished fabric.
Stitch glossary
Use these rows everywhere the pattern names them.
Foundation Row (WS): 1 dc in 2nd ch from hook, 1 dc in each ch to end. Turn.
Set-up Row: 3 ch (counts as 1 tr), miss st at base of 3 ch, *5 ch, miss 5 sts, 1 tr in next st; rep from * to end. Turn.
Arch Row: 1 ch, 1 dc in first post, *5 ch, 1 dc in next post; rep from * to end, working the last dc into the top of the turning chain when that chain stands as a post. Turn.
Crown Row (RS): 3 ch (counts as 1 tr), *CF in next 5-ch arch, 1 tr in next dc; rep from * to end. Turn.
Return Row (WS): 1 ch, 1 dc in first tr, *5 ch, miss next CF, 1 dc in next tr; rep from * to end. Turn.
Restoration Row (RS): 3 ch (counts as 1 tr), *5 tr in next 5-ch arch, 1 tr in next dc; rep from * to end. Turn. This puts 1 treble into every post and 5 trebles into every arch, returning the row to the original solid count.
Increase Row (RS): 8 ch (counts as 1 tr and 5 ch), 1 tr in first dc, *5 ch, 1 tr in next dc; rep from * to last dc, 5 ch, 1 dtr in same last dc. Turn. Adds one arch at each end (+2 posts, +2 arches, +12 sts). The following row is always an Arch Row, with the last dc worked into the 3rd of the 8 ch.
Back
Worked flat, hem to shoulder. One piece.
Chain 98 (110, 122).
Foundation Row (WS): 1 dc in 2nd ch from hook and in each ch to end. Turn. (97 (109, 121) dc)
Check: 98 − 1 = 97; 110 − 1 = 109; 122 − 1 = 121.
Row 1 (RS): Set-up Row. (17 (19, 21) posts, 16 (18, 20) arches — 97 (109, 121) sts)
Check for S: miss the first dc, then 16 repeats of (miss 5, tr in next) use 96 dc; 1 + 96 = 97.
Row 2 (WS): Arch Row. (17 (19, 21) dc posts, 16 (18, 20) arches)
Row 3 (RS): Crown Row.
Row 4 (WS): Return Row.
Rows 3 and 4 are the lace repeat. Cont until Row 22 (26, 28) has been completed. Row 22 (26, 28) is a Return Row (WS). Equivalent stitch count is still 97 (109, 121).
Row 23 (27, 29) (RS): Restoration Row. (97 (109, 121) tr)
Check: S has 16 arches; 1 + 16 × 6 = 97. M: 1 + 18 × 6 = 109. L: 1 + 20 × 6 = 121.
Next rows: 3 ch (counts as 1 tr), 1 tr in each tr to end. Turn.
Cont in solid treble until Row 36 (40, 42) has been completed (a WS row). (97 (109, 121) tr)
Mark the neck
On the final row, place a marker after stitch 24 (30, 36) and another after stitch 73 (79, 85).
- Shoulder: 24 (30, 36) sts
- Neck: 49 sts (24 + 49 = 73; 30 + 49 = 79; 36 + 49 = 85)
- Shoulder: 24 (30, 36) sts
- 24 + 49 + 24 = 97; 30 + 49 + 30 = 109; 36 + 49 + 36 = 121.
Fasten off, leaving a long tail at each shoulder for sewing.
Left Front
As worn. Centre front is the end of RS rows. Make 1.
Chain 50 (56, 62).
Foundation Row (WS): 1 dc in 2nd ch from hook and in each ch to end. Turn. (49 (55, 61) dc)
Row 1 (RS): Set-up Row. (9 (10, 11) posts, 8 (9, 10) arches — 49 (55, 61) sts)
Row 2 (WS): Arch Row.
Row 3 (RS): Crown Row.
Row 4 (WS): Return Row.
Cont the lace repeat until Row 22 (26, 28) (Return Row, WS) is complete.
Row 23 (27, 29) (RS): Restoration Row. (49 (55, 61) tr)
Row 24 (28, 30) (WS): 3 ch, 1 tr in each tr to end. Turn. (49 (55, 61) tr)
Neck shaping
Decreases are made on RS rows only, at the centre-front end of the row. WS rows are worked even on whatever stitches remain. Do not return to the stitches left unworked; they form the neck edge.
Size S
Row 25 (RS): 3 ch, 1 tr in each of next 39 sts, turn, leaving 9 sts unworked. (40 tr)
Row 26 (WS): 3 ch, 1 tr in each tr to end. Turn. (40 tr)
Row 27 (RS): 3 ch, 1 tr in each of next 35 sts, turn, leaving 4 sts unworked. (36 tr)
Row 28: Tr even. (36 tr)
Row 29: 3 ch, 1 tr in each of next 31 sts, turn, leaving 4 unworked. (32 tr)
Row 30: Tr even. (32 tr)
Row 31: 3 ch, 1 tr in each of next 28 sts, turn, leaving 3 unworked. (29 tr)
Row 32: Tr even. (29 tr)
Row 33: 3 ch, 1 tr in each of next 25 sts, turn, leaving 3 unworked. (26 tr)
Row 34: Tr even. (26 tr)
Row 35: 3 ch, 1 tr in each of next 23 sts, turn, leaving 2 unworked. (24 tr)
Row 36 (WS): Tr even. (24 tr)
Stitches removed: 9 + 4 + 4 + 3 + 3 + 2 = 25. 49 − 25 = 24, matching the Back shoulder.
Fasten off, leaving a long tail.
Size M
Work Rows 25–28 as treble even (55 tr) — neck shaping starts at Row 29. Then:
Row 29 (RS): 3 ch, 1 tr in each of next 45 sts, turn, leaving 9 unworked. (46 tr)
Row 30: Tr even. (46 tr)
Row 31: 3 ch, 1 tr in each of next 41 sts, turn, leaving 4 unworked. (42 tr)
Row 32: Tr even. (42 tr)
Row 33: 3 ch, 1 tr in each of next 37 sts, turn, leaving 4 unworked. (38 tr)
Row 34: Tr even. (38 tr)
Row 35: 3 ch, 1 tr in each of next 34 sts, turn, leaving 3 unworked. (35 tr)
Row 36: Tr even. (35 tr)
Row 37: 3 ch, 1 tr in each of next 31 sts, turn, leaving 3 unworked. (32 tr)
Row 38: Tr even. (32 tr)
Row 39: 3 ch, 1 tr in each of next 29 sts, turn, leaving 2 unworked. (30 tr)
Row 40 (WS): Tr even. (30 tr)
55 − 25 = 30, matching the Back shoulder. Fasten off, leaving a long tail.
Size L
Work Rows 25–30 as treble even (61 tr). Then:
Row 31 (RS): 3 ch, 1 tr in each of next 51 sts, turn, leaving 9 unworked. (52 tr)
Row 32: Tr even. (52 tr)
Row 33: 3 ch, 1 tr in each of next 47 sts, turn, leaving 4 unworked. (48 tr)
Row 34: Tr even. (48 tr)
Row 35: 3 ch, 1 tr in each of next 43 sts, turn, leaving 4 unworked. (44 tr)
Row 36: Tr even. (44 tr)
Row 37: 3 ch, 1 tr in each of next 40 sts, turn, leaving 3 unworked. (41 tr)
Row 38: Tr even. (41 tr)
Row 39: 3 ch, 1 tr in each of next 37 sts, turn, leaving 3 unworked. (38 tr)
Row 40: Tr even. (38 tr)
Row 41: 3 ch, 1 tr in each of next 35 sts, turn, leaving 2 unworked. (36 tr)
Row 42 (WS): Tr even. (36 tr)
61 − 25 = 36, matching the Back shoulder. Fasten off, leaving a long tail.
Right Front
As worn. Centre front is the beginning of RS rows. Work the Foundation and the lace exactly as the Left Front through Row 24 (28, 30). (49 (55, 61) tr) Then shape the neck at the start of RS rows.
Slipped stitches are not worked again. They form the neck edge.
Size S
Row 25 (RS): Sl st across 9 sts, 3 ch in next st (counts as 1 tr), 1 tr in each st to end. Turn. (40 tr)
Row 26: Tr even. (40 tr)
Row 27: Sl st across 4 sts, 3 ch in next st, 1 tr in each st to end. Turn. (36 tr)
Row 28: Tr even. (36 tr)
Row 29: Sl st across 4, 3 ch, tr to end. Turn. (32 tr)
Row 30: Tr even. (32 tr)
Row 31: Sl st across 3, 3 ch, tr to end. Turn. (29 tr)
Row 32: Tr even. (29 tr)
Row 33: Sl st across 3, 3 ch, tr to end. Turn. (26 tr)
Row 34: Tr even. (26 tr)
Row 35: Sl st across 2, 3 ch, tr to end. Turn. (24 tr)
Row 36: Tr even. (24 tr)
Fasten off, leaving a long tail.
Size M
Rows 25–28: tr even (55 tr).
Row 29 (RS): Sl st across 9, 3 ch in next st, tr to end. Turn. (46 tr)
Row 30: Tr even. (46 tr)
Row 31: Sl st across 4, 3 ch, tr to end. Turn. (42 tr)
Row 32: Tr even. (42 tr)
Row 33: Sl st across 4, 3 ch, tr to end. Turn. (38 tr)
Row 34: Tr even. (38 tr)
Row 35: Sl st across 3, 3 ch, tr to end. Turn. (35 tr)
Row 36: Tr even. (35 tr)
Row 37: Sl st across 3, 3 ch, tr to end. Turn. (32 tr)
Row 38: Tr even. (32 tr)
Row 39: Sl st across 2, 3 ch, tr to end. Turn. (30 tr)
Row 40: Tr even. (30 tr)
Fasten off, leaving a long tail.
Size L
Rows 25–30: tr even (61 tr).
Row 31 (RS): Sl st across 9, 3 ch in next st, tr to end. Turn. (52 tr)
Row 32: Tr even. (52 tr)
Row 33: Sl st across 4, 3 ch, tr to end. Turn. (48 tr)
Row 34: Tr even. (48 tr)
Row 35: Sl st across 4, 3 ch, tr to end. Turn. (44 tr)
Row 36: Tr even. (44 tr)
Row 37: Sl st across 3, 3 ch, tr to end. Turn. (41 tr)
Row 38: Tr even. (41 tr)
Row 39: Sl st across 3, 3 ch, tr to end. Turn. (38 tr)
Row 40: Tr even. (38 tr)
Row 41: Sl st across 2, 3 ch, tr to end. Turn. (36 tr)
Row 42: Tr even. (36 tr)
Fasten off, leaving a long tail.
Sleeves
Make 2. Each sleeve is worked flat from the hand upward: thumb cuff first, then a short increase into lancet lace, then the flared cathedral sleeve. The underarm seam runs the full length, including the cuff. The thumb slit is not on the seam.
The two cuffs are mirrored. Work the first as the Left sleeve and the second as the Right sleeve, or the thumbs will both sit on the same side of the wrist.
Thumb cuff
Hook: 2.5 mm.
Chain 43 (46, 49).
Row 1 (RS): 1 dc in 2nd ch from hook and in each ch to end. Turn. (42 (45, 48) dc)
Rows 2–14: 1 ch, 1 dc in each dc to end. Turn. (42 (45, 48) dc)
These 14 rows are the wrist section, about 4.5 cm.
Row 15 (RS) — thumb slit:
- Left sleeve: 1 ch, 1 dc in each of first 10 (11, 12) dc, 6 ch, miss 6 dc, 1 dc in each dc to end. Turn.
- Right sleeve: 1 ch, 1 dc in each of first 26 (28, 30) dc, 6 ch, miss 6 dc, 1 dc in each of last 10 (11, 12) dc. Turn.
The 6 missed stitches sit about a quarter of the way around the wrist from the underarm seam, which is where the thumb rests. 10 + 6 + 26 = 42; 11 + 6 + 28 = 45; 12 + 6 + 30 = 48.
Row 16 (WS): 1 ch, 1 dc in each dc and 1 dc in each of the 6 ch. Turn. (42 (45, 48) dc)
Rows 17–22: 1 ch, 1 dc in each dc to end. Turn. (42 (45, 48) dc)
Rows 16–22 are the hand section, about 2 cm, so the cuff extends just over the base of the hand. Total cuff: 22 rows, about 7 cm. Do not fasten off. Do not seam yet.
Transition
Change to the 3.0 mm hook.
Row 1 (RS): 1 ch (does not count), then increase in dc as follows.
- S (42 → 49): *1 dc in each of next 5 dc, 2 dc in next dc; rep from * to end. Turn. (49 dc)
- 7 repeats × 6 base stitches = 42, plus 7 increases = 49.
- M (45 → 55): (2 dc in next dc, 1 dc in each of next 3 dc) 5 times, (2 dc in next dc, 1 dc in each of next 4 dc) 5 times. Turn. (55 dc)
- 5 × 4 + 5 × 5 = 45 base stitches, 10 increases, 55 dc.
- L (48 → 61): (2 dc in next dc, 1 dc in each of next 2 dc) 11 times, (2 dc in next dc, 1 dc in each of next 6 dc) twice, 1 dc in last dc. Turn. (61 dc)
- 11 × 3 + 2 × 7 + 1 = 48 base stitches, 13 increases, 61 dc.
Row 2 (WS): Set-up Row. (9 (10, 11) posts, 8 (9, 10) arches — 49 (55, 61) sts)
Row 3 (RS): Arch Row.
Row 4 (WS): Crown Row? No — Row 3 was an Arch Row on the RS, so the fans would fall on the wrong side. Stop and use the row order below, which keeps every Crown Row on the RS.
Correction of row order, written here as the working instruction (follow this, not the two lines above):
Row 2 (WS): 1 ch, 1 dc in each dc to end. Turn. (49 (55, 61) dc)
Row 3 (RS): Set-up Row. (9 (10, 11) posts, 8 (9, 10) arches — 49 (55, 61) sts)
Row 4 (WS): Arch Row.
Row 5 (RS): Crown Row. Mark this side as the RS.
Row 6 (WS): Return Row.
Cathedral sleeve
Continue Crown Row on every odd RS row and Return Row on every even WS row, except where an Increase Row is given. An Increase Row replaces that odd-numbered Crown Row.
After every Increase Row, the next row (even, WS) is an Arch Row, not a Return Row. The odd row after that Arch Row is a Crown Row, and the repeat resumes.
| S | M | L | |
|---|---|---|---|
| Stitches after Row 3 | 49 | 55 | 61 |
| Increase Row | 17 | 15 | 15 |
| Stitches after it | 61 | 67 | 73 |
| Increase Row | 33 | 29 | 29 |
| Stitches after it | 73 | 79 | 85 |
| Increase Row | — | 43 | 43 |
| Stitches after it | — | 91 | 97 |
| Last even lace row | 50 | 52 | 54 |
Each Increase Row adds 2 posts and 2 arches: 49 + 12 = 61, 61 + 12 = 73; 55 + 12 = 67, 67 + 12 = 79, 79 + 12 = 91; 61 + 12 = 73, 73 + 12 = 85, 85 + 12 = 97.
Work even in pattern through Row 50 (52, 54). That row is a Return Row (WS).
Next row (RS): Restoration Row. (73 (91, 97) tr)
Check: S has 12 arches, 1 + 12 × 6 = 73. M has 15 arches, 1 + 15 × 6 = 91. L has 16 arches, 1 + 16 × 6 = 97.
Fasten off, leaving a long tail for the sleeve seam and a second length for setting in, or use a separate length of yarn later.
The restoration row is the sleeve top. It measures about 30.5 (38, 40.5) cm and is sewn to the two armhole edges.
Hood
Two panels, seamed at the centre back. The foundation edge is the neck edge; one row-end edge is the centre back; the other row-end edge is the face; the final row is the crown edge, from face to centre back.
Make 2 the same. Flipping one panel for the seam mirrors the lace.
Chain 68.
Foundation Row (WS): 1 dc in 2nd ch from hook and in each ch to end. Turn. (67 dc)
67 = 6 × 11 + 1, about 28 cm. Mark this edge “neck”.
Row 1 (RS): Set-up Row. (12 posts, 11 arches — 67 sts)
Row 2 (WS): Arch Row.
Row 3 (RS): Crown Row. Mark RS.
Row 4 (WS): Return Row.
Cont the lace repeat through Row 34 (Return Row, WS).
Row 35 (RS): Restoration Row. (67 tr)
1 + 11 × 6 = 67. Fasten off, leaving a long tail on one panel for the centre-back seam.
Each panel is about 28 cm from neck edge to crown edge, and about 30 cm from face edge to centre-back edge.
Finishing
Weave in ends that will be enclosed in seams. Leave sewing tails.
Shoulder seams
With RS together, sew each Front shoulder (24 (30, 36) tr) to the matching marked Back shoulder. The centre 49 stitches of the Back remain open as the back neck. Use mattress stitch, or a slip-stitch seam on the wrong side, taking in one stitch from each edge.
Hood
- Place the two hood panels RS together. Sew one row-end edge to one row-end edge for the centre-back seam, from the neck corner to the crown corner, about 30 cm. The remaining row-end edge of each panel is the face edge.
- Pin the foundation (neck) edge of the hood around the bolero neckline: centre-back seam to the centre of the Back neck, each face-edge corner to the top of a Front neck edge. The hood neck edges together measure about 56 cm; the bolero neckline measures about 50 cm (20.5 cm across the back neck, plus about 15 cm along each shaped front neck). Ease the extra evenly, with most of the ease along the back neck, where a little fullness sits well under a hood.
- Sew with mattress stitch. The hood should not pull the neckline in, and the neckline should not flute.
Side seams
Sew each Front to the Back at the side, from the hem upward, for 15 (13.5, 15) cm only. This is about 18 (16, 18) rows, all within the lace section. Leave the rest of the side edge open for the armhole: about 15 (20, 20) cm on the Back and the same on the Front.
The armhole edge changes from lace to treble yoke part-way up. That is intended. Ease the seam so the yoke does not gather the lace below it.
Sleeve seam and thumb
Fold each sleeve RS together. Sew the row-end edges from the hand edge of the cuff all the way to the sleeve top. This seam is the underarm.
Do not sew across the thumb slit. It sits in the middle of the cuff rows, away from the seam, so the seam should not meet it. If it does, the slit was placed on the wrong stitches — unpick and use the other cuff’s placement.
Turn the sleeve right side out. With the 2.5 mm hook and RS facing, join yarn at the thumb slit and work 1 dc in each chain and 1 dc in each stitch-edge around the opening. Join with a sl st. (about 14 dc) Fasten off. This neatens the hole and stops it stretching.
Set in the sleeves
Pin the centre of the sleeve-top restoration row to the shoulder seam. Pin the sleeve seam to the side seam, at the bottom of the armhole. Pin the rest of the 73 (91, 97) trebles along the two armhole edges.
- S: sleeve top 30.5 cm into an armhole of 30 cm. Ease the 0.5 cm through the lace.
- M: sleeve top 38 cm into an armhole of 40 cm. Ease the body slightly so the armhole is not stretched tight. A 2 cm difference over 40 cm disappears in lace.
- L: sleeve top 40.5 cm into an armhole of 40 cm. Ease the 0.5 cm.
Sew with mattress stitch, taking the restoration-row trebles to the row-ends of the armhole. The lace sleeve should hang in soft columns, not pulled flat.
Edging
Hook: 2.5 mm. RS facing.
Join yarn at the lower corner of the Right Front (as worn), at the hem.
Round 1: Dc evenly up the Right Front, around the right face edge of the hood, across both crown edges, down the left face edge, down the Left Front, and along the hem. Join with a sl st to the first dc.
Guide for an even edge, which matters more than an exact count:
- Along lace and treble row-ends (fronts, hood face, centre of the crown is a stitch edge, not a row-end): 2 dc in each row-end.
- Along stitch edges (hem, hood crown, hood neck is already sewn): 1 dc in each stitch.
- At the four outer hem corners and at the turn onto the hood crown, work 3 dc in the corner stitch so the edging can turn.
If the edge flutes, you have too many dc; if it pulls in, you have too few. Unpick that section and adjust. The finished edge should lie flat before you picot it.
Button loop: When you reach the top of the Right Front, where the front edge meets the hood, chain 8, then sl st back into the same place to form a loop, and continue the round. The loop should fit the button.
Round 2 (picot round): 1 ch, *1 dc in each of next 5 dc, picot, 1 dc in next dc; rep from * around, working a plain dc (no picot) in each corner stitch and skipping the picot if a 6-stitch group would land on a corner. Join with a sl st. Fasten off.
The picot spacing can be shifted by a stitch or two so a picot does not sit on the button loop.
Sew the button on the Left Front, opposite the loop, on the edging.
Ties instead of a button (optional): Chain 70, fasten off, and sew the centre of the chain to the top of one front. Repeat for the other front. Knot the ties. Omit the button loop if you do this.
Blocking
Lancet lace must be blocked or the arches stay closed and the sleeve looks half its width.
- Soak the bolero in cool water with a little wool wash, or steam it thoroughly if the yarn allows steam. Support the wet weight; lace-weight fabric grows when wet.
- Squeeze — do not wring — and roll in a towel.
- Pin to the finished measurements: back width 40.5 (45.5, 50.5) cm, length 31 (34, 36) cm, each sleeve top 30.5 (38, 40.5) cm around, hood smooth but not stretched hard. Pin each Cathedral Fan open so the keystone picot sits at the top of a pointed arch.
- Pin the thumb cuffs at 15 (16, 17) cm around. Do not stretch the cuffs to the sleeve width; they are meant to be firmer than the lace.
- Leave until completely dry. Unpin. The edging should be flat and the button loop unstretched.
Wearing and care
The cuff sits on the wrist, with about 2 cm over the hand and the thumb through the slit. The lace above it is meant to blouse slightly before it settles onto the dropped shoulder. Button at the throat so the hood frames the face; below the button the fronts hang open.
Hand wash cool. Dry flat, reshaping the arches. Do not hang the bolero to dry — the wet sleeves will grow.
Fit adjustments (without rewriting the lace)
- Longer sleeves: After the last Increase Row, repeat Crown and Return until the sleeve above the cuff is the length you want, ending with a Return Row, then work the Restoration Row. Add the same number of rows to both sleeves.
- Deeper hood: Work extra Crown/Return pairs before the hood Restoration Row. Add the same number to both panels, or the centre-back seam will not match.
- Wider back: Add 6 stitches (one arch) to the Back foundation and 6 rows will not be required — only stitches. Each extra 6 stitches adds about 2.5 cm. Add the same 6 stitches to one place only if you also accept that the shoulder marks must move. The clean version is to add 6 stitches to the Back and 3 stitches to each Front foundation (Fronts would then no longer be 6n+1 — so prefer adding a full 6 to each Front as well, and sew the extra at the side seam). Do this only before you start.
- Snugger cuff: Use the 2.5 mm hook and, if needed, omit 2 dc from the cuff chain (and place the thumb slit 1 stitch closer to the seam). Work the transition increases from the new cuff count up to the same 49 (55, 61) before Row 3, spacing the increases as evenly as you can.
The three sizes as written already contain every count needed to make the bolero. The adjustments above are optional and sit outside the sized instructions.
Disclaimer: This pattern was generated by AI and should be reviewed for accuracy before use. While we strive for quality, AI-generated content may contain errors. Please verify measurements, stitch counts, charts, and instructions before beginning your project. Generated by purlJam.uk
Love this pattern?
Save this pattern to your free PurlJam libraryAccess your pattern anytime
Bookmark this page to access your pattern anytime