Type
Crochet
Difficulty
beginner
Category
kimono
AI Thinking Process
Planning
Verification
Pattern
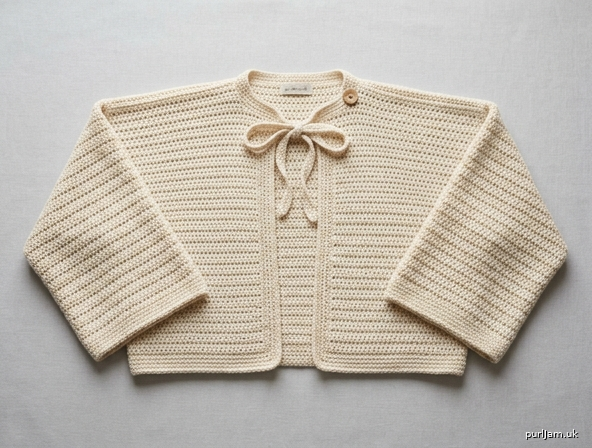
Cropped Bolero Shrug Cardigan
A beginner cropped cardigan worked in classic kimono construction: four rectangles, no shaping, dropped shoulders, and wide sleeves set on at right angles. Half double crochet makes a soft, solid fabric that holds a bolero shape without being stiff. Wear it open over a dress or tee, tie it at the neck, or close it with one button.
The fit is boxy on purpose. There is no waist shaping, no sleeve taper, and no set-in sleeve cap.
Skill Level
Beginner. You need to know chain, half double crochet, single crochet, and slip stitch. Seaming is worked with a yarn needle and is explained below. There are no increases or decreases in the fabric.
Sizes
S/M (L/XL, 2XL/3XL)
To fit bust: 32–38 (40–46, 48–54) inches
[81–96.5 (101.5–117, 122–137) cm]
Choose your size by bust. Between sizes, pick the larger size for a roomier shrug or the smaller size for a closer bolero. Finished length and sleeve length matter more than bust, because the ease is generous. Both are easy to change (see Customization).
Instructions are written S/M (L/XL, 2XL/3XL). If only one number is given, use it for every size.
Finished Measurements
| S/M | L/XL | 2XL/3XL | |
|---|---|---|---|
| Finished bust (fronts meeting) | 44 in (112 cm) | 52 in (132 cm) | 60 in (152 cm) |
| Back width | 22 in (56 cm) | 26 in (66 cm) | 30 in (76 cm) |
| Each front width | 11 in (28 cm) | 13 in (33 cm) | 15 in (38 cm) |
| Center back length | 15 in (38 cm) | 16 in (40.5 cm) | 17 in (43 cm) |
| Armhole drop (below shoulder seam) | 7 in (18 cm) | 8 in (20.5 cm) | 9 in (23 cm) |
| Side seam below underarm | 8 in (20.5 cm) | 8 in (20.5 cm) | 8 in (20.5 cm) |
| Back neck width | 10 in (25.5 cm) | 10 in (25.5 cm) | 10 in (25.5 cm) |
| Each shoulder seam | 6 in (15 cm) | 8 in (20.5 cm) | 10 in (25.5 cm) |
| Neckline when fronts meet | 20 in (51 cm) | 20 in (51 cm) | 20 in (51 cm) |
| Sleeve length (3/4) | 12 in (30.5 cm) | 13 in (33 cm) | 14 in (35.5 cm) |
| Sleeve circumference | 14 in (35.5 cm) | 16 in (40.5 cm) | 18 in (45.5 cm) |
Ease is about 12 inches at the low end of each size range and about 6 inches at the high end (44 − 32 = 12 and 44 − 38 = 6; 52 − 40 = 12 and 52 − 46 = 6; 60 − 48 = 12 and 60 − 54 = 6). The shoulder seam sits out past the natural shoulder. The sleeve seam sits 7 (8, 9) inches below the shoulder line. That dropped, T-shaped fit is the kimono silhouette.
Center back length of 15 (16, 17) inches lands near the natural waist on many adults and above the waist on taller bodies. It is a bolero length, not a hip-length cardigan.
Yarn
Worsted weight (Category 4).
Amount: 850 (1050, 1250) yards / 780 (960, 1145) meters.
If you use 200-yard (183 m) skeins, buy 5 (6, 7) skeins. Buy one extra skein if you lengthen the body or sleeves, or if your worsted is on the light side.
A cotton, bamboo, Tencel, or cotton-acrylic blend will drape best. A wool blend gives a bit more body and is still suitable. Stiff acrylic will work, but the shrug will look boxier and less fluid. Crochet fabric is naturally less drapey than knit fabric, so a relaxed gauge and a soft fiber matter more than a fancy stitch.
Hooks and Notions
- US J-10 / 6 mm crochet hook, or size needed to obtain gauge
- Tapestry needle
- Stitch markers (at least 6)
- Scissors
- Optional: one button, about 1 inch (2.5 cm) wide, if you want a button instead of ties
Gauge
12 hdc and 8 rows = 4 inches (10 cm) in half double crochet.
That is 3 stitches per inch and 2 rows per inch. Gauge is more important than hook size. The fabric should feel relaxed, not stiff. If your swatch is tight, go up a hook size.
Swatch: Chain 18. Hdc in the 2nd chain from the hook and in each chain across (17 hdc). Ch 2, turn, hdc in each stitch across. Repeat until you have 12 rows. Block the swatch the way you will block the shrug. Measure the center 4 inches. You want 12 hdc and 8 rows in that 4 inches. If you have more stitches, your fabric is tight — use a larger hook. If you have fewer, use a smaller hook. Remake the swatch until it matches.
Abbreviations (US)
- ch — chain
- hdc — half double crochet
- sc — single crochet
- sl st — slip stitch
- st(s) — stitch(es)
- RS — right side
- WS — wrong side
- rep — repeat
US stitch names are used throughout. Do not convert hdc to UK half treble.
Notes
- The Back, both Fronts, and both Sleeves are plain rectangles. There is no shaping anywhere in the fabric. If your stitch count changes, a stitch was skipped or added. Unravel to the mistake before you continue.
- Ch 2 at the start of an hdc row does not count as a stitch. Do not skip the first stitch. The first hdc goes into the first real stitch. The last hdc goes into the last real stitch. Do not work into the turning chain.
- Keep each ch-2 snug. A loose turning chain looks like an extra stitch and is the usual reason edges grow.
- Row 1, with the side facing you, is the right side. Hdc looks slightly smoother on the right side. Place a marker on the right side of every piece as soon as you finish Row 1.
- Count stitches at the end of every row. Target counts never change: Back 66 (78, 90); each Front 33 (39, 45); each Sleeve 42 (48, 54).
- This bolero has no collar. The sc edging is the neck finish. A shawl collar would need short-row shaping, which this beginner rectangle construction does not include.
- The front is worn open, tied, or closed with one button. The fronts meet at the center when pulled together. They do not overlap.
Construction
- Crochet a Back rectangle, two Front rectangles, and two Sleeve rectangles.
- Seam the shoulders in a straight horizontal line. Leave the center neck open.
- Sew each sleeve on at a right angle, centered on the shoulder seam and running down the side edges.
- Seam each side from the hem up to the underarm, then continue along the sleeve underside to the cuff.
- Work sc edging around the fronts and neck, then around the hem and cuffs.
- Add ties or a button if you want a closure.
- Block to the finished measurements.
Schematic
Shoulder seam          Back neck 10 in          Shoulder seam
6 (8, 10) in          |<-------------->|         6 (8, 10) in
|<-------->|                                      |<---------->|
+-----------------------------------------------------------+
|                          BACK                              |  15 (16, 17) in
|                                                            |
+-----------------------------------------------------------+
<---------------------- 22 (26, 30) in --------------------->


Outer edge                         Center-front edge
(side / sleeve)                    (opening)
|<-- shoulder -->|<-- neck 5 in -->|
+----------------+------------------+
|              FRONT                |  15 (16, 17) in
|              make 2               |
+-----------------------------------+
<----------- 11 (13, 15) in ------->


Cuff edge (Row 1)
+-----------------------------------+
|              SLEEVE               |  12 (13, 14) in long
|              make 2               |
+-----------------------------------+
Top edge (last row), sewn to body
<--------- 14 (16, 18) in --------->
   wide, same width top to bottom
Armhole drop of 7 (8, 9) inches is half the sleeve width. Side seam below that drop is 8 inches on every size (7 + 8 = 15; 8 + 8 = 16; 9 + 8 = 17).
Pattern
Back
Chain 67 (79, 91). This is 1 more than the 66 (78, 90) stitches you need.
Row 1 (RS): Hdc in the 2nd ch from the hook and in each ch across. — 66 (78, 90) hdc.
(67 − 1 = 66; 79 − 1 = 78; 91 − 1 = 90.)
Place a marker on this side. This is the right side.
Row 2: Ch 2 (does not count as a st), turn, hdc in each hdc across. — 66 (78, 90) hdc.
Repeat Row 2 until you have 30 (32, 34) rows.
The piece measures 15 (16, 17) inches / 38 (40.5, 43) cm from the foundation edge.
(30 ÷ 2 = 15; 32 ÷ 2 = 16; 34 ÷ 2 = 17.)
Width is 22 (26, 30) inches / 56 (66, 76) cm.
(66 ÷ 3 = 22; 78 ÷ 3 = 26; 90 ÷ 3 = 30.)
Fasten off, leaving a 24-inch tail for seaming one shoulder.
Mark the neck before you set the piece aside. On the last row, with RS facing: count 18 (24, 30) sts in from the right edge and place a marker; count 18 (24, 30) sts in from the left edge and place a marker. The center, between the markers, is 30 sts (10 inches) and is the back neck. It will not be seamed.
(18 + 30 + 18 = 66; 24 + 30 + 24 = 78; 30 + 30 + 30 = 90.)
Mark the armhole depth. On each side edge, count 14 (16, 18) rows down from the top edge and place a marker. That point is 7 (8, 9) inches below the shoulder line (14 ÷ 2 = 7; 16 ÷ 2 = 8; 18 ÷ 2 = 9). The sleeve ends here. The side seam starts here.
Front (make 2)
Chain 34 (40, 46).
Row 1 (RS): Hdc in the 2nd ch from the hook and in each ch across. — 33 (39, 45) hdc.
(34 − 1 = 33; 40 − 1 = 39; 46 − 1 = 45.)
Mark the right side.
Row 2: Ch 2 (does not count as a st), turn, hdc in each hdc across. — 33 (39, 45) hdc.
Repeat Row 2 until you have 30 (32, 34) rows, the same number as the Back. Piece measures 15 (16, 17) inches long and 11 (13, 15) inches wide (33 ÷ 3 = 11; 39 ÷ 3 = 13; 45 ÷ 3 = 15).
Fasten off, leaving a 18-inch tail on each Front for the shoulder seam.
Mark each Front before seaming. The two long edges are not the same.
- Outer edge: the long edge that will line up with the side of the Back and meet the sleeve. Mark the top corner of this edge with a locking marker on both Fronts now.
- Center-front edge: the opposite long edge. This becomes the front opening. Do not seam it.
On the last row, start at the outer top corner and count in 18 (24, 30) stitches. Place a marker. Those 18 (24, 30) stitches are the shoulder seam. The remaining 15 stitches (5 inches) between the marker and the center-front edge are the front neck. Do not seam them.
(18 + 15 = 33; 24 + 15 = 39; 30 + 15 = 45.)
On the outer edge only, count 14 (16, 18) rows down from the top and place a marker. This matches the Back armhole marker. Do not put this marker on the center-front edge.
Sleeve (make 2)
The foundation edge is the cuff. The last row is the top edge, and it is sewn to the body. Width does not change. Do not taper.
Chain 43 (49, 55).
Row 1 (RS): Hdc in the 2nd ch from the hook and in each ch across. — 42 (48, 54) hdc.
(43 − 1 = 42; 49 − 1 = 48; 55 − 1 = 54.)
Mark the right side.
Row 2: Ch 2 (does not count as a st), turn, hdc in each hdc across. — 42 (48, 54) hdc.
Repeat Row 2 until you have 24 (26, 28) rows.
Piece measures 12 (13, 14) inches / 30.5 (33, 35.5) cm long and 14 (16, 18) inches / 35.5 (40.5, 45.5) cm wide.
(24 ÷ 2 = 12; 26 ÷ 2 = 13; 28 ÷ 2 = 14. And 42 ÷ 3 = 14; 48 ÷ 3 = 16; 54 ÷ 3 = 18.)
Fasten off, leaving a 30-inch tail for sewing the sleeve to the body.
Fold the last row in half and mark the center stitch. This center will sit on the shoulder seam.
Assembly
Use the long tails where you can. When you need a new length, cut about 24 inches and weave in the start after the seam is done. Hold pieces with right sides together so the seam sits on the inside. Do not pull the sewing yarn tight enough to pucker the fabric.
Whipstitch: Insert the needle under both loops of one stitch on each piece, draw the yarn through, and move to the next pair. Keep the seam even.
1. Shoulder seams
Take one Front. Hold it to the Back, right sides together, outer corners matched. The center-front edge points toward the back neck, not toward the side.
Whipstitch only from the outer corner to the shoulder marker: 18 (24, 30) stitches on the Front to 18 (24, 30) stitches on the Back. One stitch to one stitch.
Stop at the markers. The 15 front-neck stitches and the 30 back-neck stitches stay open.
Repeat on the other side with the second Front.
Check before you fasten off each seam: 15 Front stitches and the full 30-stitch back neck are still free. If they are not, you have seamed too far. Unpick and recount.
2. Set in the sleeves
The sleeve meets the body at a right angle. There is no sleeve cap.
Fold a Sleeve, right sides together is not required yet — first find the markers. Pin the center marker of the Sleeve’s last row to the shoulder seam.
Pin each end of the Sleeve’s last row to the armhole-depth markers: one marker is 14 (16, 18) rows down the Back, the other is 14 (16, 18) rows down the Front. The body edge between those markers is 7 + 7 = 14 inches on S/M, 8 + 8 = 16 inches on L/XL, and 9 + 9 = 18 inches on 2XL/3XL. That matches the sleeve width exactly.
With right sides together, whipstitch the sleeve top to the body between the markers.
Ease the sleeve evenly. The ratio is 3 sleeve stitches for every 2 body rows:
- S/M: 42 sleeve sts to 28 rows (14 back + 14 front). 42 ÷ 28 = 1.5.
- L/XL: 48 sleeve sts to 32 rows. 48 ÷ 32 = 1.5.
- 2XL/3XL: 54 sleeve sts to 36 rows. 54 ÷ 36 = 1.5.
Pin at the center and at the quarter points before you sew, so the ease does not pile up in one spot. Do not try to match one stitch to one row.
Repeat for the second sleeve.
3. Side and sleeve underside seams
With right sides together, start at the hem and whipstitch the Front outer edge to the Back side edge, up to the armhole markers. That seam is 16 rows / 8 inches on every size (30 − 14 = 16; 32 − 16 = 16; 34 − 18 = 16).
Continue in the same seam along the Sleeve’s long edges, from the underarm to the cuff. Match row to row. The sleeve underside is 24 (26, 28) rows, 12 (13, 14) inches.
Repeat on the other side.
Weave in seam ends that will not be covered by edging.
Edging
Edging is single crochet. Work it after the seams so the seam ends are enclosed.
Along row-end edges, work 3 sc for every 2 rows unless a different count is given. A simple repeat is: 2 sc in the next row-end, 1 sc in the following row-end. If the edge pulls in, add a stitch. If it ripples, skip a row-end. The published counts are the target for a flat edge.
Front and neck edging
The edging is symmetrical. Join at either lower front corner.
Row 1 (RS): Join with a sl st in the bottom corner stitch of one Front. Ch 1. Work 45 (48, 51) sc evenly up that front edge (3 sc for every 2 row-ends; 30 × 3/2 = 45; 32 × 3/2 = 48; 34 × 3/2 = 51). Work 3 sc in the neckline corner. Work 15 sc across the front neckline stitches, 30 sc across the back neckline stitches, and 15 sc across the other front neckline. Work 3 sc in the next neckline corner. Work 45 (48, 51) sc evenly down the other front edge, ending in the bottom corner stitch. — 156 (162, 168) sc.
(45 + 3 + 15 + 30 + 15 + 3 + 45 = 156; 48 + 3 + 15 + 30 + 15 + 3 + 48 = 162; 51 + 3 + 15 + 30 + 15 + 3 + 51 = 168.)
The two bottom corner stitches are now part of this edging. Do not work them again when you edge the hem.
Row 2 (WS): Ch 1, turn, sc in each sc across. Do not add stitches at the corners. The 3-sc corners from Row 1 are enough to turn the neckline. — 156 (162, 168) sc.
Row 3 (RS): Ch 1, turn, sc in each sc across. Fasten off. — 156 (162, 168) sc.
Hem edging
With RS facing, join at one side seam on the hem.
Round 1: Ch 1. Sc in each hem stitch of both Fronts and the Back, except the two bottom corner stitches already used by the front edging. At each of those two corners, work 3 sc across the end of the front edging so there is no gap. Join with a sl st to the first sc. Do not turn. — 136 (160, 184) sc.
(Body hem is 66 + 33 + 33 = 132, or 78 + 39 + 39 = 156, or 90 + 45 + 45 = 180. Then 132 − 2 + 6 = 136; 156 − 2 + 6 = 160; 180 − 2 + 6 = 184.)
Round 2: Ch 1, sc in each sc around, join. Fasten off. — 136 (160, 184) sc.
Cuff edging (each sleeve)
With RS facing, join at the underarm seam on the cuff (the foundation edge).
Round 1: Ch 1. Work 1 sc into the base of each Row 1 hdc around. Join with a sl st to the first sc. Do not turn. — 42 (48, 54) sc.
Round 2: Ch 1, sc in each sc around, join. Fasten off. — 42 (48, 54) sc.
The cuff stays the same width as the upper sleeve. Do not decrease.
Optional Closures
The shrug is complete without a closure. Use one of these, or neither.
Ties
Make 2. Chain until the chain measures 16 inches (40.5 cm). Sl st in the 2nd ch from the hook and in each ch back to the start. Fasten off, leaving an 8-inch tail.
Sew one tie to each neckline corner, on the wrong side of the edging, so the sewn end is hidden. Tie in a soft bow, or leave them undone.
For a lower tie, sew them to the front edges about 8 inches below the neckline instead.
Single button
Join yarn at one neckline corner, ch 8, and sl st back into the same stitch to form a loop. Fasten off. Sew the button on the opposite neckline corner. A 1-inch button fits a ch-8 loop on this gauge. Test the loop around the button before you weave in the end, and add or remove chains if the button is larger or smaller.
Finishing
Weave in every end.
Block. Wet-block cotton and bamboo. Steam-block wool blends and acrylic, without pressing the iron onto the stitches. Pin to the finished measurements: back width 22 (26, 30) inches, length 15 (16, 17) inches, sleeve width 14 (16, 18) inches, sleeve length 12 (13, 14) inches. Blocking opens the hdc fabric and evens the seams. Let the piece dry completely before you unpin it.
Follow the care instructions on your yarn label.
Customization
Hip-length cardigan. Work the Back and both Fronts until they measure 22 (23, 24) inches, instead of 15 (16, 17) inches. Keep the sleeve attachment at the top 7 (8, 9) inches only. The extra length becomes side seam. Buy extra yarn: about 300 (360, 430) yards more.
Shorter shrug. Stop the Back and both Fronts at 12 inches (24 rows). Sleeve attachment stays 7 (8, 9) inches, so the side seam becomes 5 (4, 3) inches. Do not make the body shorter than the armhole drop.
Full-length sleeves. Work each Sleeve until it measures 17 (18, 18) inches, or until it reaches your wrist when the dropped shoulder is taken into account. Width stays 42 (48, 54) stitches. Buy about 150 (180, 220) yards more.
Elbow sleeves. Stop each Sleeve at 9 (10, 10) inches.
Stripes. Change color every 2 or 4 rows. Cut yarn at each change and weave in the ends, or carry the unused color loosely up the side if the stripes are only 2 rows apart. Keep the same stitch count.
No edging. The fabric will not unravel if fastened off correctly, but the fronts will curl slightly. The two rounds of sc are what keep the opening flat.
Stitch-Count Check
Use this after the pieces are crocheted and before you seam.
| Piece | Stitches | Rows | Measures |
|---|---|---|---|
| Back | 66 (78, 90) | 30 (32, 34) | 22 × 15 (26 × 16, 30 × 17) in |
| Front (each) | 33 (39, 45) | 30 (32, 34) | 11 × 15 (13 × 16, 15 × 17) in |
| Sleeve (each) | 42 (48, 54) | 24 (26, 28) | 14 × 12 (16 × 13, 18 × 14) in |
| Shoulder seam | 18 (24, 30) each side | — | 6 (8, 10) in |
| Back neck, left open | 30 | — | 10 in |
| Front neck, left open | 15 each front | — | 5 in |
| Armhole, each side of shoulder | 14 (16, 18) rows | — | 7 (8, 9) in |
| Side seam | 16 rows | — | 8 in |
Finished bust, fronts meeting: 22 + 11 + 11 = 44; 26 + 13 + 13 = 52; 30 + 15 + 15 = 60 inches.
Disclaimer: This pattern was generated by AI and should be reviewed for accuracy before use. While we strive for quality, AI-generated content may contain errors. Please verify measurements, stitch counts, charts, and instructions before beginning your project. Generated by purlJam.uk
Love this pattern?
Save this pattern to your free PurlJam libraryAccess your pattern anytime
Bookmark this page to access your pattern anytime