Type
Crochet
Difficulty
beginner
Category
kimono
AI Thinking Process
Planning
Verification
Pattern
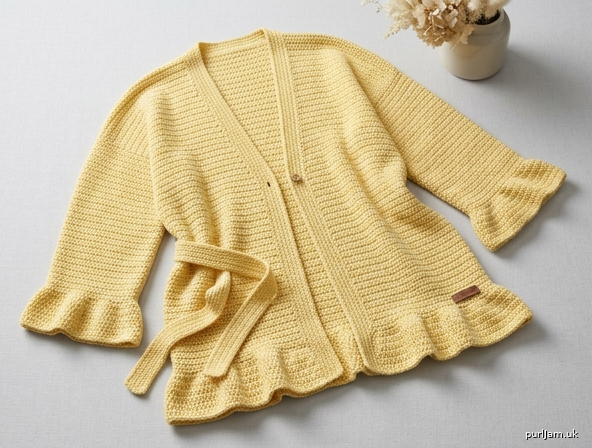
Easy Rectangle Flounce Cardigan
Butter Yellow • Sizes XS–2XL • Beginner
An oversized, open-front kimono cardigan built from five simple rectangles. There is no armhole shaping, no waist shaping, and no sleeve taper — just half double crochet worked even, seamed into a T, then finished with a tidy single-crochet border and a soft flounce at the hem and cuffs. Designed in worsted cotton in butter yellow for a light, drapey layer.
Difficulty
Beginner. Skills used: chain, half double crochet, single crochet, double crochet, slip stitch, seaming with a yarn needle.
Sizes
XS (S, M, L, XL, 2XL)
To fit bust: 28–30 (32–34, 36–38, 40–42, 44–46, 48–50)" / 71–76 (81–86, 91–97, 102–107, 112–117, 122–127) cm
Designed with approximately 8–10" (20.5–25.5 cm) of positive ease. Choose the size whose finished bust is 8–10" (20.5–25.5 cm) larger than your actual bust, or size up for a roomier drape.
Shown in parentheses throughout: XS (S, M, L, XL, 2XL). When only one number is given, it applies to all sizes.
Finished Measurements
| XS | S | M | L | XL | 2XL | |
|---|---|---|---|---|---|---|
| Bust (fronts meeting) | 38¼" (97 cm) | 42¼" (107.5 cm) | 46¼" (117.5 cm) | 50¼" (127.5 cm) | 54¼" (138 cm) | 58¼" (148 cm) |
| Back width | 19" (48.5 cm) | 21" (53.5 cm) | 23" (58.5 cm) | 25" (63.5 cm) | 27" (68.5 cm) | 29" (73.5 cm) |
| Front width (each) | 9¾" (25 cm) | 10¾" (27.5 cm) | 11¾" (30 cm) | 12¾" (32.5 cm) | 13¾" (35 cm) | 14¾" (37.5 cm) |
| Body length (shoulder to hem, before flounce) | 26" (66 cm) | 27" (68.5 cm) | 28" (71 cm) | 29" (73.5 cm) | 30" (76 cm) | 31" (78.5 cm) |
| Sleeve length (dropped shoulder to cuff, before flounce) | 15" (38 cm) | 15" (38 cm) | 16" (40.5 cm) | 16" (40.5 cm) | 17" (43 cm) | 17" (43 cm) |
| Sleeve circumference | 18" (45.5 cm) | 19" (48.5 cm) | 20" (51 cm) | 21" (53.5 cm) | 22" (56 cm) | 24" (61 cm) |
| Shoulder seam | 5" (12.5 cm) | 5½" (14 cm) | 6" (15 cm) | 6½" (16.5 cm) | 7" (18 cm) | 7½" (19 cm) |
| Armhole depth | 9" (23 cm) | 9½" (24 cm) | 10" (25.5 cm) | 10½" (26.5 cm) | 11" (28 cm) | 12" (30.5 cm) |
The flounce adds about 2" (5 cm) of ruffled depth at the hem and cuffs; it does not add full extra length because it gathers.
Materials
Yarn: Worsted weight (Category 4) cotton yarn, about 185 yd (169 m) per 3.5 oz (100 g) skein, in butter yellow.
Yardage: 1,350 (1,500, 1,700, 1,900, 2,150, 2,450) yd / 1,235 (1,370, 1,555, 1,740, 1,965, 2,240) m
Skeins (at 185 yd / 169 m each): 8 (9, 10, 11, 12, 14)
Suggested yarns: Lion Brand 24/7 Cotton (Lemon, Buttercream, or similar), WeCrochet Dishie, or any smooth worsted cotton with similar yardage. Cotton (or cotton blends with bamboo, Tencel, or silk) drapes best. Avoid stiff 100% acrylic if you want a soft fall.
Buy one extra skein if your gauge runs tight or you want a longer body or fuller flounce.
Hook: US J/10 (6 mm), or size needed to obtain gauge. Optional: US K/10.5 (6.5 mm) for the foundation chain only, so the hem is not tight.
Notions:
- Yarn needle
- Scissors
- Stitch markers (at least 4)
- Measuring tape
- Pins or locking markers for seaming
Gauge
12 hdc and 10 rows = 4" (10 cm) in half double crochet, after light wet blocking.
Swatch at least 6" (15 cm) square, block it, then measure the center 4" (10 cm).
- Stitch gauge: 3 hdc = 1" (2.5 cm)
- Row gauge: 2.5 rows = 1" (2.5 cm)
This pattern is oversized, so a small gauge difference will not ruin the fit, but it will change yarn usage and length. If you have too many stitches per 4" (10 cm), go up a hook size. If you have too few, go down a hook size. Cotton fabric relaxes after blocking — measure the blocked swatch.
Abbreviations (US terms)
- ch — chain
- dc — double crochet
- hdc — half double crochet
- rep — repeat
- rnd(s) — round(s)
- RS — right side
- sc — single crochet
- sk — skip
- sl st — slip stitch
- st(s) — stitch(es)
- WS — wrong side
- yo — yarn over
Pattern Notes
- Use US crochet terms throughout.
- The cardigan is worked flat, in rows, turning at the end of every row.
- Turning chain: Ch 1 at the start of every hdc row. This chain does not count as a stitch. Work the first hdc of the row into the first stitch (the stitch at the base of the turning chain). Work the last hdc into the last hdc of the previous row, not into the turning chain.
- Fabric is nearly reversible. After a few rows, pick the neater face as RS and mark it with a stitch marker.
- Place markers in the first and last stitch of each row for the first 8–10 rows until the edges are easy to see.
- Count stitches every 5 rows. Every body and sleeve row is worked even — the count never changes.
- Length is easy to customize: work more or fewer rows before fastening off. Keep Back and Fronts the same length. Keep both sleeves the same length.
- Cotton has little stretch and will grow slightly with blocking and wear. Do not size down thinking it will “relax into fit”; the ease is already built in.
- Construction is a T-shape. Sleeves attach at right angles to the body. Shoulders are a straight seam. There is no armhole shaping and no tapered sleeve.
Schematic (T-shape, laid flat)
                    <---- sleeve circ / 2 ---->
                    ┌─────────────────────────┐
                    │                         │  sleeve length
                    │         SLEEVE          │
                    │                         │
  front width       └────────────┬────────────┘
┌──────────────┐                 │              ┌──────────────┐
│              │                 │              │              │
│    FRONT     │      BACK       │              │    FRONT     │
│              │    back width   │              │              │
│              │                 │              │              │
│              │                 │              │              │  body length
│              │                 │              │              │
└──────────────┘                 │              └──────────────┘
     hem                     (open front)            hem

Finished garment is a T: body hangs straight; sleeves stick out from the upper sides.
Flounce is added along the hem and each cuff after seaming.
Pattern
Back
With larger hook if using two sizes, ch 58 (64, 70, 76, 82, 88). Switch to US J/10 (6 mm).
Row 1 (RS): Hdc in 2nd ch from hook and in each ch across, turn. 57 (63, 69, 75, 81, 87) hdc. (Chain 58 − 1 skipped ch = 57 hdc ✓; Chain 64 − 1 = 63 ✓; Chain 70 − 1 = 69 ✓; Chain 76 − 1 = 75 ✓; Chain 82 − 1 = 81 ✓; Chain 88 − 1 = 87 ✓.)
Row 2: Ch 1, hdc in each st across, turn. 57 (63, 69, 75, 81, 87) hdc.
Repeat Row 2 until piece measures 26 (27, 28, 29, 30, 31)" / 66 (68.5, 71, 73.5, 76, 78.5) cm from beginning, about 65 (68, 70, 73, 75, 78) rows total. (65 rows × 4" ÷ 10 rows = 26" ✓; 70 rows = 28" ✓; 75 rows = 30" ✓.)
Fasten off, leaving a 24" (61 cm) tail for one shoulder seam if you like to seam with the working yarn. Mark the RS.
Front (make 2)
The two fronts are identical rectangles. No neck shaping.
Ch 30 (33, 36, 39, 42, 45).
Row 1 (RS): Hdc in 2nd ch from hook and in each ch across, turn. 29 (32, 35, 38, 41, 44) hdc. (Chain 30 − 1 = 29 hdc ✓; Chain 33 − 1 = 32 ✓; Chain 36 − 1 = 35 ✓; Chain 39 − 1 = 38 ✓; Chain 42 − 1 = 41 ✓; Chain 45 − 1 = 44 ✓.)
Row 2: Ch 1, hdc in each st across, turn. 29 (32, 35, 38, 41, 44) hdc.
Repeat Row 2 until the Front matches the Back length: 26 (27, 28, 29, 30, 31)" / 66 (68.5, 71, 73.5, 76, 78.5) cm, about 65 (68, 70, 73, 75, 78) rows.
Fasten off. Make a second Front the same way. Mark RS on both.
Sleeves (make 2)
Sleeves are wide rectangles — the same width from cuff to shoulder. They are not tapered.
Ch 55 (58, 61, 64, 67, 73).
Row 1 (RS): Hdc in 2nd ch from hook and in each ch across, turn. 54 (57, 60, 63, 66, 72) hdc. (Chain 55 − 1 = 54 hdc ✓; Chain 58 − 1 = 57 ✓; Chain 61 − 1 = 60 ✓; Chain 64 − 1 = 63 ✓; Chain 67 − 1 = 66 ✓; Chain 73 − 1 = 72 ✓.)
Row 2: Ch 1, hdc in each st across, turn. 54 (57, 60, 63, 66, 72) hdc.
Repeat Row 2 until sleeve measures 15 (15, 16, 16, 17, 17)" / 38 (38, 40.5, 40.5, 43, 43) cm from beginning, about 38 (38, 40, 40, 42, 42) rows total. (38 rows × 4" ÷ 10 rows = 15.2" ✓; 40 rows = 16" ✓; 42 rows = 16.8" ✓.)
Fasten off. Make a second Sleeve the same way. Mark RS on both.
The 54 (57, 60, 63, 66, 72) st edges are the cuff edge and the shoulder/armhole edge. The row-end edges are the sleeve length and will be seamed together as the underarm.
Assembly
Weave in any mid-piece ends now so they are not trapped in seams. Leave long tails at corners if you plan to use them for seaming. Pin with RS together for whip stitch or mattress stitch, unless you prefer a slip-stitch seam worked from the WS.
1. Shoulder seams
Lay Back flat, RS up. Place Fronts RS down on top of the Back, aligning the outer top corners (the side edges of the Fronts with the side edges of the Back). The two Fronts do not meet in the center — a neck opening must remain.
On each side, seam only the outer 15 (17, 18, 20, 21, 23) sts of the Front to the matching outer stitches of the Back. (15 sts ÷ 3 sts per inch = 5" ✓; 18 sts = 6" ✓; 21 sts = 7" ✓.)
Do not seam the inner stitches. Unseamed stitches at the center of the Back, plus the inner top of each Front, form the neck.
After both shoulders:
- Back neck left open: 27 (29, 33, 35, 39, 41) sts = about 9 (9¾, 11, 11¾, 13, 13¾)" / 23 (25, 28, 30, 33, 35) cm. (XS: 57 − 15 − 15 = 27 sts ✓; S: 63 − 17 − 17 = 29 ✓; M: 69 − 18 − 18 = 33 ✓; L: 75 − 20 − 20 = 35 ✓; XL: 81 − 21 − 21 = 39 ✓; 2XL: 87 − 23 − 23 = 41 ✓.)
2. Attach the sleeves (T-shape)
Work one sleeve at a time.
Find the shoulder seam. Fold one Sleeve in half lengthwise to mark its center stitch with a marker. Pin that center to the shoulder seam, RS together, so the sleeve sits perpendicular to the body (the T).
Spread the Sleeve along the body side edges: half toward the Back, half toward the Front. Pin the full 54 (57, 60, 63, 66, 72) st edge of the Sleeve to the body.
- About 27 (28, 30, 31, 33, 36) sts on the Back
- About 27 (29, 30, 32, 33, 36) sts on the Front
(Half of 54 = 27 + 27 ✓; half of 60 = 30 + 30 ✓; half of 66 = 33 + 33 ✓; half of 72 = 36 + 36 ✓. Odd counts split 28/29, 31/32.)
This attachment is 9 (9½, 10, 10½, 11, 12)" / 23 (24, 25.5, 26.5, 28, 30.5) cm deep on each side of the shoulder — that is the dropped armhole. Sew this edge with mattress stitch or whip stitch. Repeat for the second Sleeve.
3. Side seams and sleeve seams
Starting at the hem, sew the Front to the Back along the side, stopping when you reach the underarm (the start of the sleeve). Then continue in one line along the Sleeve’s long edges, from underarm to cuff (or sew cuff-to-underarm if that is easier).
Side seam length is about 17 (17½, 18, 18½, 19, 19)" / 43 (44.5, 45.5, 47, 48.5, 48.5) cm. (Body length − armhole depth: 26 − 9 = 17" ✓; 28 − 10 = 18" ✓; 30 − 11 = 19" ✓; 31 − 12 = 19" ✓.)
Repeat on the other side. Turn the cardigan RS out.
Border
The border firms up the open front and neck so the cotton edges do not stretch or ripple.
Pick-up rate: Along vertical (row-end) edges, work 1 sc in each row end. Along stitch edges (back neck and unseamed front tops), work 1 sc in each st. At each of the two inner front-top corners (where the center-front edge meets the top of the Front), work 3 sc in the corner stitch so the border lies flat.
With RS facing, join yarn at the lower inner corner of the Right Front (as worn).
Border Rnd 1: Ch 1, sc evenly up the Right Front opening, 3 sc in the inner top corner, sc across the unseamed top of the Right Front, sc across the Back neck, sc across the unseamed top of the Left Front, 3 sc in the inner top corner, sc evenly down the Left Front opening. Do not work across the hem. Fasten off, or turn if you prefer to work the next row without cutting.
If you join and work as a row (not a round), turn and continue.
Border Row/Rnd 2: Ch 1, sc in each sc, working 3 sc in the center sc of each 3-sc corner. Fasten off if working as a round; turn if working as a row.
Border Row/Rnd 3: Repeat Row/Rnd 2. Fasten off.
You should have a smooth 3-row sc band along both fronts and the neck. Weave in the border ends.
Flounce
Worked in double crochet so the ruffle is soft and drapey. The increase row (2 dc in each stitch) is what creates the flounce.
Hem flounce
With RS facing, join yarn at the lower inner corner of the Left Front hem (as worn), just after the front border.
Flounce Row 1: Ch 2 (does not count as a st here; you may treat it as a turning ch only), dc in each remaining loop of the foundation chain across Left Front hem, Back hem, and Right Front hem, turn. 115 (127, 139, 151, 163, 175) dc, plus 1 extra dc at each side seam if you pick up a stitch to close any gap. (57 + 29 + 29 = 115 ✓; 63 + 32 + 32 = 127 ✓; 69 + 35 + 35 = 139 ✓; 75 + 38 + 38 = 151 ✓; 81 + 41 + 41 = 163 ✓; 87 + 44 + 44 = 175 ✓.)
If the foundation edge is awkward, pick up 1 sc per chain first, then work Row 1 as dc in each sc.
Flounce Row 2 (increase): Ch 2, 2 dc in each dc across, turn. 230 (254, 278, 302, 326, 350) dc, if you started with 115 (127, 139, 151, 163, 175). (115 × 2 = 230 ✓; 127 × 2 = 254 ✓; 139 × 2 = 278 ✓; 151 × 2 = 302 ✓; 163 × 2 = 326 ✓; 175 × 2 = 350 ✓.)
Flounce Row 3: Ch 2, dc in each dc across, turn.
Flounce Row 4 (finish): Ch 1, sc in each dc across. Fasten off.
The hem should ruffle evenly. If a section looks flat, you skipped increases; if it cups hard, extra stitches were added on Row 2.
Cuff flounce (work each sleeve)
Turn the sleeve so the cuff (foundation or last-row edge — whichever is the wrist) faces you. With RS facing, join at the sleeve seam.
Rnd 1: Ch 2, dc in each st around, sl st to first dc to join. 54 (57, 60, 63, 66, 72) dc.
Rnd 2 (increase): Ch 2, 2 dc in each dc around, sl st to first dc to join. 108 (114, 120, 126, 132, 144) dc. (54 × 2 = 108 ✓; 57 × 2 = 114 ✓; 60 × 2 = 120 ✓; 63 × 2 = 126 ✓; 66 × 2 = 132 ✓; 72 × 2 = 144 ✓.)
Rnd 3: Ch 2, dc in each dc around, sl st to first dc to join.
Rnd 4 (finish): Ch 1, sc in each dc around, sl st to first sc to join. Fasten off.
Repeat for the second cuff.
Optional Tie Belt
Ch 9.
Row 1: Hdc in 2nd ch from hook and in each ch across, turn. 8 hdc.
Row 2: Ch 1, hdc in each st across, turn.
Repeat Row 2 until belt measures about 60 (62, 64, 66, 68, 70)" / 152 (157.5, 162.5, 167.5, 173, 178) cm, or long enough to wrap and tie. Fasten off. Add a round of sc around the entire belt if you want firmer edges.
Wear the cardigan open, pinned, or wrapped with the belt.
Finishing
- Weave in every remaining end on the WS.
- Wet block. Cotton transforms with blocking. Soak in lukewarm water with a drop of wool wash or mild soap for 15–20 minutes. Press out water (do not wring). Lay flat, gently shape to the finished measurements, square the corners, and let the flounce ruffle naturally — do not stretch the flounce flat. Dry completely.
- Steam the seams lightly if they look bulky, hovering the iron; do not press the flounce.
Wear and care
Machine wash cold, gentle cycle, or hand wash. Lay flat to dry. Cotton will soften and drape more after the first wash. Store folded, not hung, so the shoulders do not stretch.
Beginner checkpoints
- After Row 1 of each piece, count stitches before you continue.
- Back stitch count never changes: 57 (63, 69, 75, 81, 87) every row.
- Front stitch count never changes: 29 (32, 35, 38, 41, 44) every row.
- Sleeve stitch count never changes: 54 (57, 60, 63, 66, 72) every row.
- If a piece gets narrower, you are skipping the first or last stitch. Marker those two stitches.
- If a piece gets wider, you are working into the turning chain. Skip that chain.
Enjoy your butter-yellow flounce cardigan.
Disclaimer: This pattern was generated by AI and should be reviewed for accuracy before use. While we strive for quality, AI-generated content may contain errors. Please verify measurements, stitch counts, charts, and instructions before beginning your project. Generated by purlJam.uk
Love this pattern?
Save this pattern to your free PurlJam libraryAccess your pattern anytime
Bookmark this page to access your pattern anytime