Type
Crochet
Difficulty
beginner
Category
kimono
AI Thinking Process
Planning
Verification
Pattern
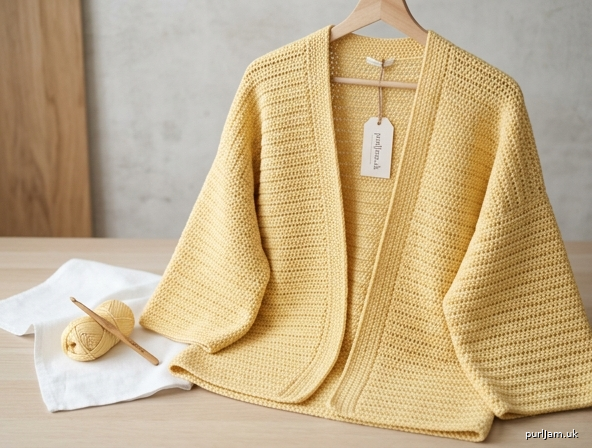
Butter Yellow Kimono-Sleeve Cardigan
An Easy Rectangle Crochet Cardigan (Beginner-Friendly)
A relaxed, boxy T-shaped cardigan made entirely from simple rectangles — no complicated shaping. The wide kimono sleeves and open front give it an effortless, drapey feel. Perfect for confident beginners: if you can chain and half double crochet, you can make this.
SKILL LEVEL
Beginner (works flat in rows; simple seaming)
SIZES
XS · S · M · L · XL · 2XL
Instructions are written for size XS, with all other sizes in parentheses: XS (S, M, L, XL, 2XL)
This is designed to be worn with 6–10 inches of positive ease (oversized fit).
Finished Measurements
| Size | Bust Circumference (open, laid flat ×2) | Body Length | Sleeve Length | Sleeve Width |
|---|---|---|---|---|
| XS | 40 in (101.5 cm) | 24 in (61 cm) | 18 in (45.5 cm) | 15 in (38 cm) |
| S | 44 in (112 cm) | 24 in (61 cm) | 18 in (45.5 cm) | 15 in (38 cm) |
| M | 48 in (122 cm) | 25 in (63.5 cm) | 18 in (45.5 cm) | 15 in (38 cm) |
| L | 52 in (132 cm) | 25 in (63.5 cm) | 18 in (45.5 cm) | 16 in (40.5 cm) |
| XL | 56 in (142 cm) | 26 in (66 cm) | 18 in (45.5 cm) | 16 in (40.5 cm) |
| 2XL | 60 in (152.5 cm) | 26 in (66 cm) | 18 in (45.5 cm) | 16 in (40.5 cm) |
Bust is measured as total garment width laid flat and doubled. As an open-front cardigan there is no set closure, so wear it as loose or overlapped as you like.
MATERIALS
- Yarn: Worsted weight (#4 medium) 100% cotton in butter yellow Recommended: a smooth, matte cotton for drape and stitch definition.
- Yardage required (approximate total):
- XS: 1200 yds (1097 m)
- S: 1300 yds (1189 m)
- M: 1450 yds (1326 m)
- L: 1600 yds (1463 m)
- XL: 1750 yds (1600 m)
- 2XL: 1900 yds (1737 m) Buy one extra skein to be safe.
- Hook: US I-9 / 5.5 mm
- Tapestry/yarn needle for seaming and weaving in ends
- Scissors
- Stitch markers (a few)
- Optional: 1 large button or toggle, or fabric for a tie belt
GAUGE
14 hdc × 10 rows = 4 in (10 cm) using 5.5 mm hook.
That works out to 3.5 sts per inch and 2.5 rows per inch.
Please make a gauge swatch — it determines the final size. Chain 20, work hdc rows until square, then measure.
ABBREVIATIONS (US Terms)
| Abbrev | Meaning |
|---|---|
| ch | chain |
| st(s) | stitch(es) |
| sc | single crochet |
| hdc | half double crochet |
| sl st | slip stitch |
| RS | right side |
| WS | wrong side |
| rep | repeat |
| sk | skip |
CONSTRUCTION OVERVIEW (Read First)
This cardigan is a simple T-shape made of 5 flat rectangles:
- Back — 1 large rectangle
- Left Front — 1 narrow rectangle
- Right Front — 1 narrow rectangle
- Sleeves — 2 wide rectangles (same width top to bottom — NOT tapered)
You seam the shoulders, attach the sleeves at right angles (dropped shoulder), seam the sides and underarms, then add a simple single crochet border. That's it!
Diagram (layout of pieces):
        [ SLEEVE ]                    [ SLEEVE ]
            |                             |
 +----------+----------+----------+-------+----+
 |  LEFT    |         BACK        |    RIGHT    |
 |  FRONT   |                     |    FRONT    |
 |          |                     |             |
 +----------+---------------------+------------+
        (open front down the center)
STITCH COUNTS PER PIECE
| Size | Back sts | Each Front sts | Body Rows | Sleeve sts | Sleeve Rows |
|---|---|---|---|---|---|
| XS | 70 | 35 | 60 | 52 | 45 |
| S | 77 | 39 | 60 | 52 | 45 |
| M | 84 | 42 | 63 | 52 | 45 |
| L | 91 | 46 | 63 | 56 | 45 |
| XL | 98 | 49 | 66 | 56 | 45 |
| 2XL | 105 | 53 | 66 | 56 | 45 |
Math check (XS): Back 70 sts ÷ 3.5 sts/in = 20 in wide. Two fronts (35 + 35 = 70 sts) = 20 in, matching the back. Length 60 rows ÷ 2.5 rows/in = 24 in. ✓
PATTERN
Note on the starting chain: Your foundation chain does NOT count as a stitch row. Ch 1 at the start of each row is a turning chain and does not count as a stitch. Work your first hdc into the first stitch.
PIECE 1 — BACK
Ch 71 (78, 85, 92, 99, 106). (That is your stitch count + 1 turning chain.)
Row 1 (RS): Working in the 2nd ch from hook, hdc across. — 70 (77, 84, 91, 98, 105) sts.
Row 2: Ch 1, turn. Hdc in each st across. — count stays the same.
Rows 3 to 60 (60, 63, 63, 66, 66): Rep Row 2.
Fasten off. This is your Back rectangle:
- Width = 20 (22, 24, 26, 28, 30) in
- Length = 24 (24, 25, 25, 26, 26) in
PIECE 2 — LEFT FRONT
Ch 36 (40, 43, 47, 50, 54).
Row 1 (RS): Hdc in 2nd ch from hook and across. — 35 (39, 42, 46, 49, 53) sts.
Row 2: Ch 1, turn. Hdc in each st across.
Rows 3 to 60 (60, 63, 63, 66, 66): Rep Row 2.
Fasten off.
PIECE 3 — RIGHT FRONT
Work exactly the same as the Left Front.
Fasten off.
Both fronts together (35 + 35 sts at XS) equal the back width, so the garment closes evenly. ✓
PIECE 4 & 5 — SLEEVES (Kimono Style — Make 2)
Kimono sleeves are wide, straight rectangles — the same width all the way up. Do not increase or decrease.
Ch 53 (53, 53, 57, 57, 57).
Row 1 (RS): Hdc in 2nd ch from hook and across. — 52 (52, 52, 56, 56, 56) sts.
Row 2: Ch 1, turn. Hdc in each st across.
Rows 3 to 45: Rep Row 2.
Fasten off.
Each sleeve measures:
- Width = 15 (15, 15, 16, 16, 16) in
- Length = 18 in
Make a second sleeve identically.
ASSEMBLY
Lay all pieces flat and block lightly with a damp cloth or steam before seaming — cotton relaxes and evens out beautifully. Use a tapestry needle and mattress stitch (or sl st seam) throughout.
Step 1 — Seam the Shoulders
Lay the Back flat (RS up). Place a Front on top of each side, RS together, aligning the top edges.
- From each outer edge, seam across the top for about 4 in (10 cm) for the shoulder.
- Leave the center open — this gap becomes the neckline.
Tip: The remaining center gap across the top of the back should be roughly 9–11 in wide for the neck opening.
Step 2 — Attach the Sleeves (Dropped Shoulder)
Open the joined body flat so the shoulder seams lie in the center (a big flat T-shape).
- Find the shoulder seam. Center the top edge of one sleeve over the shoulder seam so the sleeve hangs at a right angle to the body.
- Sew the sleeve's top edge to the body along the armhole line. The sleeve attaches to a straight edge — no armhole shaping.
- Repeat with the second sleeve on the other side.
The sleeve is 18 in long and attaches perpendicular — this creates the classic dropped kimono shoulder.
Step 3 — Seam the Sides
Fold the garment at the shoulders so fronts and back are RS together.
- Starting at the hem, seam up each side toward the underarm, stopping at the point where the sleeve begins.
Step 4 — Seam the Sleeve Undersides
Continue seaming from the underarm out to the cuff of each sleeve, closing the sleeve tube.
Step 5 — Turn Right Side Out
Turn the cardigan right side out. Try it on!
BORDER PATTERN
Worked continuously around the entire front and neck opening for a clean finish.
Round 1 (sc border): Join yarn with a sl st at the bottom right front hem corner.
- Ch 1. Work sc evenly up the right front edge, around the back neckline, and down the left front edge, ending at the left front hem.
- Work about 3 sc for every 4 rows along the vertical front edges to keep the border flat and prevent puckering.
- Work 1 sc in each st across the back neck.
- Place 3 sc in each corner (bottom front corners) to turn cleanly.
- Do not join into a round; work back and forth if you prefer, or continue around the hem for a fully bordered edge (optional).
Round 2: Ch 1, turn. Sc in each sc across. Fasten off.
Optional Cuff & Hem Edging
For a tidy finish, join yarn at a sleeve cuff and work 1 round of sc around each cuff, and 1 round of sc along the bottom hem. Fasten off.
Optional Crab Stitch (Reverse Sc) Finish
For a subtle corded edge, after your final sc round work 1 row of reverse sc (work sc backward, left to right). This adds a polished, professional look.
CLOSURE OPTIONS (Choose One)
- Worn open (no closure) — the classic kimono cardigan look.
- Single button/toggle: Sew a button to one front and use a chain loop on the other. Best placed at chest or waist height.
- Tie belt / sash: Ch a length of about 60 in, work 2 rows of hdc, and thread through the fronts or tie at the waist.
FINISHING
- Weave in all ends securely with a tapestry needle.
- Give the finished cardigan a final gentle block: lay flat, mist with water, gently pat to shape, and let dry fully. Cotton opens up its drape beautifully when blocked.
- Enjoy your butter yellow kimono cardigan!
QUICK REFERENCE — WHAT EACH PIECE SHOULD MEASURE (XS)
| Piece | Width | Length |
|---|---|---|
| Back | 20 in | 24 in |
| Left Front | 10 in | 24 in |
| Right Front | 10 in | 24 in |
| Sleeve (×2) | 15 in | 18 in |
Final math check: Back (20 in) = Left Front (10 in) + Right Front (10 in). Bust laid flat = 20 in front + 20 in back... measured as a tube = 40 in circumference. ✓
Happy crocheting! 🧶💛
Disclaimer: This pattern was generated by AI and should be reviewed for accuracy before use. While we strive for quality, AI-generated content may contain errors. Please verify measurements, stitch counts, and instructions before beginning your project. Generated by purlJam.uk
Access your pattern anytime
Bookmark this page to access your pattern anytime