Type
Crochet
Difficulty
beginner
Category
kimono
AI Thinking Process
Planning
Verification
Pattern
Slouchy Crochet Kimono Cardigan
Salaş Tığ İşi Kimono Hırka
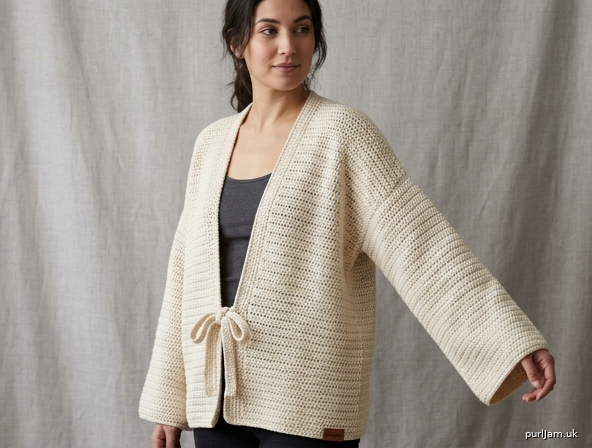
A relaxed, open-front kimono worked entirely in crochet (tığ işi) — not on knitting needles. It is a simple T-shape: rectangles only, dropped shoulders, wide straight sleeves, and no waist shaping. The oversized fit is the style. Wear it open, or add the optional ties.
Skill level: Beginner (chain, half double crochet, single crochet, and straight seams)
Sizes: S/M (L/XL, 2XL/3XL) Instructions are written for S/M, with L/XL and 2XL/3XL in parentheses. When only one number is given, it applies to all sizes.
To fit bust: 32–38 (40–46, 48–56)" / 81–96.5 (101.5–117, 122–142) cm Positive ease: about 10–16 (10–16, 8–16)" / 25–40.5 (25–40.5, 20.5–40.5) cm. This ease is intentional.
Finished Measurements
| S/M | L/XL | 2XL/3XL | |
|---|---|---|---|
| Finished bust (fronts meeting) | 48" (122 cm) | 56" (142 cm) | 64" (162.5 cm) |
| Back width | 24" (61 cm) | 28" (71 cm) | 32" (81.5 cm) |
| Each front width | 12" (30.5 cm) | 14" (35.5 cm) | 16" (40.5 cm) |
| Body length | 26" (66 cm) | 27" (68.5 cm) | 28" (71 cm) |
| Armhole depth (dropped) | 9" (23 cm) | 10" (25.5 cm) | 11" (28 cm) |
| Side seam | 17" (43 cm) | 17" (43 cm) | 17" (43 cm) |
| Sleeve length | 17" (43 cm) | 17.5" (44.5 cm) | 18" (45.5 cm) |
| Sleeve circumference | 18" (45.5 cm) | 20" (51 cm) | 22" (56 cm) |
| Back neck width | 8" (20.5 cm) | 10" (25.5 cm) | 12" (30.5 cm) |
| Each shoulder seam | 8" (20.5 cm) | 9" (23 cm) | 10" (25.5 cm) |
Schematic (S/M shown; larger sizes scale the same way):
                 sleeve 17" long
              ___________________
             |                   |  18" around
             |      SLEEVE       |
             |___________________|
                      |
                      | sewn at a right angle
     _________________|_________________
    |  front 12"  neck     back 24"     |
    |                 |                  |  26" hem to shoulder
    |_________________|__________________|
            side seam 17"
There is no armhole curve and no sleeve taper. The sleeve sticks straight out from the side of the body.
Materials
Yarn: Worsted weight (#4). A soft fiber with some drape works best for a salaş look: cotton, bamboo, Tencel, or a soft acrylic blend. Wool blends give a warmer, more structured fabric.
Amount (approximate): 1400 (1700, 2100) yd / 1280 (1555, 1920) m That is about 7 (9, 11) skeins of 200 yd (183 m) each. Buy the same dye lot. Yardage includes edging and ties.
Hook: US J/10 (6 mm), or the size needed to obtain gauge. A hook slightly larger than the ball-band suggestion is intentional — it keeps the fabric soft and slouchy. Hdc at this gauge is still a solid fabric, not a lace fabric.
Notions:
- Yarn needle
- Stitch markers or scrap yarn
- Scissors
- Pins
- Measuring tape
Gauge
12 hdc and 8 rows = 4" (10 cm) in half double crochet, after blocking. That is 3 stitches per inch and 2 rows per inch.
Swatch: Ch 17. Hdc in the 2nd ch from the hook and in each ch across (16 hdc). Ch 1, turn, hdc in each st across. Repeat until you have 12 rows. Block the swatch. Measure the center 12 stitches and 8 rows — they must equal 4" (10 cm). If the swatch is too small, use a larger hook. If it is too large, use a smaller hook. Gauge is forgiving on an oversized kimono, but a large gauge error will change the ease and the sleeve fit.
Abbreviations (US)
- ch — chain
- hdc — half double crochet
- sc — single crochet
- sl st — slip stitch
- st(s) — stitch(es)
- RS — right side
- WS — wrong side
- rep — repeat
- approx — approximately
Notes
- This is a crochet pattern. Do not use knitting needles.
- Work flat in rows, turning at the end of every row.
- The turning ch 1 does not count as a stitch. Do not work into it on the next row. Work the first hdc into the first real stitch.
- There is no shaping. Do not decrease for armholes, shoulders, or waist. Do not increase or decrease along the sleeves.
- Shoulders are straight horizontal seams. Sleeves are the same width from top to cuff.
- The dropped shoulder is created by the wide body and the deep, straight armhole — not by short rows or decreases.
- Count your stitches at the end of every few rows. Each row of a piece must have the same number as Row 1.
- Block the pieces to the finished measurements before seaming. Crochet relaxes and evens out in blocking; this is what gives the salaş drape.
- Seams may be mattress stitch (neatest) or a slip-stitch seam with the hook. Hold RS together for a slip-stitch seam so the seam sits on the WS.
Back
Ch 73 (85, 97).
Row 1 (RS): Hdc in the 2nd ch from the hook and in each ch across. — 72 (84, 96) hdc (73 − 1 = 72; 85 − 1 = 84; 97 − 1 = 96 ✓).
Row 2: Ch 1, turn. Hdc in each st across. — 72 (84, 96) hdc.
Repeat Row 2 until you have 52 (54, 56) rows, or until the piece measures 26 (27, 28)" / 66 (68.5, 71) cm from the foundation edge. At 2 rows per inch: 52 ÷ 2 = 26; 54 ÷ 2 = 27; 56 ÷ 2 = 28 ✓.
Fasten off. Width should be 24 (28, 32)" / 61 (71, 81.5) cm (72 ÷ 3 = 24; 84 ÷ 3 = 28; 96 ÷ 3 = 32 ✓).
Front (make 2)
Ch 37 (43, 49).
Row 1 (RS): Hdc in the 2nd ch from the hook and in each ch across. — 36 (42, 48) hdc (37 − 1 = 36; 43 − 1 = 42; 49 − 1 = 48 ✓). Each front is half the back: 72 ÷ 2 = 36; 84 ÷ 2 = 42; 96 ÷ 2 = 48 ✓.
Row 2: Ch 1, turn. Hdc in each st across. — 36 (42, 48) hdc.
Repeat Row 2 until you have 52 (54, 56) rows, the same number and the same length as the Back: 26 (27, 28)" / 66 (68.5, 71) cm.
Fasten off. Width should be 12 (14, 16)" / 30.5 (35.5, 40.5) cm.
Make the second front the same. The two fronts are identical; there is no left/right shaping.
Sleeve (make 2)
Sleeves are rectangles. Do not taper them.
Ch 55 (61, 67).
Row 1 (RS): Hdc in the 2nd ch from the hook and in each ch across. — 54 (60, 66) hdc (55 − 1 = 54; 61 − 1 = 60; 67 − 1 = 66 ✓).
Row 2: Ch 1, turn. Hdc in each st across. — 54 (60, 66) hdc.
Repeat Row 2 until you have 34 (35, 36) rows, or until the piece measures 17 (17.5, 18)" / 43 (44.5, 45.5) cm. At 2 rows per inch: 34 ÷ 2 = 17; 35 ÷ 2 = 17.5; 36 ÷ 2 = 18 ✓.
Fasten off. Width (sleeve circumference) should be 18 (20, 22)" / 45.5 (51, 56) cm (54 ÷ 3 = 18; 60 ÷ 3 = 20; 66 ÷ 3 = 22 ✓).
This width is exactly twice the armhole depth: 9 + 9 = 18; 10 + 10 = 20; 11 + 11 = 22 ✓. That is what lets the sleeve sit at a right angle with no armhole shaping.
Make the second sleeve the same.
Assembly
Block every piece to the measurements above before you sew. Pin and let dry.
1. Shoulder seams
Lay the Back RS up. Place one Front on each side of the Back, RS together, matching the top corners.
Seam 24 (27, 30) stitches at each outer end of the Back to the outer 24 (27, 30) stitches of each Front. These are straight horizontal seams.
Leave the center 24 (30, 36) stitches of the Back unsewn for the back neck. Leave the inner 12 (15, 18) stitches of each Front unsewn for the front neck.
Check: 24 + 24 + 24 = 72; 27 + 30 + 27 = 84; 30 + 36 + 30 = 96 ✓. Front check: 24 + 12 = 36; 27 + 15 = 42; 30 + 18 = 48 ✓.
In inches, each shoulder is 8 (9, 10)" and the back neck is 8 (10, 12)".
2. Mark the armholes
On the side edge of the Back, measure 9 (10, 11)" / 23 (25.5, 28) cm down from the shoulder seam and place a marker. Do the same on each Front side edge.
The unseamed side below the marker is the side seam: 26 − 9 = 17"; 27 − 10 = 17"; 28 − 11 = 17" ✓. All sizes have a 17" (43 cm) side seam.
3. Set in the sleeves (T-shape)
Take one sleeve. Find the center of the foundation-chain edge (the 54 (60, 66)-st edge, 18 (20, 22)" long). Pin that center to the shoulder seam, RS together.
Pin the rest of that edge along the armhole: half onto the Back, from shoulder seam down to the marker, and half onto the Front, from shoulder seam down to the marker.
The lengths match even though the stitch counts do not. The sleeve edge is 54 (60, 66) stitches over 18 (20, 22)". The armhole is 18 (20, 22) rows on the Back plus 18 (20, 22) rows on the Front = 36 (40, 44) rows over the same 18 (20, 22)". Ease 3 sleeve stitches into every 2 rows (54:36 = 60:40 = 66:44 = 3:2 ✓). Pin every 2" (5 cm) so the ease stays even. Do not gather tightly — the edge should lie flat.
Sew. Repeat for the second sleeve. The sleeves now stick straight out to the sides. That is the kimono T.
4. Side and underarm seams
Fold the garment at the shoulders so each Front lies on the Back, RS together. Match the underarm (where the sleeve meets the marker).
Sew each side from the hem up to the armhole marker. Then sew each sleeve from the underarm down to the cuff along the long edges. The underarm seam and the side seam should meet in one continuous line.
Turn RS out.
Front and Neck Edging
With RS facing, join yarn at the bottom corner of one Front.
Edging Row 1 (RS): Sc evenly up the front edge, working 1 sc in each row end — 52 (54, 56) sc. At the corner where the front edge turns onto the neck, work 3 sc in the corner stitch. Sc in each unseamed front-neck stitch — 12 (15, 18) sc. Sc in each back-neck stitch — 24 (30, 36) sc. Sc in each remaining front-neck stitch — 12 (15, 18) sc. Work 3 sc in the second front-neck corner. Sc down the other front edge, 1 sc in each row end — 52 (54, 56) sc.
Target count, including 2 extra stitches at each of the 2 corners (the 3rd sc is the corner itself, already standing in for the junction):
- S/M: 52 + 52 + 12 + 24 + 12 + 4 = 156 sc ✓
- L/XL: 54 + 54 + 15 + 30 + 15 + 4 = 172 sc ✓
- 2XL/3XL: 56 + 56 + 18 + 36 + 18 + 4 = 188 sc ✓
A difference of 1–2 stitches is fine if the edge lies flat. Do not stretch the front edges to force the count.
Edging Row 2 (WS): Ch 1, turn. Sc in each sc across. Edging Row 3 (RS): Ch 1, turn. Sc in each sc across.
Fasten off. The edging is worked in rows because the front is open — do not join it into a round.
Cuffs
With RS facing, join yarn at the cuff seam.
Round 1: Sc in each stitch around the cuff edge — 54 (60, 66) sc. Join with a sl st to the first sc. (54 ÷ 3 = 18"; 60 ÷ 3 = 20"; 66 ÷ 3 = 22" ✓.)
Round 2: Ch 1. Sc in each sc around. Join with a sl st.
Fasten off. Repeat on the second cuff.
The hem is the foundation-chain edge. It does not need a separate band. Blocking will straighten it.
Ties (optional, make 2)
Skip this section if you want to wear the kimono open.
Ch 4.
Row 1: Sc in the 2nd ch from the hook and in each ch across. — 3 sc.
Row 2: Ch 1, turn. Sc in each st across. — 3 sc.
Repeat Row 2 until the tie measures 32" (81 cm). Fasten off.
Try the kimono on. Pin one end of each tie to a front edge where you like the wrap — a good starting place is 8–10" (20–25 cm) up from the hem, below the underarm. Sew them on securely. The long ends wrap across the front and tie in a bow or a simple knot.
Finishing
Weave in all ends. Wet-block or steam-block the finished kimono to the measurements in the table: bust 48 (56, 64)", length 26 (27, 28)", sleeve circumference 18 (20, 22)". Pin the front edges straight so they do not pull in. Let it dry completely before moving the pins.
Follow the care instructions on your yarn label.
Fit Check
- Fronts should hang straight and meet, or nearly meet, at the center when smoothed flat. A small gap when worn is normal and looks relaxed.
- The shoulder seam should sit several inches below your natural shoulder. That drop is correct.
- You should be able to bend your arm easily inside the 18 (20, 22)" sleeve. If the sleeve feels tight, you missed the ease when sewing it in — take that seam out and repin.
- Do not add waist shaping to “fix” the boxy fit. The box is the design.
Enjoy your salaş kimono.
Disclaimer: This pattern was generated by AI and should be reviewed for accuracy before use. While we strive for quality, AI-generated content may contain errors. Please verify measurements, stitch counts, charts, and instructions before beginning your project. Generated by purlJam.uk
Love this pattern?
Save this pattern to your free PurlJam libraryAccess your pattern anytime
Bookmark this page to access your pattern anytime