Type
Crochet
Difficulty
beginner
Category
amigurumi
AI Thinking Process
Planning
Verification
Pattern
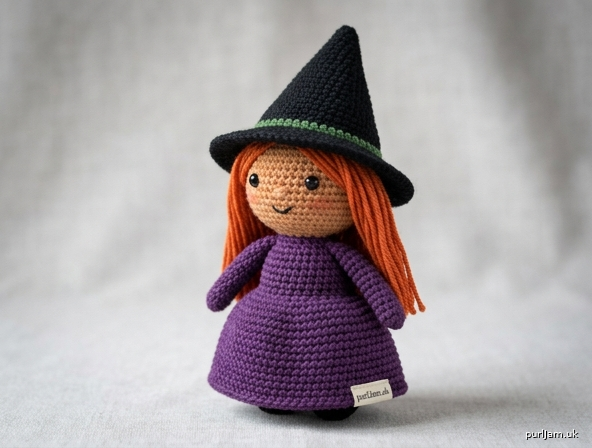
The Little Witch Doll 🧙♀️
A Beginner-Friendly Amigurumi Pattern
Meet your new spellcasting friend! This little witch is made from simple round shapes—no complicated animal assembly required. Perfect for your first character doll.
Skill Level
Beginner — uses only basic stitches (magic ring, sc, increase, decrease) and simple sewn assembly.
Finished Size
Approximately 5.5 inches (14 cm) tall including the hat, using worsted weight yarn.
Materials
- Worsted weight (4) yarn in:
- Purple or black — Dress/Body (main color, ~40 yds)
- Skin tone — Head (~25 yds)
- Black — Hat (~20 yds)
- Orange, yellow, or brown — Hair (~10 yds)
- Small amount green (optional, for a witchy accent brim/band)
- Hook: US G-6 (4.0 mm)
- Polyester fiberfill stuffing
- Yarn needle (for assembly)
- Stitch marker
- Safety eyes: two 6 mm (or embroider with black yarn)
- Small amount of black yarn or embroidery floss (mouth, optional nose)
Gauge
4 sc and 4 rounds = 1 inch (2.5 cm) in single crochet. Gauge is not critical for toys, but work tightly so stuffing doesn't show.
Abbreviations (US Terms)
- sc – single crochet
- inc – 2 sc in same stitch (increase)
- dec – invisible decrease (single crochet 2 stitches together)
- st(s) – stitch(es)
- rnd – round
- [ ] – total stitch count at end of round
Note: Work in continuous spirals (do not join rounds unless stated). Use your stitch marker to track the start of each round. Stuff firmly as you go.
PART 1 — HEAD (Skin tone yarn)
Worked as a sphere from top down.
- Rnd 1: 6 sc in magic ring [6]
- Rnd 2: inc in each st around (6 inc → 6 + 6 = 12 ✓) [12]
- Rnd 3: (sc, inc) around (6 inc → 12 + 6 = 18 ✓) [18]
- Rnd 4: (2 sc, inc) around (6 inc → 18 + 6 = 24 ✓) [24]
- Rnds 5–8: sc in each st around [24] (4 rounds)
- Insert safety eyes between Rnds 6 and 7, about 5 sts apart.
- Rnd 9: (2 sc, dec) around (6 dec → 24 − 6 = 18 ✓) [18]
- Stuff head firmly.
- Rnd 10: (sc, dec) around (6 dec → 18 − 6 = 12 ✓) [12]
- Rnd 11: dec around (6 dec → 12 − 6 = 6 ✓) [6]
Fasten off, leaving a long tail. Weave tail through remaining 6 sts and pull closed. Set aside.
PART 2 — BODY/DRESS (Purple or black yarn)
Worked as a cylinder with a rounded base.
- Rnd 1: 6 sc in magic ring [6]
- Rnd 2: inc in each st around (→ 6 + 6 = 12 ✓) [12]
- Rnd 3: (sc, inc) around (→ 12 + 6 = 18 ✓) [18]
- Rnd 4: (2 sc, inc) around (→ 18 + 6 = 24 ✓) [24]
- Rnds 5–11: sc in each st around [24] (7 rounds — this is the flared dress body)
- Rnd 12: (2 sc, dec) around (→ 24 − 6 = 18 ✓) [18]
- Stuff body firmly.
- Rnd 13: (sc, dec) around (→ 18 − 6 = 12 ✓) [12]
Fasten off, leaving a long tail for sewing the head on. Do not close the top—the small 12-st opening will attach to the head. Add more stuffing if needed.
PART 3 — ARMS (Make 2, Purple/black yarn)
Small cylinders.
- Rnd 1: 6 sc in magic ring [6]
- Rnds 2–6: sc in each st around [6] (5 rounds)
Fasten off, leaving a tail for sewing. No stuffing needed (or lightly stuff). Flatten the open end slightly for sewing.
PART 4 — HAT (Black yarn)
A cone with a flat brim. Start at the tip (top point).
Cone (top point down):
- Rnd 1: 4 sc in magic ring [4]
- Rnd 2: (sc, inc) around (2 inc → 4 + 2 = 6 ✓) [6]
- Rnd 3: sc in each st around [6]
- Rnd 4: (2 sc, inc) around (2 inc → 6 + 2 = 8 ✓) [8]
- Rnd 5: sc in each st around [8]
- Rnd 6: (3 sc, inc) around (2 inc → 8 + 2 = 10 ✓) [10]
- Rnd 7: sc in each st around [10]
- Rnd 8: (4 sc, inc) around (2 inc → 10 + 2 = 12 ✓) [12]
- Rnd 9: sc in each st around [12]
- Rnd 10: (2 sc, inc) around (4 inc → 12 + 4 = 16 ✓) [16]
- Rnd 11: sc in each st around [16]
- Rnd 12: (3 sc, inc) around (4 inc → 16 + 4 = 20 ✓) [20]
Brim (worked flat around, sharp increase):
- Rnd 13: (sc, inc) around (10 inc → 20 + 10 = 30 ✓) [30]
- Rnd 14: (4 sc, inc) around (6 inc → 30 + 6 = 36 ✓) [36]
Slip stitch to next st, fasten off, leaving a tail. Lightly stuff the pointed cone if desired (optional). The wide brim will rest flat on the head.
Optional witchy touch: With green yarn, work a single round of surface slip stitch around the base of the cone (Rnd 12/13 junction) as a hat band.
PART 5 — HAIR (Orange, yellow, or brown yarn)
Simple loop/strand hair, no crochet shape needed.
- Cut about 20–30 strands of yarn, each 3 inches (7.5 cm) long.
- Using the yarn needle, thread each strand through a stitch around the lower sides and back of the head (Rnds 5–8), fold in half, and pull through to knot (latch-hook style), OR simply sew loops directly onto the head sides so hair peeks out beneath the hat.
- Trim to your preferred length. Keep hair mainly on the sides and back, since the hat covers the top.
ASSEMBLY
Pin all pieces before sewing to check placement.
- Head to body: Position the head's closed top onto the body's 12-st opening. Using the body's long tail, sew all the way around the join. Add a little extra stuffing to the neck area before closing for a sturdy neck.
- Arms: Pin one arm to each side of the body around Rnd 10–11 (upper body). Sew the flattened open end securely to the body. Angle them slightly downward.
- Hair: Attach as described in Part 5, framing the face.
- Hat: Place the hat on top of the head, tilting slightly if you like a jaunty look. Sew the brim to the head/hair all the way around using the hat's tail. Stitch in several spots so it sits securely.
FACE & DETAILS
- Eyes: Should already be placed (safety eyes) or embroider two small black dots between Rnds 6–7.
- Mouth: With black yarn/floss, embroider a small smile 1–2 rounds below the eyes.
- Cheeks (optional): Add a touch of pink blush with cosmetic blush or a few strands of pink yarn.
- Nose (optional): A tiny stitch or French knot in a slightly darker skin tone.
FINISHING TIPS
- Work tightly so no stuffing peeks through gaps.
- Stuff as you go—it's hard to add stuffing after closing.
- Use invisible decreases for the smoothest surface, especially on the head.
- Pin before sewing to get the head straight and the arms even.
- For a firmer doll, stuff extra firmly and use a slightly smaller hook (US E-4 / 3.5 mm).
SIZE VARIATIONS
- Larger witch (~7 in): Add one more increase round to the head and body (continue to 30 sts) and add 2–3 extra even rounds to the body. Extend the hat cone with 2 more increase rounds before the brim.
- Keychain size (~3 in): Stop the head at 18 sts, the body at 18 sts, shorten the body to 4 even rounds, and skip stuffing the arms. Attach a keychain finding to the hat tip.
Enjoy your new little witch! 🧙♀️✨
Disclaimer: This pattern was generated by AI and should be reviewed for accuracy before use. While we strive for quality, AI-generated content may contain errors. Please verify measurements, stitch counts, and instructions before beginning your project. Generated by purlJam.uk
Access your pattern anytime
Bookmark this page to access your pattern anytime