Type
Crochet
Difficulty
intermediate
Category
custom
AI Thinking Process
Planning
Verification
Pattern
The Meridian Tank
A Modern Fitted V-Neck Sleeveless Tank Top
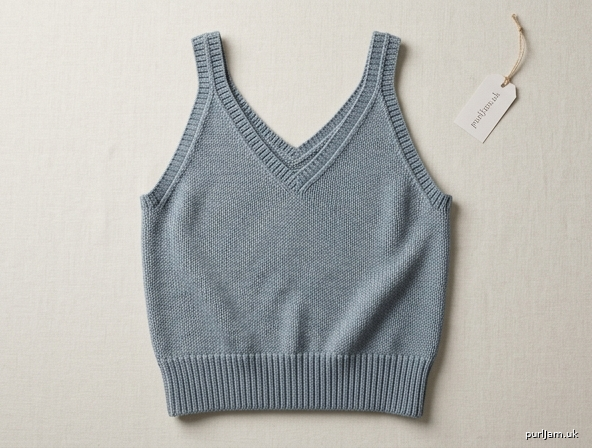
A clean, boutique-style cropped tank worked bottom-up in worsted weight cotton or cotton-blend yarn. A wide ribbed hem grounds a smooth waistcoat-stitch body that mimics knit fabric, while matching V-necklines front and back, slim 1" shoulder straps, and neat ribbed edging give it a polished finish. Slightly stretchy, comfortable, and flattering across sizes XS–5XL.
Skill Level: Easy Construction: Two flat panels (front + back), worked bottom-up, seamed at shoulders and sides, with ribbed edgings added in the round.
MATERIALS
- Yarn: Worsted weight (#4 Medium), smooth cotton or cotton-blend recommended for stitch definition and drape.
- Yardage by size (approx.):
| Size | Yardage |
|---|---|
| XS | 650 yd |
| S | 720 yd |
| M | 800 yd |
| L | 890 yd |
| XL | 980 yd |
| 2XL | 1080 yd |
| 3XL | 1180 yd |
| 4XL | 1290 yd |
| 5XL | 1400 yd |
- Hooks:
- US H-8 (5.0 mm) — main body (waistcoat stitch)
- US G-6 (4.0 mm) — ribbed hem & edgings (for a firmer, elastic rib)
- Notions: Tapestry needle, stitch markers (6–8), measuring tape.
GAUGE
- Body (waistcoat stitch), US H-8 hook: 16 sts × 18 rows = 4" × 4" (10 × 10 cm).
- Rib (hdc-BLO), US G-6 hook: 15 sts × 12 rows = 4" (relaxed); rib stretches ~30%.
Gauge is essential for fit. Make a 5" × 5" swatch in waistcoat stitch and block before beginning.
SIZES & FINISHED MEASUREMENTS
Designed with ~2" (5 cm) negative ease for a fitted look. Choose your size by finished bust ≈ your actual bust minus 2".
| Size | Finished Bust | Panel Width | Sts per Panel | Length (waist) |
|---|---|---|---|---|
| XS | 30" | 15" | 60 | 18" |
| S | 34" | 17" | 68 | 18" |
| M | 38" | 19" | 76 | 18.5" |
| L | 42" | 21" | 84 | 18.5" |
| XL | 46" | 23" | 92 | 19" |
| 2XL | 50" | 25" | 100 | 19" |
| 3XL | 54" | 27" | 108 | 19.5" |
| 4XL | 58" | 29" | 116 | 19.5" |
| 5XL | 62" | 31" | 124 | 20" |
Math check: Sts per panel ÷ 4 sts/inch = panel width. XS: 60 ÷ 4 = 15". ✓ Each size up adds 8 sts/panel = 2"/panel = 4" total bust. ✓
Instructions are written for XS with all other sizes in brackets [S, M, L, XL, 2XL, 3XL, 4XL, 5XL]. Where only one number appears, it applies to all sizes.
ABBREVIATIONS (US TERMS)
- BLO – back loop only
- ch – chain
- hdc – half double crochet
- hdc-BLO – half double crochet in back loop only (rib stitch)
- RS / WS – right side / wrong side
- rep – repeat
- sc – single crochet
- sl st – slip stitch
- sk – skip
- st(s) – stitch(es)
- tog – together
- ws – waistcoat stitch (see Special Stitches)
- ws2tog – waistcoat-stitch decrease (see Special Stitches)
SPECIAL STITCHES
Waistcoat Stitch (ws): Work a single crochet, but insert the hook into the center "V" (between the two front legs) of the sc below, rather than under the top loops. Yarn over, pull up a loop, yarn over, draw through both loops. This creates a vertical knit-like column.
Tip: Work slightly loosely; waistcoat stitch is dense. Go up a hook size if needed.
ws2tog (waistcoat decrease): Insert hook into center V of next st, yo, pull up a loop (2 loops on hook); insert into center V of following st, yo, pull up a loop (3 loops); yo, draw through all 3 loops. (Decreases 1 st.)
hdc-BLO Rib: Worked back and forth in rows through the back loop only; when the piece is turned sideways, the ridges form vertical rib.
PATTERN NOTES
- The hem is worked first as a long sideways rib strip, then the body is worked up from its long edge.
- Body is worked flat in waistcoat stitch, RS and WS rows.
- Turning chain: use ch 1 at the start of each waistcoat row; it does NOT count as a stitch.
- Two identical panels are made through the underarm; the front and back V-necks are worked the same (symmetrical front/back V).
- Stitch counts are given in parentheses at the end of rows.
- Panels are seamed at sides and shoulders; edgings are worked last in the round.
INSTRUCTIONS
PART 1 — RIBBED HEM (make 2, one per panel)
The hem is a wide rib worked sideways. Finished hem depth = 2.5".
With US G-6 hook, ch 11. (This makes a rib ~2.5" deep at 15 rows/4".)
Row 1 (RS): hdc in 3rd ch from hook and each ch across, turn. (9 hdc)
The 2 skipped ch count as the first hdc for Row 1 only.
Row 2: ch 2 (does not count as st), hdc-BLO in each st across, turn. (9 sts)
Rows 3 to end: Rep Row 2 until the rib, gently stretched to about 90% of panel width, measures the panel width for your size. Work an even number of rows so both edges match.
Target rib rows by size (unstretched hem length ≈ panel width):
| Size | Hem Rows |
|---|---|
| XS | 46 |
| S | 52 |
| M | 58 |
| L | 64 |
| XL | 70 |
| 2XL | 76 |
| 3XL | 82 |
| 4XL | 88 |
| 5XL | 94 |
Math check (XS): 46 rows ÷ 12 rows/4" = 15.3" relaxed → stretches to fit 15" panel with the body pulling it snug. ✓
Fasten off.
PART 2 — BODY PANEL (make 2 identical)
Turn the hem so its long ridged edge is at the top. With US H-8 hook and RS facing, you will pick up stitches evenly along the long edge.
Foundation Row (RS): Join yarn at right edge. sc evenly across the long edge of the hem, placing 60 [68, 76, 84, 92, 100, 108, 116, 124] sc total. Turn.
Space evenly: about 1 sc per hem row plus occasional extra to reach the target count. Use markers to divide into quarters and distribute evenly.
Stitch count: 60 [68, 76, 84, 92, 100, 108, 116, 124] sts.
Straight Body (to underarm)
Row 1 (WS): ch 1 (does not count), work 1 sc in first st, then ws in each remaining st across. Turn.
Row 1 uses sc into the foundation to establish columns; from Row 2 on, work true waistcoat stitch into the center V of the row below.
Row 2 (RS): ch 1, ws in each st across. Turn. (count unchanged)
Rows 3–48 [3–48, 3–50, 3–50, 3–52, 3–52, 3–54, 3–54, 3–56]: Rep Row 2.
Work until body measures 11" [11, 11.5, 11.5, 12, 12, 12.5, 12.5, 13"] from top of hem (including hem = ~13.5"–15.5" total to this point). This is the underarm point.
Stitch count unchanged: 60 [68, 76, 84, 92, 100, 108, 116, 124] sts.
Armhole Shaping
At the underarm, decrease each side once, then work the upper chest/V-neck.
Armhole Row 1 (RS): ch 1, sk first st, ws to last st, leave last st unworked, turn. (Decreases 2 sts total.) Count: 58 [66, 74, 82, 90, 98, 106, 114, 122] sts.
Armhole Row 2 (WS): ch 1, ws2tog, ws to last 2 sts, ws2tog, turn. Count: 56 [64, 72, 80, 88, 96, 104, 112, 120] sts.
Armhole Rows 3–4: Rep Armhole Row 2 twice more. Count after Row 3: 54 [62, 70, 78, 86, 94, 102, 110, 118] Count after Row 4: 52 [60, 68, 76, 84, 92, 100, 108, 116] sts.
Math check (XS): 60 − 2 − 2 − 2 − 2 = 52 sts. Armhole depth from these rows plus V-neck rows below = ~7". ✓
V-NECK SHAPING (front and back worked identically)
You now split the panel down the center to form the V. Each shoulder half is shaped separately.
Note current count: 52 [60, 68, 76, 84, 92, 100, 108, 116] sts. Center marker: half = 26 [30, 34, 38, 42, 46, 50, 54, 58] sts each side.
Set-up Row (RS): ch 1, ws across first 26 [30, 34, 38, 42, 46, 50, 54, 58] sts (right shoulder half as you look at RS). Turn, leaving remaining sts unworked for the second half.
Right Shoulder Half
You will decrease 1 st at the neck edge every RS row until the strap width remains.
Strap = 1" = 4 sts.
Neck decreases needed = (26 − 4) = 22 [26, 30, 34, 38, 42, 46, 50, 54] decreases.
Neck Dec Row (RS): ch 1, ws to last 2 sts at neck edge, ws2tog. Turn. (−1 st) Plain Row (WS): ch 1, ws across. Turn.
Rep these 2 rows, decreasing 1 st at the neck edge (the edge nearest center) every RS row, until 4 sts remain.
Count after all neck decreases: 4 sts.
Math check (XS): 26 sts − 22 decreases = 4 strap sts. 22 dec rows × 2 rows each ≈ 44 rows... to keep proportion, work decreases every RS row (each dec = 2 rows); if the V becomes too long for your size, see Customization to decrease every RS row but stop shaping once armhole reaches ~7" and continue straight to shoulder. For a standard fit, aim for V-neck depth of 6" measured from the neck split.
Strap: Once 4 sts remain, work even in ws for 2" [2, 2, 2, 2.5, 2.5, 2.5, 2.5, 3"] (about 9–14 rows) to reach the shoulder seam. Fasten off, leaving a 12" tail for seaming.
Left Shoulder Half
With RS facing, rejoin yarn to the innermost unworked st at center (mirror the right half).
Work as the right shoulder half, but decrease at the neck edge on the opposite side (neck edge = center side):
Neck Dec Row (RS): ch 1, ws2tog at neck edge, ws to end. Turn. (−1 st) Plain Row (WS): ch 1, ws across. Turn.
Rep until 4 sts remain, then work strap even for the same length as the right half. Fasten off, leaving a 12" tail.
Repeat entire Part 2 for the second panel (front and back are identical).
PART 3 — ASSEMBLY
- Block both panels flat to size; let dry.
- Shoulder seams: With RS together, whipstitch or mattress-stitch each front strap to the corresponding back strap (4 sts to 4 sts). Weave in.
- Side seams: With RS together, seam each side from hem to the start of the armhole shaping. Leave the armhole openings free. Use the mattress stitch through the outer loops for an invisible join.
PART 4 — RIBBED EDGINGS
Worked with US G-6 hook for firm, stretchy rib. Rib edgings are worked sideways and attached with sl st, or worked as applied hdc-BLO. Below uses a simple sc + hdc-BLO applied rib for ease.
Neckline Edging (do front and back V's — one continuous round)
Round 1 (RS): Join yarn at a shoulder seam. sc evenly around the entire neckline (down one side of the V, into the center point, up the other side, across the back V the same way). At each center V point, work sc2tog to keep the point crisp. Work a multiple that lies flat (about 3 sc per 4 rows along diagonals). Join with sl st to first sc.
Place a marker at each center V point.
Applied Rib: ch 5. Rib Row 1: hdc in 2nd ch from hook and next 3 ch (4 hdc); sl st into next 2 sc of the neckline edge; turn. Rib Row 2: sk 2 sl sts, hdc-BLO in each of 4 hdc; turn. Rib Row 3: ch 1, hdc-BLO in 4 hdc, sl st into next 2 sc of edge; turn. Rep Rib Rows 2–3 around the entire neckline, working sc2tog / a skipped st at each center V point so the rib mitres neatly and lies flat. When you reach the start, sl st the last rib row to the foundation and seam the two rib ends together. Fasten off. Weave in.
This creates a ~0.75"–1" ribbed band framing both the front and back V.
Armhole Edging (make 2, one per armhole)
Round 1 (RS): Join yarn at underarm side seam. sc evenly around the armhole opening; keep count a multiple that lies flat (about 3 sc per 4 row-ends). Join with sl st.
Applied Rib: Work the same applied hdc-BLO rib as the neckline (ch 5, 4 hdc wide), attaching with sl st into 2 sc of the armhole edge every rib row, all the way around. Join rib ends, fasten off, weave in.
Repeat for the second armhole.
FINISHING
- Weave in all remaining ends.
- Give the finished tank a final light steam-block, gently stretching the rib bands to set their elasticity.
- Try on and, if desired, tack the center V points with a discreet stitch to keep them flat.
CUSTOMIZATION TIPS
Length adjustments (body):
- Add or remove body rows before the armhole shaping. Each 4.5 rows ≈ 1".
- For a longline/regular length, add 2"–3" (9–14 rows) of straight ws body.
- For a more cropped look, remove up to 2".
Hem depth: Change the starting chain of Part 1. Every 6 chains ≈ 1" of hem depth (ch 11 ≈ 2.5"). ch 8 for a 2" hem, ch 14 for a 3" hem.
Fit / ease:
- For a relaxed fit, size up (add positive ease) or add 4–8 sts per panel.
- For extra-fitted, size down or reduce 4 sts per panel.
V-neck depth:
- Shallower V: Begin neck decreases fewer rows in and decrease faster (every row) — stop shaping sooner.
- Deeper V: Space decreases every RS row and start the split one or two rows earlier.
Strap width:
- Straps are 4 sts (1"). For 1.5" straps, keep 6 sts; for narrower, keep 3 sts. Adjust the number of neck decreases accordingly (final strap sts = panel-half sts − decreases).
Bust adjustment: Waistcoat stitch has limited vertical stretch; for a longer torso, add rows evenly rather than only at the top to keep the V-neck proportional.
Enjoy your Meridian Tank — a clean, modern layering piece with a boutique finish.
Disclaimer: This pattern was generated by AI and should be reviewed for accuracy before use. While we strive for quality, AI-generated content may contain errors. Please verify measurements, stitch counts, and instructions before beginning your project. Generated by purlJam.uk
Access your pattern anytime
Bookmark this page to access your pattern anytime