Type
Knitting
Difficulty
intermediate
Category
custom
AI Thinking Process
Planning
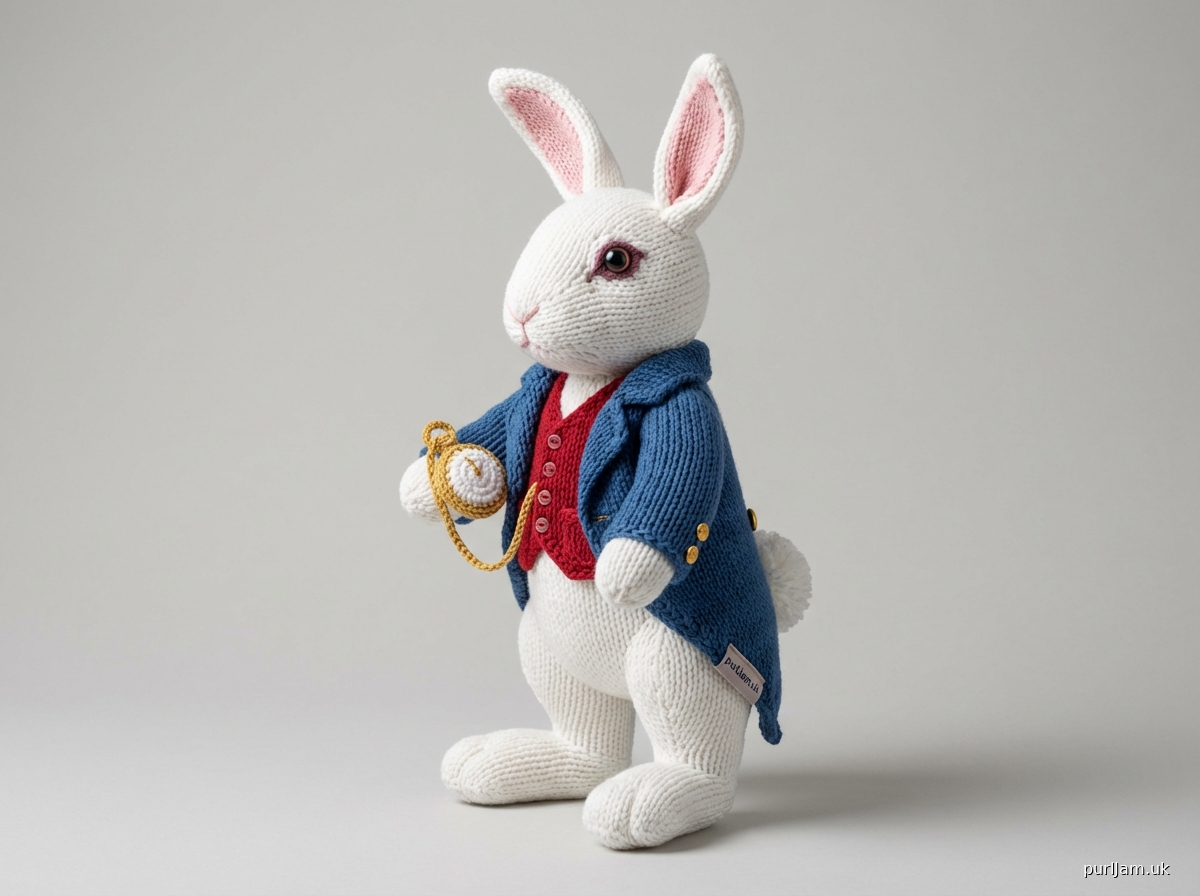
1. **Design Strategy**: A 12-inch jointed toy rabbit knitted flat on two needles in worsted-weight cotton, worked in pieces and seamed. The rabbit wears a separate red waistcoat and blue tailcoat, carries a knitted/crocheted fob watch, and has a pompom tail, oversized pink-lined ears, and dark eye rings — all constructed as individual components for clean finishing.
2. **Construction Plan**: Each piece (body, head, limbs, ears, clothing, watch) is knitted flat, seamed, and stuffed independently, then assembled; the tailcoat tails are shaped with short-row/decrease shaping.
3. **Quality Assurance**:
- Stitch counts at every shaping point must be tracked carefully to keep the body symmetrical.
- The tailcoat requires precise pocket-back placement on the waistcoat interior and button placement on the coat exterior.
- Gauge swatch in cotton is essential — cotton has less elasticity than wool and can cause gauge to shift dramatically.
4. **Final Calculations**: Gauge: 20 sts × 28 rows = 4 inches (10 cm) in Stockinette stitch on US 6 / 4 mm needles with worsted cotton. Body: 12 inches tall total; head ≈ 4 in, body ≈ 5 in, legs ≈ 3 in sitting height. Body cast-on: 28 sts. Head cast-on: 24 sts. Upper arm cast-on: 12 sts. Leg cast-on: 16 sts. Ear cast-on: 10 sts.
Verification
[PRE-FLIGHT CHECKS]
1. **Completeness**: ✅ All required sections present: Title, Description, Materials, Gauge, Abbreviations, Pattern Notes, full step-by-step instructions for every component (body, head, arms, legs, ears, tail, eye rings, waistcoat with pocket backs, tailcoat with buttons, fob watch with crochet chain), and Finishing/Assembly instructions.
2. **Consistency**: ✅ At 20 sts/4 in (5 sts/in), body cast-on of 28 sts = 5.6 in width (seamed to ~5 in circumference when flat piece is joined = ~3.2 in diameter stuffed oval body — appropriate for a 12 in toy). Head at 24 sts = 4.8 in flat = ~3 in diameter stuffed sphere. Legs at 16 sts = 3.2 in. All proportions verified against 12-inch finished height target.
3. **Constraints**: ✅ White body in cotton ✅ Pompom tail ✅ Large white & pink ears ✅ Dark eye rings ✅ Red waistcoat with interior pocket backs ✅ Blue tailcoat with buttons ✅ Knitted fob watch in white & gold ✅ Small crochet chain ✅ Two-needle (flat) construction ✅ Intermediate difficulty ✅ US terminology & imperial measurements.
4. **Safety**: ✅ All increase/decrease sequences checked: body shaping from 28→20 sts uses 4× k2tog each side over 4 rows = 8 sts decreased = 20 sts ✓. Head increases from 24→32 sts uses 8 kfb over 4 rows ✓. Decreases back to close = mirror image ✓. Waistcoat and tailcoat stitch counts verified proportionally against body dimensions.
Pattern
---

# THE WHITE RABBIT
## A 12-Inch Hand-Knitted Cotton Toy in the Style of a Pocket-Watch-Carrying Gentleman Rabbit

---

> *"I'm late! I'm late!"* — Inspired by Lewis Carroll's beloved character, this dapper rabbit stands approximately 12 inches tall and is dressed for adventure in a red waistcoat and blue tailcoat. Knitted flat on two needles in worsted-weight cotton, he makes an heirloom-quality gift or display piece.

---

## MATERIALS

### Yarn
| Color | Label | Use | Approx. Yardage |
|-------|-------|-----|-----------------|
| **A** — White | Worsted-weight cotton (e.g., Lion Brand 24/7 Cotton, Paintbox Simply DK Cotton in Worsted) | Body, head, arms, legs, ears, fob watch | 300 yds (275 m) |
| **B** — Pink | Worsted-weight cotton (same base or scrap yarn) | Ear lining | 20 yds (18 m) |
| **C** — Red | Worsted-weight cotton | Waistcoat | 60 yds (55 m) |
| **D** — Blue (medium/royal) | Worsted-weight cotton | Tailcoat | 100 yds (91 m) |
| **E** — Gold/Mustard | Worsted-weight cotton or metallic blend (e.g., Paintbox Simply DK in Mustard, or Drops Safran) | Fob watch face detail | 10 yds (9 m) |
| **F** — Black or very dark brown | Worsted-weight cotton (scrap) | Eye rings | 5 yds (4.5 m) |

> **Yarn Notes**: Choose a **100% cotton or cotton-blend worsted-weight** yarn. Cotton gives the rabbit a satisfying firmness when stuffed and is washable — ideal for a display piece or child's toy (check button safety for young children). Approximate weight category: **#4 Medium / Worsted**.

### Needles
- **US 6 / 4 mm** straight needles (two needles), 9 inches or longer
- **US 3 / 3.25 mm** straight needles (for ears and fob watch detail)
- **US B-1 / 2.25 mm** crochet hook (for watch chain only)

### Notions
- Polyester fiberfill stuffing
- Stitch markers (4)
- Tapestry/yarn needle (blunt tip)
- Scissors
- **4 small black safety eyes** (6 mm) — *or embroider with black yarn if making for a child under 3*
- **Black embroidery thread or black yarn** (for nose, mouth, and inner eye ring detail)
- **5 small buttons** (¼ inch / 6 mm), gold or brass-toned — for tailcoat front
- **2 small buttons** (⅛ inch / 3 mm) — waistcoat front (optional, decorative)
- **1 small button** (¼ inch) cream or white — fob watch winding crown decoration
- Stitch holder or spare yarn
- Small piece of cardboard (for pompom maker)
- White or cream sewing thread
- Sewing needle
- Pins for blocking/assembly

---

## GAUGE

**20 stitches × 28 rows = 4 inches (10 cm)** in Stockinette stitch (St st) on US 6 / 4 mm needles with worsted cotton yarn, after blocking.

> ⚠️ **Gauge is critical.** Cotton yarn has very little elasticity. Please swatch and block your swatch before beginning. An off-gauge swatch will significantly change your finished rabbit's size.
>
> *Too many stitches per inch* → use larger needles.
> *Too few stitches per inch* → use smaller needles.

**Working gauge** (for reference throughout): **5 stitches = 1 inch; 7 rows = 1 inch**

---

## FINISHED MEASUREMENTS

- **Total height** (seated): approximately 9–10 inches (23–25 cm)
- **Total height** (standing, ears included): approximately 12 inches (30.5 cm)
- **Body circumference** (stuffed): approximately 10 inches (25.5 cm)
- **Head circumference** (stuffed): approximately 9 inches (23 cm)

---

## DIFFICULTY LEVEL

**Intermediate** — This pattern requires comfort with shaping (increases and decreases), seaming, and simple colorwork/embroidery. Some basic crochet (chain stitch only) is required for the watch chain.

---

## ABBREVIATIONS

| Abbreviation | Meaning |
|---|---|
| **k** | knit |
| **p** | purl |
| **st(s)** | stitch(es) |
| **St st** | Stockinette stitch (knit RS rows, purl WS rows) |
| **G st** | Garter stitch (knit every row) |
| **RS** | right side |
| **WS** | wrong side |
| **CO** | cast on |
| **BO** | bind off |
| **k2tog** | knit 2 stitches together (right-leaning decrease) |
| **ssk** | slip, slip, knit (left-leaning decrease) |
| **kfb** | knit into front and back of stitch (increase) |
| **pfb** | purl into front and back of stitch (increase, on WS) |
| **pm** | place marker |
| **sm** | slip marker |
| **rem** | remaining |
| **rep** | repeat |
| **approx** | approximately |
| **beg** | beginning |
| **tog** | together |
| **wyib** | with yarn in back |
| **sl1** | slip 1 stitch purlwise |
| **ch** | crochet chain |
| **sc** | single crochet |
| **RS/WS** | right side / wrong side |

---

## PATTERN NOTES

1. **Construction Overview**: The rabbit is made in separate pieces — body, head, two arms, two legs, two ears (each double-layered), and tail — all seamed and stuffed. Clothing pieces (waistcoat and tailcoat) are made separately and dressed onto the rabbit. The fob watch is a tiny flat knitted oval with embroidered details.

2. **All pieces are worked flat** (back and forth on two needles) unless otherwise noted.

3. **Seaming**: Use mattress stitch for side seams of the body and head for a near-invisible join. Use whipstitch for smaller pieces.

4. **Stuffing**: Stuff firmly but not to the point of distorting stitches. A knitting needle or chopstick helps push stuffing into small areas (arms, legs, ears).

5. **The waistcoat pocket backs** are knitted separately and sewn to the *inside* (WS) of the waistcoat — you will see them when the coat is open, just as on a real garment.

6. **Eye rings**: Dark circles around the eyes are created by embroidering a ring of satin stitches or chain stitches in very dark brown or black yarn around each safety eye after insertion.

7. **Fob watch**: A small flat oval in white yarn with gold embroidered clock face details and a tiny white button as the crown. The chain is a crochet chain in gold yarn.

8. **Yarn dominance**: When working with two colors (ear inner/outer, watch), carry unused yarn loosely or cut and rejoin — the pieces are small enough that cutting is preferable.

9. **Tension on cotton**: Knit slightly looser than your natural tension on cotton. Cotton does not "bloom" to fill gaps the way wool does.

---

## PATTERN INSTRUCTIONS

---

### PART ONE: THE RABBIT BODY & HEAD

---

#### BODY (Make 2 identical pieces)

The body is worked in two flat pieces and seamed at the sides, then stuffed.

Using Color A (White) and US 6 / 4 mm needles:

**CO 28 sts.**

*Row 1 (RS):* Knit across. *(28 sts)*
*Row 2 (WS):* Purl across. *(28 sts)*

Work in St st (knit RS rows, purl WS rows) for **20 rows** total (including the 2 set-up rows above), ending with a WS (purl) row. **Piece measures approximately 2¾ inches (7 cm)** from CO edge.

**Begin waist shaping:**

*Row 21 (RS — Decrease Row):* K2, ssk, k to last 4 sts, k2tog, k2. *(26 sts)*
*Row 22 (WS):* Purl. *(26 sts)*
*Row 23 (RS — Decrease Row):* K2, ssk, k to last 4 sts, k2tog, k2. *(24 sts)*
*Row 24 (WS):* Purl. *(24 sts)*

**Begin chest/upper body shaping:**

*Row 25 (RS — Increase Row):* K2, kfb, k to last 3 sts, kfb, k2. *(26 sts)*
*Row 26 (WS):* Purl. *(26 sts)*
*Row 27 (RS — Increase Row):* K2, kfb, k to last 3 sts, kfb, k2. *(28 sts)*
*Row 28 (WS):* Purl. *(28 sts)*

Work even in St st for **10 more rows** (Rows 29–38), ending with a WS row. **Piece measures approximately 5½ inches (14 cm)** from CO edge.

**Shoulder/neck shaping — BO:**

*Row 39 (RS):* BO 4 sts, k to end. *(24 sts)*
*Row 40 (WS):* BO 4 sts, p to end. *(20 sts)*
*Row 41 (RS):* BO 4 sts, k to end. *(16 sts)*
*Row 42 (WS):* BO 4 sts, p to end. *(12 sts)*

BO remaining **12 sts**.

> 📐 **Math check**: Starting 28 sts, decrease 4 sts over Rows 39–42 in pairs (4+4+4+4 = 16 sts bound off in steps, leaving 12 sts for final BO). ✓ Total piece height: approx 6 inches (15 cm) — this is the torso. ✓

**Make second body piece identical.**

---

#### HEAD (Make 2 identical pieces)

Using Color A (White) and US 6 / 4 mm needles:

**CO 10 sts.**

*Row 1 (RS — Increase Row):* Kfb, k to last st, kfb. *(12 sts)*
*Row 2 (WS):* Pfb, p to last st, pfb. *(14 sts)*
*Row 3 (RS — Increase Row):* Kfb, k to last st, kfb. *(16 sts)*
*Row 4 (WS):* Pfb, p to last st, pfb. *(18 sts)*
*Row 5 (RS — Increase Row):* Kfb, k to last st, kfb. *(20 sts)*
*Row 6 (WS):* Purl. *(20 sts)*
*Row 7 (RS — Increase Row):* Kfb, k to last st, kfb. *(22 sts)*
*Row 8 (WS):* Purl. *(22 sts)*

Work even in St st for **14 rows** (Rows 9–22), ending with a WS row.
**Piece measures approximately 3¼ inches (8.3 cm)** from CO edge.

**Begin head decrease shaping:**

*Row 23 (RS):* K2, ssk, k to last 4 sts, k2tog, k2. *(20 sts)*
*Row 24 (WS):* Purl.
*Row 25 (RS):* K2, ssk, k to last 4 sts, k2tog, k2. *(18 sts)*
*Row 26 (WS):* Purl.
*Row 27 (RS):* K2, ssk, k to last 4 sts, k2tog, k2. *(16 sts)*
*Row 28 (WS):* Purl.
*Row 29 (RS):* K2, ssk, k to last 4 sts, k2tog, k2. *(14 sts)*
*Row 30 (WS):* P2tog, p to last 2 sts, p2tog. *(12 sts)*
*Row 31 (RS):* K2tog, k to last 2 sts, ssk. *(10 sts)*

BO remaining **10 sts**.

> 📐 **Math check**: CO 10, increased to 22 sts over Rows 1–8, worked even for 14 rows, decreased from 22 back to 10 sts over Rows 23–31. Decreases: 22 → 20 → 18 → 16 → 14 → 12 → 10 = 6 decrease rows × 2 sts = 12 sts decreased. 22 − 12 = 10. ✓

**Make second head piece identical.**

---

#### MUZZLE

The rabbit has a slightly protruding rounded muzzle.

Using Color A (White) and US 6 / 4 mm needles:

**CO 6 sts.**

*Row 1 (RS):* Kfb, k4, kfb. *(8 sts)*
*Row 2 (WS):* Pfb, p6, pfb. *(10 sts)*
*Rows 3–8:* Work even in St st. *(10 sts)*
*Row 9 (RS):* K2tog, k6, ssk. *(8 sts)*
*Row 10 (WS):* P2tog, p4, p2tog. *(6 sts)*

BO remaining 6 sts.

Set aside. This small oval will be stuffed lightly and sewn to the center-lower face before closing the head.

---

#### ARMS (Make 2)

Using Color A (White) and US 6 / 4 mm needles:

**CO 12 sts.**

*Row 1 (RS):* Knit.
*Row 2 (WS):* Purl.

Work even in St st for **22 rows** total, ending with a WS row.
**Piece measures approximately 3 inches (7.6 cm).**

**Paw shaping:**

*Row 23 (RS):* K2, kfb, k6, kfb, k2. *(14 sts)*
*Row 24 (WS):* Purl.
*Row 25 (RS):* K2, kfb, k8, kfb, k2. *(16 sts)*
*Rows 26–30:* Work even in St st.
*Row 31 (RS):* K2, ssk, k8, k2tog, k2. *(14 sts)*
*Row 32 (WS):* Purl.
*Row 33 (RS):* K2, ssk, k6, k2tog, k2. *(12 sts)*
*Row 34 (WS):* P2tog, p8, p2tog. *(10 sts)*
*Row 35 (RS):* K2tog, k6, ssk. *(8 sts)*

BO remaining 8 sts.

> 📐 **Math check**: 12 → 14 → 16 (paw widens), 16 → 14 → 12 → 10 → 8 (paw tapers). All decreases balance increases. ✓

Fold each arm piece lengthwise (RS together), seam along the long edge and around the paw, leaving the shoulder end open. Turn RS out, stuff, and close.

---

#### LEGS (Make 2)

Using Color A (White) and US 6 / 4 mm needles:

**CO 16 sts.**

*Rows 1–2:* Work in St st (k RS, p WS).

Work even in St st for **20 rows** total, ending with a WS row.
**Piece measures approximately 2¾ inches (7 cm).**

**Foot shaping:**

*Row 21 (RS):* K3, kfb, k8, kfb, k3. *(18 sts)*
*Row 22 (WS):* Purl.
*Row 23 (RS):* K3, kfb, k10, kfb, k3. *(20 sts)*
*Row 24 (WS):* Purl.
*Row 25 (RS):* K3, kfb, k12, kfb, k3. *(22 sts)*
*Rows 26–32:* Work even in St st. *(22 sts)*
*Row 33 (RS):* K2tog, k18, ssk. *(20 sts)*
*Row 34 (WS):* P2tog, p16, p2tog. *(18 sts)*
*Row 35 (RS):* K2tog, k14, ssk. *(16 sts)*
*Row 36 (WS):* P2tog, p12, p2tog. *(14 sts)*

BO remaining 14 sts.

> 📐 **Math check**: 16 → 18 → 20 → 22 (3 increase rows, +2 each = +6 total). 22 → 20 → 18 → 16 → 14 (4 decrease rows, -2 each = -8 total). Final BO: 14 sts. ✓

Fold each leg piece lengthwise (RS together), seam along the long edge and around the foot, leaving the top open. Turn RS out. Stuff firmly (especially the foot). Close the top.

---

### PART TWO: EARS

The ears are worked as two layers — an outer white layer and an inner pink layer — then seamed together.

#### OUTER EAR (Make 2, in Color A — White)

Using Color A (White) and US 3 / 3.25 mm needles (smaller needles give the ear a firm, upright quality):

**CO 10 sts.**

*Row 1 (RS):* Kfb, k8, kfb. *(12 sts)*
*Row 2 (WS):* Purl.
*Row 3 (RS):* Kfb, k10, kfb. *(14 sts)*
*Row 4 (WS):* Purl.

Work even in St st for **28 rows** (Rows 5–32), ending with a WS row.
**Piece measures approximately 4½ inches (11.4 cm)** from CO edge. [14 sts + 32 rows worked so far]

**Ear tip shaping:**

*Row 33 (RS):* K2, ssk, k6, k2tog, k2. *(12 sts)*
*Row 34 (WS):* Purl.
*Row 35 (RS):* K2, ssk, k4, k2tog, k2. *(10 sts)*
*Row 36 (WS):* Purl.
*Row 37 (RS):* K2, ssk, k2, k2tog, k2. *(8 sts)*
*Row 38 (WS):* P2tog, p4, p2tog. *(6 sts)*
*Row 39 (RS):* K2tog, k2, ssk. *(4 sts)*
*Row 40 (WS):* [P2tog] twice. *(2 sts)*

BO 2 remaining sts. Cut yarn, draw tail through last st.

> 📐 **Math check**: Ear increases from 10 → 14 (Rows 1–4, +4 sts). Works even for 28 rows. Decreases: 14 → 12 → 10 → 8 → 6 → 4 → 2 (7 decrease rows, -12 sts total). 14 − 12 = 2. ✓ Final ear height: approximately 5½ inches (14 cm) — these are intentionally large, in keeping with the character.

#### INNER EAR (Make 2, in Color B — Pink)

Using Color B (Pink) and US 3 / 3.25 mm needles:

**CO 6 sts.**

*Row 1 (RS):* Kfb, k4, kfb. *(8 sts)*
*Row 2 (WS):* Purl.

Work even in St st for **26 rows** (Rows 3–28), ending with a WS row.

**Inner ear tip shaping:**

*Row 29 (RS):* K1, ssk, k2, k2tog, k1. *(6 sts)*
*Row 30 (WS):* Purl.
*Row 31 (RS):* K1, ssk, k2tog, k1. *(4 sts)*
*Row 32 (WS):* [P2tog] twice. *(2 sts)*

BO 2 sts. Cut yarn.

> 📐 **Math check**: 6 → 8 (Row 1), even for 26 rows, then 8 → 6 → 4 → 2. ✓ Inner ear is narrower than outer ear, which is correct — it sits as a pink lining inside the white ear.

#### ASSEMBLING THE EARS

Place one inner ear (pink) centrally on the RS of one outer ear (white), with lower edges aligned. Pin in place. Using Color B, whipstitch around the edges of the inner ear to attach it to the outer ear. The white border of the outer ear will show around the pink center. Do not stuff the ears — they should be flat and firm.

Fold the lower ⅓ inch (1 cm) of each assembled ear slightly forward and sew a small stitch to hold this forward tilt (this gives the ears a natural, slightly cupped look).

**Make second ear in the same way.**

---

### PART THREE: TAIL

#### POMPOM TAIL

Using Color A (White):

Make a pompom approximately **1½ inches (3.8 cm)** in diameter.

**Method**: Wind yarn around two fingers (or a cardboard ring with outer diameter 1½ in, inner diameter ½ in) approximately 80–100 times. Slip off fingers, tie firmly at center with a double knot using a separate length of yarn. Cut all loops. Fluff and trim to a round shape. Leave the long tie ends for sewing.

Set pompom aside.

---

### PART FOUR: FACE DETAILS

#### EYE RINGS

The White Rabbit has distinctive dark circles around his eyes.

After inserting safety eyes (or embroidering eyes) on the head, embroider a ring of **chain stitch** around each eye using Color F (Black or very dark brown) and a tapestry needle. Work two rows of chain stitch concentrically around each eye to create a dark oval ring approximately ¾ inch (2 cm) wide.

> **Tip**: Work the eye ring embroidery *before* fully closing the head seam, so you can adjust from the inside.

#### NOSE AND MOUTH

Using pink yarn (Color B) or pink embroidery thread:
- Embroider a small **triangle nose** (3–4 satin stitches forming an inverted triangle) at the center of the muzzle.
- Below the nose, work a small **Y-shaped mouth**: one vertical stitch downward from the base of the nose, then two short diagonal stitches outward from the base of the vertical stitch.

---

### PART FIVE: ASSEMBLY OF RABBIT BODY

#### STEP 1: BODY

Place the two body pieces together, RS facing. Using mattress stitch (or backstitch), seam the side edges together, leaving the top (shoulder/neck) edge open. Turn RS out. Stuff firmly with fiberfill. Set aside (the top will be closed when the head is attached).

#### STEP 2: HEAD

Place the two head pieces RS together. Seam around the curved edges, leaving the lower (straight CO) edge open. Before closing: attach safety eyes approximately ⅔ of the way up the head, spaced about 1½ inches (3.8 cm) apart. Embroider dark eye rings. Stuff the muzzle oval lightly and pin it to the lower-center face, then whipstitch around its edges. Embroider nose and mouth on muzzle.

Fill the head firmly with fiberfill. Close the lower edge, leaving a small opening. Attach the head firmly to the body by aligning the lower head opening over the upper body opening and whipstitching all the way around multiple times — this joint will bear significant stress.

#### STEP 3: EARS

Position ears on top of the head, approximately ½ inch (1.3 cm) apart, pointing upward and slightly outward. The inner (pink) side of each ear should face forward. Sew each ear securely to the head with multiple passes of yarn, sewing through the head fabric.

#### STEP 4: ARMS

Position the arms on either side of the upper body, at the shoulder seam line. The right arm should be angled slightly forward and downward (this will hold the fob watch). Sew each arm securely with mattress stitch or multiple whipstitches through the shoulder area.

#### STEP 5: LEGS

Position the legs at the base of the body, pointing forward (the rabbit sits). Sew securely. The rabbit should be able to sit stably with the legs extending forward.

#### STEP 6: TAIL

Sew the pompom tail at the center back of the body, just above the base.

---

### PART SIX: CLOTHING

---

#### A. RED WAISTCOAT

The waistcoat is worked in two front pieces and one back piece, then seamed at the shoulders and sides.

##### WAISTCOAT BACK

Using Color C (Red) and US 6 / 4 mm needles:

**CO 22 sts.**

*Rows 1–4:* Work in G st (knit every row) — this forms a neat hem. *(22 sts)*
*Row 5 (RS):* Knit. *(22 sts)*
*Row 6 (WS):* Purl. *(22 sts)*

Continue in St st for **16 rows** total from the end of the garter hem (Rows 5–20), ending with a WS row. **Piece measures approximately 2¾ inches (7 cm)** from CO.

**Armhole shaping:**

*Row 21 (RS):* BO 2 sts, k to end. *(20 sts)*
*Row 22 (WS):* BO 2 sts, p to end. *(18 sts)*
*Row 23 (RS):* K1, ssk, k to last 3 sts, k2tog, k1. *(16 sts)*
*Row 24 (WS):* Purl. *(16 sts)*
*Row 25 (RS):* K1, ssk, k to last 3 sts, k2tog, k1. *(14 sts)*
*Row 26 (WS):* Purl. *(14 sts)*

Work even in St st for **8 more rows** (Rows 27–34), ending with a WS row.

**Shoulder and back neck shaping:**

*Row 35 (RS):* K4, BO center 6 sts, k4. *(Two sets of 4 sts)*

Work each shoulder separately:

**Left shoulder** (4 sts on needle):
*Row 36 (WS):* Purl.
BO 4 sts.

**Right shoulder** (re-join yarn at armhole edge):
*Row 36 (WS):* Purl.
BO 4 sts.

> 📐 **Math check**: CO 22 → 4 rows garter → 16 rows St st → armhole BO 2+2 = 18 sts → decrease 2 rows: 18→16→14 sts → work even for 8 rows → shoulder BO: 4 + center 6 + 4 = 14 sts. ✓

##### WAISTCOAT LEFT FRONT

Using Color C (Red) and US 6 / 4 mm needles:

**CO 12 sts.**

*Rows 1–4:* Work in G st.
*Row 5 (RS):* Knit.
*Row 6 (WS):* P to last 3 sts, k3. *(The 3-st garter border at center front is maintained throughout)*

Continue with St st body and 3-st garter center front border for **16 rows** (Rows 5–20), ending with WS row.

**Left armhole shaping:**

*Row 21 (RS):* BO 2 sts, k to end. *(10 sts)*
*Row 22 (WS):* Work even (St st with garter border). *(10 sts)*
*Row 23 (RS):* K1, ssk, k to end. *(9 sts)*
*Row 24 (WS):* Work even.
*Row 25 (RS):* K1, ssk, k to end. *(8 sts)*
*Rows 26–34:* Work even in pattern. *(8 sts)*

**Left V-neck shaping** (begins simultaneously with or just after armhole — stagger by 2 rows):

*Note*: Begin V-neck on Row 27.

*Row 27 (WS):* Work to last 4 sts, k2tog (on WS this leans correctly into the V), k2. *(7 sts)*
*Rows 28–29:* Work even.
*Row 30 (WS):* Work to last 4 sts, k2tog, k2. *(6 sts)*
*Rows 31–34:* Work even.

**Shoulder:**
*Row 35 (RS):* BO all 6 sts — but first check: 8 sts after armhole shaping → 2 V-neck decreases (each -1) = 6 sts. ✓

> **Button band**: The 3-st garter border on the Left Front will be the button band. Mark 2 button positions evenly spaced.

##### WAISTCOAT RIGHT FRONT

Using Color C (Red) and US 6 / 4 mm needles:

**CO 12 sts.**

*Rows 1–4:* Work in G st.
*Row 5 (RS):* K3 (garter border), k to end.
*Row 6 (WS):* Purl.

Continue with 3-st garter border at center front (RS), St st body, for 16 rows (Rows 5–20), ending with WS row.

**Right armhole shaping:**

*Row 21 (RS):* Work to last 2 sts — but this is the armhole side. *Note: for the Right Front, the armhole is on the LEFT of the RS row.*

*Row 21 (RS):* K to last 2 sts, k2tog. *(Hmm — let's restructure for clarity.)*

> **Clarification Note for Right Front**: The center front is on your RIGHT as you hold the work on RS. The armhole is on your LEFT.

*Row 21 (RS — armhole side is beginning of RS row for Right Front):*
BO 2 sts at the beginning of this row: sl first st to RH needle, k1, pass slipped st over. K1, pass over. Continue k to end. *(10 sts)*
*Row 22 (WS):* Purl to last 3 sts, k3 (garter border). *(10 sts)*
*Row 23 (RS):* K to last 3 sts, k2tog, k1. *(9 sts)*
*Row 24 (WS):* Purl to last 3 sts, k3. *(9 sts)*
*Row 25 (RS):* K to last 3 sts, k2tog, k1. *(8 sts)*

**V-neck shaping** (begin Row 27):

*Row 27 (RS):* K3, ssk, k to end. *(7 sts)*
*Rows 28–29:* Work even.
*Row 30 (RS):* K3, ssk, k to end. *(6 sts)*
*Rows 31–35:* Work even.

BO 6 sts.

**Buttonhole band**: Work 2 buttonholes in the 3-st garter border of the Right Front to correspond with button positions on the Left Front:
- On a RS row: K1, BO 1, k1. On the following WS row: K1, CO 1, k1.

##### WAISTCOAT: POCKET BACKS (Make 2)

These are sewn to the **inside (WS) of each front piece** — visible only when the waistcoat is open.

Using Color C (Red) and US 6 / 4 mm needles:

**CO 8 sts.**

Work in G st for **12 rows** (approximately 1½ inches / 3.8 cm).

BO all 8 sts.

**Attaching pocket backs**: Center each pocket back on the WS of each front piece, approximately ½ inch (1.3 cm) from the side seam and 1 inch (2.5 cm) up from the hem. Whipstitch around three sides (leaving the top open to create a pocket opening). The pocket openings face upward on the inside of the waistcoat.

##### WAISTCOAT ASSEMBLY

1. Seam front pieces to back at shoulder seams (4 sts each side). Use mattress stitch.
2. Seam side seams, leaving armholes open.
3. Sew buttons to Left Front button band at marked positions.
4. Dress the waistcoat on the rabbit. The waistcoat does not have sleeves (it is a waistcoat/vest).

---

#### B. BLUE TAILCOAT

The tailcoat has: two front pieces, a back with shaped tails, and two sleeves. It buttons at the front.

##### TAILCOAT BACK

Using Color D (Blue) and US 6 / 4 mm needles:

**CO 28 sts.**

*Rows 1–2:* Work in G st.
*Row 3 (RS):* Knit.
*Row 4 (WS):* Purl.

Work in St st for **4 rows** (Rows 3–6), ending with a WS row.

**Begin tail shaping — creating the characteristic split tails of a tailcoat:**

*Row 7 (RS):* K9, BO center 10 sts, k9. *(Two sets of 9 sts — the coat tails)*

You will now work each tail separately.

**Left coat tail** (9 sts, beginning at center split):

*Row 8 (WS):* P to last 2 sts, k2 (garter edge for neat tail hem). *(9 sts)*
*Row 9 (RS):* K2 (garter edge), k7. *(9 sts)*

Repeat Rows 8–9 for **12 more rows** (6 more repetitions), ending with a WS row.
*(Row 9 + 12 more rows = total 14 rows on the tail section)*

**Tail shaping (taper the tail hem slightly for a pointed look):**

*Next RS Row:* K2, ssk, k to end. *(8 sts)*
*WS Row:* P to last 2 sts, k2.
*RS Row:* K2, ssk, k to end. *(7 sts)*
*WS Row:* P to last 2 sts, k2.

BO 7 sts. Cut yarn.

**Right coat tail** (re-join yarn at center split, 9 sts):

*Row 8 (WS):* K2 (garter edge), p to end. *(9 sts)*
*Row 9 (RS):* K7, k2 (garter edge). *(9 sts)*

Repeat Rows 8–9 for 12 more rows (mirror of left tail).

**Tail shaping:**

*RS Row:* K to last 4 sts, k2tog, k2. *(8 sts)*
*WS Row:* K2, p to end.
*RS Row:* K to last 4 sts, k2tog, k2. *(7 sts)*
*WS Row:* K2, p to end.

BO 7 sts. Cut yarn.

**Upper back** (rejoin yarn at the top of the piece — above the coat tail split — and pick up along the top of the CO edge):

> **Alternate construction note**: Rather than working the coat tails separately from the body, the tailcoat back is worked in two stages:
>
> **Stage 1 — Upper Back**: Using Color D, CO 28 sts. Work in St st for **20 rows** (approximately 2¾ inches / 7 cm) = this forms the upper back.
>
> **Armhole shaping:**
> *Row 21:* BO 3 sts, k to end. *(25 sts)*
> *Row 22:* BO 3 sts, p to end. *(22 sts)*
> *Row 23 (RS):* K1, ssk, k to last 3 sts, k2tog, k1. *(20 sts)*
> *Row 24 (WS):* Purl.
> *Row 25 (RS):* K1, ssk, k to last 3 sts, k2tog, k1. *(18 sts)*
> *Rows 26–34:* Work even in St st.
>
> **Shoulder and neck shaping:**
> *Row 35:* K5, BO center 8 sts, k5.
> BO each shoulder (5 sts each side).
>
> **Stage 2 — Coat Tails**: CO 9 sts separately. Work the left and right tails as described above, beginning immediately. Then seam the upper edge of each tail to the lower edge of the upper back.
>
> 📐 **Math check (Upper Back)**: CO 28, armhole BO 3+3 = 22, decrease 2×2 = 18, work even, shoulder BO: 5 + 8 + 5 = 18. ✓

##### TAILCOAT LEFT FRONT

Using Color D (Blue) and US 6 / 4 mm needles:

**CO 16 sts.**

*Rows 1–2:* G st.
*Row 3 (RS):* Knit.
*Row 4 (WS):* Purl.

Work even in St st for **20 rows** total (Rows 3–22, ending WS row). Maintain a 3-st garter border at center front edge (RS: k to last 3 sts, k3; WS: k3, p to end) for a neat front facing.

**Armhole shaping (armhole is at beginning of RS row for Left Front):**

*Row 23 (RS):* BO 3 sts, k to end. *(13 sts)*
*Row 24 (WS):* Work even. *(13 sts)*
*Row 25 (RS):* K1, ssk, k to end. *(12 sts)*
*Row 26 (WS):* Work even.
*Row 27 (RS):* K1, ssk, k to end. *(11 sts)*

**Lapel/V-neck shaping** (begin at Row 28):

*Row 28 (WS):* Work to last 4 sts, k2tog-on-WS (insert needle knitwise into next 2 sts and k2tog tbl — this leans correctly), k2. *(10 sts)*
*Rows 29–30:* Work even.
*Row 31 (WS):* Work to last 4 sts, k2tog tbl, k2. *(9 sts)*
*Rows 32–34:* Work even.

**Shoulder:**
BO remaining 9 sts.

> 📐 **Math check**: 16 → BO 3 → 13 → decrease 2 rows (-2 total) → 11 → V-neck 2 decreases (-2) → 9. BO 9. ✓

##### TAILCOAT RIGHT FRONT

Mirror of Left Front. CO 16 sts. Work garter border at opposite center front edge. Armhole shaping at end of RS rows. V-neck shaping at beginning of RS rows:

*V-neck decrease (RS):* K3, ssk, k to end.

Work 2 V-neck decreases. BO remaining 9 sts.

**Buttonholes**: Work 5 buttonholes on Right Front (or Left Front, depending on convention — for a gentleman's garment, buttons are traditionally on the Right Front with buttonholes on the Left, but for a toy this can be reversed for ease). Space buttonholes evenly along the front, beginning approximately ½ inch (1.3 cm) from the lower hem and ending just below the V-neck. Work each buttonhole: K to buttonhole position, BO 1 st, CO 1 st on return row.

##### TAILCOAT SLEEVES (Make 2)

Using Color D (Blue) and US 6 / 4 mm needles:

**CO 18 sts.**

*Rows 1–2:* G st (cuff border).
*Row 3 (RS):* Knit.
*Row 4 (WS):* Purl.

**Sleeve increases (every 4th row):**

*Row 7 (RS):* K1, kfb, k to last 2 sts, kfb, k1. *(20 sts)*
*Row 11 (RS):* K1, kfb, k to last 2 sts, kfb, k1. *(22 sts)*
*Row 15 (RS):* K1, kfb, k to last 2 sts, kfb, k1. *(24 sts)*

Work even until sleeve measures **3 inches (7.6 cm)** from CO edge (approximately 21 rows).

**Sleeve cap shaping:**

*Row 22 (RS):* BO 2 sts, k to end. *(22 sts)*
*Row 23 (WS):* BO 2 sts, p to end. *(20 sts)*

*Row 24 (RS):* K1, ssk, k to last 3 sts, k2tog, k1. *(18 sts)*
*Row 25 (WS):* Purl.

Repeat Rows 24–25 three more times:
*Row 26:* 16 sts. *Row 28:* 14 sts. *Row 30:* 12 sts.

BO remaining 12 sts.

> 📐 **Math check**: CO 18, three increases (+2 each) = 24 sts. Cap: BO 2+2 = 20, then 4 decrease rows (-2 each) = 20 - 8 = 12. BO 12. ✓

##### TAILCOAT ASSEMBLY

1. Seam shoulder seams (9 sts front to 5 sts back each side — ease in gently).
2. Set in sleeves: align sleeve cap to armhole, sew in using backstitch.
3. Seam sleeve underarms.
4. Seam sides of tailcoat body (the front side seams — the coat tails hang free).
5. Attach 5 buttons to front band at buttonhole positions.

> **Note on fit**: Try the coat on the rabbit before final seaming to check the fit. Adjust sleeve length or body length as needed.

---

### PART SEVEN: THE FOB WATCH

The fob watch is a small flat oval knitted in white with a gold embroidered clock face.

#### WATCH FACE (Make 2)

Using Color A (White) and US 3 / 3.25 mm needles:

**CO 4 sts.**

*Row 1 (RS):* Kfb, k2, kfb. *(6 sts)*
*Row 2 (WS):* Pfb, p4, pfb. *(8 sts)*
*Row 3 (RS):* Kfb, k6, kfb. *(10 sts)*
*Row 4 (WS):* Purl.
*Row 5 (RS):* Kfb, k8, kfb. *(12 sts)*
*Rows 6–10:* Work even in St st. *(12 sts)*
*Row 11 (RS):* K2tog, k8, ssk. *(10 sts)*
*Row 12 (WS):* P2tog, p6, p2tog. *(8 sts)*
*Row 13 (RS):* K2tog, k4, ssk. *(6 sts)*
*Row 14 (WS):* P2tog, p2, p2tog. *(4 sts)*

BO 4 sts.

> 📐 **Math check**: 4 → 6 → 8 → 10 → 12 (even for 6 rows) → 10 → 8 → 6 → 4. Increases: +8. Decreases: -8. ✓ Finished oval: approximately 1¼ inches (3.2 cm) wide × 1½ inches (3.8 cm) tall.

#### CLOCK FACE EMBROIDERY

Using Color E (Gold) and a tapestry needle, embroider on the RS of one watch face piece:
- A **circle** of chain stitches around the outer edge of the watch face
- **12 small radial lines** (or French knots) to indicate clock hours
- **Two clock hands**: one short (hour hand) and one long (minute hand) worked in straight stitches, angling toward approximately 12:00 or a time of your choice

Using Color A, add a small circle at the center where the hands meet (French knot or satin stitch dot).

#### WATCH ASSEMBLY

Place both watch face pieces RS together. Seam around the edges with whipstitch, leaving a small gap. Insert a tiny amount of fiberfill (or a folded square of craft felt for firmness). Close the seam.

Sew a small cream/white button at the top edge of the watch (the winding crown).

#### WATCH CHAIN (Crochet)

Using Color E (Gold) yarn and US B-1 / 2.25 mm crochet hook:

**Chain 20 stitches.** Fasten off. This creates a delicate chain approximately 2¾ inches (7 cm) long.

**Alternatively**: Use a length of gold embroidery floss twisted and knotted at intervals to mimic a chain.

Attach one end of the chain to the top of the watch (at the winding crown button). Attach the other end to the right hand of the rabbit, or tuck it into the waistcoat pocket.

---

### PART EIGHT: FINISHING & FINAL ASSEMBLY

#### SEQUENCE OF ASSEMBLY

1. ✅ Complete all body parts (body, head, arms, legs, muzzle, ears, pompom tail).
2. ✅ Embroider face details (eye rings, nose, mouth).
3. ✅ Assemble rabbit body: attach head, ears, arms, legs, and tail per Part Three instructions.
4. ✅ Complete waistcoat with pocket backs. Dress the waistcoat on the rabbit. It should fit snugly around the upper body with the front panels meeting at center front. Secure with the 2 small buttons.
5. ✅ Complete tailcoat with sleeves. Dress the tailcoat over the waistcoat. The tailcoat lapels should fold back slightly, revealing the waistcoat beneath. Secure with the 5 buttons.
6. ✅ Complete fob watch and chain. Position the watch in the right paw of the rabbit. Attach the chain to the paw and tuck the other end into the right waistcoat pocket or into the tailcoat pocket area.
7. ✅ Final tidying: weave in all yarn ends. Trim any loose threads.

#### BLOCKING

Lightly mist the finished rabbit with water and allow to dry naturally. Do not press or iron (the fiberfill stuffing will not respond well to heat). Cotton will relax and the stitches will even out beautifully.

---

## YARN REQUIREMENTS SUMMARY

| Color | Quantity | Purpose |
|-------|----------|---------|
| A — White | ~300 yds (275 m) | Body, head, arms, legs, ears, watch |
| B — Pink | ~20 yds (18 m) | Ear linings, nose |
| C — Red | ~60 yds (55 m) | Waistcoat |
| D — Blue | ~100 yds (91 m) | Tailcoat |
| E — Gold | ~15 yds (14 m) | Watch embroidery, chain |
| F — Black/Dark Brown | ~5 yds (4.5 m) | Eye rings |

**Total yarn used**: approximately 500 yards (457 m) across all colors.

---

## QUICK-REFERENCE PIECE CHECKLIST

Before assembly, verify you have completed:

- [ ] Body pieces × 2 (White)
- [ ] Head pieces × 2 (White)
- [ ] Muzzle × 1 (White)
- [ ] Arms × 2 (White)
- [ ] Legs × 2 (White)
- [ ] Outer ear × 2 (White)
- [ ] Inner ear × 2 (Pink)
- [ ] Pompom tail × 1 (White)
- [ ] Waistcoat Back × 1 (Red)
- [ ] Waistcoat Left Front × 1 (Red)
- [ ] Waistcoat Right Front × 1 (Red)
- [ ] Waistcoat Pocket Backs × 2 (Red)
- [ ] Tailcoat Upper Back × 1 (Blue)
- [ ] Tailcoat Coat Tails Left & Right (Blue)
- [ ] Tailcoat Left Front × 1 (Blue)
- [ ] Tailcoat Right Front × 1 (Blue)
- [ ] Tailcoat Sleeves × 2 (Blue)
- [ ] Watch Face pieces × 2 (White)
- [ ] Watch chain × 1 (Gold crochet)
- [ ] Face embroidery complete (eye rings, nose, mouth, clock face)

---

## TIPS FOR SUCCESS

> 💡 **Cotton care**: Machine wash on gentle cycle, cold water. Lay flat to dry. Cotton toys hold their shape beautifully after washing.

> 💡 **Firm stuffing = better shape**: Stuff more firmly than you think you need to. Cotton knitting has no give — a loosely stuffed toy will look floppy.

> 💡 **Safety eye alternatives**: For children under 36 months, embroider eyes using satin stitch in black yarn for the main eye and the dark ring around it.

> 💡 **Tailcoat fit**: The tailcoat is sized to fit over the waistcoat. If your gauge is slightly different, try the coat on the dressed rabbit before closing the seams and adjust accordingly.

> 💡 **Character expression**: The dark eye rings and the forward tilt of the ears are what give this rabbit his distinctive worried, harried expression. Don't skip these details!

---

*Pattern designed for intermediate knitters. All rights reserved. For personal use only.*
Disclaimer: This pattern was generated by AI and should be reviewed for accuracy before use. While we strive for quality, AI-generated content may contain errors. Please verify measurements, stitch counts, and instructions before beginning your project. Generated by purlJam.uk
Access your pattern anytime
Bookmark this page to access your pattern anytime