Type
Knitting
Difficulty
intermediate
Category
tank
AI Thinking Process
Planning
Verification
Pattern
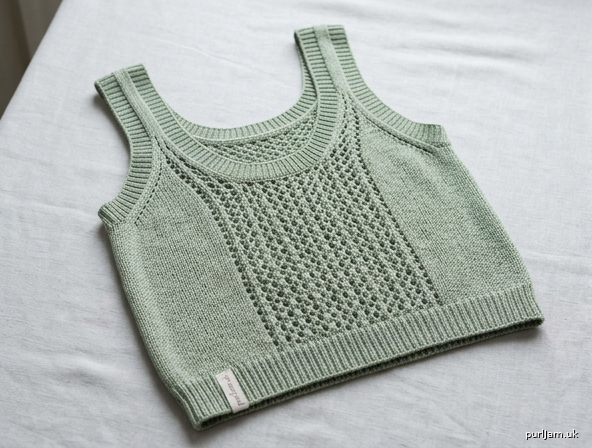
Thick-Strap Lace Tank
A beginner knitted tank in lace-weight yarn. An easy two-row mesh covers the body and the yoke. Shoulder straps are wide on purpose — about 2.7 (2.9, 2.9, 3.1, 3.1, 3.3) inches / 7 (7.5, 7.5, 8, 8, 8.5) cm at the shoulder, a little wider at the base — not spaghetti straps. A wide scoop neck, ribbed hem, and ribbed armhole and neck bands keep the edges neat and help the straps hold their shape.
Worked flat in two pieces, then seamed. No chart. Armhole shaping is finished before neck shaping starts. If you can knit, purl, cast on, and bind off, you can make this. The yarn over and the two decreases are taught below.
Difficulty: Beginner
Sizes: XS (S, M, L, XL, 2XL)
If one number is given, it applies to every size.
Finished measurements
| XS | S | M | L | XL | 2XL | |
|---|---|---|---|---|---|---|
| To fit bust | 28–30 in (71–76 cm) | 32–34 in (81–86 cm) | 36–38 in (91.5–96.5 cm) | 40–42 in (101.5–106.5 cm) | 44–46 in (112–117 cm) | 48–50 in (122–127 cm) |
| Finished bust | 32 in (81.5 cm) | 36.5 in (92.5 cm) | 40 in (101.5 cm) | 44.5 in (113 cm) | 48 in (122 cm) | 52.5 in (133.5 cm) |
| Piece width (flat) | 16 in (40.5 cm) | 18.25 in (46.5 cm) | 20 in (51 cm) | 22.25 in (56.5 cm) | 24 in (61 cm) | 26.25 in (66.5 cm) |
| Length, hem to shoulder | 20 in (51 cm) | 21 in (53.5 cm) | 22 in (56 cm) | 22.5 in (57 cm) | 23.5 in (59.5 cm) | 24 in (61 cm) |
| Hem to underarm | 13 in (33 cm) | 13.5 in (34.5 cm) | 14 in (35.5 cm) | 14 in (35.5 cm) | 14.5 in (37 cm) | 14.5 in (37 cm) |
| Armhole depth | 7 in (18 cm) | 7.5 in (19 cm) | 8 in (20.5 cm) | 8.5 in (21.5 cm) | 9 in (23 cm) | 9.5 in (24 cm) |
| Strap width | 2.7 in (7 cm) | 2.9 in (7.5 cm) | 2.9 in (7.5 cm) | 3.1 in (8 cm) | 3.1 in (8 cm) | 3.3 in (8.5 cm) |
| Back neck width | 7.5 in (19 cm) | 8.5 in (21.5 cm) | 9.25 in (23.5 cm) | 9.75 in (25 cm) | 10.75 in (27.5 cm) | 11.5 in (29 cm) |
| Front neck depth | 4.5 in (11.5 cm) | 4.5 in (11.5 cm) | 4.5 in (11.5 cm) | 4.5 in (11.5 cm) | 4.75 in (12 cm) | 5 in (12.5 cm) |
Fit: About 2–4 inches (5–10 cm) of positive ease. For a closer fit, choose the size whose finished bust is 0–2 inches (0–5 cm) larger than your bust. For a relaxed fit, choose 4–6 inches (10–15 cm) larger.
Finished bust is the blocked piece width times two, before seaming. Mattress stitch uses the edge stitch and changes the circumference by about 1/2 inch (1 cm).
Armhole style: Standard tank armhole, curved at the underarm and straight up into a wide strap. Not a racerback.
Neckline: Wide scoop in front, straight across the back. Chosen so the neck opening is large enough to pull on, even in cotton.
Yarn
Lace weight (CYC 0). Standard lace range is 33–40 stitches per 4 inches; this pattern is written for 36 stitches per 4 inches.
Smooth lace-weight cotton, linen, bamboo, or a cotton blend is the best choice for a summer tank. A wool or wool-silk lace yarn works if you want a layering piece. Avoid fuzzy or mohair yarns for a first lace project; they hide the eyelets and are harder to rip back.
Yardage: 850 (1000, 1150, 1300, 1450, 1600) yards / 780 (915, 1050, 1190, 1325, 1465) meters.
If your skein is 440 yards (402 m), that is about 2 (3, 3, 3, 4, 4) skeins. Buy by yardage, not by skein count. Buy one extra skein if you plan to lengthen the tank.
Needles
- US 1 / 2.25 mm circular needle, 24–32 inches (60–80 cm), for the body. Straight needles are fine if the stitches fit without crowding. The body is worked flat. Do not join in the round.
- US 0 / 2 mm needles for ribbing: straight or circular for the hem; a 16-inch (40 cm) circular, or double-pointed needles, for the neckband; a 24-inch (60 cm) circular, or double-pointed needles, for the armholes.
- Needle size is a suggestion. Match the blocked gauge. If you do not have a US 0, the US 1 may be used for the ribbing; the ribs will be slightly softer.
Notions
- Stitch holders or waste yarn (2)
- Locking stitch markers (2), optional but useful
- Yarn needle
- Row counter, optional
- Pins and a blocking surface
Gauge
36 stitches and 48 rows = 4 inches (10 cm) in Easy Mesh Lace, blocked.
That is 9 stitches and 12 rows per inch.
Check your gauge before you cast on the tank. Lace changes size when it is washed. An unblocked swatch will not tell you the truth.
Swatch: Cast on 48 stitches. Work Easy Mesh Lace for 6 inches (15 cm). Bind off. Wet-block or steam the swatch and pin it without stretching the mesh open. When dry, measure 4 inches in the center.
- More than 36 stitches in 4 inches: go up a needle size.
- Fewer than 36 stitches in 4 inches: go down a needle size.
- Stitch gauge sets the bust. Row gauge sets the length. If your row gauge is off, follow the inch measurements and your pieces will still match each other.
Abbreviations (US)
- BO — bind off
- CO — cast on
- k — knit
- k2tog — knit 2 stitches together (right-leaning decrease)
- p — purl
- pm — place marker
- rep — repeat
- RS — right side
- ssk — slip, slip, knit (left-leaning decrease)
- st(s) — stitch(es)
- WS — wrong side
- yo — yarn over
Techniques you will use
Long-tail cast on. Any stretchy cast on you already know is fine.
Yarn over (yo), before a knit stitch: Bring the yarn to the front between the needles, then over the right needle to the back. Knit the next stitch. The yarn over adds one stitch and makes an eyelet.
k2tog: Insert the right needle into the next 2 stitches together and knit them as one stitch.
ssk: Slip the next 2 stitches, one at a time, as if to knit. Slide the left needle into the fronts of both slipped stitches and knit them together.
Edge rule (use this whenever a row says “work in pattern”): Knit the first stitch. Repeat yo, k2tog as many times as you can until 1 or 2 stitches remain. Knit those remaining stitches. On an even stitch count this ends with 1 knit stitch. On an odd count it ends with 2 knit stitches. This keeps a garter selvedge and keeps the eyelet repeat correct.
Bind off knitwise: Knit 2 stitches, pass the first over the second. Knit 1, pass the previous stitch over. Repeat.
Stitch patterns
1×1 Rib (even number of stitches, worked flat)
Row 1 (RS): *K1, p1; rep from * to end.
Row 2 (WS): *K1, p1; rep from * to end.
Repeat these 2 rows.
1×1 Rib in the round (even number of stitches)
Round 1: *K1, p1; rep from * to end.
Repeat this round. If two knit stitches meet at the start of the round, slip the marker one stitch over so the rib continues without a break.
Easy Mesh Lace (even number of stitches)
Row 1 (RS): K1, *yo, k2tog; rep from * to last st, k1.
Row 2 (WS): K1, p to last st, k1.
Repeat these 2 rows.
The first and last stitch are knitted on every row (a garter selvedge). That edge is easier to see and easier to seam. One yarn over and one k2tog keep the stitch count the same. (yo + k2tog = 2 stitches, so the count does not change. ✓)
Notes before you cast on
- Lace weight means fine yarn and a lot of stitches. The stitch itself is simple. A size M back is 180 stitches. Plan on a longer project than a worsted-weight tank.
- Count your stitches at every checkpoint printed in the pattern.
- The lace repeat needs an even stitch count in the body. The numbers below keep it even. Odd counts appear only while the front neck is being decreased. The edge rule covers that.
- Left and Right, when used, mean as worn.
- Block pieces to the measurements in the table. Do not pull the mesh until the eyelets are huge. If you over-stretch the lace, the bust will grow and the straps will thin out.
- Do not hang a wet lace tank. It will grow.
Back
Hem
With US 0 / 2 mm needles, cast on 144 (164, 180, 200, 216, 236) stitches.
(144 ÷ 9 = 16 inches wide for XS; 164 ÷ 9 = 18.2 inches for S; 180 ÷ 9 = 20 inches for M; 200 ÷ 9 = 22.2 inches for L; 216 ÷ 9 = 24 inches for XL; 236 ÷ 9 = 26.2 inches for 2XL. ✓)
Work in 1×1 Rib until the piece measures 1.5 inches (4 cm) from the cast-on edge, ending with a WS row.
Change to US 1 / 2.25 mm needles.
Lace body
Work Easy Mesh Lace until the piece measures 13 (13.5, 14, 14, 14.5, 14.5) inches / 33 (34.5, 35.5, 35.5, 37, 37) cm from the cast-on edge, ending with a WS row.
If your row gauge matches, that is about 138 (144, 150, 150, 156, 156) lace rows after the rib. All of those numbers are even, so you finish a complete 2-row repeat. Ending on the measurement matters more than ending on that exact row count. End with a WS row either way.
Shape armholes
Next row (RS): Bind off 6 (8, 8, 10, 12, 14) stitches knitwise, then work in pattern to the end.
Next row (WS): Bind off 6 (8, 8, 10, 12, 14) stitches knitwise, then work in pattern to the end. 132 (148, 164, 180, 192, 208) stitches.
(XS: 144 − 12 = 132. S: 164 − 16 = 148. M: 180 − 16 = 164. L: 200 − 20 = 180. XL: 216 − 24 = 192. 2XL: 236 − 28 = 208. ✓)
Decrease row (RS): K1, ssk, *yo, k2tog; rep from * to last 3 sts, k2tog, k1. 2 stitches decreased.
The repeat fits. An even stitch count minus 6 edge/decrease stitches is still even, so every yo has a k2tog. If you are one stitch off and cannot finish a repeat before the last 3 stitches, knit the extra stitch, then k2tog, k1, and recount.
Next row (WS): K1, p to last st, k1.
Repeat the last 2 rows 7 (9, 13, 17, 19, 21) more times. 116 (128, 136, 144, 152, 164) stitches.
(That is 8 (10, 14, 18, 20, 22) decrease rows in all. XS: 132 − 16 = 116. S: 148 − 20 = 128. M: 164 − 28 = 136. L: 180 − 36 = 144. XL: 192 − 40 = 152. 2XL: 208 − 44 = 164. ✓)
Armhole shaping is now finished. It used 18 (22, 30, 38, 42, 46) rows, about 1.5 (1.75, 2.5, 3.25, 3.5, 3.75) inches / 4 (4.5, 6.5, 8, 9, 9.5) cm.
Work even to the shoulder
Work Easy Mesh Lace until the armhole measures 7 (7.5, 8, 8.5, 9, 9.5) inches / 18 (19, 20.5, 21.5, 23, 24) cm from the bind-off row, ending with a WS row.
If your row gauge matches, that is 84 (90, 96, 102, 108, 114) armhole rows in total, including the shaping rows, and 66 (68, 66, 64, 66, 68) even rows after the last decrease. (84 − 18 = 66, and the same subtraction holds for every size. ✓)
Shape straps and back neck
Next row (RS): Bind off 24 (26, 26, 28, 28, 30) stitches knitwise, work in pattern to the end.
Next row (WS): Bind off 24 (26, 26, 28, 28, 30) stitches knitwise, work in pattern to the end.
Place the remaining 68 (76, 84, 88, 96, 104) stitches on a holder for the back neck.
(XS: 24 + 68 + 24 = 116. S: 26 + 76 + 26 = 128. M: 26 + 84 + 26 = 136. L: 28 + 88 + 28 = 144. XL: 28 + 96 + 28 = 152. 2XL: 30 + 104 + 30 = 164. ✓)
Strap width is 24 ÷ 9 = 2.7 inches for XS, 26 ÷ 9 = 2.9 inches for S and M, 28 ÷ 9 = 3.1 inches for L and XL, and 30 ÷ 9 = 3.3 inches for 2XL. ✓
Cut the yarn, leaving a 24-inch (60 cm) tail for the shoulder seam if you want to seam with the working yarn. Otherwise leave an 8-inch (20 cm) tail and use a separate length later.
Front
Work the same as the Back through the armhole decreases. 116 (128, 136, 144, 152, 164) stitches. Armhole shaping must be finished before you start the neck.
Work even in Easy Mesh Lace for 12 (14, 12, 10, 8, 8) rows, ending with a WS row.
The armhole should now measure about 2.5 (3, 3.5, 4, 4.25, 4.5) inches / 6.5 (7.5, 9, 10, 11, 11.5) cm. Those even rows sit after shaping ends (shaping used 18 (22, 30, 38, 42, 46) rows; 18 + 12 = 30 rows completed before the neck row on XS, and 22 + 14 = 36, 30 + 12 = 42, 38 + 10 = 48, 42 + 8 = 50, 46 + 8 = 54 on the other sizes). The next row is a RS row. ✓
Shape front neck
The neck is a wide scoop. You will slip one strap to a holder, bind off the center, and work the second strap first. This keeps the stitch counts exact. Joining yarn in the middle of a bind-off can “steal” a stitch; the holder method does not.
Next row (RS): Work 30 (32, 33, 35, 36, 38) stitches in pattern. Slip those stitches to a holder or a strand of waste yarn. Join a new ball of yarn. Bind off the next 56 (64, 70, 74, 80, 88) stitches knitwise. Work in pattern to the end. 30 (32, 33, 35, 36, 38) stitches remain on the needle for Strap B.
(XS: 30 + 56 + 30 = 116. S: 32 + 64 + 32 = 128. M: 33 + 70 + 33 = 136. L: 35 + 74 + 35 = 144. XL: 36 + 80 + 36 = 152. 2XL: 38 + 88 + 38 = 164. ✓)
Sizes M and L have an odd number on each strap at this point (33 and 35). Use the edge rule. The count becomes even again on the last neck decrease.
The bound-off edge is the bottom of the scoop. Each strap’s neck edge is the edge next to that bind-off.
Strap B (stitches still on the needle)
The neck edge is at the beginning of RS rows.
Next row (WS): K1, p to last st, k1.
Neck decrease row (RS): K1, ssk, work in pattern to the end. 1 stitch decreased at the neck edge.
Repeat the last 2 rows until you have worked 6 (6, 7, 7, 8, 8) neck decrease rows in total. 24 (26, 26, 28, 28, 30) stitches remain.
(30 − 6 = 24; 32 − 6 = 26; 33 − 7 = 26; 35 − 7 = 28; 36 − 8 = 28; 38 − 8 = 30. These match the Back straps. ✓)
Work even in pattern until the armhole measures 7 (7.5, 8, 8.5, 9, 9.5) inches / 18 (19, 20.5, 21.5, 23, 24) cm from the bind-off row, ending with a WS row. Match the Back’s row count if you counted rows. The neck section is 54 (54, 54, 54, 58, 60) rows, which is 4.5 (4.5, 4.5, 4.5, 4.75, 5) inches / 11.5 (11.5, 11.5, 11.5, 12, 12.5) cm. ✓
Bind off the remaining 24 (26, 26, 28, 28, 30) stitches knitwise.
Strap A (stitches on the holder)
Slip the held stitches back to a US 1 / 2.25 mm needle, ready to work a WS row. Rejoin yarn at the neck edge.
The neck edge is at the end of RS rows.
Next row (WS): K1, p to last st, k1.
Neck decrease row (RS): Work in pattern to last 3 sts, k2tog, k1. 1 stitch decreased at the neck edge.
Repeat the last 2 rows until you have worked 6 (6, 7, 7, 8, 8) neck decrease rows in total. 24 (26, 26, 28, 28, 30) stitches remain. ✓
Work even until this strap matches Strap B, ending with a WS row. Bind off the remaining 24 (26, 26, 28, 28, 30) stitches knitwise.
Finishing
Block
Weave in ends far enough that they will not pop out, but leave the seaming tails if you saved them.
Wet-block or steam both pieces. Pin each piece to:
- Width: 16 (18.25, 20, 22.25, 24, 26.25) inches / 40.5 (46.5, 51, 56.5, 61, 66.5) cm
- Length: 20 (21, 22, 22.5, 23.5, 24) inches / 51 (53.5, 56, 57, 59.5, 61) cm
- Each strap: 2.7 (2.9, 2.9, 3.1, 3.1, 3.3) inches / 7 (7.5, 7.5, 8, 8, 8.5) cm wide
Pin the armhole bind-off edges so the two pieces match. Let the pieces dry completely. Do not stretch the mesh past these measurements.
Seam the straps (shoulders)
Put the Front and Back together, wrong sides together, so the right sides face you along the seam line. Use mattress stitch:
- Thread a blunt needle with a length of yarn. Start at the armhole end of the strap.
- Insert the needle under the bar between the edge stitch and the next stitch on one piece. Do the same on the other piece.
- Alternate sides, one bar at a time, pulling the yarn snug every inch so the seam is flat but not tight.
- Seam all 24 (26, 26, 28, 28, 30) strap stitches. Repeat for the second strap.
A lace seam should lie flat over the shoulder. If it puckers, you pulled too hard. Take it out and redo it. That is normal.
Seam the sides
Start at the hem. Mattress-stitch the side seams up to the armhole bind-off, matching the rib to the rib and the mesh rows to each other. Leave the armholes open. The underarm bind-off edges meet at the base of the armhole.
Neckband
With RS facing and US 0 / 2 mm circular needle (16 inches / 40 cm) or double-pointed needles, start at the left shoulder seam.
- Pick up and knit 40 (40, 40, 40, 43, 44) stitches down the left front neck edge.
- Pick up and knit 56 (64, 70, 74, 80, 88) stitches across the center front bind-off, about 1 stitch in each bound-off stitch.
- Pick up and knit 40 (40, 40, 40, 43, 44) stitches up the right front neck edge.
- Knit the 68 (76, 84, 88, 96, 104) back neck stitches from the holder.
204 (220, 234, 242, 262, 280) stitches. Place a marker and join to work in the round.
(XS: 40 + 56 + 40 + 68 = 204. S: 40 + 64 + 40 + 76 = 220. M: 40 + 70 + 40 + 84 = 234. L: 40 + 74 + 40 + 88 = 242. XL: 43 + 80 + 43 + 96 = 262. 2XL: 44 + 88 + 44 + 104 = 280. All even, so 1×1 rib joins cleanly. ✓)
Along the curved front edges, pick up about 3 stitches for every 4 rows. If you are short or over by 1 or 2 stitches, space the difference evenly. Keep the total even.
Work 1×1 Rib in the round for 6 rounds, about 3/4 inch (2 cm).
Bind off loosely in rib. The bound-off edge must stretch over your head. Use a needle two or three sizes larger for the bind-off if your regular bind-off is firm. Cotton barely stretches, so a tight bind-off will not go on.
Before you cut the yarn, try the neckline over your head. If it is tight, rip out the bind-off only and bind off again more loosely. The neck edge itself is about 23 inches (58 cm) or wider; the rib should not be allowed to lock that opening shut.
Armhole bands
With RS facing and US 0 / 2 mm needles, start at the underarm seam. Pick up and knit 136 (148, 156, 170, 184, 196) stitches evenly around the armhole.
(About 1 stitch for each bound-off stitch, and 3 stitches for every 4 rows along the shaped and straight edges. Full armhole = both the front edge and the back edge. ✓)
Place a marker and join. Work 1×1 Rib in the round for 6 rounds, about 3/4 inch (2 cm). Bind off loosely in rib. The band should not pull the armhole in. If it puckers, you picked up too few stitches. If it flares, you picked up too many.
Repeat for the second armhole.
These two ribbed bands are what make the wide straps feel sturdy. Each strap has rib along the neck side and rib along the armhole side.
Final steps
Weave in the remaining ends along the ribs, not through the eyelets. A yarn end woven through an eyelet will show.
Wash the tank once more if the seams look uneven, and lay it flat to dry, pinned to the finished measurements if needed. Do not hang it to dry.
How to wear and wash
Hand wash in cool water. Squeeze, do not wring. Lay flat to dry. Store it folded, not on a hanger. Lace-weight cotton grows if it is hung while wet or stored on a hanger for months.
Optional modifications
Cropped: Work the lace body until the piece measures 11 (11.5, 12, 12, 12.5, 12.5) inches / 28 (29, 30.5, 30.5, 32, 32) cm from the cast-on, then start the armholes. Finished length becomes 18 (19, 20, 20.5, 21.5, 22) inches / 46 (48.5, 51, 52, 54.5, 56) cm. All shaping stays the same.
Tunic: Work an extra 4 inches (10 cm), about 48 rows, of Easy Mesh Lace before the armholes. Finished length becomes 24 (25, 26, 26.5, 27.5, 28) inches / 61 (63.5, 66, 67.5, 70, 71) cm. Buy extra yarn: about 200 (230, 260, 290, 320, 350) yards / 185 (210, 240, 265, 295, 320) meters more.
Closer fit: Knit the next smaller size. More ease: Knit the next larger size. Do not change the stitch pattern to change the fit. Change the size.
Side slits: Sew the side seams only down to 3 inches (7.5 cm) above the hem. Work 2 extra rows of rib at the hem if you want the slit edges firmer, before you start the lace.
No waist shaping is included. Decreasing a mesh lace at the waist, then increasing it again, is a later project. The straight side seam is the beginner construction, and the ribbed hem gives a little hold.
Beginner checklist
- Swatch is blocked, and 36 stitches really measure 4 inches.
- Stitch count is 144 (164, 180, 200, 216, 236) after cast-on, and the same count when the lace starts.
- Stitch count is 116 (128, 136, 144, 152, 164) after the armhole decreases, on both Front and Back.
- Front straps end at 24 (26, 26, 28, 28, 30) stitches, the same as the Back straps.
- Neck bind-off goes over your head before you weave in that end.
- Pieces are blocked to the table, not to “as big as the lace will go.”
Disclaimer: This pattern was generated by AI and should be reviewed for accuracy before use. While we strive for quality, AI-generated content may contain errors. Please verify measurements, stitch counts, charts, and instructions before beginning your project. Generated by purlJam.uk
Love this pattern?
Save this pattern to your free PurlJam libraryAccess your pattern anytime
Bookmark this page to access your pattern anytime