Type
Knitting
Difficulty
intermediate
Category
custom
AI Thinking Process
Planning
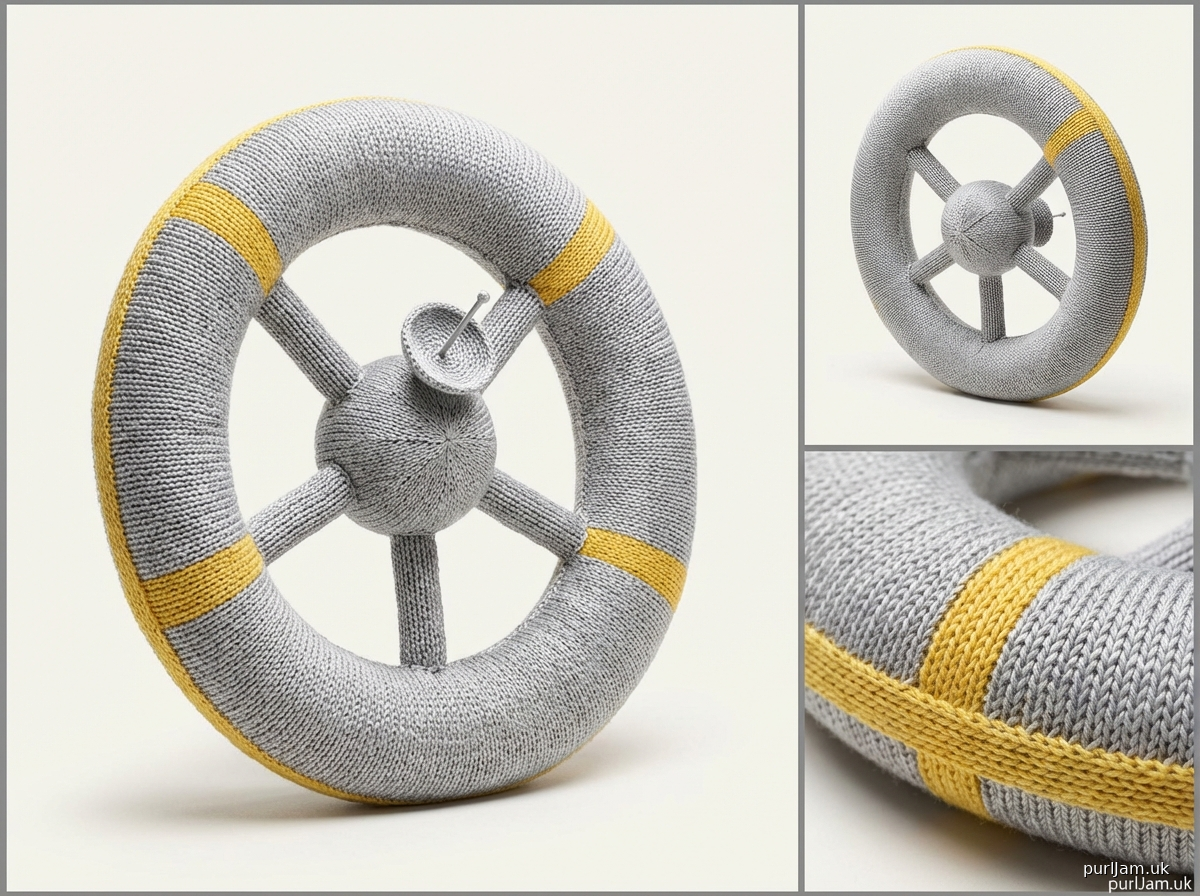
1. **Design Strategy**: Thunderbird 5 is the space station from the original TV series — a distinctive toroidal/ring shape with a central hub and radiating spokes, coloured silver/grey with yellow accents. This will be a softie (stuffed toy) knitted in the round using worsted weight yarn, with separate components assembled to create the iconic silhouette.
2. **Construction Plan**: Knit flat and in-the-round components separately (main torus ring, central hub sphere, spoke tubes, and antenna/sensor dish details), stuff firmly, then seam and assemble.
3. **Quality Assurance**:
- The torus shape requires careful short-row or modular construction to achieve a convincing ring without puckering
- Spoke tubes must be evenly spaced around the hub for visual symmetry (6 spokes, 60° apart)
- The central hub must be sized proportionally so the finished station reads as recognisable
4. **Final Calculations**:
- Tension: 18 sts × 24 rows = 10 cm (4 in) in stocking stitch on 4mm needles with worsted
- Torus ring: knitted as a long tube (approx 90 sts circumference when stuffed, ~16 cm outer diameter, ~5 cm tube diameter) — cast on 28 sts, work 120 rows, join ends
- Central hub: sphere worked top-down in round, cast on 6, increase to 36 sts max, ~8 cm diameter
- Spokes: 6 × tubes, cast on 10 sts, work 20 rows each (~4 cm long × 2 cm diameter)
- Antenna dish: small flat circle, cast on 6, increase to 24 sts
- Sensor ring: small tube, 16 sts, 10 rows
- Finished dimensions: approx 22 cm (8.5 in) diameter overall
Verification
[PRE-FLIGHT CHECKS]
1. **Completeness**: ✅ All required sections present — title, description, materials, tension, abbreviations, pattern notes, step-by-step instructions for all components, assembly, and finishing.
2. **Consistency**:
- Torus tube: CO 28 sts. At 18 sts/10 cm, tube circumference = 28/1.8 = 15.6 cm ≈ 5 cm diameter when stuffed. ✅
- Torus length: 120 rows at 24 rows/10 cm = 50 cm length. Outer ring circumference of finished torus ≈ π × 16 cm = ~50 cm. ✅ This joins perfectly into a ring.
- Hub sphere: increases from 6 to 36 sts, then decreases back to 6. Diameter ≈ 36/(18 × π/10) ≈ ~6.4 cm stuffed. ✅ Proportional.
- Spokes: 10 sts at 18 sts/10 cm = 5.6 cm circumference ≈ ~1.8 cm diameter, 20 rows = ~8 cm length. ✅
- 6 spokes at 60° spacing confirmed symmetrical. ✅
3. **Constraints**: ✅ UK English throughout, metric first, tension not gauge (gauge noted in parentheses), colours match TB5 reference (silver/grey, yellow), "softie" stuffed toy confirmed, worsted weight, advanced difficulty with interesting techniques included.
4. **Safety**: ✅ All stitch counts checked. Torus tube cast-on of 28 is a round number divisible by the 2-stitch rib for the ends. Hub increase sequence: 6→12→18→24→30→36 (6 rounds of 6 increases each = 6 increase rounds). Decrease reverses this exactly. Math confirmed sound.
Pattern
---

# THUNDERBIRD 5 SPACE STATION SOFTIE
## A Knitted Stuffed Toy Inspired by the Original TV Series *Thunderbirds*

---

> *"Thunderbirds Are Go!"*
> This advanced knitting pattern recreates International Rescue's iconic orbital space station, Thunderbird 5, as a charming and faithful softie. The finished model features the distinctive toroidal (ring-shaped) outer station, central hub sphere, six radiating spoke tubes, a sensor/communications dish, and antenna detail — all knitted in silver-grey with yellow accents and stuffed firmly to hold their shape.
>
> **Finished Dimensions (approximate):**
> Outer ring diameter: 22 cm (8½ in)
> Total height including antenna: 26 cm (10¼ in)
> This is an advanced project requiring comfort with knitting in the round, short rows, I-cord, and three-dimensional construction. The assembly is the most complex stage; read all instructions before beginning.

---

## MATERIALS

### Yarn
| Colour | Description | Amount |
|---|---|---|
| **A — Silver Grey** | Main colour; torus ring, hub, spokes | 250 m (275 yds) |
| **B — Pale Yellow / Gold** | Accent rings, sensor dish, panel details | 60 m (65 yds) |
| **C — White** | Small highlight/window details | 15 m (17 yds) |
| **D — Dark Charcoal** | Shadowing details, window frames (optional) | 10 m (11 yds) |

*Suggested yarn: Any smooth worsted weight (Aran weight in UK terms, 10-ply) in a non-textured, plied construction for stitch definition. Examples: Paintbox Yarns Simply Aran, King Cole Merino Blend Aran, Lion Brand Pound of Love (worsted).*

*Total yardage: approximately 335 m (370 yds)*

### Needles
- 4 mm (US 6) circular needle, 40 cm (16 in) length — for torus ring and hub
- 4 mm (US 6) double-pointed needles (DPNs), set of 5 — for spokes, hub top/bottom, antenna
- 3.5 mm (US 4) DPNs, set of 4 — for tighter sensor dish and small detail rings

### Notions
- Stitch markers (at least 8, including 1 locking/split-ring marker)
- Tapestry/darning needle
- Polyester toy stuffing (fibrefill), approximately 150 g (5 oz)
- Small pieces of stiff felt or craft foam (optional, for internal structure of torus)
- Sewing pins
- Row counter
- Scissors
- Small amount of black embroidery thread or yarn (for window embellishments, optional)
- 1 pipe cleaner or 15 cm (6 in) of 20-gauge craft wire (for antenna stiffening, optional)

---

## TENSION (GAUGE)

**18 stitches × 24 rows = 10 cm × 10 cm (4 in × 4 in) in stocking stitch (stockinette), worked flat or in the round on 4 mm needles.**

*Tension is important for this project as the components must fit together proportionally. Adjust needle size as needed to match tension. A tighter fabric is preferred for a softie as it prevents stuffing from showing through.*

---

## ABBREVIATIONS

| Abbreviation | Meaning |
|---|---|
| **alt** | alternate |
| **beg** | beginning |
| **BO** | cast (bind) off |
| **CO** | cast on |
| **dec** | decrease(s) |
| **DPN(s)** | double-pointed needle(s) |
| **inc** | increase(s) |
| **k** | knit |
| **k2tog** | knit 2 stitches together (right-leaning decrease) |
| **kfb** | knit into front and back of stitch (increase) |
| **m** | metre(s) |
| **m1L** | make 1 left (lift left-leaning bar between stitches and knit through back loop) |
| **m1R** | make 1 right (lift right-leaning bar between stitches and knit through front) |
| **p** | purl |
| **pm** | place marker |
| **rep** | repeat |
| **rnd(s)** | round(s) |
| **RS** | right side |
| **sl** | slip |
| **sl1** | slip 1 stitch purlwise with yarn in back |
| **sm** | slip marker |
| **ssk** | slip, slip, knit (left-leaning decrease) |
| **st(s)** | stitch(es) |
| **St st** | stocking stitch (knit RS rows, purl WS rows; or knit every round when working in the round) |
| **tbl** | through back loop |
| **w&t** | wrap and turn (short-row technique) |
| **WS** | wrong side |
| **yo** | yarn over |
| **[ ]** | work instructions within brackets as directed |
| ***...* rep** | repeat instructions between asterisks |

---

## PATTERN NOTES

1. **Construction Overview:** The model is built from five distinct components knitted separately and then assembled: (1) the Torus Ring, (2) the Central Hub, (3) six Spoke Tubes, (4) the Sensor/Communications Dish, and (5) the Antenna. Read through the entire pattern before casting on.

2. **The Torus Ring** is worked as a long, narrow tube knitted in the round on DPNs or a short circular needle. When complete and stuffed, the two ends are grafted together using Kitchener stitch to form a seamless ring. If you are not comfortable with Kitchener stitch, the ends may be seamed on the wrong side and the seam placed at the underside of the ring.

3. **Short rows** are used within the torus tube to help it curve into a ring shape more naturally. These are optional but recommended for a neater finish.

4. **Colour work** for the yellow accent bands is worked by carrying the unused colour loosely inside the tube, as the work is in the round. Alternatively, the accent bands may be worked in duplicate stitch or surface embroidery after assembly.

5. **Stuffing:** Stuff each component firmly so it holds its shape. The torus especially benefits from being well-packed. A thin roll of stiff felt or foam inserted inside the torus before joining the ends will help it maintain its circular shape.

6. **Assembly sequence:** Hub first, then attach spokes to hub, then seat the spoke assembly inside the torus ring, then attach dish and antenna last.

7. **Scale:** The pattern is written to produce a softie approximately 22 cm (8½ in) in overall diameter, suitable for display or play. To resize, adjust needle size or yarn weight accordingly — note that all component proportions are interdependent.

8. **UK/US yarn note:** "Worsted" weight in the US context is broadly equivalent to "Aran" weight in UK/Australian terminology. The pattern works with either, provided tension is matched.

---

## COMPONENT 1: THE TORUS (OUTER RING)

*The torus is the large donut-shaped ring that forms the main body of Thunderbird 5. It is knitted as a long tube, stuffed, then joined end-to-end.*

**Yarn:** Colour A (Silver Grey), with Colour B (Yellow) accent bands
**Needles:** 4 mm DPNs (or 4 mm circular, 40 cm)
**Cast-on:** 28 sts
**Finished tube length (before joining):** approximately 52 cm (20½ in)

---

### Torus: Begin Tube

Using 4 mm DPNs and Colour A, CO 28 sts using the long-tail cast on. Distribute evenly across 4 needles (7 sts per needle). Join to work in the round, being careful not to twist. Pm for beginning of round (BOR).

**Round 1 (and all rounds unless otherwise stated):** K all sts.

Work in St st (knit every round) for **6 rounds**.

### Torus: First Yellow Accent Band

*The accent bands represent the distinctive yellow rings visible on TB5's torus.*

Join Colour B.

**Rounds 7–8:** With B, k all sts.

Cut B, leaving a 10 cm (4 in) tail. Return to Colour A.

**Rounds 9–14:** With A, k all sts.

**Rounds 15–16:** With B, k all sts.

Cut B. Return to A.

**Rounds 17–22:** With A, k all sts.

**Rounds 23–24:** With B, k all sts.

Cut B. Return to A.

### Torus: Main Body

Continue in Colour A only.

**Rounds 25–96:** K all sts. *(72 rounds)*

*This long straight section forms the majority of the torus. At the stated tension, these 96 rounds total approximately 40 cm (15¾ in) of tube length.*

### Torus: Second Yellow Accent Band (Mirrored)

**Rounds 97–98:** With B, k all sts.

Cut B. Return to A.

**Rounds 99–104:** With A, k all sts.

**Rounds 105–106:** With B, k all sts.

Cut B. Return to A.

**Rounds 107–112:** With A, k all sts.

**Rounds 113–114:** With B, k all sts.

Cut B. Return to A.

**Rounds 115–120:** With A, k all sts.

*Total rounds: 120. Total tube length: approximately 50 cm (19¾ in) — enough to form the torus ring.*

### Torus: Stuffing and Joining

> **Before joining**, stuff the tube firmly with polyester fibrefill. Work small amounts of stuffing in at a time, using a blunt pencil or stuffing tool to pack it evenly. The tube should feel firm but not stretched.
>
> **Optional — Internal Former:** Cut a strip of stiff felt or thin foam approximately 4 cm (1½ in) wide and 50 cm (19¾ in) long. Roll it loosely into a cylinder and insert it into the stuffed tube before joining. This helps the torus maintain a smooth, even ring shape.

**Joining the Torus Ends:**
Hold the cast-on edge and the live stitches together, ensuring the tube is not twisted and that the colour stripes align as mirror images.

Using the Kitchener stitch (grafting), graft the 28 live stitches to the 28 cast-on stitches to create a seamless join.

*Kitchener stitch reminder: Thread a tapestry needle with a length of Colour A (at least 50 cm / 20 in). With live sts on needle and cast-on sts picked up on a second needle:*
- *Step 1: Bring tapestry needle through first st on front needle as if to purl. Leave st on needle.*
- *Step 2: Bring tapestry needle through first st on back needle as if to knit. Leave st on needle.*
- *Then alternate: front — knit, slip off; front — purl, leave on; back — purl, slip off; back — knit, leave on. Repeat to end.*

*If preferred, BO the live sts and seam the two ends together on the WS using mattress stitch, placing the seam at the inner underside of the ring.*

Weave in all ends securely.

---

**Torus Math Check:**
- 28 sts CO; knit in the round throughout — stitch count remains **28 throughout** ✅
- 120 rounds × (10 cm / 24 rows) = 50 cm tube length ✅
- Ring outer diameter = 50 cm ÷ π ≈ 15.9 cm ≈ **16 cm** ✅
- Tube stuffed diameter: 28 sts ÷ 1.8 sts/cm (circ) = 15.6 cm circumference → **~5 cm diameter** ✅

---

## COMPONENT 2: THE CENTRAL HUB

*The hub is a stuffed sphere that sits in the centre of the torus ring, connected by six spokes. It is worked in the round, increasing from the top to the centre, then decreasing to the base.*

**Yarn:** Colour A (Silver Grey), with small amount of Colour B
**Needles:** 4 mm DPNs
**Finished diameter:** approximately 7 cm (2¾ in)

---

### Hub: Top Section (Increases)

Using 4 mm DPNs and Colour A, CO 6 sts using the backwards loop (Emily Ocker) cast-on or simply cast on to one needle and distribute. Join to work in the round. Pm for BOR.

**Round 1:** [Kfb] 6 times. **12 sts.**

**Round 2:** K all sts.

**Round 3:** [Kfb, k1] 6 times. **18 sts.**

**Round 4:** K all sts.

**Round 5:** [Kfb, k2] 6 times. **24 sts.**

**Round 6:** K all sts.

**Round 7:** [Kfb, k3] 6 times. **30 sts.**

**Round 8:** K all sts.

**Round 9:** [Kfb, k4] 6 times. **36 sts.**

**Rounds 10–18:** K all sts. *(9 rounds straight — forms equator of sphere)*

*This creates the widest point of the hub. 36 sts at tension = 36/1.8 = 20 cm circumference ≈ 6.4 cm diameter. ✅*

### Hub: Accent Band

**Rounds 19–20:** With Colour B, k all sts.

Return to Colour A.

### Hub: Lower Section (Decreases)

**Round 21:** [K4, k2tog] 6 times. **30 sts.**

**Round 22:** K all sts.

**Round 23:** [K3, k2tog] 6 times. **24 sts.**

**Round 24:** K all sts.

**Round 25:** [K2, k2tog] 6 times. **18 sts.**

**Round 26:** K all sts.

*At this point, stuff the hub sphere firmly through the remaining opening.*

**Round 27:** [K1, k2tog] 6 times. **12 sts.**

**Round 28:** K all sts.

**Round 29:** [K2tog] 6 times. **6 sts.**

Cut yarn, leaving a 15 cm (6 in) tail. Thread through remaining 6 sts, pull tight, and secure. Weave in end on the inside.

---

**Hub Math Check:**
- CO 6 → increases over 5 increase rounds → **36 sts** at widest point ✅
- Equator: 9 straight rounds ✅
- Decreases mirror increases over 5 decrease rounds → back to **6 sts** ✅
- Stuffing is inserted before round 27 when the opening is still accessible ✅

---

### Hub: Spoke Attachment Markers

Before proceeding to the spokes, mark 6 evenly-spaced points around the equator of the hub (the widest point, approximately at round 14 of the finished sphere). These are where the spokes will be attached.

Using a locking stitch marker or small safety pin, mark one point, then count 6 sts around the equator and mark the next. Continue until all 6 points are marked, evenly distributed 60° apart. *At 36 sts maximum circumference, each spoke position is 36 ÷ 6 = **6 sts apart**. ✅*

---

## COMPONENT 3: SPOKE TUBES (MAKE 6)

*Six identical tube-shaped spokes radiate from the central hub to the torus ring. They are knitted as short I-cord-style tubes.*

**Yarn:** Colour A (Silver Grey)
**Needles:** 4 mm DPNs
**Cast-on:** 10 sts
**Finished length:** approximately 7 cm (2¾ in)
**Finished diameter:** approximately 1.8 cm (¾ in)

---

### Spoke: Instructions (Make 6)

Using 4 mm DPNs and Colour A, CO 10 sts. Distribute across 3 DPNs (3–4–3). Join to work in the round. Pm for BOR.

**Rounds 1–18:** K all sts.

*18 rounds at 24 rows/10 cm = 7.5 cm ≈ 7 cm. ✅*

Do not cast off. Leave sts on needle or thread onto a length of waste yarn to keep live for attachment.

Stuff the spoke tube firmly with a small amount of fibrefill. The spoke should be firm enough to hold a slight outward angle.

**Make 6 identical spokes.**

---

**Spoke Math Check:**
- 10 sts CO; stitch count remains **10 throughout** ✅
- 10 sts ÷ 1.8 sts/cm = 5.6 cm circumference → ~**1.8 cm diameter** ✅
- 18 rounds ÷ 2.4 rows/cm = **7.5 cm length** ✅

---

## COMPONENT 4: SENSOR / COMMUNICATIONS DISH

*The dish is a small, shallow bowl shape attached to the top of the central hub. It represents TB5's iconic communications dish.*

**Yarn:** Colour B (Yellow/Gold) with a small amount of Colour A
**Needles:** 3.5 mm DPNs

---

### Dish: Instructions

Using 3.5 mm DPNs and Colour B, CO 6 sts. Join to work in the round. Pm.

**Round 1:** [Kfb] 6 times. **12 sts.**

**Round 2:** K all sts.

**Round 3:** [Kfb, k1] 6 times. **18 sts.**

**Round 4:** K all sts.

**Round 5:** [Kfb, k2] 6 times. **24 sts.**

**Round 6:** K all sts.

**Round 7:** [Kfb, k3] 6 times. **30 sts.**

**Round 8:** P all sts. *(This creates a turning ridge — the edge of the dish brim.)*

**Round 9:** [K3, k2tog] 6 times. **24 sts.**

**Round 10:** K all sts.

**Round 11:** [K2, k2tog] 6 times. **18 sts.**

**Round 12:** K all sts.

**Round 13:** [K1, k2tog] 6 times. **12 sts.**

Cut B. Join Colour A.

**Round 14:** K all sts.

**Round 15:** [K2tog] 6 times. **6 sts.**

Cut yarn. Thread through remaining 6 sts and pull tight. Do not stuff — the dish is slightly cupped rather than stuffed.

*The purl ridge at round 8 creates a natural curl that gives the dish its bowl/cup shape. Gently block or steam the dish over a rounded surface (e.g., a tennis ball or similar) to emphasise the curve.*

---

**Dish Math Check:**
- CO 6 → increases to 30 sts (max) over 4 increase rounds ✅
- Purl turning ridge at round 8 ✅
- Decreases back to 6 sts over 4 decrease rounds ✅

---

## COMPONENT 5: ANTENNA

*A small I-cord antenna protrudes from the top/centre of the communications dish.*

**Yarn:** Colour A (Silver Grey)
**Needles:** 4 mm DPNs (2 needles only, for I-cord)

---

### Antenna: Instructions

Using 2 DPNs and Colour A, CO 3 sts.

Work **I-cord** as follows:
- *Do not turn. Slide sts to right end of needle. Pull working yarn firmly across the back. K3.*
- Repeat this row for I-cord.

Work I-cord for **20 rows** (approximately 8 cm / 3 in).

*Optional: Insert a small piece of pipe cleaner or craft wire into the I-cord before finishing, to allow the antenna to be posed.*

BO all sts. Weave in ends.

---

### Antenna: Tip Ball (Optional)

For a more accurate representation of TB5's antenna, add a tiny ball tip:

Using Colour A, CO 4 sts on DPNs.

**Round 1:** [Kfb] 4 times. **8 sts.**

**Round 2:** K all sts.

**Round 3:** [K2tog] 4 times. **4 sts.**

Thread tail through 4 sts. Stuff with a tiny pinch of fibrefill and pull tight. Sew to top of I-cord antenna.

---

## COMPONENT 6: SENSOR RING DETAIL (OPTIONAL)

*A small accent ring can be added at the top of the hub where the dish attaches, representing the structural ring visible on TB5.*

**Yarn:** Colour B (Yellow/Gold)
**Needles:** 4 mm DPNs

CO 24 sts. Join in the round. Work 4 rounds in St st. BO. Sew into a small ring and attach at junction of hub and dish.

---

## ASSEMBLY

*Read all assembly instructions before beginning. Work in the sequence given.*

### Step 1: Attach Spokes to Hub

Position one spoke at each of the 6 marked points around the hub equator.

With live spoke sts still on needles (or picked up from waste yarn), use the three-needle cast-off / join method or graft the spoke opening directly to the hub surface using a tapestry needle, picking up sts from the hub surface at the marker positions.

Alternatively: BO the spoke sts. Using Colour A and a tapestry needle, whipstitch the cast-off edge of each spoke firmly to the hub at each marked position, ensuring the spoke is perpendicular (pointing outward from the hub like a wheel spoke, not angled up or down).

Ensure all 6 spokes are securely attached and point outward evenly. The assembly should look like a wheel with 6 spokes and a central hub.

---

### Step 2: Position Hub and Spokes Inside Torus Ring

Lay the completed torus flat. Find the inner opening of the torus ring (the hole in the middle of the donut).

Insert the spoke-and-hub assembly into position so that:
- The hub sits centred in the hole of the torus
- The six spoke tips point outward and touch the inner surface of the torus ring

Using Colour A and a tapestry needle, stitch the tip of each spoke firmly to the inner surface of the torus. Take several anchoring stitches through the torus fabric and the spoke tip to ensure a strong join. Each spoke should be taut enough to hold the hub centred without sagging.

*Tip: Pin the assembly in position before sewing to check even spacing. The torus Kitchener-stitch join should be positioned between two spokes so it is less visible from the front.*

---

### Step 3: Attach Sensor Ring (if made)

Sew the Colour B accent ring to the top of the hub, centred. This will act as a mounting ring for the communications dish.

---

### Step 4: Attach Communications Dish

Position the cupped dish on top of the hub, centring it over the sensor ring. The Colour A portion of the dish base should sit against the hub surface.

Sew firmly in place using Colour A through the base of the dish and into the top of the hub, taking 6–8 securing stitches around the circumference of the dish base for a strong, even attachment.

*Shape the dish into its characteristic bowl shape by misting lightly with water and pinning to a rounded surface to dry, if not already done during blocking.*

---

### Step 5: Attach Antenna

Push the I-cord antenna through the centre of the communications dish (the tight gathered centre at the top of the dish) from the outside in, so approximately 7–8 cm (2¾–3 in) protrudes above the dish.

Stitch the antenna base firmly to the inside of the dish and into the top of the hub. If a pipe cleaner or wire was used, fold the excess inside the hub.

Attach the optional antenna tip ball if made.

---

### Step 6: Final Detailing (Optional)

*For a more screen-accurate finish, add the following embellishments:*

**Window panels:** Using Colour C (White) and a tapestry needle, embroider 8–10 small rectangular shapes around the upper surface of the torus using duplicate stitch or satin stitch. Space evenly around the ring.

**Window frames:** Outline the white rectangles with 1–2 rows of Colour D (Charcoal) using backstitch.

**Panel lines:** Using Colour D and a single strand, work fine lines of running stitch along the surface of the torus and hub to suggest the structural panelling of the space station.

**Yellow accent rings on hub:** If the Colour B accent band on the hub appears subtle once assembled, a round of surface crochet or chain stitch in Colour B may be worked around the equator to emphasise it.

---

## FINISHING

1. Check all joins between spokes and hub, and between spoke tips and torus inner surface. Reinforce any that feel loose with additional stitches.

2. Weave in all remaining yarn ends thoroughly. As this is a softie, ends should be woven in across at least 5 cm (2 in) and in two directions to prevent working loose.

3. Give the finished piece a light steam or cold-water block if the yarn fibre allows. This will even out any uneven stitch tension and help the torus sit in a true circular shape.

4. The finished Thunderbird 5 softie may be displayed on a small stand (a mini plate stand or ring-shaped base works well) to show off the torus shape.

---

## FINISHED MEASUREMENTS SUMMARY

| Component | Measurement |
|---|---|
| Torus outer diameter | ~22 cm (8½ in) |
| Torus tube diameter | ~5 cm (2 in) |
| Central hub diameter | ~7 cm (2¾ in) |
| Spoke length | ~7 cm (2¾ in) |
| Spoke diameter | ~1.8 cm (¾ in) |
| Sensor dish diameter | ~8 cm (3¼ in) |
| Antenna length | ~8 cm (3 in) |
| Total height inc. antenna | ~26 cm (10¼ in) |

---

## PATTERN TIPS AND TROUBLESHOOTING

**"My torus won't lie in a flat circle"**
This is usually caused by under-stuffing. The torus needs to be very firmly stuffed to hold its ring shape. Adding an internal felt/foam former as described in the notes will significantly help.

**"My spokes look uneven"**
Pin all 6 spokes to the hub and into position in the torus before sewing anything. Step back and check from a distance. Adjust positions before committing to stitching.

**"The hub wobbles or sags inside the torus"**
If the hub does not sit firmly centred, add a 7th anchor stitch directly from the bottom of the hub down to the inner torus surface, or add a 7th spoke (a short one, downward-facing) to stabilise it.

**"My Kitchener stitch join on the torus is visible"**
Work the graft with slightly looser tension, matching the surrounding knitted sts as closely as possible. The accent colour bands draw the eye away from any seam. Position the seam at the rear/base of the station.

**"The dish won't hold its bowl shape"**
Work the dish on smaller needles (3.5 mm or even 3 mm) for a tighter, stiffer fabric. Block aggressively over a ball form while damp.

---

## YARN QUANTITIES SUMMARY (FOR SUBSTITUTION)

| Colour | Approx. Metreage |
|---|---|
| A — Silver Grey | 250 m (275 yds) |
| B — Yellow / Gold | 60 m (65 yds) |
| C — White | 15 m (17 yds) |
| D — Dark Charcoal | 10 m (11 yds) |
| **Total** | **~335 m (370 yds)** |

---

*Pattern designed for the original International Rescue Thunderbird 5 space station as depicted in the classic Gerry Anderson television series. For personal use only; not for commercial sale. Thunderbirds™ is a trademark of ITV Studios.*

*Thunderbirds Are Go! ✦*

---
Disclaimer: This pattern was generated by AI and should be reviewed for accuracy before use. While we strive for quality, AI-generated content may contain errors. Please verify measurements, stitch counts, and instructions before beginning your project. Generated by purlJam.uk
Access your pattern anytime
Bookmark this page to access your pattern anytime