Type
Crochet
Difficulty
beginner
Category
gloves
AI Thinking Process
Planning
Verification
Pattern
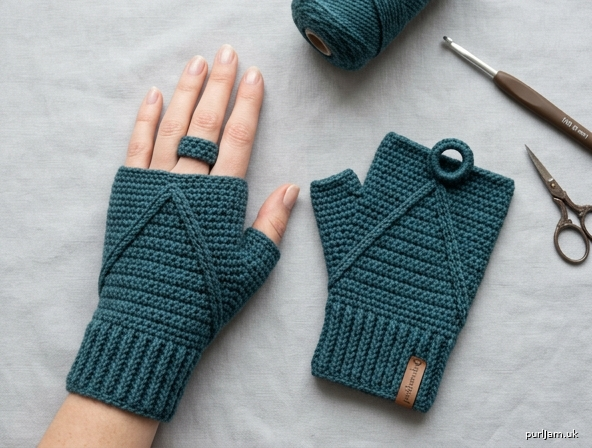
Triangle Ring Fingerless Mitts
Fingerless mitts with a triangular back panel that tapers to a ring on the middle finger.
A snug ribbed cuff leads into a simple hdc hand, a thumb opening, and a short palm edge at the knuckles. The back of the hand then decreases into a triangle that ends in a crocheted ring for the middle finger. Worked in worsted weight yarn with only sc, hdc, and hdc2tog — a quick beginner project.
Skill Level: Beginner
Sizes
Adult Small (Medium, Large)
To fit hand circumference (around knuckles, excluding thumb): 7 (8, 9)" / 18 (20.5, 23) cm
Instructions are written for size Small, with Medium and Large in parentheses. When only one number is given, it applies to all sizes.
Make 2 mitts. The tube is the same for both hands; the triangle is placed on the back of each hand after trying on, so the thumb opening sits on the correct side.
Finished Measurements
- Hand circumference: 7 (8, 9)" / 18 (20.5, 23) cm
- Cuff length: 2½" / 6.5 cm
- Palm length (top of cuff to palm edge): 3¼ (3½, 4)" / 8.5 (9, 10) cm
- Triangle length (palm edge to ring): 1¾ (2¼, 2½)" / 4.5 (5.5, 6.5) cm
Materials
- Yarn: Worsted weight (Category 4), 100 (120, 145) yd / 91 (110, 133) m. Acrylic or a wool blend is easy to care for and holds the ribbing well. One standard 190 yd / 174 m skein is enough for a pair in any size.
- Hook: US H/8 (5 mm), or size needed to obtain gauge
- Notions: Yarn needle, 4 stitch markers, scissors, measuring tape
Gauge
14 hdc and 11 rows = 4" (10 cm) in hdc, worked in the round.
Work a 5" (12.5 cm) swatch, unstretched, and measure the center 4" (10 cm). Change hook size if needed. A slightly firm fabric looks neater on the triangle and ring.
Abbreviations (US Crochet Terms)
- BLO — back loop only
- ch — chain
- hdc — half double crochet
- hdc2tog — half double crochet 2 together (decrease)
- rnd(s) — round(s)
- RS — right side
- sc — single crochet
- sl st — slip stitch
- st(s) — stitch(es)
- WS — wrong side
hdc2tog: Yarn over, insert hook in next st, yarn over and pull up a loop (3 loops on hook), yarn over, insert hook in following st, yarn over and pull up a loop (5 loops on hook), yarn over and pull through all 5 loops.
Pattern Notes
- The cuff is a ribbed strip, seamed into a tube. The hand is worked in joined rounds. The triangle is worked in turned rows.
- Ch 2 at the start of an hdc round does not count as a stitch. Work the first hdc in the same stitch as the join.
- The triangle must sit on the back of the hand, with the ring on the middle finger. Do not assign left/right until you try the tube on.
- Try the ring chain around your middle finger before joining it. It should slide over the knuckle and then sit comfortably. Add or remove 1–2 chains if needed; the stitch count of the ring will match your chain.
- Keep the thumb-opening chain untwisted.
Instructions
Cuff (make 2)
Worked flat as a ribbed strip, then joined into a tube.
Ch 11.
Row 1: Sc in 2nd ch from hook and in each ch across, turn. — 10 sc
Row 2: Ch 1, sc BLO in each st across, turn. — 10 sc
Repeat Row 2 until you have 24 (28, 32) rows total.
Cuff height is 10 sc = 2½" / 6.5 cm ✓
Cuff circumference (unstretched, about 4 sc-BLO rows per inch): 24 rows = 6" / 15 cm; 28 rows = 7" / 18 cm; 32 rows = 8" / 20.5 cm ✓
Join the cuff: Fold the strip so the two short ends meet, RS together. Sl st through both layers across all 10 sts, or whipstitch with the yarn needle. Turn RS out. The seam is the wrong side of the cuff.
Pick up for the hand: Join yarn at the seam, at one long edge of the tube (this edge becomes the top of the cuff). Ch 1, work 1 sc in each row end around, sl st to first sc to join. — 24 (28, 32) sc (1 sc per ribbing row: 24 (28, 32) rows → 24 (28, 32) sc ✓)
Hand
Worked in joined rounds on the 24 (28, 32) sts. Place a marker in the first st of the round and move it up as you go.
Rnd 1: Ch 2 (does not count as a st here and throughout), hdc in each st around, sl st to first hdc to join. — 24 (28, 32) hdc
(14 hdc = 4" / 10 cm → 24 hdc = 6.86" / 17.5 cm; 28 hdc = 8" / 20.5 cm; 32 hdc = 9.14" / 23 cm ✓)
Rnds 2–4 (2–4, 2–5): Ch 2, hdc in each st around, join. — 24 (28, 32) hdc
Length so far: 4 (4, 5) hdc rnds at 11 rnds = 4" / 10 cm → 1½ (1½, 1¾)" / 3.8 (3.8, 4.5) cm ✓
Thumb Opening
Rnd 5 (5, 6): Ch 2, hdc in next 19 (22, 25) sts, ch 5 (6, 7), skip next 5 (6, 7) sts, hdc in remaining 0 (0, 0) sts (you should now be at the join), sl st to first hdc to join.
Stitches worked + skipped = 19 + 5 = 24; 22 + 6 = 28; 25 + 7 = 32 ✓
Chain matches skipped sts: 5 (6, 7) ✓
Rnd 6 (6, 7): Ch 2, hdc in each hdc and in each ch around, join. — 24 (28, 32) hdc (19 hdc + 5 ch = 24; 22 hdc + 6 ch = 28; 25 hdc + 7 ch = 32 ✓)
Rnds 7–9 (7–10, 8–11): Ch 2, hdc in each st around, join. — 24 (28, 32) hdc
Hand after cuff: 9 (10, 11) hdc rnds → 3¼ (3½, 4)" / 8.5 (9, 10) cm ✓
Do not fasten off. Leave the working yarn attached.
Place the Back of the Hand
Try the mitt on the intended hand, thumb through the thumb opening, cuff at the wrist. The remaining live stitches should sit at about knuckle height.
With the mitt still on (or flattened the same way), place:
- Marker A at one edge of the back of the hand
- Marker B at the other edge of the back of the hand
There should be 12 (14, 16) sts between A and B across the back, and 12 (14, 16) sts across the palm (including the side that holds the thumb opening).
12 + 12 = 24; 14 + 14 = 28; 16 + 16 = 32 ✓
The triangle is worked only on the back 12 (14, 16) sts. The palm 12 (14, 16) sts are bound off next.
Palm Edge
Continue with the attached yarn. If the working yarn is not already at Marker A or B (a side edge, where back meets palm), sl st across to the nearest of those two markers. Fasten off if you had to cut; otherwise keep going.
Palm row: Ch 1, sc in each of the 12 (14, 16) palm sts from marker to marker. Fasten off. — 12 (14, 16) sc
This is the open fingerless edge across the palm and the sides, at knuckle height.
Back Triangle
The triangle sits on the back of the hand and tapers toward the middle finger.
With RS facing, join yarn at Marker A (right-hand edge of the back when the back of the hand faces you).
Row 1 (RS): Ch 2 (does not count as a st), hdc2tog, hdc in each st to last 2 sts, hdc2tog, turn. — 10 (12, 14) hdc
(12 − 2 = 10; 14 − 2 = 12; 16 − 2 = 14 ✓)
Row 2: Ch 2, hdc2tog, hdc in each st to last 2 sts, hdc2tog, turn. — 8 (10, 12) hdc
(10 − 2 = 8; 12 − 2 = 10; 14 − 2 = 12 ✓)
Row 3: Repeat Row 2. — 6 (8, 10) hdc
(8 − 2 = 6; 10 − 2 = 8; 12 − 2 = 10 ✓)
Row 4: Repeat Row 2. — 4 (6, 8) hdc
(6 − 2 = 4; 8 − 2 = 6; 10 − 2 = 8 ✓)
Row 5: Repeat Row 2. — 2 (4, 6) hdc
(4 − 2 = 2; 6 − 2 = 4; 8 − 2 = 6 ✓)
Size Small only: Skip to Middle Finger Ring. Small is at 2 sts after 5 rows ✓
Size Medium only:
Row 6: Ch 2, hdc2tog, hdc2tog, turn. — 2 hdc (4 − 2 = 2 ✓)
Skip to Middle Finger Ring.
Size Large only:
Row 6: Ch 2, hdc2tog, hdc in next 2 sts, hdc2tog, turn. — 4 hdc (6 − 2 = 4 ✓)
Row 7: Ch 2, hdc2tog, hdc2tog, turn. — 2 hdc (4 − 2 = 2 ✓)
Triangle length: 5 (6, 7) hdc rows at 11 rows = 4" / 10 cm → 1¾ (2¼, 2½)" / 4.5 (5.5, 6.5) cm ✓
All sizes now have 2 hdc.
Middle Finger Ring
Next Row: Ch 1, sc in each of the 2 sts. — 2 sc
Ring: Ch 10 (11, 12). Try this chain around the middle finger; it must pass over the knuckle. Adjust by 1–2 chains if needed, then use that count for the sc round below.
Being careful not to twist the chain, sl st in the first of the 2 sc to close the loop. The 2 sc sit at the base of the ring, centered on the triangle point.
Ch 1, work 10 (11, 12) sc into the chain loop (insert the hook into the loop and around the chain, not into individual chains). Sl st to first sc of the ring to join. — 10 (11, 12) sc ✓
Fasten off.
The ring is a small band at the tip of the triangle and is meant to sit on the middle finger.
Thumb Edging
With RS facing, join yarn at the thumb opening.
Ch 1, work 12 (14, 16) sc evenly around the opening (work into skipped sts, into the opposite side of the chain, and into the sides of the adjacent hdc rnds as needed). Sl st to first sc to join. Fasten off. — 12 (14, 16) sc
Second Mitt
Work a second cuff, hand, and thumb opening the same way.
Try this second tube on the other hand before placing markers. Mark the 12 (14, 16) sts that lie on the back of that hand, then work Palm Edge, Back Triangle, Middle Finger Ring, and Thumb Edging as before.
The two mitts are not identical once the triangle is placed: on each hand the thumb opening sits to the side and the triangle points at the middle finger.
Finishing
Weave in all ends on the WS with the yarn needle.
If the ring or thumb edging feels loose, weave the starting tail around the inside of that round and pull slightly to firm it, then secure.
Block lightly if desired: mist with water, shape the triangle so the sides are straight and the ring is round, and let dry flat. Do not stretch the ribbed cuff.
Fit Checks
- Cuff: Should hug the wrist and stay put when you flex your hand.
- Palm edge: Should sit at or just below the knuckles, leaving the fingers free.
- Triangle: Should lie flat on the back of the hand and point at the middle finger, without pulling the palm edge sideways.
- Ring: Should slide over the middle-finger knuckle and then rest comfortably. If it is tight, undo the ring only and recrochet with 1–2 extra chains. If it is loose, use 1–2 fewer chains.
Optional Contrast Ring
For a clearer “ring” look, work the Middle Finger Ring in a second color. Fasten off the main color after the 2 sc at the triangle tip, join the contrast color, then work the chain and the sc round as written.
Disclaimer: This pattern was generated by AI and should be reviewed for accuracy before use. While we strive for quality, AI-generated content may contain errors. Please verify measurements, stitch counts, charts, and instructions before beginning your project. Generated by purlJam.uk
Love this pattern?
Save this pattern to your free PurlJam libraryAccess your pattern anytime
Bookmark this page to access your pattern anytime