Type
Crochet
Difficulty
intermediate
Category
custom
AI Thinking Process
Planning
Verification
Pattern
Tripled Ruffle Hyperbolic Plane
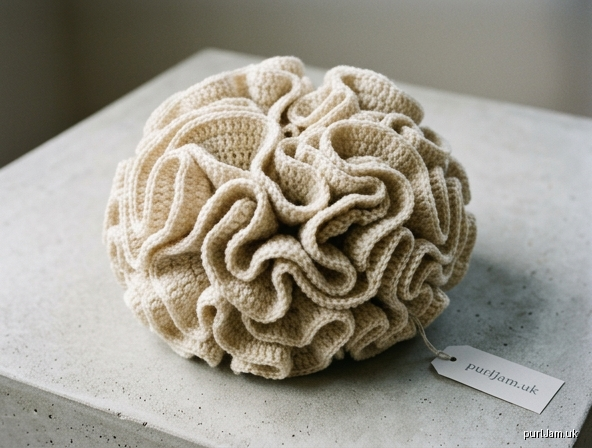
A crocheted model of a hyperbolic plane, the shape found in coral reefs, lettuce leaves and sea slugs. Every round triples its stitch count. This makes an exceptionally dense, frilled form that curls in on itself in every direction.
Skill level: Advanced. The stitches are simple, but the counts are very large and the work needs stamina.
Materials
- Yarn: Worsted weight (UK Aran/heavy DK equivalent), about 450–550 m (490–600 yd) in total.
- Example: 5 × 100 g balls of about 200 m each will give you a comfortable margin.
- A smooth, light-coloured wool or acrylic makes stitches easier to see.
- Hook: 5 mm (US H-8).
- Notions:
- At least 10 locking stitch markers.
- A tapestry needle.
- Scissors.
- Optional: a tally counter.
Tension (Gauge)
14 tr and 7 rounds = 10 cm (4 in) over trebles worked flat on a 5 mm hook.
Tension is not critical for this project, but it affects yarn use. A looser tension uses more yarn and gives a floppier ruffle.
Finished Size
- Radius: about 10 cm (4 in) from the centre to the edge, measured along a single "spoke".
- Shape: the piece will not lie flat. It forms a dense, ruffled ball about 15–20 cm (6–8 in) across.
- Outer edge length: about 31 m (34 yd), made up of 4,374 sts.
Abbreviations (UK terms)
- ch – chain
- sl st – slip stitch
- st(s) – stitch(es)
- tr – treble crochet (US double crochet)
- MR – magic ring
- rep – repeat
- ( ) – stitch count at the end of the round
Pattern Notes
- The pattern is worked in joined rounds. Do not turn your work.
- The ch-3 at the start of each round counts as the first tr. Always work 2 tr into the same stitch as the ch-3. This completes the first group of 3.
- The final ch-3 of each round is never worked into. You join to the top of it instead.
- Work all stitches through both loops.
- Each round triples the stitch count. The formula is: stitches in the round = 6 × 3^(round − 1).
- Counting tip: from Round 4 onwards, place a marker every 54 sts (18 groups of 3). Check the number of markers rather than recounting every stitch.
- Join new yarn mid-round using a spit splice or a woven join. A new ball will often be needed in Rounds 6–7.
- Interpretation note: this pattern makes 7 rounds in total, including the magic ring round. If you meant 7 increase rounds after the ring, work one more round. That eighth round has 13,122 sts and needs roughly 1,000 m more yarn.
Instructions
Round 1: Make a MR. Ch 3 (counts as tr), then work 5 tr into the ring. Pull the ring closed. Sl st to the top of the ch-3 to join. (6 sts)
Round 2: Ch 3 (counts as tr), then work 2 tr in the same st. *Work 3 tr in the next st; rep from * 4 more times. Sl st to the top of the ch-3 to join. (18 sts) ✓ 6 sts × 3 = 18
Round 3: Ch 3, then work 2 tr in the same st. *Work 3 tr in the next st; rep from * to the end. Sl st to the top of the ch-3 to join. (54 sts) ✓ 18 × 3 = 54
Round 4: Repeat Round 3. (162 sts) ✓ 54 × 3 = 162. Place a marker every 54 sts (3 markers).
Round 5: Repeat Round 3. (486 sts) ✓ 162 × 3 = 486. The 3 sections of Round 4 each become 162 sts (3 × 162 = 486).
Round 6: Repeat Round 3. (1,458 sts) ✓ 486 × 3 = 1,458
Round 7: Repeat Round 3. (4,374 sts) ✓ 1,458 × 3 = 4,374
Total stitches worked: 6 + 18 + 54 + 162 + 486 + 1,458 + 4,374 = 6,558 tr ✓
Fasten off.
Tips for Rounds 5–7
- The edge will twist and fold over itself. Work a short section, then let it fall freely before continuing. This stops it tangling.
- To avoid skipped stitches, count in groups: each 3-tr group comes from one stitch below. Checking "one group per stitch below" is easier than counting the totals.
- Expect Round 7 alone to take many hours. Marking your place before each break helps.
Finishing
- Weave in all ends securely along the stitch posts. Do not weave them along the edge, where they would show.
- Do not block flat. If you want, mist the piece lightly and arrange the ruffles by hand.
- Optional: to give the edge more definition, work a round of sl st in a contrasting colour. This adds about 31 m of yarn.
Design variation: for a more open, classroom-style hyperbolic model, use a gentler ratio such as "2 tr in every 3rd st". This produces a slower, more readable curve.
Disclaimer: This pattern was generated by AI and should be reviewed for accuracy before use. While we strive for quality, AI-generated content may contain errors. Please verify measurements, stitch counts, charts, and instructions before beginning your project. Generated by purlJam.uk
Love this pattern?
Save this pattern to your free PurlJam libraryAccess your pattern anytime
Bookmark this page to access your pattern anytime