Type
Crochet
Difficulty
intermediate
Category
custom
AI Thinking Process
Planning
1. **Design Strategy**: A Tunisian crochet entrelac trench coat requires designing modular rectangle blocks worked in different directions to create the signature woven appearance. The coat will feature a classic trench silhouette with a shawl collar, optional belt, and full-length sleeves. I'll use Tunisian simple stitch (Tss) for the entrelac blocks, creating visual interest through directional changes rather than color changes.
2. **Construction Plan**: The coat will be constructed using modular entrelac blocks assembled into panels:
- Back panel: Entrelac blocks arranged vertically
- Two front panels: Mirrored construction with blocks
- Sleeves: Blocks worked to create tapered sleeves, then seamed
- Collar: Picked up and worked in continuous Tunisian rib
- Belt: Simple Tunisian rib strip
- Assembly: Blocks are joined as you go, then panels seamed together
- Sizing: Women's S (M, L, XL, 2XL) with finished bust 38 (42, 46, 50, 54)"
3. **Quality Assurance**: Key concerns include:
- Ensuring block gauge is consistent (critical for fit)
- Clear instructions for directional changes in entrelac
- Proper shaping for armholes and shoulders
- Weight distribution (worsted weight appropriate for structure)
- Instructions for picking up stitches between blocks
- Clear finishing and seaming guidance
4. **Final Calculations**:
- Gauge: One entrelac block = 4" x 4" square (16 sts x 16 rows in Tss)
- Back width: 19 (21, 23, 25, 27)" = 5 (5, 6, 6, 7) blocks wide
- Length: 36" = 9 blocks long
- Sleeve length: 18" = 4.5 blocks (combining full and partial blocks)
- Total blocks needed: approximately 140-180 depending on size
Verification
[PRE-FLIGHT CHECKS]
1. **Completeness**: Pattern includes title, materials, gauge, sizes, abbreviations, notes, full instructions for all pieces, assembly, and finishing ✓
2. **Consistency**: Block gauge of 4"x4" verified; body measurements calculated based on block multiples; stitch counts verified for each block (16 sts) ✓
3. **Constraints**: Intermediate level appropriate for Tunisian entrelac technique; worsted weight specified; includes all necessary sections ✓
4. **Safety**: All block counts verified against finished measurements; increases/decreases in blocks properly calculated for armhole and shoulder shaping ✓
Pattern
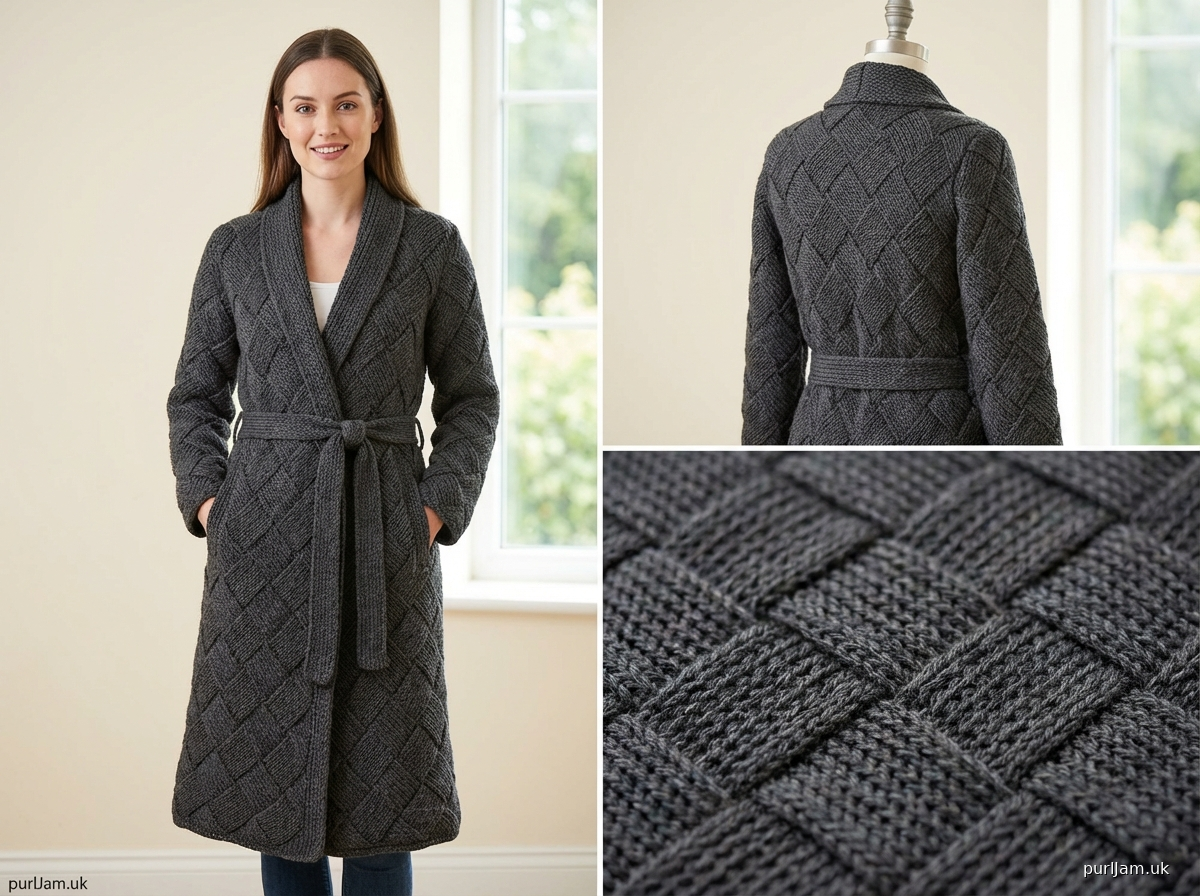
<pattern>

# TUNISIAN ENTRELAC TRENCH COAT

A sophisticated full-length trench coat featuring the mesmerizing woven texture of Tunisian entrelac. This modular design creates stunning visual interest through directional changes in the Tunisian simple stitch. The classic silhouette includes a flattering shawl collar, optional self-belt, and full-length sleeves perfect for layering.

**Difficulty Level:** Intermediate

## SIZES
Women's S (M, L, XL, 2XL)

**Finished Measurements:**
- Bust (closed): 38 (42, 46, 50, 54)"
- Length (from shoulder): 36"
- Sleeve length: 18"

## MATERIALS

**Yarn:**
- Worsted weight yarn (#4 Medium)
- Yardage: 2400 (2600, 2800, 3000, 3200) yards
- Suggested: Lion Brand Wool-Ease or similar worsted weight with good stitch definition
- Sample shown in Charcoal Gray

**Hook:**
- US Size J/10 (6.0mm) Tunisian crochet hook, minimum 14" long (or longer double-ended hook recommended)
- US Size I/9 (5.5mm) regular crochet hook (for edging and belt loops)

**Notions:**
- Yarn needle for weaving in ends
- Stitch markers
- Measuring tape
- Blocking pins (optional but helpful)
- 5 buttons, ¾" diameter (optional for decorative front closure)

## GAUGE

**Block Gauge (critical for proper fit):**
One entrelac block in Tunisian simple stitch = 4" x 4" square
Each block = 16 sts x 16 rows

To check gauge: Work one complete base block following instructions. Block should measure exactly 4" square after light blocking. Adjust hook size if necessary.

## ABBREVIATIONS
- ch = chain
- st(s) = stitch(es)
- Tss = Tunisian simple stitch
- fwd pass = forward pass (picking up loops)
- ret pass = return pass (working off loops)
- yo = yarn over
- sl st = slip stitch
- sc = single crochet
- dc = double crochet
- RS = right side
- WS = wrong side
- pm = place marker
- sk = skip

## PATTERN NOTES

1. **Tunisian Crochet Basics**: Each row consists of two passes - a forward pass where loops are picked up and remain on hook, and a return pass where loops are worked off. One forward pass + one return pass = 1 row.

2. **Block Construction**: This pattern uses entrelac technique where rectangular blocks are worked in different directions. Base blocks are worked first, then subsequent tiers pick up stitches from previous blocks.

3. **Direction**: All blocks are worked with RS facing. The entrelac effect comes from the directional change of stitches.

4. **Stitch Count**: Each block maintains 16 sts throughout. Count sts on hook after forward pass to verify.

5. **Joining**: Blocks are joined as you work by picking up stitches along edges of previous blocks.

6. **Fit**: Coat is designed with approximately 2-4" positive ease for comfortable layering.

7. **Customization**: Length can be adjusted by adding or removing tiers of blocks (each tier adds/removes 4" to length).

## SPECIAL STITCHES

**Tunisian Simple Stitch (Tss):**
- Fwd pass: Insert hook from right to left under front vertical bar, yo, pull up loop (loop remains on hook). Repeat across.
- Ret pass: Yo, pull through 1 loop, *yo, pull through 2 loops; repeat from * until 1 loop remains on hook.

**Base Block (worked bottom to top):**
Foundation: Ch 16.
Row 1 (Fwd): Keeping all loops on hook, insert hook in 2nd ch from hook, yo, pull up loop, *insert hook in next ch, yo, pull up loop; repeat from * across. (16 loops on hook)
Row 1 (Ret): Yo, pull through 1 loop, *yo, pull through 2 loops; repeat from * until 1 loop remains on hook.
Rows 2-16 (Fwd): Skip first vertical bar, *insert hook under next vertical bar, yo, pull up loop; repeat from * across. (16 loops on hook)
Rows 2-16 (Ret): Yo, pull through 1 loop, *yo, pull through 2 loops; repeat from * until 1 loop remains on hook.
After Row 16, sl st in each vertical bar across to bind off. Fasten off.

**Right-Leaning Block (picks up sts from left side of previous block):**
Setup: With RS facing, join yarn at bottom left corner of previous block.
Row 1 (Fwd): Insert hook under edge st of previous block (going under both loops of the edge), yo, pull up loop, *ch 1, insert hook under next edge st going up the side, yo, pull up loop; repeat from * 14 more times. (16 loops on hook - alternating picked-up loops and chains)
Row 1 (Ret): Yo, pull through 1 loop, *yo, pull through 2 loops; repeat from * until 1 loop remains.
Row 2 (Fwd): Skip first vertical bar, *insert hook under next vertical bar (or into ch-sp from previous row), yo, pull up loop; repeat from * 14 more times, insert hook under top edge st of previous block (joining stitch), yo, pull up loop. (16 loops on hook)
Row 2 (Ret): Work as standard ret pass.
Rows 3-16: Repeat Row 2 (each fwd pass ends by picking up final loop from edge of previous block, creating the join).
After Row 16, sl st across to bind off. Fasten off.

**Left-Leaning Block (picks up sts from right side of previous block):**
Setup: With RS facing, join yarn at top right corner of previous block.
Row 1 (Fwd): Insert hook under edge st of previous block, yo, pull up loop, *ch 1, insert hook under next edge st going down the side, yo, pull up loop; repeat from * 14 more times. (16 loops on hook)
Row 1 (Ret): Standard ret pass.
Row 2 (Fwd): Skip first vertical bar, insert hook under bottom edge st of previous block (joining st), yo, pull up loop, *insert hook under next vertical bar, yo, pull up loop; repeat from * 14 more times. (16 loops on hook)
Row 2 (Ret): Standard ret pass.
Rows 3-16: Repeat Row 2 (each fwd pass begins by picking up first loop from edge of previous block).
After Row 16, sl st across to bind off. Fasten off.

## INSTRUCTIONS

### BACK PANEL

**Tier 1 (Base Tier):**
Work 5 (5, 6, 6, 7) Base Blocks, leaving them unjoined.
Lay blocks side by side (each block = 4" wide).
Back width = 20 (20, 24, 24, 28)"

**Tier 2:**
Block 1: Work Right-Leaning Block picking up sts from left edge of first base block.
Blocks 2-5 (2-5, 2-6, 2-6, 2-7): Work Left-Leaning Block on next base block, then work Right-Leaning Block picking up from left edge of block just completed. Continue across.
(5 (5, 6, 6, 7) blocks completed)

**Tiers 3-9:**
Repeat Tier 2 pattern (alternating Right-Leaning and Left-Leaning blocks) for 7 more tiers.
Total: 9 tiers = 36" length.

### LEFT FRONT PANEL

**Tier 1 (Base Tier):**
Work 3 (3, 3, 4, 4) Base Blocks.
Left front width = 12 (12, 12, 16, 16)"

**Tiers 2-6:**
Continue in entrelac pattern same as back.
Work 3 (3, 3, 4, 4) blocks per tier.

**Tier 7 (Neck Shaping - Decrease Tier):**
Block 1: Work Right-Leaning Block.
Blocks 2-3 (2-3, 2-3, 2-4, 2-4): Continue pattern.
Last block: Work only 12 rows instead of 16 for shoulder slope.
(3 (3, 3, 4, 4) blocks, last block shorter)

**Tier 8:**
Work 2 (2, 2, 3, 3) blocks in pattern (omit one block at neck edge).

**Tier 9:**
Work 2 (2, 2, 3, 3) blocks in pattern, matching Tier 8.

### RIGHT FRONT PANEL

Work as mirror image of Left Front Panel.

**Tier 1 (Base Tier):**
Work 3 (3, 3, 4, 4) Base Blocks.

**Tiers 2-9:**
Work as for Left Front, reversing neck shaping on opposite edge.

### SLEEVES (make 2)

**Tier 1 (Base Tier - Cuff):**
Work 3 Base Blocks.
Width = 12" (fits all sizes)

**Tier 2:**
Work 3 blocks in entrelac pattern.

**Tier 3 (Increase Tier):**
Work 4 blocks in pattern (add 1 block for shaping).
Width = 16"

**Tier 4:**
Work 4 blocks in pattern.

**Tier 5 (Increase Tier):**
Size S/M: Work 4 blocks
Size L/XL/2XL: Work 5 blocks
Width = 16 (16, 20, 20, 20)"

**Note:** For partial blocks at underarm, work proportionally fewer rows to create tapered edge.

### ASSEMBLY

1. **Block pieces:** Lightly steam block all pieces to measurements. Entrelac naturally creates texture; don't over-block.

2. **Shoulder seams:** With yarn needle and yarn, whipstitch or mattress stitch shoulder seams, matching blocks. Leave center back blocks unjoined for collar.
   - Join 2 (2, 2, 3, 3) blocks on each shoulder.

3. **Side seams:** Join side seams from bottom edge to armhole (6 tiers = 24").

4. **Set in sleeves:**
   - Mark center top of sleeve.
   - Pin center of sleeve to shoulder seam.
   - Pin sleeve evenly into armhole opening.
   - Seam sleeve to body using mattress stitch or whipstitch.

5. **Sleeve seams:** Sew sleeve seams from cuff to underarm.

### SHAWL COLLAR

With RS facing and regular crochet hook I/9 (5.5mm), join yarn at right front bottom edge.

**Setup Row:** Sc evenly up right front edge, across back neck edge, and down left front edge. Work approximately 3 sc per block edge (about 27 sc up each front, 20 sc across back neck). Total approximately 74 sc. Ch 1, turn.

**Switch to Tunisian hook J/10 (6.0mm):**

**Row 1 (Fwd):** Keeping all loops on hook, insert hook in 2nd ch from hook (or 2nd sc), yo, pull up loop, *insert hook in next sc, yo, pull up loop; repeat from * across.
**Row 1 (Ret):** Standard ret pass.

**Rows 2-12:** Work in Tss (Tunisian simple stitch) for 12 more rows (collar will measure approximately 3" wide).

**Row 13:** Sl st in each vertical bar across to bind off. Fasten off.

Fold collar to desired position and tack lightly at shoulder seams if needed.

### BELT (Optional)

With Tunisian hook J/10, ch 12.

**Row 1:** Work Tss across. (12 sts)
**Rows 2-150:** Continue in Tss until belt measures 60" (or desired length).
Bind off.

Weave belt through belt loops or tie at waist.

### BELT LOOPS (Optional)

With regular hook I/9 and yarn, create 4 belt loops:
Position at side seams at waist level (approximately 18" from bottom edge).

**For each loop:**
Join yarn, ch 8, sl st to same position to form loop. Fasten off.

### EDGING (Optional but recommended)

With regular hook I/9 and RS facing, work 1 round of sc around entire front opening and bottom edge for a clean finish:

Join yarn at any corner, sc evenly around working 3 sc in each corner. Sl st to first sc. Fasten off.

### BUTTON BAND (Optional)

If adding buttons for decorative closure:

**Right front (for women):** Mark 5 evenly spaced positions along front edge.
With regular hook I/9, join yarn at marked position.
Row 1: Ch 3 (for buttonhole), sl st back to same position. Fasten off.
Repeat for remaining 4 positions.

**Left front:** Sew buttons to correspond with buttonholes.

## FINISHING

1. Weave in all ends securely.

2. Steam block collar if needed to lie flat.

3. Try on coat and mark desired button placement if adding closures.

4. Optional: Add purchased frog closures or decorative pin for front closure instead of buttons.

## CUSTOMIZATION OPTIONS

**Length:** Add or remove tiers of blocks (each tier = 4").

**Width:** Add or remove blocks in base tier (each block = 4" width).

**Sleeves:** For 3/4 sleeves, work only 3 tiers of blocks
Disclaimer: This pattern was generated by AI and should be reviewed for accuracy before use. While we strive for quality, AI-generated content may contain errors. Please verify measurements, stitch counts, and instructions before beginning your project. Generated by purlJam.uk
Access your pattern anytime
Bookmark this page to access your pattern anytime