Type
Crochet
Difficulty
intermediate
Category
bag
AI Thinking Process
Planning
Verification
Pattern
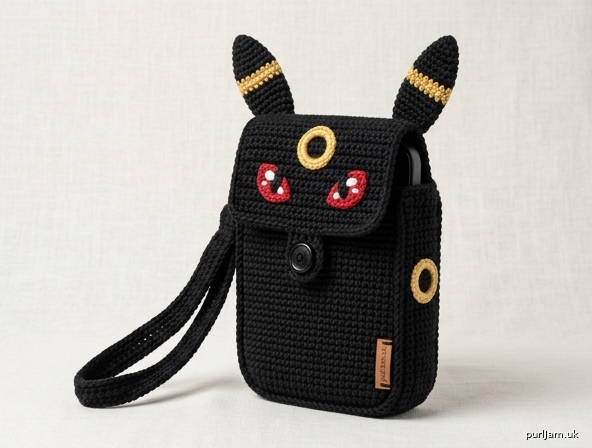
Umbreon-Inspired Crochet Phone Bag
Fan-made character pouch for personal use. Not affiliated with Nintendo, Game Freak, or The Pokémon Company.
A fitted phone bag worked in the round from an oval base, with a head-shaped flap, standing ears, gold rings, and a sturdy wrist strap. Solid single crochet replaces tote mesh so the fabric is dense enough to hold a phone and show the markings clearly.
Skill level: Intermediate
Skills used: Oval base in the round, BLO turning round, flap shaping, appliqué, assembly
Finished measurements
One size, to fit phones up to 6.7" × 3.25" × 0.45" (17 × 8.5 × 1.1 cm), including most slim cases.
- Width (flat): 4½" (11.5 cm)
- Depth (base): 1¼" (3 cm)
- Body height: 7" (18 cm)
- Height with flap closed (not including ears): 7" (18 cm)
- Height with ears: about 9½" (24 cm)
- Wrist strap: 12" × ¾" (30.5 × 2 cm), excluding sewn tabs
Yarn
Worsted weight (Category 4) cotton or cotton blend; cotton is recommended for structure and less stretch.
Shown in: 100% cotton, worsted, approx. 186 yd / 100 g (170 m / 100 g)
| Color | Role | Amount |
|---|---|---|
| A Black | Body, flap, ears, tail, strap | 95 yd (87 m) |
| B Gold / bright yellow | Rings | 35 yd (32 m) |
| C Red | Eyes | 10 yd (9 m) |
| D White | Eye highlights | 5 yd (5 m) |
Hook and notions
- Hook: US G/6 (4.00 mm), or size needed to obtain gauge (go down a hook if fabric is loose or holey)
- Yarn needle
- 4 stitch markers
- ¾" (19 mm) button (black or gold)
- Optional: small amount of polyester stuffing for ear bases only
- Optional: fabric lining 8" × 10" (20.5 × 25.5 cm) and sewing needle/thread
Gauge
16 sc and 18 rnds = 4" (10 cm) in unworked sc, in the round, after light blocking.
Swatch: Ch 20. Sc in 2nd ch from hook and in each ch across (19 sc). Work 20 rows of sc. Center 16 sts × 18 rows should measure 4" × 4" (10 × 10 cm).
Dense fabric is required. If you have fewer than 16 sc in 4" (10 cm), use a smaller hook.
Abbreviations (US terms)
- BLO — back loop only
- ch — chain
- FO — fasten off
- MR — magic ring (adjustable ring)
- pm — place marker
- rep — repeat
- rnd(s) — round(s)
- sc — single crochet
- sc2tog — single crochet 2 together (decrease)
- sl st — slip stitch
- st(s) — stitch(es)
- WS / RS — wrong side / right side
Pattern notes
- US crochet terms throughout.
- Base and body are worked in a continuous spiral unless a join is stated. Place a marker in the first st of every rnd and move it up.
- Do not turn at the end of rnds.
- The flap is worked in turned rows.
- Colorwork is appliqué (sewn rings, eyes, and tail), not tapestry, so the bag stays even at 36 sts.
- Leave long tails (12" / 30.5 cm) on all pieces that will be sewn on.
- This is a fan pattern for personal use.
Bag
Oval base
With A, ch 13.
Rnd 1: Work 2 sc in 2nd ch from hook, sc in next 10 ch, 4 sc in last ch; rotate to work along the opposite side of the foundation ch, sc in next 10 ch, 2 sc in the same ch as the beginning 2 sc. Do not join. Pm in first st.
(2 + 10 + 4 + 10 + 2 = 28 sts ✓)
Rnd 2: 2 sc in each of next 2 sts, sc in next 10 sts, 2 sc in each of next 4 sts, sc in next 10 sts, 2 sc in each of next 2 sts.
(4 + 10 + 8 + 10 + 4 = 36 sts ✓)
Rnd 3 (turning rnd): Sc in BLO of each st around. (36 sts)
This BLO rnd makes a sharp bottom edge so the base sits flat.
Body
Rnds 4–35: Sc in each st around. (36 sts; 32 rnds ✓)
Height of Rnds 4–35: 32 rnds × 4" / 18 rnds = 7.11" ≈ 7" (18 cm) ✓
Rnd 36: Sc in each st around, sl st in first sc to join and end the spiral. (36 sts) FO A, leaving a 12" (30.5 cm) tail, or keep yarn attached if you prefer to start the flap without rejoining.
Flatten the bag so the oval’s long axis is the width. Each face has 18 sts (36 / 2 = 18 ✓). Mark the 18 sts of the back face for the flap. Mark the center of the front face for the button.
Head flap
Join A with sl st in the first marked back st (or continue from Rnd 36 if yarn is still attached), so you are working across the 18 back sts only.
Row 1 (RS): Ch 1, sc in same st and in next 17 sts. (18 sc) Ch 1, turn.
Rows 2–8: Sc in each st across. (18 sc) Ch 1, turn.
(7 additional rows; 8 rows total × 4" / 18 = 1.78" / 4.5 cm ✓)
Row 9: Sc2tog, sc in next 14 sts, sc2tog. (16 sts ✓) Ch 1, turn.
Row 10: Sc in each st across. (16 sts) Ch 1, turn.
Row 11: Sc2tog, sc in next 12 sts, sc2tog. (14 sts ✓) Ch 1, turn.
Row 12: Sc in each st across. (14 sts) Ch 1, turn.
Row 13: Sc2tog, sc in next 10 sts, sc2tog. (12 sts ✓) Ch 1, turn.
Row 14: Sc in each st across. (12 sts) Ch 1, turn.
Row 15: Sc2tog, sc in next 8 sts, sc2tog. (10 sts ✓) Do not turn.
Edging: Ch 1. Work sc evenly down the left side of the flap (about 15 sc), sc in each of the 18 unused body sts along the front opening, sc evenly up the right side of the flap (about 15 sc), sc in next 4 sts of Row 15, ch 8 (button loop), skip next 2 sts of Row 15, sc in last 4 sts of Row 15. Sl st in first edging sc. FO A.
(Button loop: ch 8 sits over the 2 skipped sts at the flap’s center ✓)
Flap length: 15 rows × 4" / 18 = 3.33" (8.5 cm) ✓
Weave in the join. Check that the ch-8 loop reaches the marked front-center st when the flap is folded down; adjust loop length by 1–2 ch if needed before weaving in.
Wrist strap (sturdy handle)
With A, ch 6.
Row 1: Sc in 2nd ch from hook and in each ch across. (5 sc) Ch 1, turn.
Rows 2–56: Sc in each st across. (5 sc) Ch 1, turn.
(56 rows × 4" / 18 = 12.4" ≈ 12½" / 32 cm ✓)
Width: 5 sc × 4" / 16 = 1.25" (3 cm) before seaming.
FO, leaving a 18" (45.5 cm) tail. Fold the strap in half lengthwise (WS together) so it measures about ⅝–¾" (1.5–2 cm) wide. Whipstitch the long edges together through both layers. This doubled strap is the tote-style sturdy handle, scaled to a wristlet.
Ears (make 2)
Worked in a spiral. Do not stuff, or stuff only the lower third very lightly so the ear can be flattened into a point.
With A, make a MR.
Rnd 1: 6 sc in MR. Pm. (6 sts)
Rnd 2: Sc in each st around. (6 sts)
Rnd 3: (Sc in next 2 sts, 2 sc in next st) twice. (8 sts ✓)
Rnd 4: Sc in each st around. (8 sts)
Rnd 5: (Sc in next 3 sts, 2 sc in next st) twice. (10 sts ✓)
Rnd 6: Sc in each st around. (10 sts)
Rnd 7: (Sc in next 4 sts, 2 sc in next st) twice. (12 sts ✓)
Rnd 8: Sc in each st around. (12 sts)
Rnd 9: (Sc in next 5 sts, 2 sc in next st) twice. (14 sts ✓)
Rnds 10–11: Sc in each st around. (14 sts)
Sl st in next st. FO, leaving a 12" (30.5 cm) tail.
Flatten each ear into a triangle, with the MR at the tip. Height: 11 rnds × 4" / 18 = 2.44" ≈ 2½" (6.5 cm) ✓
Ear rings (make 2)
With B, ch 10. Join with sl st in first ch, taking care not to twist.
Rnd 1: Ch 1, sc in each ch around, join with sl st in first sc. (10 sts)
FO, leaving an 8" (20.5 cm) tail. Sew one ring onto the outer face of each flattened ear, centered, about ½" (1.5 cm) up from the base.
Tail
With A, make a MR.
Rnd 1: 6 sc in MR. (6 sts)
Rnd 2: Sc in each st around. (6 sts)
Rnd 3: (Sc in next 2 sts, 2 sc in next st) twice. (8 sts ✓)
Rnds 4–6: Sc in each st around. (8 sts)
Rnd 7: (Sc in next 3 sts, 2 sc in next st) twice. (10 sts ✓)
Rnds 8–12: Sc in each st around. (10 sts)
Sl st in next st. FO, leaving a 12" (30.5 cm) tail. Do not stuff. Flatten slightly. Length: 12 rnds × 4" / 18 = 2.67" ≈ 2¾" (7 cm) ✓
Tail ring (make 1)
With B, ch 12. Join with sl st in first ch.
Rnd 1: Ch 1, sc in each ch around, join. (12 sts)
FO. Slide onto the tail and sew at Rnds 6–8 (mid-tail).
Body rings (make 2)
With B, ch 20. Join with sl st in first ch, taking care not to twist.
Rnd 1: Ch 1, sc in each ch around, join. (20 sts)
Rnd 2: Sc in each st around, join. (20 sts)
FO, leaving a 12" (30.5 cm) tail.
Ring circumference: 20 sts × 4" / 16 = 5" (12.5 cm); outer diameter about 1⅝" (4 cm) ✓
Forehead ring (make 1)
With B, ch 14. Join with sl st in first ch.
Rnd 1: Ch 1, sc in each ch around, join. (14 sts)
Rnd 2: Sc in each st around, join. (14 sts)
FO, leaving a 10" (25.5 cm) tail.
Circumference: 14 sts × 4" / 16 = 3.5" (9 cm); outer diameter about 1⅛" (3 cm) ✓
Eyes (make 2)
Red base — with C
Make a MR.
Rnd 1: 6 sc in MR, join with sl st. (6 sts)
Rnd 2: Ch 1, 2 sc in each st around, join. (12 sts ✓)
FO, leaving an 8" (20.5 cm) tail.
Pupil — with A
Make a MR, 5 sc in MR, join. FO, leaving a tail. (5 sts)
Highlight — with D
Embroider 2–3 small straight sts on the upper-outer edge of each pupil after the pupil is sewn to the red base.
Sew each pupil onto a red base, slightly toward the inner (nose) side, so the eyes look inward.
Assembly
Use matching yarn and small whipstitches. Pin every piece before sewing.
-
Face (on flap, RS)
- Place the two eyes on flap Rows 4–8, about ½" (1.5 cm) apart at the inner edges and ⅜" (1 cm) up from Row 1 (the flap join).
- Place the forehead ring on flap Rows 10–14, centered, sitting just above the eyes. The ring should not cover the button loop.
- Sew all three pieces firmly.
-
Ears
Sew the flattened bases of the ears to the top corners of the flap (Row 15 corners), angling them slightly outward (about 10–15° from vertical). Stitch through both layers of the ear base and through the flap. The tips point up past the flap. -
Body rings
Flatten the bag. Sew one gold ring on each side of the body (the curved gusset), centered top-to-bottom on Rnds 12–28, so they read as Umbreon’s side rings when the bag is viewed from the front. -
Tail
Sew the tail to the lower back, centered, with the base on Rnds 4–8 of the body (just above the BLO turning rnd). The tail points up and slightly to one side. -
Button
With flap closed and the ch-8 loop centered on the front, mark the loop’s landing point. Sew the button to the front body at that point (typically near Rnd 32–34 at front center). -
Wrist strap
Sew one end of the strap to the left top edge and the other end to the right top edge, just below Rnd 36, on the side gussets (not on the flap). Overlap each end ¾" (2 cm) onto the bag and stitch a ⅝" (1.5 cm) square plus an X through the square, through both strap layers and the bag wall. -
Optional lining
Cut fabric 8" × 9½" (20.5 × 24 cm). Fold RS together, seam the 8" sides with ½" (1.5 cm) seam allowance to make a tube, then box or seam the bottom to match the oval. Fold ½" (1.5 cm) to the WS at the top. Insert WS of lining to WS of bag and whipstitch the lining just below Rnd 36, keeping the flap free.
Weave in every remaining tail on the WS.
Finishing
- Steam-block the bag lightly: hover a steam iron over the cotton (do not press the rings flat). Shape the oval base and stand the ears up until dry.
- Check that the phone slides in with the flap closed and the loop around the button. If the opening feels tight, do not stretch the fabric; instead, work one extra rnd of sc on a future bag, or go up half a hook size at the gauge swatch stage.
- If the flap gaps at the sides, tack the first 2 edging sts of each flap side to the body with a couple of hidden sts.
Care
Cotton: machine wash cold, gentle cycle, in a mesh bag. Lay flat to dry. Do not tumble dry (shrinkage and strap twist). Re-shape ears and rings while damp.
Disclaimer: This pattern was generated by AI and should be reviewed for accuracy before use. While we strive for quality, AI-generated content may contain errors. Please verify measurements, stitch counts, charts, and instructions before beginning your project. Generated by purlJam.uk
Love this pattern?
Save this pattern to your free PurlJam libraryAccess your pattern anytime
Bookmark this page to access your pattern anytime