Type
Crochet
Difficulty
intermediate
Category
tank
AI Thinking Process
Planning
Verification
Pattern
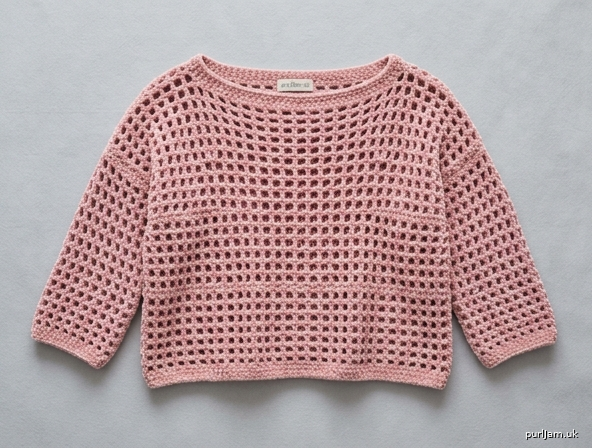
Velvet Mesh Drop-Shoulder Pullover
Cropped open-mesh sweater in bulky chenille — US crochet terms
A boxy, cropped drop-shoulder pullover in airy (dc, ch 1) mesh. The fabric is see-through — wear over a cami, bralette, or tank. Written for chunky velvet/chenille and sized XS–XXL; 420 g is enough for XS, and for S only if you keep the cropped body and ¾ sleeves.
Construction (read this first): Body is worked in the round from the hem to the armholes, then split and the Front and Back are worked flat. Sleeves are worked in the round from the cuff up and sewn into dropped armholes. Shoulders are seamed. No waist shaping.
Difficulty: Intermediate. The mesh stitch is simple; fit, splitting the body, sleeve increases, and seaming fuzzy yarn are the challenge. A confident beginner who has finished one garment can manage this if they use plenty of stitch markers and measure as they go.
US vs UK terms
This pattern is written entirely in US crochet terms (as requested by the terminology profile). If you learned UK terms, convert as you work:
| US term (this pattern) | UK term | What it is |
|---|---|---|
| ch | ch | chain |
| sl st | sl st | slip stitch |
| sc | dc | single crochet / UK double crochet |
| hdc | htr | half double / UK half treble |
| dc | tr | double crochet / UK treble |
| tr | dtr | treble / UK double treble |
| skip (sk) | miss | skip a stitch |
| gauge | tension | stitches per 4" / 10 cm |
US dc is the tall stitch used for the mesh. If you work UK dc (which is US sc), the sweater will be short, dense, and use more yarn.
Sizes
XS (S, M, L, XL, XXL)
Instructions are written for XS with larger sizes in parentheses. When only one number is given, it applies to all sizes.
To fit bust: 30–32 (34–36, 38–40, 42–44, 46–48, 50–52)" / 76–81 (86–91, 97–102, 107–112, 117–122, 127–132) cm
Finished bust: 36 (40, 44, 48, 52, 56)" / 91 (102, 112, 122, 132, 142) cm
Intended ease: Relaxed, about +4 to +6" / +10 to +15 cm. Velvet grows when worn — do not add extra ease.
Finished length (cropped, shoulder to hem): 18 (18.5, 19.5, 20.5, 21, 22)" / 46 (47, 50, 52, 53, 56) cm
¾ sleeve length (underarm to cuff): 12 (12, 12.5, 12.5, 13, 13)" / 30 (30, 32, 32, 33, 33) cm
Upper arm (sleeve): 16 (17.25, 18.75, 18.75, 20, 21.25)" / 41 (44, 48, 48, 51, 54) cm
Yarn
Bulky / chunky (weight 5) velvet or chenille, about 109–131 yd / 100–120 m per 100 g.
You have 420 g. Check the meters on your ball band:
- If ~120 m / 100 g → 420 g ≈ 504 m / 550 yd
- If ~100 m / 100 g → 420 g ≈ 420 m / 460 yd
Estimated yarn (cropped body + ¾ sleeves):
| Size | Grams | Yards (approx, at 110 yd/100 g) |
|---|---|---|
| XS | 380 g | 420 yd / 385 m |
| S | 450 g | 495 yd / 450 m |
| M | 520 g | 570 yd / 520 m |
| L | 590 g | 650 yd / 595 m |
| XL | 670 g | 735 yd / 675 m |
| XXL | 760 g | 835 yd / 765 m |
420 g reality check: XS should finish. S will finish only if you keep this cropped length and ¾ sleeves and your gauge is not heavy. M–XXL need more yarn. Weigh your swatch (see Gauge) before you commit to a size.
Long sleeves or extra body length: add about 80–120 g.
Sample yarn types: Himalaya Dolphin Baby, YarnArt Dolce, or any bulky chenille that meets gauge. Match gauge, not the ball-band hook.
Hook
- US K-10½ / 6.5 mm for the mesh, or size needed to match gauge
- US L-11 / 8 mm for the foundation chain only (velvet chains tighten)
If the swatch is stiff, go up to 7 mm or 8 mm. Mesh in velvet should drape, not stand up.
Notions
- 8+ stitch markers (velvet hides stitches — this is not optional)
- Tapestry needle
- Scissors
- Optional: removable markers for sleeve increase lines
- Optional: a cami or stretch lining if you want opacity
Gauge
Worked flat in Mesh Pattern, measured after hanging (velvet does not wet-block well):
6 dc and 6 ch-1 spaces (12 sts) and 7 rows = 4" / 10 cm
That is 1.5 dc per inch and 1.75 rows per inch.
Swatch: With 6.5 mm, ch 22. Row 1: Dc in 6th ch from hook (skipped chs count as dc + ch 1), *ch 1, sk 1 ch, dc in next ch; rep from * across. Turn. Row 2: Ch 4 (counts as dc + ch 1), sk next ch-1 sp, dc in next dc, *ch 1, dc in next dc; rep from * across, working last dc in 3rd ch of turning ch. Rep Row 2 until the piece is about 6" tall. Fasten off. Pin the top edge and hang it overnight with a little weight, then measure in the center.
Weigh the swatch (in grams), measure its area, and scale up:
needed grams ≈ (swatch grams ÷ swatch sq in) × garment sq in
Rough garment area for this cropped ¾-sleeve version: XS 960 / S 1080 / M 1220 / L 1360 / XL 1520 / XXL 1700 sq in. If that number is above 420 g, go down a size, shorten the body, or skip sleeves (vest).
Always work the garment to the inch measurements. Row counts are a guide.
Stitch guide (US)
- ch — chain
- sl st — slip stitch
- sc — single crochet
- hdc — half double crochet
- dc — double crochet
- sk — skip
- ch-sp — chain space
- rep — repeat
- rnd — round
- st(s) — stitch(es)
Mesh Pattern (in the round): Ch 4 (counts as dc + ch 1), sk next st or sp, *dc in next dc, ch 1, sk next ch-1 sp; rep from * around, join with sl st to 3rd ch of beginning ch-4.
Mesh Pattern (flat): Ch 4 (counts as dc + ch 1), sk next ch-1 sp, dc in next dc, *ch 1, dc in next dc; rep from * across, working last dc in 3rd ch of turning ch. Turn.
Stitch count in this pattern = number of dc (mesh columns). Each dc has a ch-1 after it except as noted when working flat (the row ends with a dc).
Pattern notes
- Join each body/sleeve round with a sl st to the 3rd ch of the beginning ch-4. Do not turn while working in the round.
- Move a marker up the first dc of every round so you can find the join in the pile.
- Place a marker in every 10th dc on the foundation round and leave them until the fabric is established.
- Velvet/chenille does not frog cleanly. Count at the end of every round. If you must undo, go slowly — the nylon core can pull out of the pile.
- The fabric will grow in length. Aim for 1" / 2.5 cm shorter than your ideal hem before wearing.
- Mesh is open and see-through, especially in a lighter color. Plan a lining or a close-fitting layer.
- Weave ends along a dc post, never across a ch-space — they will show and pop out.
- When a size is too big for 420 g, the pattern still gives full numbers so you can buy more yarn or make a vest (stop at the armholes, add straps or cap sleeves).
Body
With 8 mm hook, ch 108 (120, 132, 144, 156, 168). Join with sl st to first ch, being careful not to twist. Switch to 6.5 mm.
Check: 108 = 54 × 2; 120 = 60 × 2; 132 = 66 × 2; 144 = 72 × 2; 156 = 78 × 2; 168 = 84 × 2 ✓
Rnd 1 (set-up): Ch 4 (counts as dc + ch 1 here and throughout), sk next ch, *dc in next ch, ch 1, sk next ch; rep from * around, join to 3rd ch of beginning ch-4.
54 (60, 66, 72, 78, 84) dc and 54 (60, 66, 72, 78, 84) ch-1 sps ✓
Place a marker in the first dc. Place a second marker 27 (30, 33, 36, 39, 42) dc later — this is the side “seam” (split point).
Rnd 2: Ch 4, sk next ch-1 sp, *dc in next dc, ch 1, sk next ch-1 sp; rep from * around, join.
54 (60, 66, 72, 78, 84) dc ✓
Rnds 3–18 (18, 18, 19, 19, 20): Rep Rnd 2.
Work until the tube measures 10 (10, 10.5, 11, 11, 11.5)" / 25 (25, 27, 28, 28, 29) cm from the foundation chain, unstretched. End at the side marker (the split).
Length check: 18 rows × 4" / 7 rows ≈ 10.3". 20 rows ≈ 11.4". Measure, don’t only count. ✓
Longer body (uses extra yarn): Continue Rnd 2 to 14 (14, 14.5, 15, 15, 15.5)" / 36 (36, 37, 38, 38, 39) cm before splitting. Add ~70–100 g.
Split for Front and Back
You will now work flat. Each panel has 27 (30, 33, 36, 39, 42) dc.
From the join (side marker), work across the next 27 (30, 33, 36, 39, 42) dc only — this is the Front. Leave the remaining 27 (30, 33, 36, 39, 42) dc unworked for the Back.
Front
Row 1: Ch 4, sk next ch-1 sp, dc in next dc, *ch 1, dc in next dc; rep from * until 27 (30, 33, 36, 39, 42) dc are on the needle (the beginning ch-4 counts as 1 dc + ch 1). Turn.
27 (30, 33, 36, 39, 42) dc ✓
Rows 2–12 (13, 14, 15, 16, 16): Ch 4, sk next ch-1 sp, dc in next dc, *ch 1, dc in next dc; rep from * across, last dc in 3rd ch of turning ch. Turn.
27 (30, 33, 36, 39, 42) dc every row ✓
Work until the armhole (split to top of fabric) measures 6 (6.5, 7, 7.5, 8, 8.5)" / 15 (17, 18, 19, 20, 22) cm. Boat-neck shaping uses the last ~2" / 5 cm.
Front boat neck and shoulders
Next row (divide): Ch 4, sk next ch-1 sp, dc in next dc, *ch 1, dc in next dc; rep from * until you have 6 (7, 8, 8, 9, 10) dc (beginning ch-4 counts as 1 dc). Stop. Turn. Leave the remaining stitches unworked.
Shoulder + neck + shoulder: 6+15+6=27; 7+16+7=30; 8+17+8=33; 8+20+8=36; 9+21+9=39; 10+22+10=42 ✓
Right Front shoulder (as worn, this is the first side you just worked):
Shoulder rows 2–3 (3, 3, 4, 4, 4): Ch 4, sk next ch-1 sp, dc in next dc, *ch 1, dc in next dc; rep from * across the 6 (7, 8, 8, 9, 10) dc. Turn.
6 (7, 8, 8, 9, 10) dc ✓
Work until total armhole depth is 8 (8.5, 9, 9.5, 10, 10.5)" / 20 (22, 23, 24, 25, 27) cm. Fasten off, leaving a 12" / 30 cm tail for seaming.
Left Front shoulder: Skip the center 15 (16, 17, 20, 21, 22) dc of the divide row. Join yarn with sl st in the next dc.
Row 1: Ch 4 (counts as dc + ch 1), sk next ch-1 sp, dc in next dc, *ch 1, dc in next dc; rep from * across remaining 6 (7, 8, 8, 9, 10) dc, last dc in 3rd ch of the old turning ch (or in the last dc). Turn.
6 (7, 8, 8, 9, 10) dc ✓
Work the same number of shoulder rows as the other side, to the same armhole depth. Fasten off, leaving a 12" / 30 cm tail.
Back
Join yarn at the unworked side of the split, at the armhole edge.
Work exactly as for Front, including the boat neck (Back neck is the same depth — a wide boat neck). Same stitch counts:
- Panel: 27 (30, 33, 36, 39, 42) dc
- Each shoulder: 6 (7, 8, 8, 9, 10) dc
- Center neck skipped: 15 (16, 17, 20, 21, 22) dc
- Same armhole depth: 8 (8.5, 9, 9.5, 10, 10.5)" / 20 (22, 23, 24, 25, 27) cm
Fasten off both shoulders with tails for seaming.
Sleeves (make 2)
Worked in the round from the cuff up. ¾ length is the default (yarn-saving).
With 8 mm, ch 28 (28, 32, 32, 36, 36). Join without twisting. Switch to 6.5 mm.
28 = 14 × 2; 32 = 16 × 2; 36 = 18 × 2 ✓
Rnd 1: Ch 4, sk next ch, *dc in next ch, ch 1, sk next ch; rep from * around, join to 3rd ch of beginning ch-4.
14 (14, 16, 16, 18, 18) dc ✓
Place two markers opposite each other (increase lines).
Rnd 2: Ch 4, sk next ch-1 sp, *dc in next dc, ch 1, sk next ch-1 sp; rep from * around, join.
14 (14, 16, 16, 18, 18) dc ✓
Increase rounds
Increase rnd: Ch 4, sk next ch-1 sp, *dc in next dc, ch 1, sk next ch-1 sp; rep from * to an increase marker, work (dc, ch 1, dc, ch 1) all in that marked dc (or in the ch-sp before it — pick one method and stick to it), move marker to the first of those 2 dc, continue in established mesh to the second marker, increase the same way, mesh to end, join.
Each increase rnd adds 2 dc ✓
Work increase rnds spaced as follows, with even mesh rnds (as Rnd 2) between them:
XS: Increase on rnds 4, 8, 12, 16, 20 (5 increase rnds × 2 dc = +10).
14 + 10 = 24 dc ✓
S: Increase on rnds 4, 7, 10, 13, 16, 19 (6 × 2 = +12).
14 + 12 = 26 dc ✓
M: Increase on rnds 4, 7, 10, 13, 16, 19 (6 × 2 = +12).
16 + 12 = 28 dc ✓
L: Increase on rnds 4, 8, 12, 16, 20, 23 (6 × 2 = +12).
16 + 12 = 28 dc ✓
XL: Increase on rnds 4, 8, 12, 16, 20, 24 (6 × 2 = +12).
18 + 12 = 30 dc ✓
XXL: Increase on rnds 3, 6, 9, 12, 15, 18, 21 (7 × 2 = +14).
18 + 14 = 32 dc ✓
After the last increase, work even in mesh until the sleeve measures 12 (12, 12.5, 12.5, 13, 13)" / 30 (30, 32, 32, 33, 33) cm from the foundation chain.
24 (26, 28, 28, 30, 32) dc ✓
Fasten off, leaving a 24" / 60 cm tail for seaming.
Long-sleeve option (extra yarn): After reaching the upper-arm count, continue even until the sleeve measures 17 (17.5, 17.5, 18, 18, 18.5)" / 43 (44, 44, 46, 46, 47) cm. Do not add more increases — drop-shoulder ease is already in the upper-arm width.
Finishing
Block / set the pieces. Velvet will not hold a wet block. Steam very lightly from a distance (do not crush the pile, do not rest the iron on it) or just pat the pieces flat and pin to the measurements below. Hang the body overnight and re-measure length before you seam — it may already have grown.
Shoulder seams. With right sides facing you (mattress stitch on the dc posts, not in the ch-spaces), join Front to Back at each shoulder over 6 (7, 8, 8, 9, 10) dc. The boat neck opening is the skipped center dc.
Set in sleeves. The armhole is a vertical drop-shoulder opening 8 (8.5, 9, 9.5, 10, 10.5)" deep on Front and Back. Sleeve cap circumference equals about 2 × that depth. Pin the sleeve underarm to the body side split, pin the sleeve midpoint to the shoulder seam, and mattress-stitch the sleeve to the armhole, matching the 24 (26, 28, 28, 30, 32) dc to the armhole edge. Ease evenly. Repeat for the second sleeve.
Do not use a bulky slip-stitch seam through both layers if you can avoid it — it will ridge in velvet. Mattress stitch through the posts stays flatter.
Neck edging. Join yarn at a shoulder seam. Work 1 rnd sc evenly around the boat neck: 1 sc in each dc, 1 sc in each row-end (or 2 sc in some row-ends if the edge pulls), 1 sc in each skipped neck dc. Join, fasten off. Optional 2nd rnd of sc if the neck stretches too open.
Hem edging. 1 rnd sc in each foundation ch (or in each ch-sp/dc around the hem), join, fasten off. This stops the chain from flaring.
Cuff edging. 1 rnd sc around each cuff, join, fasten off.
Weave in ends along dc posts for at least 2" / 5 cm, then reverse direction for 1" / 2.5 cm so they lock in the pile.
Finished measurements (after hanging)
| XS | S | M | L | XL | XXL | |
|---|---|---|---|---|---|---|
| Bust | 36" / 91 cm | 40" / 102 cm | 44" / 112 cm | 48" / 122 cm | 52" / 132 cm | 56" / 142 cm |
| Length, cropped | 18" / 46 cm | 18.5" / 47 cm | 19.5" / 50 cm | 20.5" / 52 cm | 21" / 53 cm | 22" / 56 cm |
| Armhole depth | 8" / 20 cm | 8.5" / 22 cm | 9" / 23 cm | 9.5" / 24 cm | 10" / 25 cm | 10.5" / 27 cm |
| Shoulder (each) | 4" / 10 cm | 4.75" / 12 cm | 5.25" / 13 cm | 5.25" / 13 cm | 6" / 15 cm | 6.75" / 17 cm |
| Boat neck width | 10" / 25 cm | 10.75" / 27 cm | 11.25" / 29 cm | 13.25" / 34 cm | 14" / 36 cm | 14.75" / 37 cm |
| ¾ sleeve | 12" / 30 cm | 12" / 30 cm | 12.5" / 32 cm | 12.5" / 32 cm | 13" / 33 cm | 13" / 33 cm |
| Upper arm | 16" / 41 cm | 17.25" / 44 cm | 18.75" / 48 cm | 18.75" / 48 cm | 20" / 51 cm | 21.25" / 54 cm |
Shoulder width = dc ÷ 1.5: 6/1.5=4"; 7/1.5=4.67"; 8/1.5=5.33"; 9/1.5=6"; 10/1.5=6.67" ✓
Neck width = dc ÷ 1.5: 15/1.5=10"; 16/1.5=10.67"; 17/1.5=11.33"; 20/1.5=13.33"; 21/1.5=14"; 22/1.5=14.67" ✓
If you are running out of yarn
In this order (saves the most yarn first):
- Stop the body 1–2" / 2.5–5 cm sooner (more cropped).
- Keep ¾ sleeves; do not add long sleeves.
- Skip the second sc round at the neck.
- Make a vest: omit sleeves, work 1 rnd sc around each armhole, and keep the boat neck.
- Go down a size — the fit is already relaxed.
Do not stretch the gauge to “make it bigger.” Velvet will grow on its own.
Disclaimer: This pattern was generated by AI and should be reviewed for accuracy before use. While we strive for quality, AI-generated content may contain errors. Please verify measurements, stitch counts, charts, and instructions before beginning your project. Generated by purlJam.uk
Love this pattern?
Save this pattern to your free PurlJam libraryAccess your pattern anytime
Bookmark this page to access your pattern anytime