Type
Crochet
Difficulty
intermediate
Category
bag
AI Thinking Process
Planning
Verification
Pattern
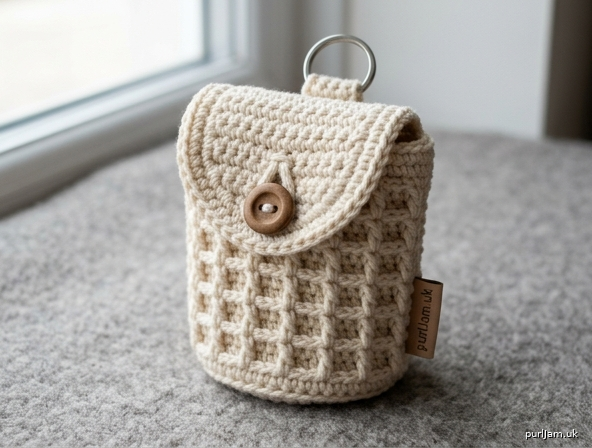
Waffle Stitch Earpod Pouch
A snug, structured pouch for earbuds or a small charging case. The piece is worked in joined rounds from a circular base, with a BLO ridge to turn the sides up—the same bottom-up logic as a market tote, scaled down. Classic waffle stitch (front-post double crochet on a 3-stitch grid) gives a thick, grippy fabric. A double-crochet flap with a centered buttonhole folds over the opening; a reinforced hanging loop replaces tote handles so you can clip the pouch to a bag or keyring.
Skill level: Intermediate (working in the round, front-post stitches, flap, buttonhole)
Finished size (one size):
- Diameter: 3¼" (8.5 cm)
- Circumference: 10" (25.5 cm)
- Height to opening: 3½" (9 cm)
- Flap length: 2½" (6.5 cm)
- Flap width: 5" (12.5 cm)
Size is slightly generous for a standard earbud charging case and a short cable. Exact fit is not critical.
Materials
- Yarn: Worsted weight (category 4) cotton, 70 yd / 64 m. Cotton is recommended for structure and less stretch than acrylic (examples: WeCrochet Dishie, Lily Sugar ’n Cream, Paintbox Cotton Aran, 24/7 Cotton).
- Hook: US H-8 / 5.0 mm, or size needed to obtain gauge
- Notions: Yarn needle, stitch marker, one ⅝–¾" (16–19 mm) button, scissors
- Optional: ¾" (19 mm) keyring or lobster clasp for the hanging loop
Gauge
12 sts and 8 rnds = 4" (10 cm) in waffle stitch, worked in the round with US H-8 / 5.0 mm hook, after light steaming.
Work a small circular swatch or measure on the pouch body after 4 waffle rnds. If the fabric is much looser than 12 sts = 4" (10 cm), drop to US G-6 / 4.0 mm so the pouch stays firm and the earbuds do not stretch the opening.
Abbreviations (US)
| Term | Meaning |
|---|---|
| BLO | back loop only |
| ch | chain |
| dc | double crochet |
| FPdc | front post double crochet |
| rnd(s) | round(s) |
| RS | right side |
| sc | single crochet |
| sk | skip |
| sl st | slip stitch |
| st(s) | stitch(es) |
| WS | wrong side |
| yo | yarn over |
Special stitches
FPdc (front post double crochet): Yo, insert hook from front to back to front around the post of the indicated stitch (not into the top loops), yo and pull up a loop, [yo, pull through 2 loops] twice. The post of a beginning ch-3 is treated as a dc.
Notes
- US crochet terminology throughout.
- The body is worked in joined rounds with RS always facing; do not turn unless the flap instructions say to turn. This keeps the waffle grid on the outside and a smoother surface inside so cables do not catch.
- Ch 3 at the start of a dc rnd counts as 1 dc.
- On waffle Rnd 3, ch 2 does not count as a stitch; join to the first FPdc, ignoring the ch-2.
- Join each rnd with a sl st to the indicated stitch, then work the next beginning ch.
- Stitch counts appear in parentheses at the end of each rnd/row. Count after every waffle rnd—the repeat is a multiple of 3 and must stay at 30 sts.
- Weave ends firmly on the WS. Do not leave long tails inside the pouch.
Pattern
Base
Worked in joined rnds. The circle lies flat; it becomes the bottom of the pouch.
Make a magic ring.
Rnd 1: Ch 3 (counts as dc here and throughout the base), 9 dc in ring, join with sl st to top of ch-3. Pull ring closed. (10 dc)
Rnd 2: Ch 3, dc in same st as join (2 sts in first st), 2 dc in each st around, join. (10 increases → 10 + 10 = 20 ✓)
Rnd 3: Ch 3, 2 dc in next st, *dc in next st, 2 dc in next st; rep from * around, join. (10 repeats of 3 sts → 30 ✓) (10 increases → 20 + 10 = 30 ✓)
Rnd 4 (turning ridge): Ch 1, sc in BLO of each st around, join with sl st to first sc. (30 sc)
This BLO ridge is the “corner” where the bottom turns up into the sides.
Body (waffle stitch)
Do not turn. Keep RS facing. 30 sts is 10 repeats of the 3-st waffle grid (30 ÷ 3 = 10 ✓).
Waffle Rnd 1 (setup): Ch 3, dc in each st around, join with sl st to top of ch-3. (30 dc)
Waffle Rnd 2: Ch 3 (counts as dc), dc in next st, FPdc around next st, *dc in next 2 sts, FPdc around next st; rep from * around, join with sl st to top of ch-3. (10 groups of dc, dc, FPdc → 20 dc + 10 FPdc = 30 ✓)
Waffle Rnd 3: Ch 2 (does not count as a st), FPdc around the ch-3 of the previous rnd (same st as the join), FPdc around next dc, dc in next FPdc, *FPdc around next 2 dc, dc in next FPdc; rep from * around, join with sl st to first FPdc (skip the ch-2). (10 groups of FPdc, FPdc, dc → 20 FPdc + 10 dc = 30 ✓)
Waffle Rnds 4–7: Rep Waffle Rnds 2–3 two more times. (4 additional rnds → 2 + 4 = 6 rnds of the 2-rnd repeat, plus setup = 7 waffle rnds total ✓)
Piece should measure about 3½" (9 cm) from the BLO ridge. If you are short of height, work one extra Waffle Rnd 2; if you are tall, stop after Waffle Rnd 6 (end on a Rnd 3). Do not fasten off.
Flap
The flap is worked back and forth in dc on 15 sts (half the opening: 30 ÷ 2 = 15 ✓) so it matches the flattened width of the pouch. Remaining 15 sts stay unworked for the front opening.
Row 1 (RS): Ch 3 (counts as dc), dc in next 14 sts, turn. (15 dc)
Row 2: Ch 3, dc in each st across, turn. (15 dc)
Row 3 (buttonhole): Ch 3, dc in next 5 sts, ch 2, sk 2 sts, dc in last 7 sts, turn. (6 dc + ch-2 + 7 dc = 15 ✓)
Row 4: Ch 3, dc in next 6 sts, 2 dc in ch-2 sp, dc in last 6 sts, turn. (7 + 2 + 6 = 15 ✓)
Row 5: Ch 3, dc in each st across. Do not turn and do not fasten off. (15 dc)
Flap measures about 2½" (6.5 cm) from the opening.
Edging, hanging loop, and button
Edging: Ch 1. Working down the first side of the flap, sc evenly along the row-ends (place 2 sc in each dc row-end → 5 rows × 2 = 10 sc ✓). Sc in each of the 15 unworked body sts across the front opening (15 sc). Sc evenly up the other flap side (10 sc). Sc in each of the 15 dc across the top of the flap (15 sc). Join with sl st to first sc. (10 + 15 + 10 + 15 = 50 sc ✓)
Fasten off. Weave in this tail.
Hanging loop (sturdy strap): With RS facing, join yarn with sl st to the center back of the opening (the hinge, where the flap meets the body). Ch 16, sl st in the 2nd ch from the hook and in each ch back to the pouch, then sl st in the same body st as the join. Fasten off. (15 sl sts along the chain ✓)
This reinforced loop is the pouch equivalent of tote handles: strong enough for a keyring or bag clip, short enough not to snag.
Button: Fold the flap down. Mark the spot on the front body that shows through the buttonhole. Sew the button to the body (not the flap) at that mark, weaving the sewing yarn through dc posts so it does not pull through the waffle holes.
Finishing
Weave in all remaining ends on the WS, snipping tails short so they cannot catch on earbuds.
Blocking: Hover a steam iron over the cotton (do not press the waffle flat). Shape the base into a circle and the sides into a straight cylinder. Let dry completely.
Thread the hanging loop onto a keyring or lobster clasp if desired. Store the pouch empty for a day after blocking so the cotton sets.
Fit and customization
- Tighter pouch: Use US G-6 / 4.0 mm for the whole piece, or stop the base at 24 sts (skip Base Rnd 3, but 24 is still a multiple of 3) for a smaller diameter. At 24 sts, waffle is 8 repeats (24 ÷ 3 = 8 ✓) and the flap is 12 dc.
- Roomier pouch (case + cable): After Base Rnd 3, work one more increase rnd: *dc in next 2 sts, 2 dc in next st; rep from * around (10 increases → 30 + 10 = 40). 40 is not a multiple of 3; decrease 1 st on the BLO rnd (sk 1 st) to 39 sts (39 ÷ 3 = 13 ✓). Flap then uses 19 or 20 dc.
- No button: Skip the buttonhole row and work 5 even dc rows; add a sew-on snap on the WS of the flap and RS of the body.
- Color: A single solid shows the waffle grid clearly. A second color for the BLO ridge, edging, and loop reads as trim.
The interior of waffle stitch is less smooth than single crochet. If you want a fully snag-free lining, cut a fabric circle and rectangle, sew a small cloth bag, and whipstitch it into the pouch along the opening after the edging is done—optional, not required for the pattern to function.
Disclaimer: This pattern was generated by AI and should be reviewed for accuracy before use. While we strive for quality, AI-generated content may contain errors. Please verify measurements, stitch counts, charts, and instructions before beginning your project. Generated by purlJam.uk
Love this pattern?
Save this pattern to your free PurlJam libraryAccess your pattern anytime
Bookmark this page to access your pattern anytime