Type
Crochet
Difficulty
beginner
Category
hat
AI Thinking Process
Planning
Verification
Pattern
Wintspinner Ornament
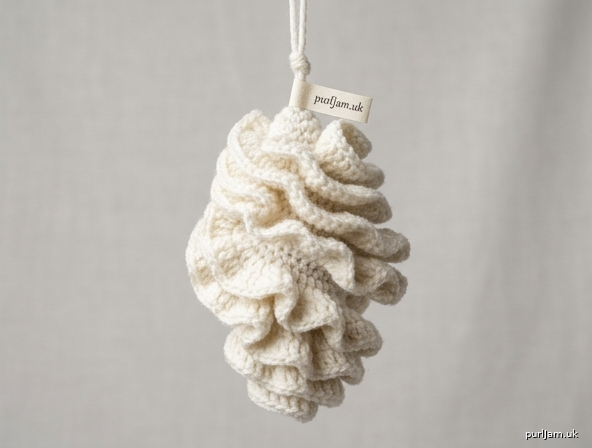
A Crochet Wind Spinner
A small hanging spinner with a snug center hub and deep ruffles that catch the air and twirl. Worked in worsted-weight yarn from a magic ring, it is a quick leftover-yarn project for a winter window, porch hook, or tree.
Skill Level: Beginner
Finished Size
One size (standard ornament)
- Hub: about 1 in (2.5 cm) across
- Ruffled span: about 7 in (18 cm) across when the ruffles are spread
- Hanging depth: about 4 in (10 cm) as a layered spiral, plus loop
Small tree ornament: Fasten off after Round 4 (64 dc). Span about 5 in (13 cm).
Large porch spinner: Work Optional Round 6 Increase (256 dc). Uses extra yarn.
Exact size will vary with yarn and how tightly the ruffles nest.
Materials
- Yarn: Worsted weight (medium / category 4), about 50 yd (46 m) for the standard size; up to 90 yd (82 m) if making the large spinner. Acrylic or a wool blend both work. Winter colors: snow white, ice blue, silver gray, or classic red.
- Hook: US H/8 (5 mm), or size needed to obtain a firm but not stiff fabric
- Notions: Yarn needle, scissors, stitch marker (optional), ornament hook or 10–12 mm jump ring (optional)
- Optional: Spray starch or fabric stiffener for a crisper spin outdoors
One standard skein is far more than enough.
Gauge
16 sc = 4 in (10 cm) with US H/8 (5 mm)
Gauge is not critical for this ornament. A slightly different gauge changes the finished size but not the construction. If your fabric is very loose and floppy, drop to US G/6 (4 mm) so the ruffles hold their shape.
Abbreviations (US Crochet Terms)
| Abbreviation | Meaning |
|---|---|
| ch | chain |
| sc | single crochet |
| hdc | half double crochet |
| dc | double crochet |
| sl st | slip stitch |
| st(s) | stitch(es) |
| MR | magic ring (magic circle) |
| rnd | round |
| RS | right side |
Do not use UK terms. In this pattern, sc is US single crochet (UK dc).
Pattern Notes
- The spinner is worked in joined rounds from the center out.
- Ch 1 at the start of a single crochet round does not count as a stitch.
- Ch 2 at the start of a half double or double crochet round does not count as a stitch. Always join with a slip stitch to the first hdc or first dc of the round, never to the ch-2.
- The first stitch of every round is worked into the same stitch as the slip-stitch join.
- This piece will not lie flat. Two stitches in every stitch create the ruffles that make it spin. Do not skip increases to flatten it.
- Right side faces you as you crochet. There is no turning.
- Leave a 12 in (30 cm) beginning tail when you start the magic ring — it becomes the hanging loop.
- If you prefer not to use a magic ring, ch 4, sl st in the first ch to form a ring, and work Round 1 into that ring. Still leave a 12 in (30 cm) beginning tail.
Ornament
Leave a 12 in (30 cm) beginning tail.
Rnd 1: Make a magic ring. Work 8 sc in the ring. Pull the tail to close the ring firmly. Join with sl st to first sc. (8 sc ✓)
Rnd 2: Ch 1 (does not count as a st), 2 sc in each st around. Join with sl st to first sc.
(2 sc in each of 8 sts → 8 increases → 8 + 8 = 16 sc ✓)
Rnd 3: Ch 2 (does not count as a st), 2 hdc in each st around. Join with sl st to first hdc.
(2 hdc in each of 16 sts → 16 increases → 16 + 16 = 32 hdc ✓)
Rnd 4: Ch 2 (does not count as a st), 2 dc in each st around. Join with sl st to first dc.
(2 dc in each of 32 sts → 32 increases → 32 + 32 = 64 dc ✓)
Small size: fasten off here and go to Finishing.
Rnd 5 (standard size): Ch 2 (does not count as a st), 2 dc in each st around. Join with sl st to first dc.
(2 dc in each of 64 sts → 64 increases → 64 + 64 = 128 dc ✓)
The fabric should be strongly ruffled. This is correct.
Optional Round 6 — Extra Drape (work even)
For a slightly deeper hang without more ruffle:
Rnd 6 (even): Ch 2 (does not count as a st), dc in each st around. Join with sl st to first dc. (128 dc ✓)
Optional Round 6 — Large Spinner (increase)
For a bigger, fuller spinner (uses more yarn; skip the even round above):
Rnd 6 (increase): Ch 2 (does not count as a st), 2 dc in each st around. Join with sl st to first dc.
(2 dc in each of 128 sts → 128 increases → 128 + 128 = 256 dc ✓)
Optional Contrasting Edge
Join a second color in any stitch of the last round.
Edge Rnd: Ch 1 (does not count as a st), sc in each st around. Join with sl st to first sc. (Same count as the last round: 64, 128, or 256 sc ✓)
Fasten off the contrast color, leaving an 8 in (20 cm) tail.
Finishing
-
Fasten off the main color, leaving an 8 in (20 cm) tail. Weave this ending tail through the back of the last round and hide it. Do not use this tail for hanging — it sits on the outer edge.
-
Hanging loop (center): Thread the beginning tail onto a yarn needle. Pass the needle up through the magic-ring hole so the ring stays closed and the tail exits at the hub. Tie an overhand knot against the back of Round 1, leaving a loop about 1½ in (4 cm) long. Weave the remaining tail through Round 1 stitches on the wrong side.
Hardware option: Skip the yarn loop and attach an ornament hook or jump ring directly through the magic ring.
-
Weave in any remaining ends.
-
Set the spiral: Hold the ornament by the loop. Lightly mist with water. Gently twist the ruffles in one direction so they cascade in layers. Hang until dry. For outdoor use, apply spray starch or fabric stiffener following the product instructions, then hang to dry in the twisted shape.
Do not steam-press the piece flat.
Color Ideas
- Snow: All white, or white with an ice-blue Round 5
- Icy stripe: Change color at the start of Rounds 3, 4, and 5
- Classic winter: Red hub (Rounds 1–2), white ruffle, green optional edge
When changing color, fasten off the old color at the join and join the new color in the same stitch, then chain as directed for that round.
Wear / Use Notes
This is a decoration, not a toy. Hang out of reach of babies, pets, and open flame. If used outdoors, acrylic holds up better to moisture than untreated wool; bring it in during ice storms.
End of pattern.
Disclaimer: This pattern was generated by AI and should be reviewed for accuracy before use. While we strive for quality, AI-generated content may contain errors. Please verify measurements, stitch counts, charts, and instructions before beginning your project. Generated by purlJam.uk
Love this pattern?
Save this pattern to your free PurlJam libraryAccess your pattern anytime
Bookmark this page to access your pattern anytime