Type
Crochet
Difficulty
intermediate
Category
socks
AI Thinking Process
Planning
Verification
Pattern
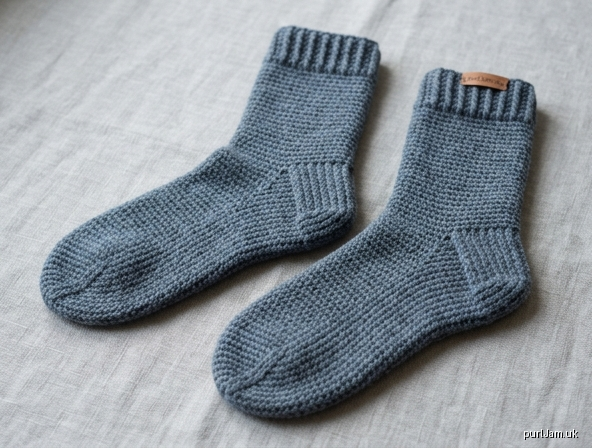
WORSTED TOE-UP CROCHET SOCKS
Skill level: Intermediate
Construction: Toe up, short-row heel, worked in a continuous spiral unless stated
Yarn: Worsted / aran (UK)
Terminology: UK crochet (dc = US single crochet)
These socks are denser and thicker than knitted socks. They suit house wear, boots, or shoes with extra room.
SIZES
To fit adult foot circumference (unstretched sock slightly smaller than foot):
| Size | Foot circumference | Approx. UK shoe | Stitch count |
|---|---|---|---|
| S | 18 cm (7 in) | 3–5 | 36 sts |
| M | 20.5 cm (8 in) | 5–7 | 40 sts |
| L | 23 cm (9 in) | 7–9 | 46 sts |
Shown as S (M, L).
Choose size by foot circumference, not shoe size. Measure around the ball of the foot.
Foot length: Work the foot until the piece measures 5 cm (2 in) less than actual foot length (heel will add that length). Typical finished foot lengths: S 22 cm, M 24 cm, L 26 cm — adjust to your foot.
MATERIALS
- Yarn: 150 (180, 220) g worsted/aran wool or wool-blend with nylon if possible (approx. 200 m / 100 g). Colour A for main sock; optional Colour B for cuff.
- Hook: 4 mm (or size to obtain tension — typically 0.5–1 mm smaller than yarn band for dense fabric)
- Stitch markers (at least 2)
- Yarn needle
- Scissors
Optional: Work toe and heel with yarn held double for extra durability.
TENSION (GAUGE)
20 dc and 22 rounds = 10 cm (4 in) over dc in the round, unstretched, after light blocking.
Work tightly. If you have fewer than 20 sts in 10 cm, go down a hook size.
ABBREVIATIONS (UK)
- ch – chain
- dc – double crochet (US sc)
- htr – half treble (US hdc)
- sl st – slip stitch
- st(s) – stitch(es)
- rnd – round
- BLO – back loop only
- pm – place marker
- sm – slip marker
- rep – repeat
- RS – right side
NOTES
- Work in a continuous spiral; do not join unless instructed. Mark the first stitch of the round.
- Toe and heel benefit from a firm fabric.
- Crochet socks do not stretch like knitted socks; if between sizes, size up.
- Make two identical socks.
TOE
Magic ring (or ch 4, sl st to form ring).
Rnd 1: 8 dc into ring, pull closed. (8 sts)
Do not join. Pm in first st.
Rnd 2: 2 dc in each st. (16 sts) ✓ 8 × 2 = 16
Place a second marker in the 9th st (opposite side). You now have 2 increase points.
Rnd 3: *Dc to marked st, 2 dc in marked st, sm in first of the 2 dc; rep from * once more. (18 sts) ✓ 16 + 2 = 18
Rnd 4: Rep Rnd 3. (20 sts)
Continue Rnd 3 (2 increases per round, one at each side) until you have:
36 (40, 46) sts.
Increase rounds needed after Rnd 2:
S: 10 more rnds → 16 + 20 = 36 ✓
M: 12 more rnds → 16 + 24 = 40 ✓
L: 15 more rnds → 16 + 30 = 46 ✓
Toe should measure about 5 cm (2 in) long and sit comfortably across the ball of the foot. Add 1–2 even rounds (no increases) if the toe is too short before stitch count is reached, or stop increases when width is correct and work even to 5 cm.
Remove the second (side) marker. Keep the beginning-of-round marker.
FOOT
Work even in dc (1 dc in each st) in a spiral until the piece, from tip of toe, measures:
Your foot length minus 5 cm (2 in).
Example: 24 cm foot → work until 19 cm from toe tip.
Keep fabric even and firm. Optional texture: alternate 1 rnd dc, 1 rnd BLO dc.
HEEL (short rows)
Heel is worked back and forth on half the stitches. Instep remains unworked.
Heel stitches: 18 (20, 23) sts.
Place a marker after the 18th (20th, 23rd) st from the start of the round. These are the heel sts. Remaining 18 (20, 23) sts are instep.
Turn so you work across the heel sts only.
Row 1 (WS): Ch 1, dc across all heel sts, turn. 18 (20, 23) sts
Row 2 (RS): Ch 1, sl st in first st, dc to last st (leave last st unworked), turn.
Row 3: Ch 1, sl st in first st, dc to last worked st of previous row (leave 1 more st unworked), turn.
Rep Row 3, leaving 1 additional st unworked at the end of each row, until the centre third remains worked:
- S: 6 sts remaining in work (18 ÷ 3 = 6 ✓)
- M: 6–8 sts remaining (aim 6 or 8; 20 ÷ 3 ≈ 6–7 — stop when 6 sts remain)
- L: 7–8 sts remaining (23 ÷ 3 ≈ 7–8 ✓)
You now have unworked stitches (with a small “step”) on each side.
Work back out
Next row: Ch 1, dc across the centre sts, dc in the next unworked st (picking up the “wrap”/step by inserting hook under both the unworked st and the strand at the edge if needed for a smooth join), turn.
Continue: each row, work 1 st further into the previously unworked stitches, dc into that st (catching the edge strand for a neat heel), until all 18 (20, 23) heel sts have been worked again.
Last row should be a RS row ending at the junction with the instep.
LEG
Resume working in the round.
Joining rnd: Dc across all heel sts, then dc across all instep sts. 36 (40, 46) sts ✓
Work even in dc (or BLO dc for a little stretch) until leg measures:
- Ankle: 10–12 cm from floor of heel
- Crew (this pattern default): 15–18 cm from floor of heel
- Knee: 30–40 cm (add slight increases every 4–5 cm if calf is larger: 2 dc in 1 st at each side, 2 sts increased)
Default: work 12 cm of even dc after joining rnd for a crew sock (adjust to taste).
CUFF
Work 4 cm of ribbing.
Ribbing rnd: *1 dc BLO, 1 dc FLO; rep from * around.
If stitch count is odd (Size L, 46): work 1 dc BLO, 1 dc FLO to last 2 sts, 1 dc BLO, 1 dc. (46 ✓)
Rep ribbing rnd until cuff measures 4 cm (1½ in).
Fasten off with an invisible join: cut yarn, pull through last st, thread needle under both loops of first st of rnd, then back down into the last st. Weave in.
Optional firmer cuff: 1 rnd sl st BLO around, loosely.
FINISHING
- Weave in all ends securely on the WS (toes and heels take wear).
- Block lightly: dampen, shape to foot measurements, dry flat — do not stretch the fabric thin.
- Make the second sock to match.
FIT TIPS
- Too tight: go up a hook or add 4 sts at the end of the toe (2 extra increase rnds).
- Too loose: smaller hook.
- Heel holes: on the joining rnd, work 1 extra dc in the “corner” between heel and instep, then decrease it on the next rnd (dc2tog) if the count must stay even.
- Reinforce: hold a strand of leftover yarn with the main yarn for toe and heel only.
Enjoy your socks.
Disclaimer: This pattern was generated by AI and should be reviewed for accuracy before use. While we strive for quality, AI-generated content may contain errors. Please verify measurements, stitch counts, charts, and instructions before beginning your project. Generated by purlJam.uk
Love this pattern?
Save this pattern to your free PurlJam libraryAccess your pattern anytime
Bookmark this page to access your pattern anytime