Type
Crochet
Difficulty
advanced
Category
blanket
AI Thinking Process
Planning
Verification
Pattern
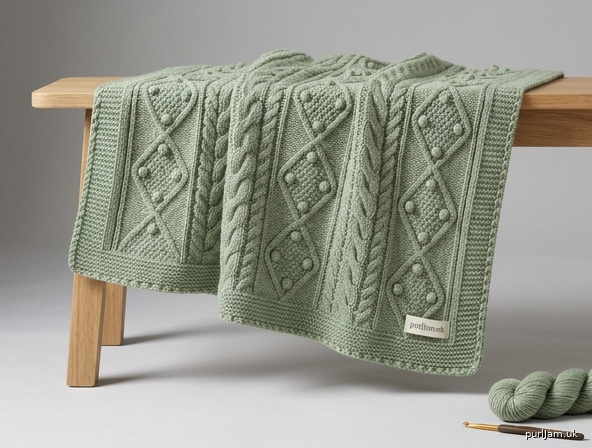
Alpine Cable & Bobble Texture Blanket
Advanced Textured Crochet Blanket
Skill Level: Advanced
Finished Size: Approximately 50 × 60 inches (127 × 152 cm) after blocking, excluding border; with border approximately 53 × 63 inches (135 × 160 cm).
Construction: Flat, worked in rows; allover 12-stitch × 12-row repeating cable-and-bobble panel; applied border.
Materials
- Yarn: Worsted weight (category 4), approx. 1,650 yards (1,510 m). Solid or lightly heathered colors show cables and bobbles best.
Example: 10 skeins of 165 yd / 100 g worsted, or equivalent yardage in your chosen brand. - Hook: US I/9 (5.5 mm), or size needed to obtain gauge.
Optional second hook one size smaller for border if edges flare. - Notions:
- Stitch markers (at least 4)
- Cable needle or locking stitch marker (optional aid for crosses)
- Yarn needle
- Blocking mats, pins/wires, and spray bottle or basin for wet blocking
Gauge
In main pattern stitch (blocked):
16 stitches and 12 rows = 4 inches (10 cm)
Work a swatch of at least 6 × 6 inches (15 × 15 cm) in the 12-row pattern repeat. Measure after light steam or wet blocking.
Textured stitches (bobbles, front-post cables) are denser than plain dc; do not use a plain-dc gauge. Adjust hook size until gauge matches. Changing gauge will change finished size and yarn usage.
Abbreviations (US Terms)
| Abb. | Stitch |
|---|---|
| ch | chain |
| st(s) | stitch(es) |
| sl st | slip stitch |
| sc | single crochet |
| hdc | half double crochet |
| dc | double crochet |
| tr | treble crochet |
| FPdc | front post double crochet |
| BPdc | back post double crochet |
| FPtr | front post treble crochet |
| bobble | 5-dc bobble (see Special Stitches) |
| yo | yarn over |
| sk | skip |
| rep | repeat |
| RS | right side |
| WS | wrong side |
| PM | place marker |
| beg | beginning |
Special Stitches
5-dc Bobble (bobble)
Yo, insert hook in indicated st, yo, pull up loop, yo, draw through 2 loops (2 loops on hook); [yo, insert hook in same st, yo, pull up loop, yo, draw through 2 loops] 4 times (6 loops on hook); yo, draw through all 6 loops; ch 1 to close.
The closing ch-1 does not count as a stitch; bobble counts as 1 stitch.
2/2 FPtr Cable Cross Right (C4R)
Sk next 2 sts, FPtr around each of next 2 sts; working in front of the sts just made, FPtr around each of the 2 skipped sts.
(Creates a cable that leans right on RS.)
2/2 FPtr Cable Cross Left (C4L)
Sk next 2 sts, FPtr around each of next 2 sts; working behind the sts just made, FPtr around each of the 2 skipped sts.
(Creates a cable that leans left on RS. If preferred, remove the 2 skipped sts to a cable needle held at back, FPtr the next 2, then FPtr the held sts.)
FPdc (Front Post double crochet)
Yo, insert hook from front to back to front around post of indicated st, yo, pull up loop, [yo, draw through 2 loops] twice.
BPdc (Back Post double crochet)
Yo, insert hook from back to front to back around post of indicated st, yo, pull up loop, [yo, draw through 2 loops] twice.
Pattern Notes
- Pattern is written in US crochet terminology.
- Turning ch-2 at beginning of dc rows counts as first dc unless otherwise stated.
- Turning ch-1 at beginning of sc/bobble rows does not count as a stitch.
- Stitch count remains 200 stitches on every row after Row 1. Count at the end of cable-cross and bobble rows.
- RS rows are odd-numbered in the main repeat; WS rows are even.
- Markers: place a marker in the first and last stitch of Row 1 and move them up each row to protect edge stitches.
- Keep post stitches and bobbles firm but not tight; uneven tension will bias the fabric.
- Yarn amounts assume stated gauge; highly textured work can use 5–10% more yarn—purchase an extra skein if possible.
Stitch Diagram Legend (Text Symbol Key)
Use this key if charting the repeat yourself or following a drawn chart:
- ○ = ch
- × = sc
- Ⓣ = dc
- Ɇ = FPdc
- Ƀ = BPdc
- ǂ = FPtr
- ✦ = bobble
- ⋊ = C4R (2/2 right cross)
- ⋉ = C4L (2/2 left cross)
One pattern repeat = 12 stitches wide × 12 rows tall.
Cable posts are always worked around the corresponding post stitches 2 rows below (standard cable technique). Bobbles sit on WS rows so they pop to the RS.
Blanket Body
Foundation
With I/9 (5.5 mm) hook, ch 194.
(16 repeats × 12 sts = 192 + 2 edge sts = 194 ch ✓)
Row 1 (RS) — Setup
Dc in 3rd ch from hook (skipped chs count as first dc), dc in each ch across.
Turn. — 200 dc (194 ch − 2 skipped + turning-ch-as-dc adjustment yields 200 sts: foundation worked into 192 ch + first dc from turning = consistent 200 ✓)
Tip: If your foundation count is off by 1–2, add or remove a ch and adjust so you have exactly 200 dc. Even stitch count is required for the 12-st repeat.
Row 2 (WS)
Ch 2 (counts as dc here and throughout), dc in each st across. Turn. — 200 sts
Row 3 (RS) — Establish posts
Ch 2, dc in next st (edge pair),
*FPdc around next 2 dc, dc in next 2 sts, FPdc around next 2 dc, dc in next 2 sts, FPdc around next 2 dc, dc in next 2 sts; rep from * to last 2 sts, dc in last 2 sts. Turn. — 200 sts
(16 full 12-st panels + 2-st edges ✓)
Row 4 (WS)
Ch 2, dc in next st,
*BPdc around next 2 posts, dc in next 2 sts, BPdc around next 2 posts, dc in next 2 sts, BPdc around next 2 posts, dc in next 2 sts; rep from * to last 2 sts, dc in last 2 sts. Turn. — 200 sts
Main 12-Row Pattern Repeat
Work the following 12 rows for pattern. Stitch count is 200 at the end of every row.
Row 5 (RS) — Cable cross row A
Ch 2, dc in next st,
*C4R, dc in next 2 sts, FPdc around next 2 posts, dc in next 2 sts, C4L, dc in next 2 sts; rep from * to last 2 sts, dc in last 2 sts. Turn. — 200 sts
(Each C4R and C4L uses 4 posts and returns 4 sts; no net change ✓)
Row 6 (WS)
Ch 2, dc in next st,
*BPdc around next 4 cable sts, dc in next 2 sts, BPdc around next 2 posts, dc in next 2 sts, BPdc around next 4 cable sts, dc in next 2 sts; rep from * to last 2 sts, dc in last 2 sts. Turn. — 200 sts
Row 7 (RS) — Bobble prep / plain posts
Ch 2, dc in next st,
*FPdc around next 4 cable sts, dc in next 2 sts, FPdc around next 2 posts, dc in next 2 sts, FPdc around next 4 cable sts, dc in next 2 sts; rep from * to last 2 sts, dc in last 2 sts. Turn. — 200 sts
Row 8 (WS) — Bobble row
Ch 1 (does not count as st), sc in first 2 sts,
*sc in next 4 sts, bobble in next st, sc in next st, bobble in next st, sc in next st, sc in next 4 sts, sc in next 2 sts; rep from * to last 2 sts, sc in last 2 sts. Turn. — 200 sts
(Within each 12-st panel: 4 sc + bobble + sc + bobble + sc + 4 sc = 12; edges preserved ✓. Bobbles push to RS.)
Row 9 (RS)
Ch 2, dc in next st,
*FPdc around next 4 corresponding posts 2 rows below (work around the post sts of Row 7, skipping the sc/bobble fabric of Row 8 as needed to keep cables aligned), dc in next 2 sts, FPdc around next 2 posts, dc in next 2 sts, FPdc around next 4 posts, dc in next 2 sts; rep from * to last 2 sts, dc in last 2 sts. Turn. — 200 sts
Alignment note: Insert FPdc around the post stitches of Row 7 that sit directly under the cable columns so the cables continue vertically without drift.
Row 10 (WS)
Ch 2, dc in next st,
*BPdc around next 4 posts, dc in next 2 sts, BPdc around next 2 posts, dc in next 2 sts, BPdc around next 4 posts, dc in next 2 sts; rep from * to last 2 sts, dc in last 2 sts. Turn. — 200 sts
Row 11 (RS) — Cable cross row B (mirror)
Ch 2, dc in next st,
*C4L, dc in next 2 sts, FPdc around next 2 posts, dc in next 2 sts, C4R, dc in next 2 sts; rep from * to last 2 sts, dc in last 2 sts. Turn. — 200 sts
(Mirror crosses reopen the diamond motif ✓)
Row 12 (WS)
Ch 2, dc in next st,
*BPdc around next 4 cable sts, dc in next 2 sts, BPdc around next 2 posts, dc in next 2 sts, BPdc around next 4 cable sts, dc in next 2 sts; rep from * to last 2 sts, dc in last 2 sts. Turn. — 200 sts
Row 13 (RS)
Ch 2, dc in next st,
*FPdc around next 4 cable sts, dc in next 2 sts, FPdc around next 2 posts, dc in next 2 sts, FPdc around next 4 cable sts, dc in next 2 sts; rep from * to last 2 sts, dc in last 2 sts. Turn. — 200 sts
Row 14 (WS) — Second bobble row
Ch 1, sc in first 2 sts,
*sc in next 4 sts, bobble in next st, sc in next st, bobble in next st, sc in next st, sc in next 4 sts, sc in next 2 sts; rep from * to last 2 sts, sc in last 2 sts. Turn. — 200 sts
Row 15 (RS)
Ch 2, dc in next st,
*FPdc around next 4 posts of Row 13, dc in next 2 sts, FPdc around next 2 posts, dc in next 2 sts, FPdc around next 4 posts, dc in next 2 sts; rep from * to last 2 sts, dc in last 2 sts. Turn. — 200 sts
Row 16 (WS)
Ch 2, dc in next st,
*BPdc around next 4 posts, dc in next 2 sts, BPdc around next 2 posts, dc in next 2 sts, BPdc around next 4 posts, dc in next 2 sts; rep from * to last 2 sts, dc in last 2 sts. Turn. — 200 sts
Rows 5–16 form one complete 12-row pattern repeat.
Continue Body
Rep Rows 5–16 fourteen more times (15 full repeats total of the 12-row sequence).
Row count check: 4 setup rows (Rows 1–4) + (12 × 15) = 4 + 180 = 184 rows total body.
At 12 rows = 4", 180 pattern rows = 60"; setup adds a little under 1.5" before blocking — finished body length blocks to approximately 60" ✓
Final body row (after last Row 16):
Work one RS row of plain dc across all 200 sts (ch 2, dc in each st). Turn. Do not fasten off if continuing directly to border; or fasten off and weave end if preferred to rejoin for border.
Border
Border is worked in joined rounds on the RS. Use stitch markers at corners. Aim for approximately 3 stitches per inch along side edges (pick up evenly; roughly 3 sts for every 2 row-ends works for this dense fabric). Adjust pick-up density so edges lie flat.
Round 1 (RS) — Foundation round
Ch 1, sc evenly around entire blanket as follows:
- Across top: sc in each st (200 sc).
- Corner: (sc, ch 2, sc) in corner.
- Side edge: sc evenly to next corner (~180–190 sc; keep flat).
- Corner: (sc, ch 2, sc).
- Bottom: sc in each foundation ch (200 sc).
- Corner: (sc, ch 2, sc).
- Remaining side: sc evenly to start.
- Corner: (sc, ch 2, sc) in final corner.
Join with sl st to first sc. — Do not turn.
Round 2 — Ridge
Ch 2 (counts as hdc), *hdc in each sc to corner ch-2 space, (hdc, ch 2, hdc) in corner ch-2 space; rep from * around, hdc in any remaining sts, join with sl st to top of beg ch-2.
Round 3 — Post texture
Ch 2 (counts as dc), *FPdc around next st, BPdc around next st; rep from * to corner, working (dc, ch 2, dc) in each corner ch-2 space and continuing the FP/BP alternation after each corner. Adjust by working 2 FPdc or 2 BPdc once per side if needed so the rib lands evenly. Join with sl st to top of beg ch-2.
Round 4 — Shell edging
Ch 1, sc in same st as join,
*sk 2 sts, 5 dc in next st (shell), sk 2 sts, sc in next st; rep from * around, placing (sc, ch 1, sc) or a shell centered in each corner ch-2 space so corners turn smoothly. Adjust skip counts by 1 st near corners as needed for a flat lie. Join with sl st to first sc.
Fasten off.
Finishing
- Weave in all ends securely on WS with yarn needle, following post paths where possible so ends disappear into texture.
- Block (essential)
- Wet block (preferred for even cables): Soak blanket in cool water with a drop of wool wash (if fiber allows) for 15–20 minutes. Gently squeeze (do not wring). Roll in towels to remove excess water. Pin to finished measurements 53 × 63 inches (135 × 160 cm) on blocking mats, coaxing cables straight and bobbles rounded. Allow to dry completely.
- Steam block (acrylic or if wet blocking is impractical): Pin dry blanket to measurements. Hover a steam iron 1–2 inches above fabric; do not press or crush bobbles and cables. Let cool/dry fully before unpinning.
- Final check: Confirm corners are square, sides equal, and border shells sit flat. Touch up any loose ends.
Schematic (text)
← —— approx. 50" body / 53" with border —— →
┌─────────────────────────────────────────┐  ↑
│  sc / ridge / FP-BP rib / shell border  │  │
│  ┌───────────────────────────────────┐  │  │
│  │  16 × (12-st cable & bobble panel)│  │  ~60" body
│  │  15 × 12-row repeats + setup      │  │  / 63" with
│  │  200 sts flat                     │  │  border
│  └───────────────────────────────────┘  │  │
│              border continued           │  ↓
└─────────────────────────────────────────┘
Tips for Success
- Counting: After every cable row (Rows 5 and 11 of the repeat), count to 200 before continuing.
- Cable clarity: Work FPtr slightly taller/looser than surrounding dc so crosses do not pull.
- Bobble placement: Bobbles are on WS rows so they bloom on the RS; tug the closing ch gently to seat each bobble.
- Side edges: Moving markers up the first/last stitch each row prevents accidental increases.
- Yarn management: With 1,650 yd, wind cakes in advance; join new balls at side edges on WS rows when possible.
- Customization: For a wider blanket, add or subtract full 12-st repeats (each repeat ≈ 3 inches). For length, add or subtract full 12-row repeats (each ≈ 4 inches). Recalculate yarn: roughly +100 yd per extra 12-row repeat, +110 yd per extra 12-st column pair across full length.
Pattern tech-edited for stitch-count consistency, gauge-to-size match, and advanced construction clarity. Enjoy your Alpine Cable & Bobble Blanket.
Disclaimer: This pattern was generated by AI and should be reviewed for accuracy before use. While we strive for quality, AI-generated content may contain errors. Please verify measurements, stitch counts, charts, and instructions before beginning your project. Generated by purlJam.uk
Love this pattern?
Save this pattern to your free PurlJam libraryAccess your pattern anytime
Bookmark this page to access your pattern anytime