Type
Crochet
Difficulty
intermediate
Category
custom
AI Thinking Process
Planning
Verification
Pattern
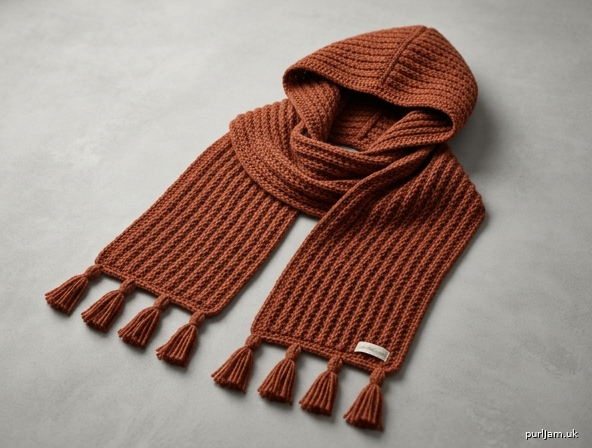
Alpine Textured Hooded Scarf
A cosy adult hooded scarf (scoodie) in alpine stitch — a richly ridged, knit-look fabric of trebles and front-post trebles over a double-crochet mesh. The scarf is worked first as a long rectangle; the hood is then picked up from the centre of one long edge, worked in the same texture, and seamed at the crown. Sport-weight yarn keeps the piece warm without bulk. Intermediate: confident trebles, front-post stitches, even pickup along an edge, and mattress-stitch seaming.
Materials
Yarn: 1,100 metres (1,200 yards) sport-weight yarn (5 ply). A wool or wool-blend gives the best stitch definition and warmth; a wool-acrylic mix is easier to wash. Solid or tonal colour shows the texture most clearly (rust, forest, oatmeal, charcoal).
Allow an extra 50–80 metres (55–85 yards) if adding tassels.
Typical purchase: 4 × 100g balls of a yarn labelled approx. 280–300m / 100g.
Hook: 4mm (UK 8), or the size needed to obtain tension. Optional 3.5mm for a slightly firmer edging.
Notions:
- Tapestry needle
- 6 stitch markers
- Scissors
- Optional: 8cm (3in) card for tassels
Tension (gauge)
18 stitches and 14 rows = 10 × 10cm (4 × 4in) in Alpine Stitch, using 4mm hook, after light blocking.
Work a tension square of at least 12 × 12cm (4¾ × 4¾in) and measure the centre 10cm (4in). Count every stitch across, and count every row (both the treble/FPtr rows and the dc rows).
If you have too few stitches in 10cm, try a smaller hook; if too many, try a larger hook. Tension affects both drape and yarn quantity — check it before you begin.
Finished size
One size (adult).
- Scarf: 20cm wide × 190cm long (8 × 75in), excluding optional tassels
- Hood neck edge: 50cm (19¾in), centred on the scarf (70cm / 27½in tails either side)
- Hood height: 30cm (11¾in) from pickup to crown seam
- Face opening: approx. 60cm (23½in) around, before edging
To shorten or lengthen the scarf, work fewer or more 4-row repeats; every repeat is about 2.9cm (1⅛in). For a roomier hood, pick up 108 dc over 60cm (23½in) and work the hood instructions as written (108 is even; inner repeats become 53 instead of 44).
Abbreviations (UK)
| Abb. | Meaning |
|---|---|
| ch | chain |
| dc | double crochet (US single crochet) |
| FPtr | front post treble (see Special stitches) |
| rem | remain(ing) |
| rep | repeat |
| RS | right side |
| sl st | slip stitch |
| st(s) | stitch(es) |
| tr | treble (US double crochet) |
| WS | wrong side |
| yoh | yarn over hook |
Special stitches
Front post treble (FPtr): Yoh, insert hook from front to back to front around the post of the indicated stitch, yoh, pull up a loop to the height of the current row (3 loops on hook), (yoh, draw through 2 loops) twice.
Alpine FPtr (used throughout the pattern): Work the FPtr around the stitch two rows below (the treble or FPtr of the last RS row). Do not work into the dc of the previous row that sits in that column — the FPtr replaces it and counts as the stitch of the current row. If your count grows, you are working into the dc as well as making the FPtr; if it shrinks, a column has been skipped.
Pattern notes
- UK crochet terminology and spelling throughout. Measurements are given in centimetres, with inches in parentheses.
- Turning ch-1 (dc rows) and turning ch-2 (tr / FPtr rows) do not count as stitches. The first stitch of every row is worked into the first stitch of the previous row.
- Work in both loops unless stated.
- Stitch count is given in parentheses at the end of each instruction. Scarf remains 36 sts; hood remains 90 sts.
- The first and last stitch of every RS textured row is a plain treble (selvedge). This keeps the long edges straight and makes seaming and edging easier.
- Place a marker in the first FPtr of each RS row until the offset is automatic.
- Lightly block the scarf before picking up the hood, so the 50cm (19¾in) pickup span is accurate.
Scarf
With 4mm hook, ch 37.
Foundation Row (WS): Dc in 2nd ch from hook and in each ch to end, turn. (36 dc) (37 − 1 turning ch skipped = 36 ✓)
Row 1 (RS): Ch 2, tr in each st to end, turn. (36 tr)
Row 2 (WS): Ch 1, dc in each st to end, turn. (36 dc)
Row 3 (RS): Ch 2, tr in first st, *FPtr around next st 2 rows below, tr in next st; rep from * until 1 st rem, tr in last st, turn. (36 sts) (1 selvedge + 17 × 2-st repeats + 1 selvedge = 36 ✓)
Row 4 (WS): Ch 1, dc in each st to end, turn. (36 dc)
Row 5 (RS): Ch 2, tr in first st, *tr in next st, FPtr around next st 2 rows below; rep from * until 1 st rem, tr in last st, turn. (36 sts) (1 + 17 × 2 + 1 = 36 ✓)
Row 6 (WS): Ch 1, dc in each st to end, turn. (36 dc)
Repeat Rows 3–6 until the scarf measures 190cm (75in) from the Foundation Row, ending after a Row 6 (WS). Fasten off.
Guide: Rows 1–2 plus 66 repeats of Rows 3–6 = 2 + (66 × 4) = 266 rows → 266 ÷ 14 × 10 = 190cm ✓. Trust the tape measure over the repeat count if your row tension differs.
Hood
Lay the scarf flat with RS facing and a long edge at the top. Place a marker at the centre of that long edge (95cm / 37½in from either short end). Place two further markers 25cm (9¾in) either side of centre. The span between the outer markers is 50cm (19¾in); each tail beyond the hood is 70cm (27½in). (70 + 50 + 70 = 190 ✓)
With RS facing, join yarn with sl st at the right-hand outer marker.
Hood Row 1 (RS): Ch 1, work 90 dc evenly between the two outer markers, turn. (90 dc)
Even pickup: drop extra markers every 10cm (4in) along the 50cm span and work 18 dc in each 10cm section (18 × 5 = 90 ✓).
Hood Row 2 (WS): Ch 1, dc in each st to end, turn. (90 dc)
Hood Row 3 (RS): Ch 2, tr in each st to end, turn. (90 tr)
Hood Row 4 (WS): Ch 1, dc in each st to end, turn. (90 dc)
Hood Row 5 (RS): Ch 2, tr in first st, *FPtr around next st 2 rows below, tr in next st; rep from * until 1 st rem, tr in last st, turn. (90 sts) (1 + 44 × 2 + 1 = 90 ✓)
Hood Row 6 (WS): Ch 1, dc in each st to end, turn. (90 dc)
Hood Row 7 (RS): Ch 2, tr in first st, *tr in next st, FPtr around next st 2 rows below; rep from * until 1 st rem, tr in last st, turn. (90 sts) (1 + 44 × 2 + 1 = 90 ✓)
Hood Row 8 (WS): Ch 1, dc in each st to end, turn. (90 dc)
Repeat Hood Rows 5–8 until the hood measures 30cm (11¾in) from Hood Row 1, ending after a WS dc row (Hood Row 6 or 8). Fasten off, leaving a 50cm (20in) tail for seaming.
Finishing
Block. Pin the scarf to 20 × 190cm (8 × 75in) and the hood rectangle to 50 × 30cm (19¾ × 11¾in). Spray with water (or steam very lightly, without flattening the posts) and leave to dry fully.
Seam the crown. Fold the hood in half with RS together, matching the two top corners so the fold runs up the centre back. Using the long tail (or a fresh length), mattress-stitch the top edge together from the back fold to the front. The seamed edge is 25cm (9¾in) — half of 50cm ✓. Fasten off. Turn the hood right side out.
Face opening edging. With RS facing, join yarn at the right-hand junction of hood and scarf (base of the face opening). Work in rows (do not join into a tight round, or the opening will draw in):
- Row 1: Ch 1, dc evenly up the first side of the hood (1 dc in each dc row-end and 2 dc in each tr row-end), 2 dc at the crown seam, then down the second side in the same manner, turn.
- Row 2: Ch 1, dc in each dc to end, turn.
- Row 3: Ch 1, dc in each dc to end. Fasten off. Stitch the two short ends of the edging neatly to the scarf.
Scarf border. With RS facing, join yarn at any scarf corner. Dc evenly around the outer edge of the scarf only (both short ends, the long edge without the hood, and the two 70cm / 27½in top-edge sections beside the hood), working 1 dc in each dc row-end, 2 dc in each tr row-end, and 3 dc in each corner. Sl st to the first dc. Fasten off.
Weave in all remaining ends.
Optional tassels
Make 8 tassels. For each: wrap yarn 20 times around an 8cm (3in) card, slide off, tie tightly under the top loops, bind 1.5cm (½in) below the tie, and cut the lower loops. Attach 4 tassels evenly across each short end of the scarf (one at each corner and two spaced evenly between).
Care
Follow the ball band. For a wool blend: hand wash cool, roll in a towel, and dry flat. Do not tumble-dry. Reshape the hood while damp if needed.
Disclaimer: This pattern was generated by AI and should be reviewed for accuracy before use. While we strive for quality, AI-generated content may contain errors. Please verify measurements, stitch counts, charts, and instructions before beginning your project. Generated by purlJam.uk
Love this pattern?
Save this pattern to your free PurlJam libraryAccess your pattern anytime
Bookmark this page to access your pattern anytime