Type
Crochet
Difficulty
beginner
Category
amigurumi
AI Thinking Process
Planning
Verification
Pattern
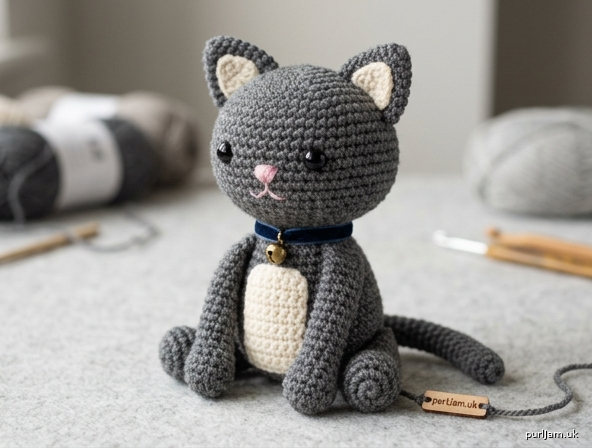
Amigurumi Cat – Simple Shapes Beginner Pattern
Skill Level: Beginner
Finished Size: Approximately 4.5 inches (11.5 cm) tall when seated
Yarn Weight: Worsted (4)
Materials
- Worsted weight yarn (US 4):
– Main color (MC): 50 yd (46 m) – body, head, tail, legs (gray, orange, or black recommended)
– Contrast color (CC): 10 yd (9 m) – optional belly patch or inner ears (cream/white)
– Small amount black or pink for nose/mouth embroidery - Crochet hook: US E-4 (3.5 mm) – go down 1–2 sizes from yarn label for tight fabric
- Fiberfill polyester stuffing
- Yarn needle
- Stitch marker
- 9 mm safety eyes (pair)
- Optional: small bell or collar scrap
Abbreviations (US Terms)
- ch: chain
- sc: single crochet
- inc: increase (2 sc in same stitch)
- dec: invisible decrease (sc2tog through front loops)
- st(s): stitch(es)
- rnd(s): round(s)
- MR: magic ring
- FO: fasten off
- [ ]: total stitch count at end of round
Gauge
5 sc × 5 rnds = 1 inch (2.5 cm) in continuous sc worked tightly.
Exact gauge is not critical but fabric must be dense so stuffing does not show.
Notes
- Work in continuous spiral rounds unless stated. Do not join or turn.
- Place stitch marker in first st of each rnd and move up.
- Stuff firmly as directed; shape while stuffing.
- Use invisible decrease for smooth surface.
- All pieces start with MR unless noted.
Pattern Instructions
Head (Sphere – make 1 in MC)
Rnd 1: 6 sc in MR [6]
Rnd 2: inc in each st around [12] (6 inc → 6 + 6 = 12 ✓)
Rnd 3: (sc, inc) around [18] (6 inc → 12 + 6 = 18 ✓)
Rnd 4: (2 sc, inc) around [24] (6 inc → 18 + 6 = 24 ✓)
Rnds 5–9: sc in each st around [24] (5 rnds)
Insert safety eyes between Rnds 6–7, spaced 5 sts apart.
Rnd 10: (2 sc, dec) around [18] (6 dec → 24 – 6 = 18 ✓)
Stuff head firmly.
Rnd 11: (sc, dec) around [12] (6 dec → 18 – 6 = 12 ✓)
Rnd 12: dec around [6] (6 dec → 12 – 6 = 6 ✓)
FO, leaving 8-inch tail. Thread tail through front loops of remaining 6 sts and pull tight to close. Weave in end.
Body (Oval – make 1 in MC)
Rnd 1: 6 sc in MR [6]
Rnd 2: inc in each st around [12]
Rnd 3: (sc, inc) around [18]
Rnd 4: (2 sc, inc) around [24]
Rnd 5: (3 sc, inc) around [30] (6 inc → 24 + 6 = 30 ✓)
Rnds 6–12: sc in each st around [30] (7 rnds)
Rnd 13: (3 sc, dec) around [24] (6 dec → 30 – 6 = 24 ✓)
Rnd 14: (2 sc, dec) around [18]
Stuff body firmly, shaping into a slightly elongated oval.
Rnd 15: (sc, dec) around [12]
Rnd 16: dec around [6]
FO, leaving long tail for sewing. Close hole as for head. Do not weave in – use tail to attach head later.
Ears (Small Cone – make 2 in MC)
Rnd 1: 4 sc in MR [4]
Rnd 2: (sc, inc) around [6]
Rnd 3: sc around [6]
Rnd 4: (2 sc, inc) around [8]
Rnd 5: sc around [8]
FO, leaving 6-inch tail for sewing. Do not stuff (ears stay flat-ish). Optional: with CC, embroider or surface-sl-st a small triangle on inner ear before attaching.
Front Legs (Tube – make 2 in MC)
Rnd 1: 6 sc in MR [6]
Rnd 2: inc in each st around [12]
Rnds 3–6: sc around [12]
Lightly stuff.
Rnd 7: (sc, dec) around [8]
FO, leaving tail for sewing. Flatten open end slightly.
Back Legs (Tube – make 2 in MC)
Rnd 1: 6 sc in MR [6]
Rnd 2: inc in each st around [12]
Rnds 3–5: sc around [12]
Lightly stuff.
Rnd 6: (sc, dec) around [8]
FO, leaving tail for sewing.
Tail (Thin Tube – make 1 in MC)
Rnd 1: 6 sc in MR [6]
Rnds 2–12: sc around [6] (11 rnds – adjust length if desired)
Stuff lightly as you go (or leave unstuffed for floppy look).
FO, leaving tail for sewing. Do not close – sew open end to body.
Optional Belly Patch (make 1 in CC)
Ch 5.
Row 1: sc in 2nd ch from hook and each ch across [4]
Rows 2–5: ch 1, turn, sc across [4]
FO, leaving tail. Sew centered on front of body before attaching legs.
Assembly
- Pin first: Place head on top of body (closed ends together). Pin ears on head top, slightly angled outward, fronts facing forward. Pin front legs to lower front of body, back legs to lower sides/rear so cat sits stably. Pin tail to lower back center.
- Sew head to body: Using body tail, mattress-stitch head securely to body opening area. Add extra stuffing at neck joint if needed before final stitches.
- Sew ears: Whip-stitch open edge of each ear to head between Rnds 3–5, 4 sts apart.
- Sew legs: Attach front legs at Rnds 10–12 of body, angled slightly forward. Attach back legs at Rnds 8–11 sides so cat sits.
- Sew tail: Attach open end of tail at lower back (Rnd 12–13 area). Curve tail around side or leave straight.
- Face embroidery (after eyes placed):
– Nose: with pink or black, satin-stitch a small triangle or “Y” over Rnd 8 center, 2 sts wide.
– Mouth: straight stitch a small inverted “Y” or simple line below nose.
– Optional whiskers: 2–3 straight stitches each side of muzzle with black thread or thin yarn. - Weave in all ends securely on inside.
Finishing
- Steam-block lightly if needed (do not flatten stuffing).
- Check that all pieces are firmly attached; reinforce high-stress points (neck, legs).
- Optional: add a tiny ribbon collar or jingle bell.
- Final height check: ≈4.5" (11.5 cm) seated.
Tips for Success
- Work tightly – amigurumi fabric should not show stuffing.
- Count stitches every round; marker is essential.
- Stuff head and body firmer than limbs.
- If cat tips forward, add a bit more stuffing to back of body or angle back legs farther rearward.
Enjoy your beginner-friendly amigurumi cat! This pattern uses only basic sphere, oval, cone, and tube shapes for easy construction.
Disclaimer: This pattern was generated by AI and should be reviewed for accuracy before use. While we strive for quality, AI-generated content may contain errors. Please verify measurements, stitch counts, charts, and instructions before beginning your project. Generated by purlJam.uk
Love this pattern?
Save this pattern to your free PurlJam libraryAccess your pattern anytime
Bookmark this page to access your pattern anytime