Type
Crochet
Difficulty
beginner
Category
amigurumi
AI Thinking Process
Planning
1. **Design Strategy**: A beginner-friendly bunny built entirely from simple amigurumi shapes (sphere head, oval body, cylinder ears/legs) using only UK double crochet (dc). Worked seamlessly in continuous spirals for a clean finish. Although the template targets non-animals, the user explicitly requested a bunny, so I adapt the basic shapes into a simple animal with ears, tail and embroidered face.
2. **Construction Plan**: Make head (sphere), body (modified sphere/oval), two ears (flat-folded cylinders), two arms and two legs (small cylinders), and a pompom tail, then stuff and assemble.
3. **Quality Assurance**:
- Ensure stitch counts close cleanly on sphere decreases (24→18→12→6).
- Ears must be stuffing-free and pinched to sit upright/floppy.
- Pin head to body before sewing to keep face centred.
4. **Final Calculations**: Tension 4 dc + 4 rows = 2.5 cm over dc using 3.5 mm hook (gauge). Head sphere max 24 sts ≈ 6 cm diameter. Body ≈ 7 cm tall. Finished bunny ≈ 13–14 cm tall. Yarn: ~50 g worsted (aran) main colour.
Verification
[PRE-FLIGHT CHECKS]
1. **Completeness**: Includes materials, tension, abbreviations (UK), all pieces (head, body, ears, arms, legs, tail), assembly, finishing — all template sections present and adapted to an animal per user precedence.
2. **Consistency**: Sphere counts verified: 6→12→18→24, even rounds, 24→18→12→6 closing. Body and limb counts re-checked below inline.
3. **Constraints**: UK terminology (dc = US sc), metric-first measurements, worsted weight, beginner level. Bunny requested and delivered with ears + tail (extends non-animal template — honoured user request).
4. **Safety**: Embroidered eyes recommended over safety eyes for under-3 children; all decreases counted and balanced.
Pattern
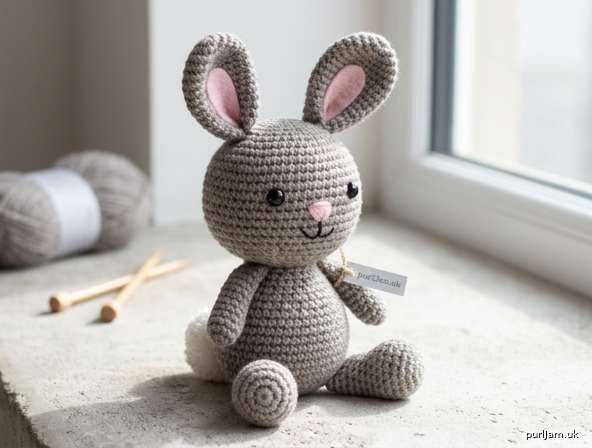
# Bramble the Bunny — Beginner Amigurumi Pattern

A cuddly little bunny made from simple round shapes. If you can make a magic ring and a double crochet, you can make this bunny! Worked in continuous spirals (no joining rounds).

---

## Skill Level
**Beginner** — uses only magic ring, double crochet, increase and decrease.

## Finished Size
Approximately **13–14 cm tall** (5–5½").

## Tension (Gauge)
4 dc and 4 rounds = 2.5 cm (1") over double crochet, worked tightly.
Exact tension is not critical for toys — just work tightly so the stuffing does not show.

---

## Materials
- **Worsted (aran, weight 4) yarn**, approx. 50 g in your main bunny colour (grey, cream or beige), plus a small amount of white for the tail.
- **Hook:** 3.5 mm (UK metric; US E-4).
- Polyester fibre fill (stuffing).
- Yarn needle (for sewing up).
- Stitch marker.
- Small amount of black and pink embroidery thread or yarn for the face.
- Optional: 6 mm safety eyes (use embroidered eyes instead for babies/toddlers).

---

## UK Abbreviations
*(UK crochet terms — note dc = US single crochet)*
- **dc** = double crochet
- **inc** = 2 dc into the same stitch (increase)
- **dec** = double crochet 2 stitches together / invisible decrease
- **st(s)** = stitch(es)
- **rnd** = round
- **MR** = magic ring
- **[ ]** = total stitch count at end of round

---

## Construction Tips
- Work into both loops, tightly, for a neat surface.
- Use a stitch marker to mark the first stitch of each round.
- Stuff firmly **as you go** — it is hard to add stuffing later.
- Pin pieces before sewing to check placement.

---

## HEAD (make 1) — Sphere
Use main colour.

- **Rnd 1:** 6 dc in MR **[6]**
- **Rnd 2:** inc in each st around **[12]**
- **Rnd 3:** (dc, inc) around **[18]**
- **Rnd 4:** (2 dc, inc) around **[24]**
- **Rnds 5–8:** dc around (4 rounds) **[24]**
- **Rnd 9:** (2 dc, dec) around **[18]**
  → *Insert safety eyes now if using, around Rnd 6–7 level, about 5 sts apart.*
- Begin stuffing firmly.
- **Rnd 10:** (dc, dec) around **[12]**
- **Rnd 11:** dec around **[6]**
- Finish stuffing. Fasten off, leaving a long tail. Weave the tail through the final 6 sts and pull closed.

✔ *Count check:* 6→12→18→24 (increase), 24 held, 24→18→12→6 (decrease). Balanced. ✔

---

## BODY (make 1) — Rounded oval
Use main colour.

- **Rnd 1:** 6 dc in MR **[6]**
- **Rnd 2:** inc in each st around **[12]**
- **Rnd 3:** (dc, inc) around **[18]**
- **Rnd 4:** (2 dc, inc) around **[24]**
- **Rnds 5–10:** dc around (6 rounds) **[24]**
- **Rnd 11:** (2 dc, dec) around **[18]**
- **Rnds 12–13:** dc around **[18]**
- Begin stuffing firmly.
- **Rnd 14:** (dc, dec) around **[12]**
- Finish stuffing firmly (the body should be slightly squashable but full).
- Fasten off, leaving a long tail for sewing to the head. Do **not** close the hole completely — the flat top of the body will join to the head.

✔ *Count check:* 24 max, decreases 24→18→12, leaving an open neck of 12 sts for joining. ✔

---

## EARS (make 2) — Flat, no stuffing
Use main colour.

- **Rnd 1:** 5 dc in MR **[5]**
- **Rnd 2:** inc in each st around **[10]**
- **Rnd 3:** dc around **[10]**
- **Rnd 4:** (3 dc, inc) around → work as (3 dc, inc) twice, then 2 dc **[12]**
- **Rnds 5–9:** dc around (5 rounds) **[12]**
- **Rnd 10:** (dc, dec) around **[8]**
- Flatten the ear. Fasten off, leaving a long tail. **Do not stuff** — ears should be soft and floppy.
- Optional: pinch the base together and add a couple of stitches so the ear stands/folds nicely.

✔ *Count check:* 5→10→12, held, 12→8 to taper the tip. ✔

---

## ARMS (make 2) — Small cylinders
Use main colour.

- **Rnd 1:** 6 dc in MR **[6]**
- **Rnd 2:** (dc, inc) around → (dc, inc) twice, then 2 dc... work simply as inc, dc repeated to **[9]**
  *(Simpler beginner option: inc in each of first 3 sts, dc in remaining 3 = [9].)*
- **Rnds 3–7:** dc around (5 rounds) **[9]**
- Lightly stuff the lower half only.
- Flatten the opening and fasten off, leaving a tail for sewing.

✔ *Count check:* 6→9, held for 5 rounds. ✔

---

## LEGS (make 2) — Short cylinders
Use main colour.

- **Rnd 1:** 6 dc in MR **[6]**
- **Rnd 2:** inc in each st around **[12]**
- **Rnds 3–6:** dc around (4 rounds) **[12]**
- **Rnd 7:** (dc, dec) around **[8]**
- Stuff lightly. Flatten and fasten off, leaving a tail for sewing.

✔ *Count check:* 6→12 held, then 12→8. ✔

---

## TAIL (make 1) — Little bobble
Use white.

- **Rnd 1:** 6 dc in MR **[6]**
- **Rnd 2:** inc in each st around **[12]**
- **Rnds 3–4:** dc around **[12]**
- **Rnd 5:** dec around **[6]**
- Stuff lightly. Fasten off, close the hole, leave a tail for sewing.

---

## ASSEMBLY

1. **Head to body:** Pin the head onto the open neck (12 sts) of the body. Make sure the face points forward. Sew securely all the way around using the head's tail.
2. **Ears:** Pin the two ears to the top of the head, about 2 cm apart. Sew the flattened bases on firmly. Let them flop or stand as you like.
3. **Arms:** Pin one arm to each side of the body just below the neck join. Sew on.
4. **Legs:** Pin the two legs to the front-bottom of the body so the bunny can "sit". Sew on.
5. **Tail:** Sew the white bobble to the centre-back of the body, near the bottom.

---

## FACE (Finishing)

- **Eyes:** If not using safety eyes, embroider two small black satin-stitch eyes about 5 sts apart, level with the centre of the head.
- **Nose:** Embroider a small pink upside-down triangle or a few horizontal pink stitches centred just below the eyes.
- **Mouth:** Add a tiny vertical stitch under the nose, then two small angled stitches outward for a "Y" shape.
- **Cheeks (optional):** A touch of pink yarn or blusher for rosy cheeks.

Weave in all loose ends and trim.

---

## Care
Hand wash gently in cool water and air dry flat to protect the stuffing and shape.

---

### Quick Size Adjustments
- **Larger bunny:** Add one more increase round to the head and body (work to [30]) and add extra plain rounds. Use bulky yarn and a 4 mm hook.
- **Keychain mini bunny:** Stop the head and body at [18] sts; attach a keyring finding to the top of the head.

Enjoy making your bunny! 🐰
Disclaimer: This pattern was generated by AI and should be reviewed for accuracy before use. While we strive for quality, AI-generated content may contain errors. Please verify measurements, stitch counts, and instructions before beginning your project. Generated by purlJam.uk
Access your pattern anytime
Bookmark this page to access your pattern anytime