Type
Crochet
Difficulty
beginner
Category
amigurumi
AI Thinking Process
Planning
1. **Design Strategy**: Bbokari (Lee Know's SKZOO) is a white bunny character with a round head/body, long floppy ears, small arms and feet, and an embroidered minimal face. Worsted yarn with UK dc-based amigurumi using simple sphere and cylinder shapes keeps it beginner-friendly.
2. **Construction Plan**: Work seamless head and body as two spheres joined together, with separate ears, arms, and feet sewn on, plus an embroidered face.
3. **Quality Assurance**:
- Keep stuffing firm but ears flat/unstuffed for floppy look.
- Maintain consistent dc tension to avoid stuffing showing through.
- Pin all appendages before sewing for symmetrical placement.
4. **Final Calculations**: Tension 16 dc x 18 rnds = 10 cm (gauge). Head sphere max 24 sts → approx 7 cm diameter. Body sphere max 30 sts → approx 8 cm. Finished height approx 18 cm including ears. Hook 3.5 mm (US E-4).
Verification
[PRE-FLIGHT CHECKS]
1. **Completeness**: Includes materials, tension, abbreviations (UK), all pieces (head, body, ears x2, arms x2, feet x2), assembly, face — all present.
2. **Consistency**: Sphere counts verified: 6→12→18→24 increases (+6 each) correct; decreases 24→18→12→6 correct. Body extended to 30 sts: 6→12→18→24→30 (+6 each) correct.
3. **Constraints**: User wants Bbokari (Lee Know's bunny SKZOO) — addressed via white colour, long floppy ears, minimal face. UK terminology used throughout.
4. **Safety**: All round maths sum verified; inc/dec counts balance to closure of 6 sts.
Pattern
# Bbokari — Lee Know's SKZOO Bunny (Beginner Amigurumi)

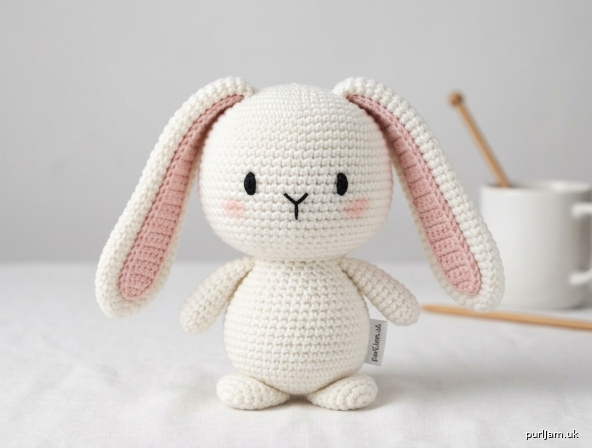
A cuddly version of **Bbokari**, the white bunny SKZOO character belonging to **Lee Know** of Stray Kids. This beginner pattern uses only simple sphere and cylinder shapes, basic stitches, and a minimal embroidered face — no complicated animal assembly required.

> **Note on terminology:** This pattern uses **UK crochet terms**. UK **dc** = US sc. Measurements are given in centimetres first, with inches in parentheses.

---

## Finished Size
- Approximately **18 cm (7 in)** tall including ears
- Body width approximately **8 cm (3¼ in)**

## Materials
- **Worsted weight (Aran, 4) yarn:**
  - Main colour (MC): White — approx. 50 g
  - Small amounts of pale pink for inner ears
  - Small amount of black for face embroidery (or use embroidery thread)
- **Hook:** 3.5 mm (US E-4)
- Polyester fibre stuffing
- Yarn needle (for assembly and embroidery)
- Stitch marker
- Optional: 6 mm safety eyes (or embroider the eyes)
- Optional: small amount of pale pink for cheeks

## Tension (Gauge)
16 dc x 18 rounds = 10 cm (4 in) worked in continuous spiral.
Exact tension is not critical, but work **tightly** so stuffing does not show.

## Abbreviations (UK terms)
- **dc** – double crochet (US sc)
- **inc** – work 2 dc in same stitch (increase)
- **dec** – invisible decrease (work 2 sts together)
- **st(s)** – stitch(es)
- **MR** – magic ring
- **rnd** – round
- **[ ]** – total stitch count at end of round

> Work in a **continuous spiral** (do not join rounds) unless told otherwise. Use your stitch marker to track the start of each round. Stuff firmly **as you go**.

---

## PIECE 1 — HEAD (make 1, in MC/white)

- **Rnd 1:** 6 dc in MR [6]
- **Rnd 2:** inc in each st around [12] *(6 inc → 12 ✓)*
- **Rnd 3:** (dc, inc) around [18] *(6 inc added → 18 ✓)*
- **Rnd 4:** (2 dc, inc) around [24] *(6 inc added → 24 ✓)*
- **Rnds 5–9:** dc around [24] *(5 plain rounds)*
- **Rnd 10:** (2 dc, dec) around [18] *(6 dec → 18 ✓)*
- **Begin stuffing firmly.**
- **Rnd 11:** (dc, dec) around [12] *(6 dec → 12 ✓)*
- **Rnd 12:** dec around [6] *(6 dec → 6 ✓)*
- Finish stuffing. Fasten off, leaving a long tail. Weave tail through the final 6 sts and pull closed.

---

## PIECE 2 — BODY (make 1, in MC/white)

- **Rnd 1:** 6 dc in MR [6]
- **Rnd 2:** inc in each st around [12]
- **Rnd 3:** (dc, inc) around [18]
- **Rnd 4:** (2 dc, inc) around [24]
- **Rnd 5:** (3 dc, inc) around [30] *(6 inc added → 30 ✓)*
- **Rnds 6–11:** dc around [30] *(6 plain rounds)*
- **Rnd 12:** (3 dc, dec) around [24] *(6 dec → 24 ✓)*
- **Rnd 13:** (2 dc, dec) around [18] *(6 dec → 18 ✓)*
- **Begin stuffing firmly.**
- **Rnd 14:** (dc, dec) around [12]
- **Rnd 15:** dec around [6]
- Finish stuffing. Fasten off, leaving a long tail for sewing to the head.

---

## PIECE 3 — EARS (make 2, in MC/white; inner ear in pink — optional)

Bbokari's ears are **long and floppy** — leave them **unstuffed** so they flop naturally.

**Outer ear (white) — make 2:**
- **Rnd 1:** 6 dc in MR [6]
- **Rnd 2:** (2 dc, inc) around [8] *(2 inc → 8 ✓)*
- **Rnds 3–11:** dc around [8] *(9 plain rounds — this gives the long shape)*
- **Rnd 12:** (2 dc, dec) around [6] *(2 dec → 6 ✓)*
- Flatten the open end. Do **not** stuff. Fasten off, leaving a long tail.

**Inner ear (pink) — optional, make 2:**
- Ch 7. Work 1 dc in 2nd ch from hook, 4 dc, then continue — simply make a flat narrow strip the length of the ear:
  - **Row 1:** dc in 2nd ch from hook and in each ch across [6]
  - **Rows 2–8:** ch 1, turn, dc across [6]
- Fasten off. Sew this flat pink strip lengthways onto the front of each white ear before attaching the ears.

---

## PIECE 4 — ARMS (make 2, in MC/white)

Small simple cylinders, lightly stuffed.

- **Rnd 1:** 6 dc in MR [6]
- **Rnd 2:** inc in each st around [12]
- **Rnds 3–6:** dc around [12] *(4 plain rounds)*
- **Rnd 7:** dec around [6] *(6 dec → 6 ✓)*
- Lightly stuff. Fasten off, leaving a long tail.

---

## PIECE 5 — FEET (make 2, in MC/white)

Small flattened ovals to help the toy sit.

- **Rnd 1:** 6 dc in MR [6]
- **Rnd 2:** inc in each st around [12]
- **Rnds 3–4:** dc around [12] *(2 plain rounds)*
- **Rnd 5:** dec around [6]
- Lightly stuff. Fasten off, leaving a long tail.

---

## ASSEMBLY

Lay out all pieces and **pin before sewing** to check symmetry.

1. **Join head to body:** Position the head on top of the body. Using the body tail, sew the two spheres firmly together all the way around the join. Add a little extra stuffing at the neck if needed for stability.

2. **Attach ears:** Pin the two ears to the top of the head, set slightly apart and angled so they flop forward/sideways (Bbokari's signature long droopy ears). Sew the flattened ends securely across the top of the head.

3. **Attach arms:** Pin one arm to each side of the upper body, just below the head join. Sew in place.

4. **Attach feet:** Pin the two feet to the front-bottom of the body so the toy sits upright. Sew in place.

---

## FACE (Bbokari's minimal expression)

Bbokari has a very simple, calm face — two small eyes and a tiny nose/mouth.

- **Eyes:** Insert two 6 mm safety eyes between Rnds 6–7 of the head, set about 2.5 cm (1 in) apart — **OR** embroider two small black oval/dot eyes in the same position. *(If using safety eyes, insert before closing the head.)*
- **Nose/mouth:** Using black yarn or embroidery thread, embroider a tiny "Y" shape (a small inverted triangle nose with a short vertical line below) centred just under and between the eyes.
- **Cheeks (optional):** Add two small pale-pink stitched or lightly brushed circles below the eyes for a soft look.

---

## CONSTRUCTION TIPS
- Work **tightly** throughout so the white stuffing does not peek through.
- Stuff the head and body **firmly**, but keep the ears **completely unstuffed** so they remain floppy — this is key to the Bbokari look.
- Use the **invisible decrease** for a smooth surface on the head.
- **Pin everything** before sewing to keep ears, arms, and feet symmetrical.
- Weave in all ends securely inside the stuffed pieces.

## SIZE ADJUSTMENTS
- **Larger Bbokari:** Add one more increase round to head and body (e.g. continue to 30/36 sts) and add extra plain rounds.
- **Keychain size:** Stop the head at 18 sts max, shorten ears to ~6 rounds, and attach a keychain finding to the top seam between the ears.

Enjoy your finished **Bbokari** — Lee Know's adorable bunny SKZOO! 🐰
Disclaimer: This pattern was generated by AI and should be reviewed for accuracy before use. While we strive for quality, AI-generated content may contain errors. Please verify measurements, stitch counts, and instructions before beginning your project. Generated by purlJam.uk
Access your pattern anytime
Bookmark this page to access your pattern anytime