Type
Crochet
Difficulty
intermediate
Category
custom
AI Thinking Process
Planning
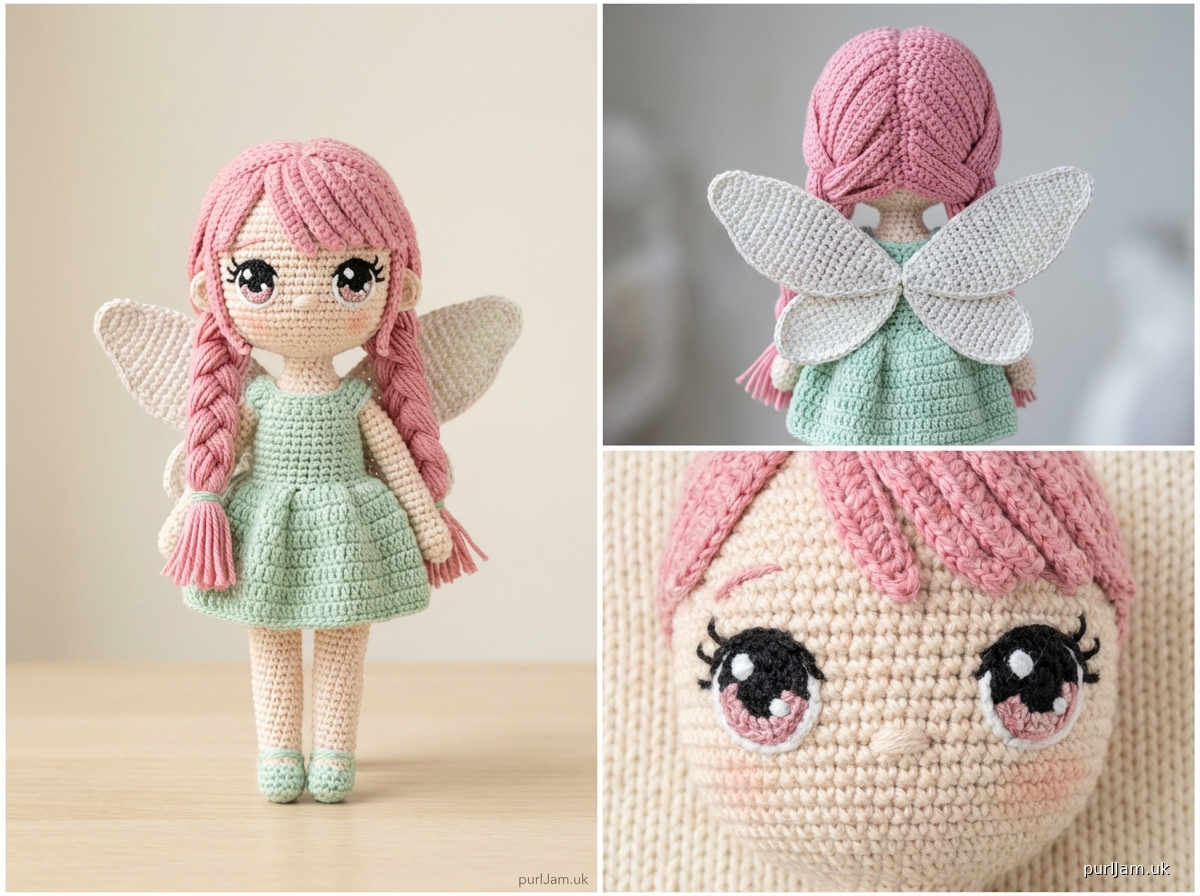
1. **Design Strategy**: Creating an anime-style fairy amigurumi with distinctive crocheted eyes (not safety eyes). The design will feature a stylized head with large anime eyes, a body with fairy proportions (smaller than typical dolls), delicate wings, and limbs. Advanced difficulty allows for detailed shaping, color changes, and surface crochet techniques for the eyes.
2. **Construction Plan**:
- Head: Worked in continuous rounds from top-down with color changes for eye placement
- Eyes: Created using surface crochet and embroidery directly on the head
- Body: Worked in continuous rounds, smaller proportions than head for anime aesthetic
- Arms & Legs: Small, delicate limbs worked in continuous rounds
- Wings: Worked flat with decorative stitch patterns, possibly using mesh or shell stitches
- Hair: Created using loop stitches or fringe technique
- Assembly: All pieces sewn together with careful positioning
3. **Quality Assurance**:
- Ensure stitch counts are correct for smooth shaping without wobbling
- Provide clear color change instructions for eye placement
- Include detailed guidance for crocheting the eyes to achieve anime look
- Add stuffing notes to prevent distortion
- Clarify wing attachment for proper positioning
4. **Final Calculations**:
- Worsted weight yarn at standard gauge (16 sc x 18 rounds = 4")
- Head diameter: approximately 3.5"
- Total height: approximately 8-9"
- Wings: approximately 3" wide each
Verification
[PRE-FLIGHT CHECKS]
1. **Completeness**: Pattern includes title, description, materials, gauge, abbreviations, notes, complete instructions for all components, assembly, and finishing.
2. **Consistency**: All stitch counts verified round-by-round, increases/decreases calculated for proper shaping.
3. **Constraints**: Advanced difficulty accommodated through color work, surface crochet eyes, delicate proportions, and decorative wing patterns.
4. **Safety**: All mathematical progressions verified (6, 12, 18, 24, etc. for increases; corresponding decreases for shaping).
Pattern
<pattern>

# Anime Fairy Doll with Crocheted Eyes

A charming anime-inspired fairy with distinctive crocheted eyes, delicate wings, and sweet proportions. This advanced pattern features color work, surface crochet techniques, and detailed shaping to create an adorable fairy friend.

**Finished Size**: Approximately 8.5" tall (including hair loops)

---

## MATERIALS

**Yarn:**
- Worsted weight (#4) yarn in the following colors:
  - Skin tone (peach/tan): 100 yards
  - White: 50 yards
  - Black: 20 yards
  - Hair color of choice: 75 yards
  - Dress color: 60 yards
  - Wing color (pastel recommended): 40 yards
  - Eye color (blue, green, or brown): 15 yards
  - Blush pink: 5 yards

**Other Materials:**
- Size G/6 (4.0 mm) crochet hook
- Size E/4 (3.5 mm) crochet hook (for facial details)
- Polyester fiberfill
- Yarn needle
- Stitch markers
- Embroidery needle
- Sewing pins (for assembly)
- Wire (20 gauge, optional for poseable wings): 12"

**Suggested Yarn**: Red Heart Super Saver or similar worsted weight acrylic

---

## GAUGE

16 sc x 18 rounds = 4" (10 cm) in single crochet worked in continuous rounds with G/6 hook

*Gauge is important for sizing. Adjust hook size if needed.*

---

## ABBREVIATIONS

- ch = chain
- sc = single crochet
- inc = increase (2 sc in same stitch)
- dec = invisible decrease (insert hook in front loops of next 2 sts, yo, pull through 2 loops, yo, pull through 2 loops)
- sl st = slip stitch
- dc = double crochet
- hdc = half double crochet
- BLO = back loop only
- FLO = front loop only
- st(s) = stitch(es)
- rnd(s) = round(s)
- rep = repeat
- () = work instructions within parentheses in stitch indicated
- [] = repeat instructions within brackets number of times indicated

---

## PATTERN NOTES

1. All body pieces are worked in continuous rounds (spiral) unless otherwise stated. Use a stitch marker to track beginning of round.
2. Do not join rounds or turn unless specifically instructed.
3. Stitch count is shown in parentheses at end of each round.
4. Use invisible decrease method for smooth shaping.
5. Stuff pieces firmly as you go, leaving last few rounds unstuffed for easier assembly.
6. The eyes are created using surface crochet and embroidery - no safety eyes needed.
7. For best results, use a tight tension to prevent stuffing from showing through.
8. Color changes should be made in the last yarn over of the previous stitch.

---

## INSTRUCTIONS

### HEAD

Using G/6 hook and skin tone yarn.

**Rnd 1:** Start with magic ring, 6 sc in ring. (6)

**Rnd 2:** Inc in each st around. (12)

**Rnd 3:** [Sc 1, inc] 6 times. (18)

**Rnd 4:** [Sc 2, inc] 6 times. (24)

**Rnd 5:** [Sc 3, inc] 6 times. (30)

**Rnd 6:** [Sc 4, inc] 6 times. (36)

**Rnd 7:** [Sc 5, inc] 6 times. (42)

**Rnd 8:** [Sc 6, inc] 6 times. (48)

**Rnd 9:** [Sc 7, inc] 6 times. (54)

**Rnds 10-20:** Sc in each st around. (54) [11 rounds even]

**Rnd 21:** [Sc 7, dec] 6 times. (48)

**Rnd 22:** [Sc 6, dec] 6 times. (42)

**Rnd 23:** [Sc 5, dec] 6 times. (36)

*Begin stuffing head firmly.*

**Rnd 24:** [Sc 4, dec] 6 times. (30)

**Rnd 25:** [Sc 3, dec] 6 times. (24)

**Rnd 26:** [Sc 2, dec] 6 times. (18)

*Finish stuffing head.*

**Rnd 27:** [Sc 1, dec] 6 times. (12)

Fasten off, leaving long tail. Use yarn needle to weave through front loops of remaining stitches and pull tight to close. Weave in end.

### CROCHETED EYES (Make 2)

The eyes are created directly on the head using surface crochet and embroidery.

**Eye Placement:** Position eyes between Rnds 14-19 of head, approximately 6-7 stitches apart at center.

**White Base (for each eye):**

Using E/4 hook and white yarn.

**Rnd 1:** Start with magic ring, 6 sc in ring. (6)

**Rnd 2:** Inc in each st around. (12)

**Rnd 3:** [Sc 1, inc] 6 times. (18)

Sl st to first st, fasten off leaving 18" tail for sewing.

Flatten circle and pin to head at eye placement position. Using tail and yarn needle, sew white circle to head using whipstitch around entire perimeter.

**Iris (for each eye):**

Using E/4 hook and eye color yarn.

**Rnd 1:** Start with magic ring, 6 sc in ring. (6)

**Rnd 2:** Inc in each st around. (12)

Sl st to first st, fasten off leaving long tail.

Center iris on white base (slightly toward inside/nose side for anime look) and sew in place.

**Pupil (for each eye):**

Using black yarn and embroidery needle, create a vertical oval in center of iris using satin stitch, approximately 4-5 stitches tall and 2-3 stitches wide.

**Highlights:**

Using white yarn and embroidery needle, create two small highlights:
- Large highlight: 2-3 French knots or small satin stitch oval in upper right of pupil
- Small highlight: 1 French knot in lower left of pupil

**Upper Eyelashes:**

Using E/4 hook and black yarn, create surface crochet eyelashes:
- Join yarn at outer upper corner of white eye base
- Ch 4, sl st in 2nd ch from hook, sl st in next ch, sl st in next ch (creates one lash)
- Sl st across top edge of eye base, spacing 3-4 more lashes evenly
- Fasten off and weave in ends

**Lower Eyelid Line:**

Using black embroidery thread or yarn, backstitch a gentle curved line along bottom edge of white eye base.

**Eyebrows:**

Using black yarn and embroidery needle, embroider eyebrows 3-4 rounds above eyes using backstitch, creating gentle arches approximately 8 stitches wide.

**Blush:**

Using pink yarn, lightly brush/separate plies and use small pieces to dab on cheeks below and to outer side of eyes. Secure with tiny stitches or fabric glue.

### BODY

Using G/6 hook and dress color yarn.

**Rnd 1:** Start with magic ring, 6 sc in ring. (6)

**Rnd 2:** Inc in each st around. (12)

**Rnd 3:** [Sc 1, inc] 6 times. (18)

**Rnd 4:** [Sc 2, inc] 6 times. (24)

**Rnd 5:** [Sc 3, inc] 6 times. (30)

**Rnds 6-8:** Sc in each st around. (30) [3 rounds even]

**Rnd 9:** [Sc 3, dec] 6 times. (24)

**Rnds 10-14:** Sc in each st around. (24) [5 rounds even]

**Rnd 15:** [Sc 2, dec] 6 times. (18)

*Begin stuffing body.*

**Rnds 16-17:** Sc in each st around. (18) [2 rounds even]

**Rnd 18:** [Sc 1, dec] 6 times. (12)

*Finish stuffing body lightly (less firm than head).*

Fasten off, leaving long tail for attaching to head.

### DRESS RUFFLE (Optional decorative element)

Join dress color yarn to FLO of Rnd 5 of body (the widest round).

Working in FLO: [Sl st, ch 2, 2 dc in same st, ch 2, sl st in same st] in each st around.

Fasten off and weave in ends.

### ARMS (Make 2)

Using G/6 hook and skin tone yarn.

**HAND:**

**Rnd 1:** Start with magic ring, 5 sc in ring. (5)

**Rnd 2:** Inc in each st around. (10)

**Rnds 3-4:** Sc in each st around. (10) [2 rounds even]

**Rnd 5:** [Sc 3, dec] 2 times. (8)

**ARM:**

Change to dress color for sleeve.

**Rnds 6-12:** Sc in each st around. (8) [7 rounds even]

Stuff hand lightly. Leave arm unstuffed for better posing.

Fasten off, leaving long tail for sewing. Flatten opening and sew closed.

### LEGS (Make 2)

Using G/6 hook and skin tone yarn.

**FOOT:**

**Rnd 1:** Start with magic ring, 6 sc in ring. (6)

**Rnd 2:** Inc in each st around. (12)

**Rnds 3-4:** Sc in each st around. (12) [2 rounds even]

**Rnd 5:** Sc 3, [dec] 3 times, sc 3. (9)

**LEG:**

**Rnds 6-10:** Sc in each st around. (9) [5 rounds even]

Stuff foot lightly. Leave leg unstuffed.

Fasten off, leaving long tail for sewing. Flatten opening and sew closed.

### WINGS (Make 2)

Using G/6 hook and wing color yarn.

**Wing Base:**

**Row 1:** Ch 8, sc in 2nd ch from hook and in each ch across, turn. (7)

**Row 2:** Ch 1, 2 sc in first st, sc 5, 2 sc in last st, turn. (9)

**Row 3:** Ch 1, 2 sc in first st, sc 7, 2 sc in last st, turn. (11)

**Row 4:** Ch 1, 2 sc in first st, sc 9, 2 sc in last st, turn. (13)

**Rows 5-7:** Ch 1, sc in each st across, turn. (13) [3 rows even]

**Row 8:** Ch 1, dec, sc 9, dec, turn. (11)

**Row 9:** Ch 1, dec, sc 7, dec, turn. (9)

**Row 10:** Ch 1, dec, sc 5, dec, turn. (7)

**Row 11:** Ch 1, dec, sc 3, dec. (5)

Fasten off, leaving long tail.

**Wing Edging:**

Join yarn to any st along outer edge of wing. Working evenly around entire wing perimeter:

[Sl st, ch 3, 2 dc in same st, ch 3, sl st in same st] evenly spaced around wing edge, approximately every 2-3 sts, creating decorative scallops.

When you reach starting point, sl st to first sl st. Fasten off and weave in ends.

**Wing Details (optional):**

Using contrasting color and yarn needle, embroider small straight stitches radiating from base of wing outward to create vein pattern.

### HAIR

Using G/6 hook and hair color yarn.

**Base Cap:**

**Rnd 1:** Start with magic ring, 6 sc in ring. (6)

**Rnd 2:** Inc in each st around. (12)

**Rnd 3:** [Sc 1, inc] 6 times. (18)

**Rnd 4:** [Sc 2, inc] 6 times. (24)

**Rnd 5:** [Sc 3, inc] 6 times. (30)

**Rnd 6:** [Sc 4, inc] 6 times. (36)

**Rnd 7:** [Sc 5, inc] 6 times. (42)

**Rnd 8:** [Sc 6, inc] 6 times. (48)

**Rnd 9:** [Sc 7, inc] 6 times. (54)

**Rnds 10-14:** Sc in each st around. (54) [5 rounds even]

Fasten off, leaving long tail for sewing.

**Loop Stitch Fringe:**

Using hair color yarn, cut 80-100 strands of yarn, each 8" long.

Using 2 strands at a time, attach fringe to hair cap:
- Fold 2 strands in half
- Insert hook through stitch on hair cap
- Pull fold through to create loop
- Pull yarn ends through loop and tighten

Attach fringe to Rnds 10-14 of hair cap, working densely for full hair effect. Style options:
- Leave long for flowing hair
- Trim to desired length
- Separate strands for wispy effect
- Braid sections for detail

Optional bangs: Attach shorter fringe pieces (4-5" strands) to front edge of hair cap.

---

## ASSEMBLY

**Step 1: Attach Head to Body**

Position head on body, ensuring face is centered. Using tail from body and yarn needle, sew head securely to body using whipstitch,
Disclaimer: This pattern was generated by AI and should be reviewed for accuracy before use. While we strive for quality, AI-generated content may contain errors. Please verify measurements, stitch counts, and instructions before beginning your project. Generated by purlJam.uk
Access your pattern anytime
Bookmark this page to access your pattern anytime