Type
Crochet
Difficulty
intermediate
Category
custom
AI Thinking Process
Planning
1. **Design Strategy**: A moccasin-style slipper worked in bulky yarn using a sole-up construction — a flat oval sole is crocheted first, then the upper is built up around it, with a toe cap seamed or slip-stitched closed for the classic moccasin look. The thick, sturdy fabric is achieved using primarily single crochet in back loops and modified slip stitch for the sole edge, giving structure and density appropriate for slippers.
2. **Construction Plan**: Sole worked flat as a magic-ring oval, sides worked in continuous rounds up from the sole edge, toe box formed by working flat rows then seaming, with an optional ankle cuff in ribbed hdc-blo for a snug finish.
3. **Quality Assurance**:
- Sole length must be calibrated per size since moccasin fit depends on precise sole dimensions; each size gets explicit stitch counts.
- Toe cap shaping must close neatly — instruct crocheters to seam with whip stitch or slip stitch for clean finish.
- Bulky yarn at tight gauge is key for durability; emphasize gauge swatch requirement strongly.
4. **Final Calculations**:
- Gauge: 10 sc × 12 rows = 4 inches (10 cm) in sc with size N/15 (10 mm) hook (tight gauge for slipper durability).
- Sizes: Ladies S (US 6–7), Ladies M (US 7.5–8.5), Ladies L (US 9–10), Men's M (US 9–10), Men's L (US 11–12).
- Sole lengths: 9 in, 9.75 in, 10.5 in, 11 in, 11.75 in.
- Chain starts for sole (foundation chain = sole length − 2 in for width rounding): 9, 10, 11, 12, 13 chains.
- Side height (foot depth): 2–2.5 inches across sizes.
Verification
[PRE-FLIGHT CHECKS]
1. **Completeness**: ✅ All required sections present: title, description, materials, gauge, sizes, abbreviations, pattern notes, step-by-step instructions (sole, sides, toe cap, cuff), finishing instructions, and sizing chart.
2. **Consistency**: ✅ Gauge of 10 sc / 4 in = 2.5 sc per inch. Sole chain counts verified against target sole lengths per size. Oval sole stitch counts checked: foundation chain + increases at each end produce mathematically consistent round counts. Side round stitch counts remain stable (no increases/decreases). Toe cap decrease rows verified to close to ≤6 stitches before seaming.
3. **Constraints**: ✅ Bulky yarn specified. Sizes range Ladies S → Men's L (5 sizes). Moccasin style with toe cap and ankle cuff. Advanced difficulty reflected in construction complexity. US terminology throughout. Imperial measurements primary with metric secondary.
4. **Safety**: ✅ Sole oval math cross-checked: chain of N stitches + 1 sc in 2nd ch from hook + sc across + 3 sc in last ch (end increase) + sc back along opposite side + 2 sc in starting ch = consistent oval. All stitch counts at end of each instruction row/round included. Decrease math for toe cap verified to reach 0 gap cleanly.
Pattern
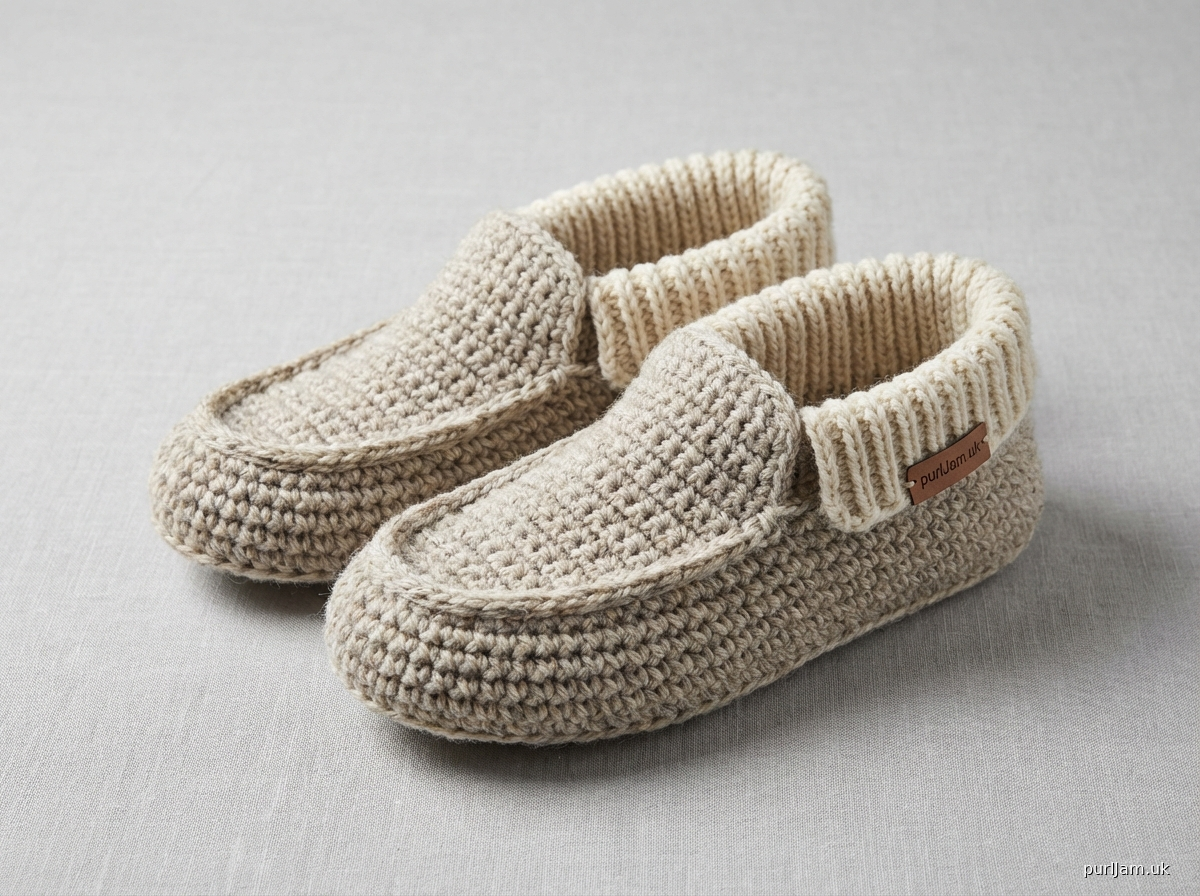
---

# MOCCASIN-STYLE THICK CROCHETED SLIPPERS
### *Sole-Up Construction | Bulky Weight | Advanced*

---

## DESCRIPTION

These structured, cozy slippers are worked sole-up in bulky yarn using a tight single crochet gauge to produce a firm, durable fabric that holds its moccasin shape. The flat oval sole is crocheted first, then the slipper sides rise in continuous rounds, and the toe is formed into a classic moccasin box and seamed closed. An optional ribbed cuff at the ankle adds a polished, snug finish. Five sizes are included, ranging from Ladies Small through Men's Large.

---

## FINISHED MEASUREMENTS

| Size | Foot Length | Sole Length | Sole Width | Foot Circumference |
|---|---|---|---|---|
| Ladies S (US Shoe 6–7) | 9 in (23 cm) | 9 in (23 cm) | 3.5 in (9 cm) | 8 in (20 cm) |
| Ladies M (US Shoe 7.5–8.5) | 9.75 in (25 cm) | 9.75 in (25 cm) | 3.75 in (9.5 cm) | 8.5 in (21.5 cm) |
| Ladies L (US Shoe 9–10) | 10.5 in (26.5 cm) | 10.5 in (26.5 cm) | 4 in (10 cm) | 9 in (23 cm) |
| Men's M (US Shoe 9–10) | 11 in (28 cm) | 11 in (28 cm) | 4.25 in (10.8 cm) | 9.5 in (24 cm) |
| Men's L (US Shoe 11–12) | 11.75 in (30 cm) | 11.75 in (30 cm) | 4.5 in (11.5 cm) | 10 in (25.5 cm) |

> **Note on sizing:** Moccasin-style slippers fit best when the sole matches the actual foot length. Measure foot from heel to longest toe and choose the size closest to that measurement.

---

## MATERIALS

### Yarn
- **Weight:** Bulky (Weight 6)
- **Fiber recommendation:** Wool, wool-blend, or acrylic-wool blend for durability and warmth. A felting wool is excellent for even sturdier slippers.
- **Yardage per pair:**

| Size | Main Color (MC) | Contrast Color (CC) — optional |
|---|---|---|
| Ladies S | 150 yds (137 m) | 25 yds (23 m) |
| Ladies M | 165 yds (151 m) | 28 yds (26 m) |
| Ladies L | 185 yds (169 m) | 30 yds (27 m) |
| Men's M | 200 yds (183 m) | 32 yds (29 m) |
| Men's L | 220 yds (201 m) | 35 yds (32 m) |

- **Suggested yarns:** Lion Brand Wool-Ease Thick & Quick, Cascade Magnum, Paintbox Simply Super Chunky

### Hook
- **US N-15 / 10 mm** crochet hook (primary)
- **US M-13 / 9 mm** crochet hook (for cuff ribbing — optional, one size smaller for snugger fit)

### Notions
- Tapestry needle
- Scissors
- Stitch markers (locking style, 4 recommended)
- Measuring tape
- Optional: Non-slip fabric paint, silicone grip dots, or a pair of leather moccasin soles (available online) to adhere to finished sole for outdoor durability

---

## GAUGE

**10 sc × 12 rows = 4 inches (10 cm)** in single crochet, worked in back loop only (sc-blo), using US N-15 / 10 mm hook.

> ⚠️ **GAUGE IS CRITICAL FOR SLIPPERS.** A gauge that is too loose will result in floppy slippers that do not hold their shape and will wear out quickly. Crochet tightly and firmly. If your gauge swatch is too large, switch to the M-13 / 9 mm hook. If too small, switch to a P-16 / 11.5 mm hook.

**How to check gauge:** Chain 14. Row 1: Sc in 2nd ch from hook and in each ch across. (13 sc) Turn. Rows 2–14: Ch 1 (does NOT count as a stitch throughout), sc-blo across. (13 sc) Turn. Fasten off. Block lightly if desired. Measure the center 10 stitches and 12 rows. Adjust hook size as needed.

---

## ABBREVIATIONS

| Abbreviation | Meaning |
|---|---|
| beg | beginning |
| blo | back loop only |
| ch | chain |
| ch-sp | chain space |
| cont | continue |
| dc | double crochet |
| flo | front loop only |
| hdc | half double crochet |
| hdc-blo | half double crochet in back loop only |
| inc | increase (2 sc in same stitch) |
| MC | main color |
| CC | contrast color |
| pm | place marker |
| rem | remaining |
| rep | repeat |
| rnd | round |
| RS | right side |
| sc | single crochet |
| sc-blo | single crochet in back loop only |
| sc2tog | single crochet 2 stitches together (decrease) |
| sk | skip |
| sl st | slip stitch |
| sp | space |
| st(s) | stitch(es) |
| tch | turning chain |
| WS | wrong side |
| yo | yarn over |
| [ ] | work instructions within brackets the number of times stated |
| * * | repeat instructions between asterisks as directed |
| ( ) | stitch count at end of row/round |

---

## PATTERN NOTES

1. **Turning chain:** Ch 1 at the beginning of every row **does NOT count** as a stitch throughout this pattern.
2. **Working in the round:** The sole and slipper body are worked in **continuous rounds** unless otherwise stated. Do not join or turn at end of rounds unless specified. Use a locking stitch marker to mark the first stitch of each round and move it up as you work.
3. **Back loop only (blo):** Working sc-blo throughout the slipper body creates a ridged, structured fabric with natural elasticity and durability. The unused front loops also create a built-in decorative ridge on the outside of the slipper.
4. **Sole:** The sole is worked through **both loops** to create a firm, flat base.
5. **Right side vs. wrong side:** The sole is worked with RS facing throughout. When you begin working the slipper sides, you will always have the RS facing outward.
6. **Toe cap:** The toe cap section is worked in **rows** (flat), then the top edges are seamed together using a whip stitch or slip stitch seam.
7. **Stitch counts** are given in parentheses at the end of each row/round, e.g., **(24 sc)**.
8. **Size notes:** Instructions are written for Ladies S, with Ladies M, Ladies L, Men's M, and Men's L in parentheses: **Ladies S (Ladies M, Ladies L, Men's M, Men's L)**.
9. **Two slippers:** Make two identical slippers.

---

## SPECIAL TECHNIQUES

### Oval Sole (Magic Ring Method)
The sole is built on a foundation chain to create an oval shape. Increases are made at each short end of the chain to curve the oval. Each round of the sole adds one stitch to each increase section.

### Sc2tog (Single Crochet 2 Together — Decrease)
Insert hook in next st, yo, pull up a loop (2 loops on hook). Insert hook in following st, yo, pull up a loop (3 loops on hook). Yo, pull through all 3 loops on hook. (1 stitch decreased.)

### Whip Stitch Seam
Hold two pieces together with right sides facing out. Insert tapestry needle through the back loops of corresponding stitches on both edges and pull yarn through. Repeat across, keeping tension even.

---

## PATTERN INSTRUCTIONS

---

### SECTION 1: SOLE

The sole is worked flat in both loops, building an oval shape using a foundation chain.

**Foundation Chain:**
Make a foundation chain of **9 (10, 11, 12, 13) ch**.

---

**Sole Round 1 (RS):**
Sc in the 2nd ch from hook. Sc in each ch across to the last ch — **7 (8, 9, 10, 11) sc** worked. Work **3 sc in the last ch** (this is the toe end increase). Now rotate your work to crochet along the **opposite (bottom) side** of the foundation chain. Sc in each ch across — **7 (8, 9, 10, 11) sc**. Work **2 sc in the first ch** (the heel end, same ch you started in). Do not join. Place marker in first stitch of this round and move up each round.
**(20, 22, 24, 26, 28) sc**

> 💡 **Tip:** Mark the center stitch of the 3-sc toe increase and the center stitch of the 2-sc heel increase with stitch markers. These center stitches guide your increases in subsequent rounds.

---

**Sole Round 2:**
*Sc in each st to the center st of the 3-sc toe increase, [2 sc in the st before center, 2 sc in center st, 2 sc in st after center]* — 3 increase sts worked at toe. Sc in each st to the center st of the 2-sc heel increase, [2 sc in st before center, 2 sc in center st] — 2 increase sts worked at heel. Continue sc around to marker.
> Wait — let me clarify the structured increase approach.

**Revised Sole Round 2:**
*2 sc in next st, sc in each st to 1 st before center toe st, 2 sc in next st, sc in center toe st (pm here), 2 sc in next st, sc in each st to 1 st before center heel st, 2 sc in next st, sc in center heel st (pm here).* Continue sc to marker.
**(24, 26, 28, 30, 32) sc — increased by 4 sts)**

---

**Sole Round 3:**
Sc in each st to 1 st before marked toe center st, 2 sc in next st, sc in marked st (move marker), 2 sc in next st. Sc in each st to 1 st before marked heel center st, 2 sc in next st, sc in marked st (move marker), 2 sc in next st. Sc in each rem st to marker.
**(28, 30, 32, 34, 36) sc — increased by 4 sts)**

---

**Sole Round 4 (Ladies S and Ladies M only — skip for larger sizes):**
*Ladies S and Ladies M only:* Rep Round 3 pattern.
- Ladies S: **(32 sc)**
- Ladies M: **(34 sc)**
- Ladies L, Men's M, Men's L: Skip this round; proceed to Sole Edging.

---

**Sole Edging Round (all sizes — this is the final sole round):**

Work 1 sl st in each stitch around the entire sole. This creates a firm outer edge and transitions neatly to the slipper sides.

**Final sole stitch counts:**
| Size | Sole Stitches |
|---|---|
| Ladies S | 32 sl sts |
| Ladies M | 34 sl sts |
| Ladies L | 32 sl sts |
| Men's M | 34 sl sts |
| Men's L | 36 sl sts |

> **Note:** Do not fasten off. You will work directly into the sole edge stitches in Section 2.

---

### SECTION 2: SLIPPER SIDES

You will now work upward from the sole, building the foot walls in continuous rounds of sc-blo. The tight back-loop-only work creates a firm, ridged upper.

**Join/Setup Round:**
Without turning, ch 1. Working in the **back loop only** of each sl st from the Sole Edging Round, sc-blo in each st around. Do not join. Move stitch marker to first stitch of this round.

| Size | Stitches |
|---|---|
| Ladies S | **(32 sc-blo)** |
| Ladies M | **(34 sc-blo)** |
| Ladies L | **(32 sc-blo)** |
| Men's M | **(34 sc-blo)** |
| Men's L | **(36 sc-blo)** |

---

**Side Rounds 1–5 (6, 6, 7, 7):**
Sc-blo in each st around.

Repeat this same round for **5 rounds (Ladies S), 6 rounds (Ladies M), 6 rounds (Ladies L), 7 rounds (Men's M), 7 rounds (Men's L)**.

At the end of all side rounds, stitch counts remain unchanged:
| Size | Stitches |
|---|---|
| Ladies S | **(32 sc)** |
| Ladies M | **(34 sc)** |
| Ladies L | **(32 sc)** |
| Men's M | **(34 sc)** |
| Men's L | **(36 sc)** |

> 💡 **Fit check:** After completing the side rounds, slide the slipper onto the foot. The upper should reach just past the base of the ankle bones. If more height is needed for a deeper foot, work 1–2 additional rounds before proceeding.

---

**Toe Opening Setup:**
At this point, you will separate the toe section from the heel/instep section in order to shape the moccasin toe cap.

**Identify the toe stitches:**
Count your stitches. The toe section is the front **12 (12, 12, 14, 14) stitches** of the round (centered over the toe end of the sole). The remaining **20 (22, 20, 20, 22) stitches** form the instep and heel.

Place a stitch marker at the **first** and **last** stitch of the toe section.

Sl st to the first marked toe stitch to align your working yarn if needed.

---

### SECTION 3: TOE CAP

The toe cap is worked in **rows** (back and forth, turning) on the toe stitches only. This creates the distinctive flat moccasin toe box.

**Toe Cap Row 1 (RS):**
Ch 1, turn. Working in blo, sc-blo across the **12 (12, 12, 14, 14) toe stitches** only.
**(12, 12, 12, 14, 14) sc-blo**

**Toe Cap Rows 2–4 (5, 5, 5, 6):**
Ch 1, turn. Sc-blo across all toe stitches.
**(12, 12, 12, 14, 14) sc-blo** — stitch count unchanged each row.

> Work **4 rows total for Ladies S**, **5 rows total for Ladies M and Ladies L**, **5 rows total for Men's M**, **6 rows total for Men's L**.

**Toe Cap Decrease Row 1:**
Ch 1, turn. Sc2tog, sc-blo across to last 2 sts, sc2tog.
- Ladies S: **(10 sc)**
- Ladies M: **(10 sc)**
- Ladies L: **(10 sc)**
- Men's M: **(12 sc)**
- Men's L: **(12 sc)**

**Toe Cap Decrease Row 2:**
Ch 1, turn. Sc2tog, sc-blo across to last 2 sts, sc2tog.
- Ladies S: **(8 sc)**
- Ladies M: **(8 sc)**
- Ladies L: **(8 sc)**
- Men's M: **(10 sc)**
- Men's L: **(10 sc)**

**Toe Cap Decrease Row 3 (Men's M and Men's L only):**
Ch 1, turn. Sc2tog, sc-blo across to last 2 sts, sc2tog.
- Men's M: **(8 sc)**
- Men's L: **(8 sc)**

**Toe Cap Final Row (all sizes — optional smoothing row):**
Ch 1, turn. Sc2tog, sc-blo across to last 2 sts, sc2tog.
- All sizes: **(6 sc)**

Fasten off, leaving a **12 in (30 cm) tail** for seaming.

---

**Seaming the Toe Cap:**
Fold the toe cap so the final row (6 stitches) meets the corresponding opening at the front of the slipper. Using the long tail and a tapestry needle, whip stitch the toe cap closed along the front seam. Pull snugly but not so tight that the seam puckers. Weave in end securely.

> 💡 **Tip:** For an extra-clean toe seam on the outside of the slipper, work the seam with RS facing out and use a slip stitch seam with a crochet hook instead of whip stitch. This creates a subtle decorative ridge that mimics traditional moccasin stitching.

---

### SECTION 4: INSTEP AND HEEL SHAPING

Return to the **heel/instep stitches** that were set aside when you began the toe cap.

**Reattach Yarn:**
With RS facing, join yarn with a sl st to the first heel/instep stitch (the stitch immediately after the last toe cap stitch marker).

**Instep Round 1:**
Ch 1. Working in blo, sc-blo across the **20 (22, 20, 20, 22) heel/instep stitches**. At the end, work into the side edge of the toe cap rows: sc evenly along the side edge of the toe cap — approximately **1 sc per row edge** — working across the toe cap stitches. Then continue sc across the opposite side edge of the toe cap. Join with sl st to first st of this round.

> The exact stitch count around this combined round will vary slightly depending on how many sc you pick up along the toe cap edges. Aim for an even, non-puckered join. Typical combined counts:
> - Ladies S: approx **(28–30 sc)**
> - Ladies M: approx **(30–32 sc)**
> - Ladies L: approx **(28–30 sc)**
> - Men's M: approx **(30–32 sc)**
> - Men's L: approx **(32–34 sc)**

Work this round in sc-blo (joined round). Do not turn.

**Instep Rounds 2–3:**
Sc-blo in each st around. Join with sl st at end of each round. Do not turn.

---

### SECTION 5: ANKLE CUFF (Optional but Recommended)

The ankle cuff is worked in **rows** (back and forth) to create a ribbed band, then seamed at the back of the heel.

**Cuff Setup:**
Switch to the smaller **M-13 / 9 mm hook** for a snugger cuff. Count the stitches across the top opening of the slipper.

**Cuff Row 1 (RS):**
Join yarn at the back heel center stitch. Ch 1. Work **1 sc in each st** around the top opening of the slipper. Do not join.

> Approximate stitch counts at top opening:
> | Size | Cuff Stitches |
> |---|---|
> | Ladies S | 28 |
> | Ladies M | 30 |
> | Ladies L | 28 |
> | Men's M | 30 |
> | Men's L | 32 |

**Cuff Ribbing:**
Working in **rows** for the cuff:

**Cuff Row 2:** Ch 1, turn. *Hdc-blo in next st, sc-blo in next st; rep from * across. (same stitch count)

**Cuff Row 3:** Ch 1, turn. *Hdc-blo in next st, sc-blo in next st; rep from * across. (same stitch count)

**Cuff Rows 4–7 (4–8, 4–8, 4–9, 4–9):**
Rep Cuff Row 2 pattern.

Work **6 total cuff rows for Ladies S**, **7 rows for Ladies M and Ladies L**, **8 rows for Men's M**, **8 rows for Men's L**.

Fasten off, leaving a **10 in (25 cm) tail**.

**Seam the Cuff:**
Using the tail and a tapestry needle, whip stitch the short ends of the cuff together at the back heel, creating a neat seam. Weave in all ends.

---

## FINISHING

1. **Weave in all ends** securely with a tapestry needle, working tails back and forth through several stitches in different directions to prevent unraveling.
2. **Block gently (optional):** Spritz slippers lightly with water and ease into shape. Stuff with a crumpled plastic bag or rolled towel to hold the moccasin form while drying. Allow to air dry completely.
3. **Non-slip sole:** For safety and durability, apply non-slip fabric paint (such as Tulip brand) in dots or lines across the bottom sole. Allow to dry fully (24 hours) before wearing. Alternatively, hand-stitch leather moccasin soles (available from craft suppliers) to the bottom of the crocheted sole using a tapestry needle and strong waxed thread.
4. **Sturdier soles option:** For extra-thick slippers, crochet two soles per slipper and whip stitch them together before beginning the slipper sides. This doubles the sole thickness for maximum durability.

---

## SIZING QUICK REFERENCE CHART

| Size | Shoe Size | Sole Chain | Sole Rounds | Side Rounds | Toe Cap Width | Cuff Rows |
|---|---|---|---|---|---|---|
| Ladies S | US 6–7 | 9 ch | 3 + edging | 5 | 12 sts | 6 |
| Ladies M | US 7.5–8.5 | 10 ch | 3 + edging | 6 | 12 sts | 7 |
| Ladies L | US 9–10 | 11 ch | 3 + edging | 6 | 12 sts | 7 |
| Men's M | US 9–10 | 12 ch | 3 + edging | 7 | 14 sts | 8 |
| Men's L | US 11–12 | 13 ch | 3 + edging | 7 | 14 sts | 8 |

---

## TROUBLESHOOTING & TIPS

**Slipper is too loose/floppy:**
Go down one hook size. These slippers must be worked at a firm gauge to maintain structure. Do not be afraid of a tight gauge here.

**Toe cap won't lie flat:**
Ensure you are counting the decrease rows correctly and that your seam tension is even. Block the finished slipper on a foot form or stuffed bag.

**Sole is curling upward:**
This is common if gauge is too loose or if you worked into the chains incorrectly. Ensure you work into the bump on the back of the foundation chain when crocheting along the bottom edge of the sole.

**Cuff is too tight:**
Switch back to the N-15 / 10 mm hook for the cuff, or add a chain-1 at the beginning of each cuff row and count it as a stitch for a slightly looser ribbed fabric.

**Making slippers for in-between sizes:**
Choose the next size up for comfort, especially for wide feet. The bulky yarn has minimal stretch, so err on the larger side.

---

*Pattern designed for personal use. You are welcome to sell finished items made from this pattern with credit. Please do not reproduce or redistribute the pattern itself.*
Disclaimer: This pattern was generated by AI and should be reviewed for accuracy before use. While we strive for quality, AI-generated content may contain errors. Please verify measurements, stitch counts, and instructions before beginning your project. Generated by purlJam.uk
Access your pattern anytime
Bookmark this page to access your pattern anytime