Type
Knitting
Difficulty
intermediate
Category
hat

AI Thinking Process
Planning
Verification
Pattern
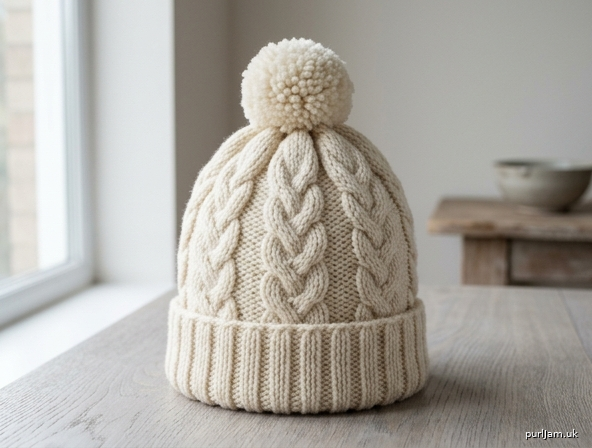
Arden Cabled Turn-Back Hat with Pompom
A structured adult hat in chunky yarn — not a close-fitting beanie. A deep 2×2 rib folds to the outside as a turn-back brim; six rope-cable panels (three left-leaning, three right-leaning) run up the body on a reverse-stocking-stitch ground; the crown decreases keep those cable columns until they taper away; a generous pompom finishes the top.
Skill level: Intermediate (working in the round, 6-stitch cables, shaped crown).
Sizes
S (M, L)
To fit head circumference: 55 (58, 62)cm (21¾ (22¾, 24½)in)
Instructions are written for S with M and L in parentheses. When only one number is given, it applies to all sizes.
Finished measurements
Measured after light blocking, unstretched.
| S | M | L | |
|---|---|---|---|
| Hat circumference | 51.5cm (20¼in) | 55.5cm (21¾in) | 60cm (23½in) |
| Brim depth, folded | 7cm (2¾in) | 7cm (2¾in) | 7cm (2¾in) |
| Cable body depth | 10cm (4in) | 11cm (4¼in) | 12cm (4¾in) |
| Crown depth | 8cm (3¼in) | 8cm (3¼in) | 8cm (3¼in) |
| Length worn (brim folded) | 25cm (9¾in) | 26cm (10¼in) | 27cm (10¾in) |
| Length unfolded | 32cm (12½in) | 33cm (13in) | 34cm (13½in) |
Ease is modest (−3.5 to −2cm), so the hat sits as a proper turn-back hat rather than a tight skull-cap. The folded brim anchors the fit.
Yarn
Chunky (UK) / Bulky (US 5).
Fibre: Wool or wool-blend with clear stitch definition (avoid fluffy or haloed yarns, which hide cables).
Meterage: 190 (210, 230)m (208 (230, 252)yd) including pompom.
Shown using: 2 × 100g balls of a chunky wool/acrylic (approx. 144m / 157yd per 100g). Two balls are sufficient for all sizes if the pompom is made from leftovers; keep a third ball to hand for a very large pompom in size L.
Suggested yarns: Stylecraft Special Chunky; King Cole Big Value Chunky; a smooth 100% wool chunky of similar meterage.
Needles
- 6mm (UK 4 / US 10) circular needle, 40cm, for the rib
- 7mm (UK 2 / US 10¾) circular needle, 40cm, for the cable pattern
- 7mm double-pointed needles, or a long (80cm) 7mm circular for magic loop, for the crown
Use whichever 7mm method you prefer once the stitches no longer sit comfortably on the 40cm circular.
Notions
- Cable needle
- 6 stitch markers (one of them unique for the beginning of the round)
- Tapestry needle
- Pompom maker, 85–90mm (3¼–3½in), or two cardboard rings of that diameter
- Sharp scissors
Tension (gauge)
14 stitches and 18 rounds = 10cm (4in) over the 6-stitch cable pattern (cables plus reverse stocking stitch) using 7mm needles, after light blocking.
Stocking-stitch reference (optional check): approx. 12 stitches and 17 rounds = 10cm (4in) using 7mm needles.
Work a circular swatch of at least two full cable panels and two 8-round repeats. Measure over the centre of the swatch, including one cable and the reverse-stocking stitches beside it.
Change needle size to obtain the correct tension. Cables pull the fabric in: matching the pattern tension is essential for the finished circumference.
Abbreviations (UK knitting)
| Abbrev. | Meaning |
|---|---|
| C6B | Cable 6 back: slip next 3 sts onto cn and hold at back of work, k3, then k3 from cn |
| C6F | Cable 6 front: slip next 3 sts onto cn and hold at front of work, k3, then k3 from cn |
| cn | cable needle |
| CO | cast on |
| dec | decrease(s) / decreasing |
| dpn(s) | double-pointed needle(s) |
| k | knit |
| k2tog | knit 2 together (right-leaning dec) |
| M1 | make 1: lift the running thread between the st just worked and the next st from front to back and knit into the back of it (1 st increased) |
| p | purl |
| p2tog | purl 2 together |
| patt | pattern |
| pm | place marker |
| rep | repeat |
| rnd(s) | round(s) |
| RS | right side |
| sm | slip marker |
| ssk | slip, slip, knit: slip 1 knitwise, slip 1 knitwise, insert left needle into the fronts of both slipped sts and knit them together (left-leaning dec) |
| st(s) | stitch(es) |
| WS | wrong side |
| * | repeat instructions between asterisks |
Pattern notes
- The hat is worked in the round from the brim to the crown. Every round is a RS round.
- The rib brim is worked longer than it will be worn and is folded outwards so the cast-on edge sits on the outside. This is what gives the hat its turn-back, non-beanie silhouette.
- Six cable panels. Odd-numbered panels (1, 3, 5) use C6F; even-numbered panels (2, 4, 6) use C6B. They alternate around the hat.
- Place a marker at the start of each panel. The unique marker is the beginning of the round.
- Change to dpns or magic loop when the crown stitches no longer reach comfortably around the circular needle.
- Charts are provided; full written instructions are given as well. Use whichever you prefer.
- When a size has 0 repeats of a step, skip that step and go on to the next.
Stitch patterns
2×2 rib (multiple of 4 sts)
Every rnd: *K2, p2; rep from * to end.
Cable pattern — written (worked over 12 (13, 14) sts per panel)
Panel A (C6F) — used for panels 1, 3 and 5
- Rnds 1–7: K6, p6 (p7, p8).
- Rnd 8: C6F, p6 (p7, p8).
Panel B (C6B) — used for panels 2, 4 and 6
- Rnds 1–7: K6, p6 (p7, p8).
- Rnd 8: C6B, p6 (p7, p8).
One full round of the hat: work Panel A, Panel B, Panel A, Panel B, Panel A, Panel B.
Repeat rounds 1–8 for the pattern. Stitch count is unchanged: 72 (78, 84) sts (6 panels × 12 (13, 14) sts = 72 (78, 84) ✓).
Cable charts
Charts show the 6 cable stitches only. Work the purl stitches of each panel as given in the written instructions (p6 (p7, p8) on every round, including cable rounds). Read every round from right to left. All rounds are RS.
Key
| Symbol | Instruction |
|---|---|
k |
knit |
C6F |
C6F (3 sts held at front) |
C6B |
C6B (3 sts held at back) |
Chart A — Panel A (C6F), 6 sts × 8 rnds
Rnd 8   C6F
Rnd 7   k  k  k  k  k  k
Rnd 6   k  k  k  k  k  k
Rnd 5   k  k  k  k  k  k
Rnd 4   k  k  k  k  k  k
Rnd 3   k  k  k  k  k  k
Rnd 2   k  k  k  k  k  k
Rnd 1   k  k  k  k  k  k
        6  5  4  3  2  1
Chart B — Panel B (C6B), 6 sts × 8 rnds
Rnd 8   C6B
Rnd 7   k  k  k  k  k  k
Rnd 6   k  k  k  k  k  k
Rnd 5   k  k  k  k  k  k
Rnd 4   k  k  k  k  k  k
Rnd 3   k  k  k  k  k  k
Rnd 2   k  k  k  k  k  k
Rnd 1   k  k  k  k  k  k
        6  5  4  3  2  1
C6F leans left; C6B leans right. Together they read as six opposing rope columns.
Hat
Brim
With 6mm circular needle and using a stretchy cast-on (long-tail is ideal), CO 72 (76, 84) sts. (72 ÷ 4 = 18 ✓; 76 ÷ 4 = 19 ✓; 84 ÷ 4 = 21 ✓)
Join to work in the round, being careful not to twist, and pm for beginning of rnd.
Work in 2×2 rib (k2, p2) until the brim measures 14cm (5½in) from the cast-on edge.
The brim will be folded in half to 7cm (2¾in) when worn. 14cm of knitting gives a firm, hat-like turn-back rather than a shallow beanie cuff.
Set up cable pattern
Change to 7mm circular needle.
Size S only Setup rnd: *K6, p6, pm; rep from * 5 more times, using the beginning-of-round marker as the sixth marker. 72 sts (6 × 12 = 72 ✓).
Size M only Inc rnd: K38, M1, k38, M1. 78 sts (76 + 2 = 78 ✓). Setup rnd: *K6, p7, pm; rep from * 5 more times, using the beginning-of-round marker as the sixth marker. 78 sts (6 × 13 = 78 ✓).
Size L only Setup rnd: *K6, p8, pm; rep from * 5 more times, using the beginning-of-round marker as the sixth marker. 84 sts (6 × 14 = 84 ✓).
All sizes You now have 6 panels. Panels 1, 3 and 5 are Panel A (C6F); panels 2, 4 and 6 are Panel B (C6B).
Body
Work the cable pattern as given (written or charts), beginning with round 1, until the cable section measures 10 (11, 12)cm (4 (4¼, 4¾)in) from the setup round, ending with a round 8 (a cable-crossing round).
If you reach the stated length a few rounds before round 8, work through to round 8 so the cables are freshly crossed before the crown. If you pass round 8 just before the length, work one extra full repeat and begin the crown after that round 8.
Stitch count remains 72 (78, 84) throughout the body.
Crown
Keep the 6 markers in place. Each marker sits at the start of a k6 cable. Change to 7mm dpns or magic loop when needed.
Work the directions for your size until you reach the All sizes heading (48 sts), then continue together.
On any round that would have been a cable round, work C6F / C6B as established for as long as 6 knit stitches remain in the panel. Once a panel has been decreased to 4 knit stitches, knit those stitches with no further cabling.
Size S — starting with 72 sts, each panel k6, p6
Rnd 1 (dec): *K6, p2tog, p2, p2tog, sm; rep from * to end. 60 sts (72 − 12 = 60; 6 × 10 = 60 ✓).
Rnd 2: *K6, p4, sm; rep from * to end.
Rnd 3 (dec): *K6, p2tog, p2tog, sm; rep from * to end. 48 sts (60 − 12 = 48; 6 × 8 = 48 ✓).
Rnd 4: *K6, p2, sm; rep from * to end.
Go to All sizes.
Size M — starting with 78 sts, each panel k6, p7
Rnd 1 (dec): *K6, p2tog, p3, p2tog, sm; rep from * to end. 66 sts (78 − 12 = 66; 6 × 11 = 66 ✓).
Rnd 2: *K6, p5, sm; rep from * to end.
Rnd 3 (dec): *K6, p2tog, p1, p2tog, sm; rep from * to end. 54 sts (66 − 12 = 54; 6 × 9 = 54 ✓).
Rnd 4: *K6, p3, sm; rep from * to end.
Rnd 5 (dec): *K6, p2tog, p1, sm; rep from * to end. 48 sts (54 − 6 = 48; 6 × 8 = 48 ✓).
Rnd 6: *K6, p2, sm; rep from * to end.
Go to All sizes.
Size L — starting with 84 sts, each panel k6, p8
Rnd 1 (dec): *K6, p2tog, p4, p2tog, sm; rep from * to end. 72 sts (84 − 12 = 72; 6 × 12 = 72 ✓).
Rnd 2: *K6, p6, sm; rep from * to end.
Rnd 3 (dec): *K6, p2tog, p2, p2tog, sm; rep from * to end. 60 sts (72 − 12 = 60; 6 × 10 = 60 ✓).
Rnd 4: *K6, p4, sm; rep from * to end.
Rnd 5 (dec): *K6, p2tog, p2tog, sm; rep from * to end. 48 sts (60 − 12 = 48; 6 × 8 = 48 ✓).
Rnd 6: *K6, p2, sm; rep from * to end.
Go to All sizes.
All sizes — 48 sts, each panel k6, p2
Cable rnd: *C6F (or C6B as established), p2, sm; rep from * to end. 48 sts.
Dec rnd: *K6, p2tog, sm; rep from * to end. 42 sts (48 − 6 = 42; 6 × 7 = 42 ✓).
Next rnd: *K6, p1, sm; rep from * to end.
Dec rnd: *K2tog, k2, ssk, p1, sm; rep from * to end. 30 sts (42 − 12 = 30; 6 × 5 = 30 ✓). The 6-st cables have become 4-st columns; no further crossings.
Next rnd: *K4, p1, sm; rep from * to end.
Dec rnd: *K2tog, ssk, p1, sm; rep from * to end. 18 sts (30 − 12 = 18; 6 × 3 = 18 ✓).
Next rnd: *K2, p1, sm; rep from * to end.
Dec rnd: *K2tog, p1, sm; rep from * to end. 12 sts (18 − 6 = 12; 6 × 2 = 12 ✓).
Next rnd: Knit (markers may be removed).
Dec rnd: *K2tog; rep from * to end. 6 sts (12 − 6 = 6 ✓).
Break yarn, leaving a 25cm (10in) tail. Thread the tail through the remaining 6 sts, pull up firmly, and fasten off on the inside. Do not weave this tail in yet if you want to use it to help anchor the pompom.
Pompom
Make one pompom 8–9cm (3¼–3½in) in diameter.
With a pompom maker: Wind the remaining yarn generously around both halves (a dense pompom holds its shape on chunky yarn). Clamp, cut around the equator, tie off in the centre with a 40cm (16in) length of the same yarn, using a surgeon’s knot (two throws on the first pass). Open the maker, trim to a round ball, leaving the two tie-ends long.
With cardboard: Cut two rings with an outer diameter of 9cm (3½in) and an inner hole of 3cm (1¼in). Hold them together and wind yarn through the hole until the centre is well packed. Cut around the outer edge, between the rings. Pass a 40cm (16in) tie between the rings, knot off tightly as above, remove the cardboard, and trim.
A slightly over-full pompom trims into a cleaner sphere than a sparse one.
Finishing
- Weave in the cast-on tail on the WS of the brim, taking it along the rib so it does not show when the brim is folded.
- Weave in any other ends, except the crown tail if you are using it to secure the pompom.
- Block. Soak in lukewarm water with a little wool wash, press out water in a towel, and dry over a bowl or balloon about 51 (55, 60)cm in circumference so the cables open and the crown rounds. Do not stretch the rib. Light steam on the cable body is an alternative if you prefer not to wet-block; do not press the cables flat.
- Fold the brim. Fold the rib outwards so the cast-on edge sits on the outside, 7cm (2¾in) up. The fold may be left free (it will stay in place in wear) or catch-stitched invisibly on the inside at four points if you want it fixed.
- Attach the pompom. Using the long tie-ends (and the crown tail if still free), take both ends down through the gathered hole at the top of the crown and through a firm stitch on the inside. Knot securely, then weave the ends through several nearby stitches so the pompom cannot pull out. Trim.
Schematic (finished, brim folded)
                    pompom
                       ●
                    /     \
                   / crown \          8cm
                  |  6 cables |
                  |   body    |       10 (11, 12)cm
                  |           |
               /===============  \    7cm folded brim
              /    2×2 rib      \
             --------------------
              51.5 (55.5, 60)cm circumference
To adjust the fit
- Closer (more beanie-like): go down one hat size, or use 6.5mm needles for the cable body. Recheck tension.
- Roomier: go up one size, or add 1cm of extra cable body before starting the crown.
- Shorter worn length: work the brim to 12cm instead of 14cm (folds to 6cm) and/or reduce the cable body by 1–2cm, still ending on a round 8.
- Longer, slouchier hat: add one extra 8-round cable repeat (about 4.5cm) before the crown.
Do not change the stitch count without also changing tension; the panel maths (multiples of 6) must remain intact for the crown.
Disclaimer: This pattern was generated by AI and should be reviewed for accuracy before use. While we strive for quality, AI-generated content may contain errors. Please verify measurements, stitch counts, charts, and instructions before beginning your project. Generated by purlJam.uk
Love this pattern?
Save this pattern to your free PurlJam libraryAccess your pattern anytime
Bookmark this page to access your pattern anytime