Type
Crochet
Difficulty
advanced
Category
blanket
AI Thinking Process
Planning
Verification
Pattern
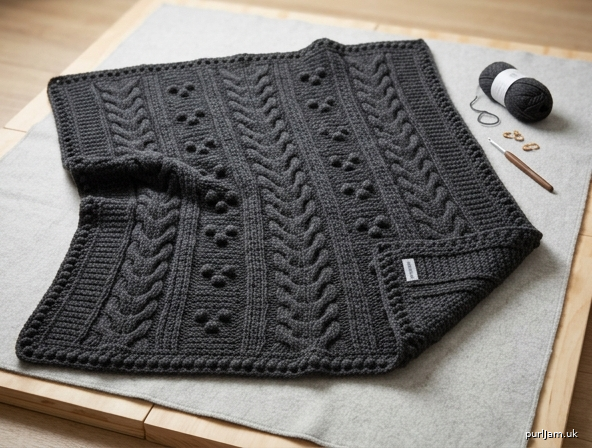
Avalanche Cable & Bobble Blanket
Advanced Textured Crochet Blanket
A substantial, cozy throw worked in an allover advanced cable-and-bobble panel. Deep front-post cables and raised bobbles create a heavy, tactile fabric perfect for cold evenings. Intermediate-to-advanced skills required: comfort with post stitches, bobbles, and reading a multi-row repeat.
Finished Size: 52" wide × 62" long (132 × 157 cm) after blocking, including border
Skill Level: Advanced
Construction: Flat, one piece, bottom-up
Materials
- Yarn: Worsted weight (#4), approximately 2200 yd (2012 m). Choose a soft wool or wool-blend for warmth and stitch definition (e.g., 10 skeins of 220 yd each).
Sample color: deep charcoal or oatmeal. - Hook: US I/9 (5.5 mm) or size needed to obtain gauge
- Notions:
– Stitch markers (at least 12)
– Cable needle or spare hook (optional, for holding stitches)
– Yarn needle
– Blocking mats and pins
Gauge
14 stitches and 12 rows = 4" (10 cm) in Cable & Bobble Pattern, blocked
Make a 6" × 6" swatch (chain 30, work 18 rows of pattern) and measure the center 4".
Dense post stitches and bobbles produce a thicker fabric than plain dc; adjust hook if your swatch is stiff or loose.
Abbreviations (US Terms)
- ch – chain
- st(s) – stitch(es)
- sc – single crochet
- dc – double crochet
- tr – treble crochet
- FPdc – front post double crochet
- BPdc – back post double crochet
- FPtr – front post treble crochet
- bobble – [yo, insert hook in st, yo, pull up loop, yo, draw through 2 loops] 4 times in same st (5 loops on hook), yo, draw through all 5 loops, ch 1 to close
- RS – right side
- WS – wrong side
- PM – place marker
- rep – repeat
- sk – skip
- sp – space
Special Stitches & Notes
Cable 4 Right (C4R): Sk next 2 sts, FPtr around each of next 2 sts, working in front of the FPtr just made, FPtr around each of the 2 skipped sts.
Cable 4 Left (C4L): Sk next 2 sts, FPtr around each of next 2 sts, working behind the FPtr just made, FPtr around each of the 2 skipped sts.
- Bobble counts as 1 stitch; the closing ch-1 does not count as a stitch.
- Always skip the stitch behind each FPdc/FPtr.
- Pattern multiple = 16 stitches + 6 edge stitches.
- Place a marker on the first stitch of every RS row and after every 16-st panel to stay oriented.
- Work all post stitches around the posts of the stitches 2 rows below when indicated (standard cable technique).
Stitch Diagram Legend
○   = chain (ch)
×   = single crochet (sc)
†   = double crochet (dc)
T   = front post double crochet (FPdc)
∩   = back post double crochet (BPdc)
▼   = bobble
CR  = C4R (cable 4 right)
CL  = C4L (cable 4 left)
(Work from bottom to top, right to left on RS rows, left to right on WS rows. Each 16-st panel is identical.)
Pattern Instructions
Foundation
With I/9 hook, ch 182.
(11 panels × 16 sts = 176 + 3 edge sts each side = 182 ✓)
Row 1 (RS): Dc in 4th ch from hook (3 skipped ch count as first dc), dc in each ch across.
— 180 dc (counting turning ch as 1). PM every 16 sts to mark panels.
Row 2 (WS): Ch 2 (does not count as st here and throughout), turn; BPdc around each st across, dc in top of turning ch.
— 180 sts.
Establish Cable & Bobble Pattern
Row 3 (RS): Ch 2, turn; dc in first 3 sts,
*FPdc around next 2 sts, C4R, FPdc around next 2 sts, bobble in next st, dc in next 3 sts, bobble in next st, FPdc around next 2 sts;
rep from * across to last 3 sts, dc in last 3 sts.
— 11 bobble pairs, 11 cables.
Row 4 (WS): Ch 2, turn; BPdc around each st across (work BPdc around the bobble itself, not the closing ch), dc in top of turning ch.
Row 5 (RS): Ch 2, turn; dc in first 3 sts,
*FPdc around next 2 sts, FPdc around next 4 cable sts, FPdc around next 2 sts, dc in next 5 sts, FPdc around next 2 sts;
rep from * to last 3 sts, dc in last 3 sts.
Row 6 (WS): Rep Row 4.
Row 7 (RS): Ch 2, turn; dc in first 3 sts,
*FPdc around next 2 sts, C4L, FPdc around next 2 sts, bobble in next st, dc in next 3 sts, bobble in next st, FPdc around next 2 sts;
rep from * to last 3 sts, dc in last 3 sts.
Row 8 (WS): Rep Row 4.
Row 9 (RS): Rep Row 5.
Row 10 (WS): Rep Row 4.
Row 11 (RS): Ch 2, turn; dc in first 3 sts,
*bobble in next st, dc in next 3 sts, bobble in next st, FPdc around next 2 sts, C4R, FPdc around next 2 sts, FPdc around next 2 sts;
rep from * to last 3 sts, dc in last 3 sts.
(Bobbles now alternate position for staggered texture.)
Row 12 (WS): Rep Row 4.
Row 13 (RS): Ch 2, turn; dc in first 3 sts,
*dc in next 5 sts, FPdc around next 2 sts, FPdc around next 4 cable sts, FPdc around next 2 sts, FPdc around next 2 sts;
rep from * to last 3 sts, dc in last 3 sts.
Row 14 (WS): Rep Row 4.
Row 15 (RS): Ch 2, turn; dc in first 3 sts,
*bobble in next st, dc in next 3 sts, bobble in next st, FPdc around next 2 sts, C4L, FPdc around next 2 sts, FPdc around next 2 sts;
rep from * to last 3 sts, dc in last 3 sts.
Row 16 (WS): Rep Row 4.
Row 17 (RS): Rep Row 13.
Row 18 (WS): Rep Row 4.
Rows 19–162: Repeat Rows 3–18 nine more times (10 full 16-row repeats total).
— 162 pattern rows.
(At 12 rows = 4", 162 rows ≈ 54" length before border ✓)
Row 163 (RS – final RS): Ch 2, turn; dc in each st across.
Row 164 (WS): Ch 2, turn; BPdc around each st across, dc in top of turning ch. Fasten off.
Border
Join yarn with slip st in any corner.
Round 1: Ch 1, 3 sc in corner, sc evenly around entire blanket (work 3 sc in each remaining corner). Aim for approximately 1 sc per row-end on sides and 1 sc per st on top/bottom, adjusting to keep edges flat. Join with slip st to first sc.
Round 2: Ch 2, *dc in each sc to corner 3-sc group, (dc, ch 2, dc) in center sc of corner; rep from * around, join.
Round 3 (Textured Edge): Ch 1, *sc in next 2 sts, bobble in next st; rep from * around, working (sc, bobble, sc) in each corner ch-2 sp. Join, fasten off.
Finishing
- Weave in all ends securely on WS with yarn needle.
- Block (essential): Wet block for best cable definition. Soak in lukewarm water with wool wash 15 minutes. Gently squeeze (do not wring). Roll in towel. Pin to 52" × 62" on blocking mats, opening cables and evening bobbles. Dry completely.
Alternative: Steam block by hovering iron above fabric—never press flat or you will crush the texture. - Optional: Add a 4" fringe on short ends if desired (cut 8" strands, attach 3 per stitch).
Stitch Count Validation Summary
- Foundation ch 182 → 180 sts after Row 1 ✓
- 16-st repeat × 11 panels = 176 + 3 edge sts each side = 182 ch ✓
- Width: 180 sts ÷ 14 sts per 4" = 51.4" + border ≈ 52" ✓
- Length: 164 rows ÷ 12 rows per 4" ≈ 54.7" + border ≈ 62" ✓
- Bobbles: 2 per panel × 11 panels = 22 bobbles on bobble rows ✓
- Cables: 1 per panel × 11 = 11 cables every cable row ✓
Enjoy your heavy, cozy Avalanche Blanket—the cables and bobbles will keep you warm for years.
Disclaimer: This pattern was generated by AI and should be reviewed for accuracy before use. While we strive for quality, AI-generated content may contain errors. Please verify measurements, stitch counts, charts, and instructions before beginning your project. Generated by purlJam.uk
Love this pattern?
Save this pattern to your free PurlJam libraryAccess your pattern anytime
Bookmark this page to access your pattern anytime