Type
Crochet
Difficulty
intermediate
Category
custom
AI Thinking Process
Planning
Verification
Pattern
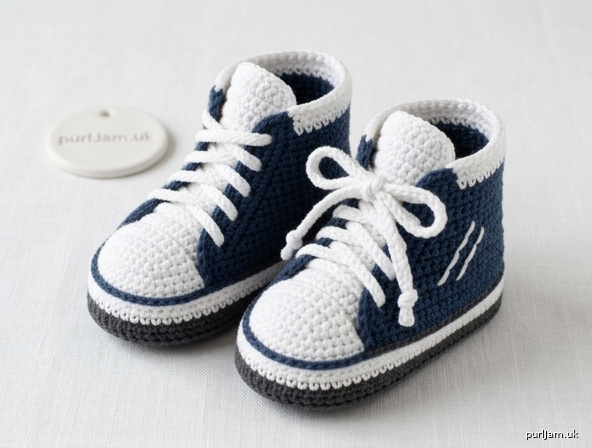
Baby Converse-Style Booties
Classic high-top sneaker booties with a dark sole, white midsole stripe, colored upper, white toe cap, tongue, and laces. Worked in single crochet throughout—a true beginner project with a big graphic payoff.
Materials
Yarn: Worsted weight (category 4). Cotton or a cotton blend holds its shape well; acrylic is fine and easy-care.
- Color A (sole): Black or charcoal — 40 (45, 50) yd / 37 (41, 46) m
- Color B (upper): Navy, red, or any favorite color — 55 (65, 75) yd / 50 (60, 69) m
- Color C (stripe, toe cap, cuff, tongue tip, laces): White — 45 (50, 55) yd / 41 (46, 50) m
One standard skein of each color is enough.
Hook: US G/6 (4.0 mm), or size needed to obtain gauge.
Notions: Yarn needle, scissors, 4 stitch markers, tape measure.
Gauge
18 sc and 20 rows = 4 in (10 cm) in single crochet with US G/6 (4.0 mm), before blocking.
Work a 5 × 5 in swatch, then measure the center 4 in. Matching gauge matters here: the sole length is the finished shoe size.
Sizes
Instructions are written for 0–3 months (3–6 months, 6–12 months). Where only one number appears, it applies to all sizes.
| Size | To fit | Sole length |
|---|---|---|
| 0–3 months | Newborn–3 mo | 3½ in (9 cm) |
| 3–6 months | 3–6 mo | 4 in (10 cm) |
| 6–12 months | 6–12 mo | 4½ in (11.5 cm) |
Finished height (base of sole to top of cuff, at the back): about 3 (3½, 4) in / 7.5 (9, 10) cm.
Make 2 booties.
Abbreviations (US)
- BLO — back loop only
- ch — chain
- rep — repeat
- rnd(s) — round(s)
- RS — right side
- sc — single crochet
- sk — skip
- sl st — slip stitch
- st(s) — stitch(es)
- WS — wrong side
Pattern Notes
- US crochet terms throughout.
- Booties are worked RS facing on all rounds.
- Joined rounds: Join with a sl st to the first sc. Ch 1 at the start of a rnd does not count as a stitch. Work the first sc in the first sc of the rnd (the same stitch you joined to).
- Rows: Ch 1 and turn at the end of every row. Ch 1 does not count as a stitch. Work the first sc in the first stitch.
- Work through both loops unless the pattern says BLO.
- Stitch counts are given in parentheses at the end of each rnd/row.
- Sizes are shown as 0–3 months (3–6 months, 6–12 months).
- After the sole is finished, measure it. It should match the chart. If it is more than ¼ in off, change hook size and remake the sole before you continue.
- These are baby items: sew every piece on firmly and weave ends in securely. Do not add buttons, beads, or plastic lace tips.
Bootie (make 2)
Sole (Color A)
Rnd 1: Ch 11 (13, 15). Sc in 2nd ch from hook, sc in next 8 (10, 12) ch, 3 sc in last ch. Rotate to work along the opposite side of the foundation chain: sc in next 8 (10, 12) ch, 2 sc in the last ch (this is the same ch as the first sc of the rnd). Join. (22 (26, 30) sc) (Ends have 3 sc each: 1 + 8 + 3 + 8 + 2 = 22 ✓; 1 + 10 + 3 + 10 + 2 = 26 ✓; 1 + 12 + 3 + 12 + 2 = 30 ✓)
Rnd 2: Ch 1, 2 sc in first st, sc in next 8 (10, 12) sts, 2 sc in each of next 3 sts, sc in next 8 (10, 12) sts, 2 sc in each of last 2 sts. Join. (28 (32, 36) sc) (6 increases → 22 + 6 = 28 ✓; 26 + 6 = 32 ✓; 30 + 6 = 36 ✓)
Rnd 3: Ch 1, sc in first st, 2 sc in next st, sc in next 8 (10, 12) sts, (sc in next st, 2 sc in next st) 3 times, sc in next 8 (10, 12) sts, (sc in next st, 2 sc in next st) 2 times. Join. (34 (38, 42) sc) (6 increases → 28 + 6 = 34 ✓; 32 + 6 = 38 ✓; 36 + 6 = 42 ✓)
Fasten off Color A.
Check: Sole should measure 3½ (4, 4½) in / 9 (10, 11.5) cm long. The join sits at one rounded end—this is the heel. The opposite end is the toe.
Midsole stripe (Color C)
Rnd 4: Join Color C in the first st (heel). Ch 1, sc BLO in each st around. Join. (34 (38, 42) sc)
This BLO round makes a neat ridge and the white stripe around the sole. Fasten off Color C.
Sides (Color B)
Rnd 5: Join Color B in the first st. Ch 1, sc in each st around (both loops). Join. (34 (38, 42) sc)
Rnds 6–7 (6–8, 6–9): Ch 1, sc in each st around. Join. (34 (38, 42) sc)
You have now worked 3 (4, 5) even rounds in Color B. Fasten off, leaving a 6 in tail to weave in.
Mark the toe opening: Lay the bootie flat with the heel join at the back. Place a marker in the center toe stitch (directly opposite the heel). Place a second marker 5 (5, 6) sts to the right of center, and a third marker 5 (5, 6) sts to the left of center. The 10 (10, 12) sts between and including the two outer markers are the toe opening—leave them unworked for the high-top.
High-top (Color B)
With RS facing, join Color B in the stitch immediately after the left-hand toe marker (as you look at the toe). You will now work in rows around the heel, leaving the marked toe sts unworked.
Row 1 (RS): Ch 1, sc in same st as join and in each st around to the stitch immediately before the right-hand toe marker. Turn. (24 (28, 30) sc) (34 − 10 = 24 ✓; 38 − 10 = 28 ✓; 42 − 12 = 30 ✓)
Rows 2–6 (2–7, 2–8): Ch 1, sc in each st across. Turn. (24 (28, 30) sc)
You have worked 6 (7, 8) rows of Color B. Fasten off Color B.
Cuff (Color C)
Row 7 (8, 9): Join Color C in the first st. Ch 1, sc in each st across. Turn. (24 (28, 30) sc)
Rows 8–9 (9–10, 10–11): Ch 1, sc in each st across. Turn. (24 (28, 30) sc)
Fasten off Color C, leaving a 8 in tail.
The white cuff is the Converse-style collar. Weave in the starting tail; keep the ending tail if you want to tack the front corners of the cuff down later.
Tongue (make 2)
With Color B, ch 8 (9, 10).
Row 1: Sc in 2nd ch from hook and in each ch across. Turn. (7 (8, 9) sc)
Rows 2–8 (2–10, 2–12): Ch 1, sc in each st across. Turn. (7 (8, 9) sc)
Fasten off Color B.
Rows 9–10 (11–12, 13–14): Join Color C in the first st. Ch 1, sc in each st across. Turn. (7 (8, 9) sc)
Fasten off Color C, leaving a 12 in tail for sewing. The white rows are the top of the tongue.
Toe Cap (make 2)
A small oval in Color C, sewn over the front of the toe like a rubber bumper.
Rnd 1: Ch 7 (8, 9). Sc in 2nd ch from hook, sc in next 4 (5, 6) ch, 3 sc in last ch. Rotate to work along the opposite side of the chain: sc in next 4 (5, 6) ch, 2 sc in last ch. Join. (14 (16, 18) sc) (1 + 4 + 3 + 4 + 2 = 14 ✓; 1 + 5 + 3 + 5 + 2 = 16 ✓; 1 + 6 + 3 + 6 + 2 = 18 ✓)
Rnd 2: Ch 1, 2 sc in first st, sc in next 4 (5, 6) sts, 2 sc in each of next 3 sts, sc in next 4 (5, 6) sts, 2 sc in each of last 2 sts. Join. (20 (22, 24) sc) (6 increases → 14 + 6 = 20 ✓; 16 + 6 = 22 ✓; 18 + 6 = 24 ✓)
Fasten off, leaving a 18 in tail for sewing.
Laces (make 2)
With Color C, ch 90 (100, 110). Fasten off. Roll each chain between your palms so it rounds out like a shoelace. Knot each end and trim the yarn tails close to the knots.
Finishing
Weave in all ends that are not needed for sewing, on the WS.
Tongue. Pin the Color B (bottom) edge of the tongue to the inside of the toe opening, covering the 10 (10, 12) unworked sts, with the WS of the tongue toward the foot. Using Color B, sew this edge firmly in place. Tack each side of the tongue to the inside of the high-top for about ½ in up from the toe so it stays put, then leave the rest of the tongue free. The white tip should sit at or just below the cuff.
Toe cap. Center the oval on the toe, with one long side along the white midsole stripe and the rest wrapping up over the vamp. It should cover the front of the toe and a little of each side, like a Converse bumper. Pin, then sew all the way around with the long Color C tail, catching the upper and the edge of the sole so it cannot lift.
Side stripes (optional but classic). On the outer side of each bootie, add two short parallel white lines running from the midsole stripe up toward the ankle, about ¼ in apart and about 1 in long. Easiest method for beginners: with a yarn needle and Color C, work two lines of running stitch or backstitch. Alternate method: surface slip stitch in Color C.
Laces. Thread one lace through the row-end spaces along the high-top opening, as if lacing a sneaker—bottom to top, criss-cross, 3 or 4 passes each side. Tie a small bow. Keep bows snug and trim any extra length so laces cannot wrap or snag.
Front corners. If the cuff points flare, use the cuff tail to tack each front corner down to the row below with a couple of hidden stitches.
Weave in every remaining end. Shape each bootie with your hands (round the toe, flatten the sole). Do not steam-flatten the 3-D shape. If needed, a light hover-steam on the sole only will even the stitches.
Fit and safety notes
- Sole should be about ¼–½ in longer than the baby’s foot.
- If the bootie is snug, go up a hook size and remake; if it is loose, go down to US F/5 (3.75 mm) for a denser fabric.
- Sew all applied pieces so they cannot be pulled off. Check seams before each wear.
- These booties are for wearing, not for unsupervised sleep. Keep laces tied short.
Disclaimer: This pattern was generated by AI and should be reviewed for accuracy before use. While we strive for quality, AI-generated content may contain errors. Please verify measurements, stitch counts, charts, and instructions before beginning your project. Generated by purlJam.uk
Love this pattern?
Save this pattern to your free PurlJam libraryAccess your pattern anytime
Bookmark this page to access your pattern anytime