Type
Crochet
Difficulty
intermediate
Category
dress
AI Thinking Process
Planning
Verification
Pattern
Baby Summer Shift Dress
Beginner · Sleeveless A-line · 0–6 (6–12) months
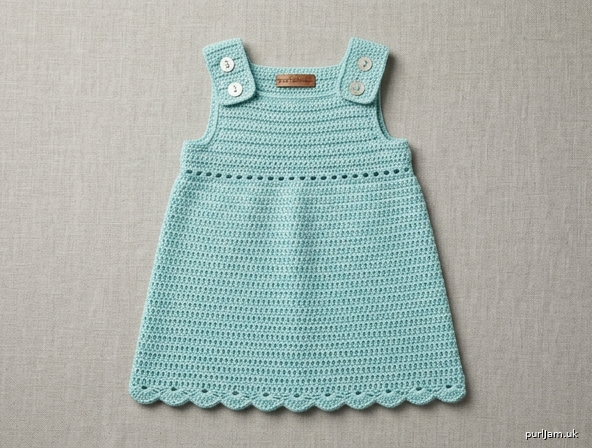
A light cotton shift worked from the hem up in simple double crochet. A gentle A-line, a square neck, and a shell hem keep it summery without advanced stitches. Shoulders button so the dress goes on like a pinafore—cotton does not stretch enough to pull a closed neck over a baby’s head.
This pattern uses US crochet terms.
Skill Level
Beginner. You need to chain, slip stitch, single crochet, double crochet, decrease (dc2tog), join rounds, and sew on buttons.
Sizes
0–6 months (6–12 months)
Instructions are written for 0–6 months with 6–12 months in parentheses. When only one number is given, it applies to both sizes.
To choose a size, use the baby’s chest measurement, not age. Finished chest is listed below; the dress is meant to be worn with about 2½–3½" (6.5–9 cm) of positive ease.
Finished Measurements
| 0–6 months | 6–12 months | |
|---|---|---|
| To fit chest | 16–17½" (40.5–44.5 cm) | 18–19½" (45.5–49.5 cm) |
| Finished chest | 19½" (49.5 cm) | 22¼" (56.5 cm) |
| Finished hem | 22¼" (56.5 cm) | 24¾" (63 cm) |
| Length, shoulder to hem (including shell) | 15" (38 cm) | 17½" (44.5 cm) |
| Armhole depth | 4" (10 cm) | 4½" (11.5 cm) |
| Shoulder width (each) | 2" (5 cm) | 2¼" (5.5 cm) |
| Neck opening (worn, buttoned) | about 12" (30.5 cm) | about 14" (35.5 cm) |
Length is easy to change: see Adjusting Length before you begin.
Materials
Yarn: Sport weight (Category 3 / 4ply number 3) cotton or cotton blend, 400 (525) yards / 365 (480) m.
Smooth, machine-washable cotton with good stitch definition is ideal. Avoid fuzzy or highly textured yarns; they hide stitches and make counting harder.
Hook: 3.5 mm (US E-4), or size needed to obtain gauge.
Notions:
- 4 stitch markers
- Yarn needle
- Scissors
- Tape measure
- 4 buttons, ½" (13 mm) diameter, securely sew-on style (no snap-on or glued buttons)
Safety: Buttons are a choking hazard. Sew each button on twice, knot between passes, and check before every wear. Do not use beads, bells, or cords longer than 6" (15 cm).
Gauge
18 dc and 10 rows = 4" (10 cm) in double crochet, blocked, using 3.5 mm hook.
Swatch: Ch 22. Dc in 4th ch from hook and in each ch across (20 dc). Ch 3, turn. Work 12 rows total. Block, then measure the center 18 stitches and 10 rows.
- Too few stitches in 4" (10 cm): hook is too large — go down 0.5 mm.
- Too many stitches in 4" (10 cm): hook is too small — go up 0.5 mm.
Do not skip the swatch. At this gauge, 2 extra or missing stitches per 4" (10 cm) changes chest size by about 2" (5 cm).
Abbreviations (US)
- beg — beginning
- ch — chain
- dc — double crochet
- dc2tog — double crochet 2 together (decrease 1 stitch)
- pm — place marker
- rem — remaining
- rep — repeat
- rnd(s) — round(s)
- RS — right side
- sc — single crochet
- sk — skip
- sl st — slip stitch
- st(s) — stitch(es)
- WS — wrong side
dc2tog: Yarn over, insert hook in next st, yarn over, pull up a loop, yarn over, draw through 2 loops (2 loops left on hook). Yarn over, insert hook in next st, yarn over, pull up a loop, yarn over, draw through 2 loops (3 loops on hook). Yarn over, draw through all 3 loops. (1 st decreased ✓)
Pattern Notes
- The dress is worked in joined rounds from the hem to the underarms, right side always facing. Do not turn at the end of rounds.
- At the underarms the work is split and Front and Back are worked flat (turn at the end of every row).
- Ch 3 at the start of a round or row counts as the first dc. Do not also work a dc into the stitch at the base of that ch-3 or you will gain a stitch.
- Join every round with a sl st in the top of the beginning ch-3.
- Stitch counts are given in bold at the end of each instruction that changes the count. Count at the end of every round until you are confident.
- The join sits at the left side. That is where the four decrease points are not stacked — decreases are at four even markers so the A-line stays balanced.
- Stitch multiple for the dc body: any even number. Hem shells need a multiple of 4.
- Work over yarn tails as you go when you can; you will still weave them in at the end.
Adjusting Length
The 10½ (12½)" / 26.5 (32 cm) from hem to underarm is the place to add or subtract length.
- Each 1" (2.5 cm) of length ≈ 2½ rounds.
- Add or subtract rounds after the last decrease round and before the eyelet round, so the A-line and chest count stay the same.
- Yarn: allow about 25 extra yards (23 m) per extra inch of length.
Do not change the armhole depth unless you are also changing chest size; a deeper armhole drops the shoulder.
Dress
Body
Worked in the round, RS facing.
With 3.5 mm hook, ch 100 (112). Join with sl st to the first ch, taking care not to twist.
Rnd 1 (RS): Ch 3 (counts as dc here and throughout), dc in next ch and in each ch around, join. 100 (112) dc.
Place 4 stitch markers evenly:
- 0–6 months: in stitches 25, 50, 75, and 100 (every 25 sts ✓).
- 6–12 months: in stitches 28, 56, 84, and 112 (every 28 sts ✓).
These four markers are the decrease points. Move each marker up to the stitch made in that spot as you work.
Rnds 2–7 (2–9): Ch 3, dc in each dc around, join. 100 (112) dc. (6 (8) even rounds after Rnd 1, for 7 (9) even rounds total including Rnd 1 ✓)
Rnd 8 (10) — Decrease rnd: Ch 3, dc in each st to 1 st before the next marker, dc2tog (the unmarked st and the marked st), move marker to the dc2tog just made; repeat this at each of the 4 markers, dc in any remaining sts after the last decrease, join. 4 sts decreased → 96 (108) dc ✓
Rnds 9–15 (11–19): Ch 3, dc in each dc around, join. 96 (108) dc. (7 (9) even rounds ✓)
Rnd 16 (20) — Decrease rnd: Work as Rnd 8 (10). 4 sts decreased → 92 (104) dc ✓
Rnds 17–23 (21–29): Ch 3, dc in each dc around, join. 92 (104) dc. (7 (9) even rounds ✓)
Rnd 24 (30) — Decrease rnd: Work as Rnd 8 (10). 4 sts decreased → 88 (100) dc ✓ (3 decrease rounds × 4 sts = 12 sts decreased; 100 − 12 = 88, 112 − 12 = 100 ✓)
Rnds 25–26 (31): Ch 3, dc in each dc around, join. 88 (100) dc.
The piece should measure about 10½ (12½)" / 26.5 (32 cm) from Rnd 1. If it is short, work extra even rounds until it does. If it is already long enough before Rnd 26 (31), stop after the last decrease once the length is right, then go to the eyelet.
Remove the 4 decrease markers.
Eyelet band
Eyelet rnd: Ch 4 (counts as dc + ch 1), sk next st, *dc in next st, ch 1, sk next st; rep from * around, join to 3rd ch of beg ch-4. 44 (50) dc and 44 (50) ch-1 spaces ✓ (88 ÷ 2 = 44, 100 ÷ 2 = 50 ✓)
Restore rnd: Ch 3, dc in each ch-1 space and in each dc around, join. 88 (100) dc ✓
Body now measures about 11 (13)" / 28 (33 cm) from Rnd 1, including the eyelet. This is the underarm.
Divide for Front and Back
Do not fasten off. On the last round, place 4 new markers to mark the split, as follows (the join is the left side):
0–6 months (88 sts):
- Next 4 sts = Left underarm
- Next 40 sts = Front
- Next 4 sts = Right underarm
- Next 40 sts = Back (4 + 40 + 4 + 40 = 88 ✓)
6–12 months (100 sts):
- Next 4 sts = Left underarm
- Next 46 sts = Front
- Next 4 sts = Right underarm
- Next 46 sts = Back (4 + 46 + 4 + 46 = 100 ✓)
The 4 underarm stitches on each side stay unworked. They become part of the armhole edging later. Front and Back remain joined through those stitches—no side seam.
Front
Worked flat. Turn at the end of every row.
Row 1 (RS) — Armhole decrease: Sl st into the first Front stitch (the first of the 40 (46) Front sts). Ch 3 (counts as dc), dc2tog over the next 2 sts, dc in each st to last 3 Front sts, dc2tog, dc in last Front st. Leave the underarm stitches unworked. Turn. 38 (44) dc ✓ (40 − 2 = 38, 46 − 2 = 44 ✓)
Rows 2–6 (2–7): Ch 3, dc in each dc across. Turn. 38 (44) dc.
Front should measure about 2½ (3)" / 6.5 (7.5 cm) from the divide. Work one more or fewer even row if needed so the remaining shoulder rows will bring the armhole to 4 (4½)" / 10 (11.5 cm).
Shape square neck
The center 20 (24) stitches are the neck. Each shoulder is 9 (10) stitches. (9 + 20 + 9 = 38, 10 + 24 + 10 = 44 ✓)
Right Front shoulder (as worn; this is the first 9 (10) sts of the RS row):
Row 7 (8) (RS): Ch 3, dc in next 8 (9) sts. Leave remaining sts unworked. Turn. 9 (10) dc ✓
Rows 8–10 (9–11): Ch 3, dc in each dc across. Turn. 9 (10) dc.
Work 4 shoulder rows, or until the armhole measures 4 (4½)" / 10 (11.5 cm) from the divide. Fasten off, leaving a 6" (15 cm) tail.
Left Front shoulder:
With RS facing, skip the center 20 (24) neck sts, join yarn in the next st.
Row 7 (8) (RS): Ch 3, dc in remaining 8 (9) sts. Turn. 9 (10) dc ✓
Rows 8–10 (9–11): Ch 3, dc in each dc across. Turn. 9 (10) dc.
Match the Right Front shoulder row count. Fasten off.
Back
Worked exactly as Front. No buttonholes yet—those are added in finishing.
With RS facing, join yarn in the first Back stitch (the first of the 40 (46) Back sts).
Row 1 (RS) — Armhole decrease: Ch 3, dc2tog over the next 2 sts, dc in each st to last 3 Back sts, dc2tog, dc in last Back st. Turn. 38 (44) dc ✓
Rows 2–6 (2–7): Ch 3, dc in each dc across. Turn. 38 (44) dc.
Right Back shoulder (first 9 (10) sts of the RS row):
Row 7 (8) (RS): Ch 3, dc in next 8 (9) sts. Leave remaining sts unworked. Turn. 9 (10) dc ✓
Rows 8–10 (9–11): Ch 3, dc in each dc across. Turn. 9 (10) dc.
Match Front shoulder length. Fasten off.
Left Back shoulder:
With RS facing, skip the center 20 (24) neck sts, join yarn in the next st.
Row 7 (8) (RS): Ch 3, dc in remaining 8 (9) sts. Turn. 9 (10) dc ✓
Rows 8–10 (9–11): Ch 3, dc in each dc across. Turn. 9 (10) dc.
Match the other shoulders. Fasten off.
Do not sew the shoulders. They overlap and button.
Finishing
Shoulder bands and buttonholes
Worked in sc so the buttons have a firm base.
Front shoulders (buttonholes)
With RS facing, join yarn at the armhole edge of one Front shoulder.
Row 1: Ch 1, sc in each of the 9 (10) shoulder sts. Turn. 9 (10) sc.
Row 2 — Buttonholes:
- 0–6 months (9 sts): Ch 1, sc in first 2 sts, ch 2, sk 2 sts, sc in next st, ch 2, sk 2 sts, sc in last 2 sts. Turn. (2 + 2 skipped + 1 + 2 skipped + 2 = 9 ✓; two ½" buttonholes)
- 6–12 months (10 sts): Ch 1, sc in first 2 sts, ch 2, sk 2 sts, sc in next 2 sts, ch 2, sk 2 sts, sc in last 2 sts. Turn. (2 + 2 skipped + 2 + 2 skipped + 2 = 10 ✓)
Row 3: Ch 1, sc in each sc and 2 sc in each ch-2 space across. 9 (10) sc ✓
Fasten off. Repeat on the other Front shoulder.
Back shoulders (solid bands)
With RS facing, join yarn at the armhole edge of one Back shoulder.
Rows 1–3: Ch 1, sc in each of the 9 (10) sts. Turn at the end of Rows 1 and 2. 9 (10) sc.
Fasten off. Repeat on the other Back shoulder.
Neck edging
Work Front neck and Back neck separately.
Front neck: With RS facing, join yarn at the inner corner of the Left Front shoulder band. Ch 1. Work sc evenly down the left neck edge (2 sc in each dc row-end), sc in each of the 20 (24) unworked neck sts, sc evenly up the right neck edge, working 3 sc in each inner corner so the square neck lies flat. Fasten off.
Back neck: Repeat on the Back neck, including 3 sc in each inner corner.
Armhole edging
Each armhole is a U-shape: Front armhole row-ends, 4 unworked underarm sts, Back armhole row-ends. The shoulder buttons close the top.
With RS facing, join yarn at the Front shoulder edge of one armhole.
Ch 1, sc evenly around the U (about 2 sc in each dc row-end and 1 sc in each of the 4 underarm sts). Do not work across the shoulder. Join with sl st to the first sc if the ends meet neatly at the shoulder; otherwise fasten off and weave both ends.
Repeat on the second armhole.
Shell hem
Turn the dress upside down. With RS facing, join yarn in any foundation-chain stitch at the hem, preferably at a side.
Shell rnd: Ch 1, *sc in next st, sk 1 st, 5 dc in next st, sk 1 st; rep from * around, join to first sc.
25 (28) shells ✓ (100 ÷ 4 = 25, 112 ÷ 4 = 28 ✓)
If you are 1–2 stitches short of a full repeat at the join, skip 1 extra stitch or work 1 extra sc—do not add a partial shell. Fasten off.
Buttons
Overlap each Front shoulder on top of the matching Back shoulder. Using the buttonholes as a guide, mark button positions on the Back bands.
Sew on 4 buttons (2 per shoulder). For each button:
- Sew through the button and both loops of the Back band with doubled sewing thread or a short length of yarn.
- Knot on the wrong side.
- Sew through the same button a second time and knot again.
- Weave in and trim.
Check that every button is immovable before the dress is worn.
Weave in ends
Thread each tail on a yarn needle. Weave on the wrong side through at least 2" (5 cm) of stitches, going in two directions so the tail cannot work free. Trim. Give every end a gentle tug after trimming to be sure it is locked.
Blocking
Cotton relaxes and evens out with blocking. Do not skip this.
- Soak the dress in cool water with a drop of wool wash or mild soap for 15–20 minutes.
- Press out water (do not wring). Roll in a towel and press again.
- Lay flat on a blocking mat. Pin to the finished measurements:
- Chest 19½ (22¼)" / 49.5 (56.5 cm)
- Hem 22¼ (24¾)" / 56.5 (63 cm)
- Length 15 (17½)" / 38 (44.5 cm)
- Armholes 4 (4½)" / 10 (11.5 cm) deep
- Open the shells with pins so they lie in a smooth fan.
- Dry completely before unpinning.
Steam blocking is acceptable if you hover the iron and never rest it on the stitches. Do not iron cotton dc flat or you will lose drape.
Wear and care
Unbutton both shoulders, slip the dress on over the baby’s body, then button. Neck opening when buttoned is about 12 (14)" / 30.5 (35.5 cm)—comfortable to wear, not meant to pass over the head.
Machine wash cool, gentle cycle, or hand wash. Lay flat to dry. Recheck buttons after every wash.
Schematic (blocked)
                    2 (2¼)"     4½ (5¼)"     2 (2¼)"
                   |--------|-------------|--------|
                   |  btn   |    neck     |  btn   |
              -----+--------|-------------|--------+----  ← shoulders
             /     |                               |     \
            /      |         square neck           |      \
           /       |                               |       \
          |        +-------------------------------+        |  armhole
          |                                                 |  4 (4½)"
          |                                                 |
          +------------------- underarm --------------------+
          |                                                 |
          |              straight-to-A-line body            |  11 (13)"
          |                                                 |  hem to underarm
          |                                                 |
           \                                               /
            \                                             /
             +-------------------------------------------+  ← shell hem
                          22¼ (24¾)" hem
                          19½ (22¼)" chest
                          15 (17½)" total length
Stitch-count recap
| Stage | 0–6 months | 6–12 months | Check |
|---|---|---|---|
| Foundation / Rnd 1 | 100 | 112 | hem 22¼ (24¾)" |
| After 3 decrease rnds | 88 | 100 | 100−12=88, 112−12=100 ✓ |
| Front / Back at split | 40 / 40 | 46 / 46 | + 4 + 4 underarm sts ✓ |
| After armhole decrease | 38 | 44 | −2 sts ✓ |
| Each shoulder | 9 | 10 | |
| Neck sts left unworked | 20 | 24 | 9+20+9=38, 10+24+10=44 ✓ |
| Hem shells | 25 | 28 | ÷4 ✓ |
If a count ever does not match, stop and look for an extra stitch at the ch-3 (the most common beginner error) before continuing.
Disclaimer: This pattern was generated by AI and should be reviewed for accuracy before use. While we strive for quality, AI-generated content may contain errors. Please verify measurements, stitch counts, charts, and instructions before beginning your project. Generated by purlJam.uk
Love this pattern?
Save this pattern to your free PurlJam libraryAccess your pattern anytime
Bookmark this page to access your pattern anytime