Type
Crochet
Difficulty
beginner
Category
blanket
AI Thinking Process
Planning
Verification
Pattern
Beginner Granny Square Blanket
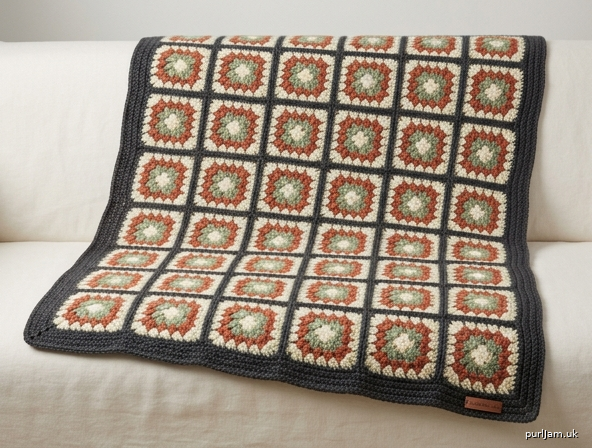
A classic throw made from 48 traditional granny squares. Each square is the same simple 6-round motif. You make the squares one at a time, block them so they match, then sew them together with whip stitch. A plain double-crochet border is optional and gives the edge a neat, firm finish.
This is a sofa throw or lap blanket, not a bed blanket: large enough to use, small enough to finish. Worked in four colours it has the traditional granny look. Every square ends with the same dark round, so the joins read as a tidy grid.
Difficulty: Beginner.
Skills used: chain, slip stitch, treble crochet, double crochet, and sewing with a yarn needle. A magic ring is optional. Every stitch used is written out below.
UK terms are used throughout. In this pattern, tr (treble) is the tall stitch — that is a US double crochet. Dc (double crochet) is the short stitch — that is a US single crochet. Mixing the two systems up will make the square the wrong size.
Finished measurements
After blocking.
- One square: 15 cm (6 in) across the centre, side to side (not corner to corner).
- Joined blanket, before the border: 90 cm (35½ in) wide × 120 cm (47¼ in) long.
- Width: 6 squares × 15 cm = 90 cm ✓
- Length: 8 squares × 15 cm = 120 cm ✓
- With the optional 4-round border: approximately 95 cm (37½ in) wide × 125 cm (49¼ in) long. The border adds about 2.5 cm (1 in) on every side (90 + 2.5 + 2.5 = 95 ✓; 120 + 2.5 + 2.5 = 125 ✓).
All squares are identical, so the blanket has one size only.
Materials
Yarn: Aran-weight yarn (worsted / 10 ply), any fibre you like to work with. Acrylic is the easiest choice for a first blanket. Amounts below assume a skein of about 200 m (219 yd) per 100 g. Buy enough of each colour in one go so the dye lots match. The amounts include a tension square and an allowance for ends; you should have some left over.
| Colour | Role | Skeins | Metres | Yards |
|---|---|---|---|---|
| A – Cream | Rounds 1 and 4 | 3 × 100 g | 600 m | 657 yd |
| B – Sage | Rounds 2 and 5 | 3 × 100 g | 600 m | 657 yd |
| C – Terracotta | Round 3 | 2 × 100 g | 400 m | 438 yd |
| D – Charcoal | Round 6, all seams, border | 5 × 100 g | 1,000 m | 1,094 yd |
| Total | 13 × 100 g (1,300 g) | 2,600 m | 2,847 yd |
Suggested roles, so you can substitute your own colours: A is the light centre, B a medium contrast, C a warm accent used only once in each square, and D the darkest colour. D frames every square and is the only colour used for sewing and the border.
If you omit the border, 3 skeins of Colour D (600 m / 657 yd) are enough for round 6 and the seams. Colours A, B and C do not change.
Single-colour version: 11 × 100 g skeins, 2,200 m (2,409 yd), in one colour. Work every round, the seams and the border in that colour.
Hook: 5.0 mm crochet hook (US H/8). Have a 4.5 mm (US 7) and a 5.5 mm (US I/9) to hand in case your tension square is off.
Notions:
- Yarn needle (a blunt tapestry needle with an eye large enough for aran yarn)
- Scissors
- Tape measure
- Blocking pins and a towel or blocking mat
- Stitch markers or ordinary pins (about 4 is plenty)
- Optional: a steam iron, used hovering above acrylic — never pressed onto the stitches
Tension (gauge)
Using the 5.0 mm hook, one finished 6-round square measures 15 cm (6 in) square, measured across the centre from one side to the opposite side, after blocking. Do not measure along the diagonal; the diagonal is longer and will mislead you.
Make the tension square before the other 47. Block it and measure it.
- If it is larger than 16 cm (6¼ in), remake it on a 4.5 mm hook.
- If it is smaller than 14 cm (5½ in), remake it on a 5.5 mm hook.
- A difference under 1 cm (⅜ in) is acceptable only if every square comes out the same size. The finished blanket will then be slightly smaller or larger than stated. Consistency matters more than hitting 15 cm exactly.
Fabric tension (a solid swatch) is not used for this pattern. The square is the tension swatch.
Abbreviations
UK terms. US equivalents are in brackets so you do not have to translate mid-round.
| Abbreviation | UK meaning | US equivalent |
|---|---|---|
| beg | beginning | beginning |
| ch | chain | chain |
| ch-sp | chain space | chain space |
| dc | double crochet | single crochet (sc) |
| rep | repeat | repeat |
| RS | right side | right side |
| sl st | slip stitch | slip stitch |
| sp | space | space |
| st(s) | stitch(es) | stitch(es) |
| tr | treble crochet | double crochet (dc) |
| WS | wrong side | wrong side |
| yrh | yarn round hook | yarn over (yo) |
3-tr group: 3 treble crochet all worked into the same stitch or space. This is the only “cluster” in the pattern.
Stitch guide
Slip stitch (sl st): Insert the hook, yrh, pull the yarn through both the stitch and the loop already on the hook, in one movement.
Double crochet (dc) — the short stitch, used only for the border:
- Insert the hook into the stitch or space.
- Yrh and pull through (2 loops on the hook).
- Yrh and pull through both loops.
Treble crochet (tr) — the tall stitch, used for the squares:
- Yrh, then insert the hook into the stitch or space.
- Yrh and pull through (3 loops on the hook).
- Yrh and pull through 2 loops (2 loops left).
- Yrh and pull through the last 2 loops.
Chain ring (start here if you are new to granny squares): Ch 4. Insert the hook into the first ch, yrh, and pull through both the chain and the loop on the hook (a sl st). You have a small ring. Work round 1 into the middle of the ring, not into the individual chains.
Magic ring (neater centre, optional): Wrap the yarn around two fingers to make a loop, insert the hook, yrh and draw up a loop. Ch 3 and work round 1 into the ring. When round 1 is complete, pull the yarn tail until the hole closes.
Notes — read these before you start
- The beginning ch-3 counts as 1 tr on every round. It is the first leg of the first 3-tr group. At the end of the round, sl st into the top of that ch-3, not into the first “real” treble you made. If you join in the wrong place you will gain or lose a stitch every round.
- Do not turn at the end of a round. The right side faces you the whole time.
- Join each new colour with a sl st in a corner ch-2 space: put a slip knot on the hook, insert the hook into the space, yrh, and pull through both the space and the slip knot.
- Keep the sl st joins fairly loose. A tight join makes the square twist.
- Fasten off by cutting the yarn to leave a 15 cm (6 in) tail, yrh, and pulling the tail all the way through the loop on the hook.
- Weave in ends at the end of every round, down the back of a 3-tr group for 4 or 5 stitches, then back on itself for 2 stitches. Do not leave 48 squares of ends for the end.
- Granny squares look almost the same on both sides. Choose the side you like, call it the right side, and put a stitch marker on it. Use the same side for every square.
- On round 6, try to leave the sl st join in the same corner of every square (top right is easy to remember). The blanket looks calmer if the joins all face the same way.
- Count the 3-tr groups at the end of every round, before you fasten off. The checkpoints below are there so a mistake costs one round, not a whole square.
The square
Make 48 squares. The first finished, blocked square is your tension square. Only make the rest once that one measures 15 cm (6 in), or you have accepted a different size and will match it exactly.
Round 1 — Colour A
Make a chain ring (or a magic ring).
Ch 3 (counts as 1 tr), 2 tr into the ring, ch 2, [3 tr into the ring, ch 2] 3 times. Sl st into the top of the beg ch-3.
You have just made 4 corners and nothing else. Fasten off. If you used a magic ring, pull the tail to close the centre. Weave in the ends.
Checkpoint: 4 groups × 3 tr = 12 tr, and 4 corner ch-2 spaces ✓. If you have 11 or 13 tr, you missed the ch-3 or joined into the wrong stitch. Unravel this round and redo it.
Round 2 — Colour B
Join Colour B with a sl st in any corner ch-2 sp.
Ch 3, 2 tr in the same sp, ch 2, 3 tr in the same sp (first corner made), ch 1, [(3 tr, ch 2, 3 tr) in the next corner ch-2 sp, ch 1] 3 times. Sl st into the top of the beg ch-3.
Fasten off. Weave in the ends.
Checkpoint: 4 corners × 2 groups = 8 groups; 8 × 3 tr = 24 tr. 4 corner ch-2 sps and 4 side ch-1 sps (one on each side) ✓. There are no 3-tr groups along the sides yet — only in the corners. That is correct for round 2.
Round 3 — Colour C
Join Colour C with a sl st in any corner ch-2 sp.
Ch 3, 2 tr in the same sp, ch 2, 3 tr in the same sp (first corner). *Ch 1, 3 tr in the next ch-1 sp, ch 1, (3 tr, ch 2, 3 tr) in the next corner ch-2 sp; rep from * twice more. Ch 1, 3 tr in the next ch-1 sp, ch 1. Sl st into the top of the beg ch-3.
Fasten off. Weave in the ends.
How the repeat adds up: the first corner is already made. “Twice more” works the * sequence 3 times in total and adds 3 corners. The last line is the fourth side, and it brings you back to the first corner. 1 + 3 = 4 corners ✓. One side group on each of 4 sides.
Checkpoint: 12 groups × 3 tr = 36 tr. 4 corner ch-2 sps. Side ch-1 sps: 2 on each side × 4 = 8 ✓.
Round 4 — Colour A
Join Colour A with a sl st in any corner ch-2 sp.
Ch 3, 2 tr in the same sp, ch 2, 3 tr in the same sp (first corner). *Ch 1, 3 tr in the next ch-1 sp, ch 1, 3 tr in the next ch-1 sp, ch 1, (3 tr, ch 2, 3 tr) in the next corner ch-2 sp; rep from * twice more. Ch 1, 3 tr in the next ch-1 sp, ch 1, 3 tr in the next ch-1 sp, ch 1. Sl st into the top of the beg ch-3.
Fasten off. Weave in the ends.
Checkpoint: 16 groups × 3 tr = 48 tr. Side ch-1 sps: 3 on each side × 4 = 12 ✓. You worked into 2 ch-1 sps on each side of round 3 (2 × 4 sides = 8) and made one new ch-1 between them.
Round 5 — Colour B
Join Colour B with a sl st in any corner ch-2 sp.
Ch 3, 2 tr in the same sp, ch 2, 3 tr in the same sp (first corner). *[Ch 1, 3 tr in the next ch-1 sp] 3 times, ch 1, (3 tr, ch 2, 3 tr) in the next corner ch-2 sp; rep from * twice more. [Ch 1, 3 tr in the next ch-1 sp] 3 times, ch 1. Sl st into the top of the beg ch-3.
Fasten off. Weave in the ends.
Checkpoint: 20 groups × 3 tr = 60 tr. Side ch-1 sps: 4 on each side × 4 = 16 ✓.
Round 6 — Colour D
Join Colour D with a sl st in any corner ch-2 sp. This round is the frame of the square. Use Colour D on every square, even if you change the other colours later.
Ch 3, 2 tr in the same sp, ch 2, 3 tr in the same sp (first corner). *[Ch 1, 3 tr in the next ch-1 sp] 4 times, ch 1, (3 tr, ch 2, 3 tr) in the next corner ch-2 sp; rep from * twice more. [Ch 1, 3 tr in the next ch-1 sp] 4 times, ch 1. Sl st into the top of the beg ch-3.
Fasten off. Weave in the ends, including the tail from the centre if it is still loose.
Checkpoint: 24 groups × 3 tr = 72 tr. Side ch-1 sps: 5 on each side × 4 = 20 ✓.
One side, from corner space to corner space, now reads: corner ch-2, 3 tr, ch 1, 3 tr, ch 1, 3 tr, ch 1, 3 tr, ch 1, 3 tr, ch 1, 3 tr, corner ch-2.
That is 6 groups × 3 tr = 18 tr, plus 5 ch-1 spaces, on every side ✓. You will match these when you sew. The corner ch-2 spaces are not part of the 18; they are the corners.
What each round should contain
| Round | 3-tr groups | Trebles | Ch-1 spaces on each side |
|---|---|---|---|
| 1 | 4 | 12 | 0 |
| 2 | 8 | 24 | 1 |
| 3 | 12 | 36 | 2 |
| 4 | 16 | 48 | 3 |
| 5 | 20 | 60 | 4 |
| 6 | 24 | 72 | 5 |
Groups on round N = 4 × N. Trebles = 12 × N. Round 6: 4 × 6 = 24 groups, and 12 × 6 = 72 tr ✓.
Progress
Tick a box only when that square is fastened off, ends woven in, and blocked.
Row 1  □ □ □ □ □ □
Row 2  □ □ □ □ □ □
Row 3  □ □ □ □ □ □
Row 4  □ □ □ □ □ □
Row 5  □ □ □ □ □ □
Row 6  □ □ □ □ □ □
Row 7  □ □ □ □ □ □
Row 8  □ □ □ □ □ □
6 squares × 8 rows = 48 squares ✓.
Blocking the squares
Pin each square to 15 cm × 15 cm (6 in × 6 in). One pin in each corner, and one more in the middle of any side that bows. The corner ch-2 spaces should sit open, not crushed shut.
- Acrylic: pin to shape, then hover a steam iron just above the square. Do not touch the iron to the yarn. Leave until completely dry, then unpin.
- Wool, cotton or blends: follow the ball band. Wet blocking or a gentle steam both work. Unpin only when fully dry.
Do not start sewing until the squares are dry and the same size. A damp square stretches and then shrinks back, and the seam will pucker.
Joining
Method taught: whip stitch, worked one seam at a time. This is the reliable method for a first blanket.
Join-as-you-go (joining the squares on round 6, as you crochet, instead of sewing) is the other traditional method. It is not written out here, because a missed join is much harder to unpick than a whip stitch. Use whip stitch for this blanket.
Layout
Arrange the squares in 6 columns × 8 rows, right sides up, with every round-6 join in the same corner.
Row 8   [ ][ ][ ][ ][ ][ ]
Row 7   [ ][ ][ ][ ][ ][ ]
Row 6   [ ][ ][ ][ ][ ][ ]
Row 5   [ ][ ][ ][ ][ ][ ]
Row 4   [ ][ ][ ][ ][ ][ ]
Row 3   [ ][ ][ ][ ][ ][ ]
Row 2   [ ][ ][ ][ ][ ][ ]
Row 1   [ ][ ][ ][ ][ ][ ]
         ^  6 squares across
You will:
- Join the squares in each row, side to side, to make 8 strips of 6.
- Then join those 8 strips, row to row, along their long edges.
How many seams
- In one row, 6 squares need 6 − 1 = 5 joins. Eight rows: 8 × 5 = 40 short seams ✓.
- Between 8 rows there are 8 − 1 = 7 long joins, and each of those crosses 6 square edges: 7 × 6 = 42 square-to-square seams ✓.
- Total seams: 40 + 42 = 82 ✓.
Whip stitch
Use Colour D and the yarn needle. Cut a length of about 80 cm (31½ in) for each square-to-square seam. That covers the seam plus a 15 cm (6 in) tail at each end to weave in.
- Hold two squares wrong sides together, edges matched, right sides facing out. Pin or marker them at both corners and at the middle of the edge so they cannot shift.
- Work through the back loops only (the loops furthest from you as the squares lie together). Insert the needle from front to back under the back loop of the first square and the back loop of the second, then repeat in the next pair of loops. Keep the stitches firm but not tight. Tight sewing cups the seam.
- On each square edge, match every stitch in this order:
- the corner ch-2 space (one stitch, through both squares’ corner spaces)
- each of the 18 tr tops
- each of the 5 ch-1 spaces (one stitch into the space, not into every chain)
- the corner ch-2 space at the far end
- That is 1 + 18 + 5 + 1 = 25 whip stitches on a single square-to-square seam ✓. Count them on your first seam. After that, matching every treble and every space matters more than the number.
- Fasten off by passing the needle back through the last 3 whip stitches. Leave the tail to weave in along the wrong side of the seam.
When you join strips to each other: sew one square edge at a time, still matching 18 tr and 5 ch-1 spaces. Where four corners meet, you will arrive at a seam you have already sewn. Pass the needle once through the middle of that existing seam to close the little hole, then carry on along the next square. Sew that shared corner once, not twice. One locking stitch at the crossing is what you want; a lump means you have sewn the crossing several times.
Start each new seam with a fresh length of yarn rather than trying to travel the yarn down a whole strip. Extra ends are easier to hide than a yarn that shows between squares.
When all 82 seams are done, weave in every tail. The blanket should lie flat. If one seam cups, that seam was sewn too tightly: unpick it and resew it a little looser. It is one seam, not the whole blanket.
Border (optional)
The blanket is complete without a border. If you stop here, weave in the last ends and block to 90 cm × 120 cm (35½ in × 47¼ in).
The border is 4 rounds of UK double crochet in Colour D. It firms the edge and covers the slight unevenness where squares were sewn. Do not skip the counts. An extra stitch on one side makes that side frill; a missed stitch makes it pull in.
Where to put each dc on round 1:
- 1 dc in the top of each tr
- 1 dc in each ch-1 space (into the hole, not into the chain itself)
- 1 dc in each seam, worked through the joined corner or through the whip stitch, whichever you can see clearly
- At each of the 4 corners of the blanket (not at the seams): (2 dc, ch 2, 2 dc) in the blanket’s corner ch-2 space
Round 1 edge count, not including the corner groups:
- One square edge contributes 18 tr + 5 ch-1 spaces = 23 dc ✓.
- Short edge (6 squares): 23 × 6 + 1 dc × 5 seams = 138 + 5 = 143 dc ✓.
- Long edge (8 squares): 23 × 8 + 1 dc × 7 seams = 184 + 7 = 191 dc ✓.
Join Colour D with a sl st in any blanket corner ch-2 sp. Ch 1 (this ch-1 does not count as a stitch, here or on later border rounds).
(2 dc, ch 2, 2 dc) in the same corner sp. Work 143 dc along the short edge. (2 dc, ch 2, 2 dc) in the next blanket corner. Work 191 dc along the long edge. (2 dc, ch 2, 2 dc) in the next corner. Work 143 dc along the next short edge. (2 dc, ch 2, 2 dc) in the next corner. Work 191 dc along the last long edge. Sl st into the first dc to join.
Do not work another corner when you get back to the start. The first corner is already there. Fasten off.
Check before you fasten off: the stitches you can count between one corner ch-2 and the next, now including the 2 dc at each end that belong to the corner groups, are 2 + 143 + 2 = 147 dc on each short edge, and 2 + 191 + 2 = 195 dc on each long edge ✓.
Round 2: Join Colour D with a sl st in any corner ch-2 sp. Ch 1, (2 dc, ch 2, 2 dc) in the same sp. Work 1 dc in each dc along the edge: 147 dc on each short edge and 195 dc on each long edge. Work (2 dc, ch 2, 2 dc) in each of the other three corners. Sl st into the first dc. Fasten off.
Between the new corner ch-2 spaces you should now have 2 + 147 + 2 = 151 dc on each short edge, and 2 + 195 + 2 = 199 dc on each long edge ✓.
Round 3: Join in any corner ch-2 sp. Ch 1, (2 dc, ch 2, 2 dc) in the same sp. Work 151 dc along each short edge and 199 dc along each long edge, with (2 dc, ch 2, 2 dc) in each remaining corner. Sl st into the first dc. Fasten off.
Check: 2 + 151 + 2 = 155 dc on each short edge, and 2 + 199 + 2 = 203 dc on each long edge ✓.
Round 4: Join in any corner ch-2 sp. Ch 1, (2 dc, ch 2, 2 dc) in the same sp. Work 155 dc along each short edge and 203 dc along each long edge, with (2 dc, ch 2, 2 dc) in each remaining corner. Sl st into the first dc. Fasten off. Weave in the border ends.
Final check: 2 + 155 + 2 = 159 dc between corner ch-2 spaces on each short edge, and 2 + 203 + 2 = 207 dc on each long edge ✓.
Each border round adds 2 dc at each end of every edge, which is 4 dc per edge, and 4 edges × 4 dc = 16 extra dc on the whole round. That is the only increase. There are no increases along the sides.
Finishing
Weave in any tail you can still find, running each one along the wrong side for several stitches and back on itself so it cannot work free. Trim the tails to about 1 cm (⅜ in) only after they are woven in — never before.
Block the finished blanket. Pin the corners and a few points along each side so it measures about 95 cm × 125 cm (37½ in × 49¼ in) if you added the border, or 90 cm × 120 cm (35½ in × 47¼ in) if you did not. Steam or wet block as you did the squares, following the ball band. Leave it until it is completely dry. Unpin.
Care
Follow the care instructions on your yarn band. That overrides anything general written here, because fibre and brand vary.
As a guide only: wash a wool blanket by hand in cool water and dry it flat, eased back to shape. Many acrylic aran yarns can be machine washed on a cool, gentle cycle and dried flat; do not assume yours can until the band says so. Do not tumble-dry wool. Do not iron the stitches directly. Store the blanket dry and clean, folded rather than hung, so the seams do not stretch.
If something looks wrong
- A round does not match the checkpoint. Stop. Unravel back to the sl st join of that round and rework it. Do not try to “lose” a stitch on the next round; the error will sit in the corner and the square will not lie flat.
- The square twists like a spiral. The sl st joins are too tight, or the ch-3 is being pulled. Redo the square with looser joins. Mild twist usually blocks out; a strong twist does not.
- Two squares will not match at the seam. One of them has the wrong number of groups on round 6. The side must be 18 tr and 5 ch-1 spaces. Do not skip a treble to force them together; fix the square.
- A seam cups. It was sewn too tightly, or the squares were not blocked to the same size. Unpick that seam only.
- The border frills. There are too many stitches. Count the edge you have just worked and take out the round if it is over the checkpoint.
- The border pulls in. There are too few stitches, often a missed ch-1 space (the dc went into the chain instead of the hole) or a missed seam. Recount against 143 and 191 on round 1.
A mistake in one square, or one seam, is ordinary. Unpick that piece and carry on. The blanket does not have to be perfect to be warm.
Disclaimer: This pattern was generated by AI and should be reviewed for accuracy before use. While we strive for quality, AI-generated content may contain errors. Please verify measurements, stitch counts, charts, and instructions before beginning your project. Generated by purlJam.uk
Love this pattern?
Save this pattern to your free PurlJam libraryAccess your pattern anytime
Bookmark this page to access your pattern anytime