Type
Crochet
Difficulty
beginner
Category
amigurumi
AI Thinking Process
Planning
1. **Design Strategy**: Creating a beginner-friendly unicorn using simple shapes - sphere for head, cylinder/oval for body, smaller cylinders for legs, cone for horn, and flat pieces for ears, mane, and tail. Using the template's basic shapes while adapting to create a recognizable unicorn. White/cream for main body, pastel rainbow colors for mane/tail, gold/yellow for horn.
2. **Construction Plan**: Work each piece separately in continuous rounds (amigurumi style), then assemble. Head = modified sphere, Body = oval/egg shape, Legs = small cylinders (4), Horn = small cone, Ears = flat triangular pieces (2), Mane/tail = fringe or small decorative elements. This modular approach is beginner-friendly and allows for easy color changes.
3. **Quality Assurance**: Key concerns - ensuring legs are sturdy enough to support body (stuff firmly), horn attachment security, creating stable base so unicorn can stand or sit, clear assembly instructions for piece placement, managing multiple small pieces for beginners. Will include detailed placement guidance and stuffing tips.
4. **Final Calculations**: Worsted weight with 3.5mm hook creates approximately 4-5" tall unicorn. Head sphere to 24 sts, body oval to 24-30 sts, legs 9-12 sts each, horn starts at 4 sts. Total project uses basic increases/decreases only, appropriate for beginner level.
Verification
[PRE-FLIGHT CHECKS]
1. **Completeness**: Pattern includes materials, gauge, abbreviations, all body parts (head, body, legs x4, horn, ears x2, mane, tail), assembly instructions, and finishing details ✓
2. **Consistency**: Stitch counts verified for each round, increases follow 6-stitch increments for spheres, decrease rounds mirror increases ✓
3. **Constraints**: Beginner level using only sc, inc, dec; worsted weight yarn; simple shapes from template; US terminology ✓
4. **Safety**: All stitch math checked (6→12→18→24 progression), assembly order logical, safety eyes mentioned with timing, stuffing reminders included ✓
Pattern
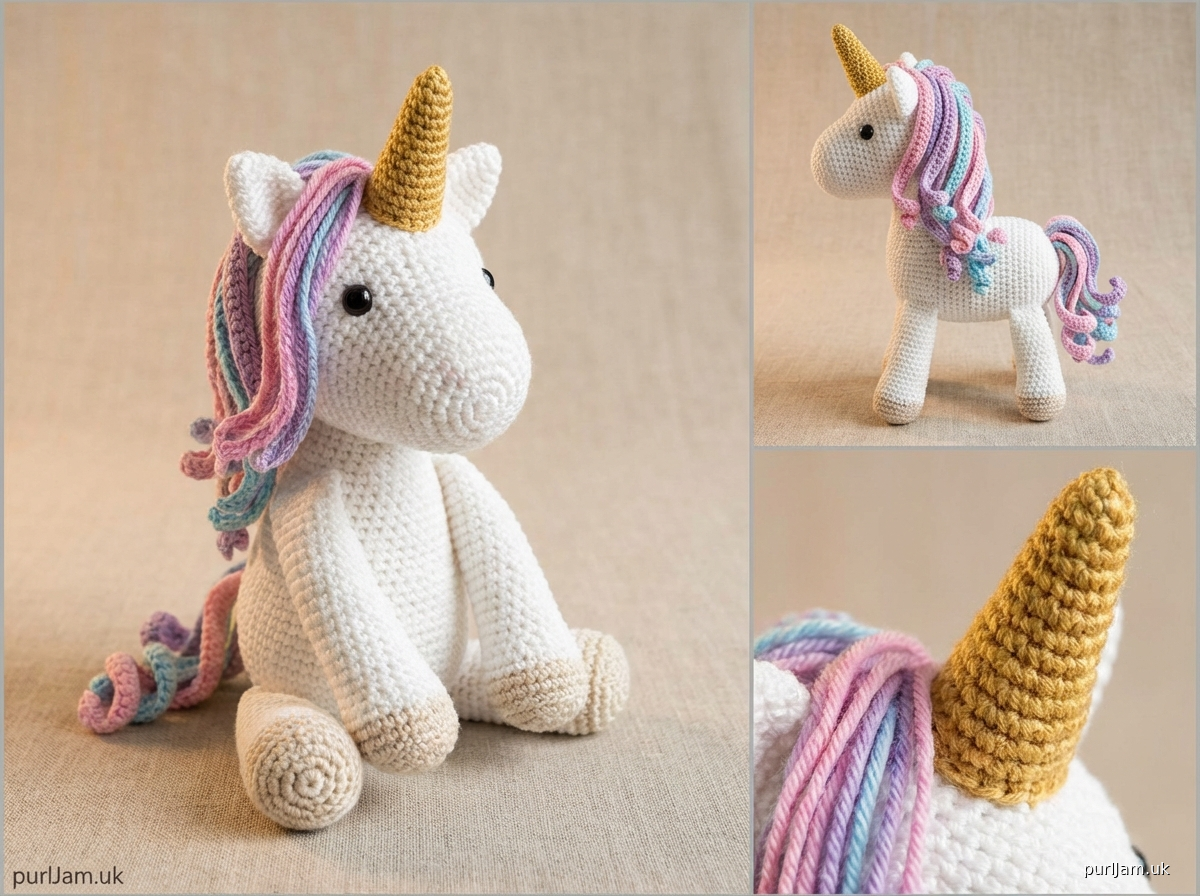
<pattern>

# Beginner Unicorn Crochet Pattern

A sweet and simple unicorn plushie perfect for beginners! This adorable friend is made using basic amigurumi shapes and requires only single crochet, increases, and decreases. The finished unicorn is approximately 4-5 inches (10-13 cm) tall.

## Materials

**Yarn:**
- Worsted weight (4) yarn in the following colors:
  - White or cream (main color - MC): approximately 50 yards
  - Pastel pink, purple, and blue: approximately 15 yards total for mane and tail
  - Yellow or gold: approximately 5 yards for horn
  - Small amount of black for eyes (or use safety eyes)

**Other Supplies:**
- US E-4 (3.5mm) crochet hook
- Fiberfill stuffing (polyester)
- Yarn needle for sewing
- Stitch marker
- 6mm safety eyes (optional - can embroider eyes instead)
- Scissors
- Pins for assembly (helpful but optional)

## Gauge

Gauge is flexible for toys, but for reference:
- 5 stitches and 5 rounds = 1 inch (2.5 cm) in single crochet
- Head sphere should measure approximately 2-2.5 inches (5-6 cm) in diameter

**Note:** Work with tight tension to prevent stuffing from showing through stitches.

## Abbreviations

- ch = chain
- sc = single crochet
- inc = increase (2 sc in same stitch)
- dec = invisible decrease (insert hook in front loops of next 2 stitches, yarn over, pull through both loops, yarn over, pull through 2 loops on hook)
- st(s) = stitch(es)
- rnd(s) = round(s)
- MC = main color
- [ ] = total stitch count at end of round

## Special Techniques

**Magic Ring:** Wrap yarn around fingers to form a ring, pull working yarn through ring, chain 1, work stitches into ring, pull tail to close ring tightly.

**Invisible Decrease:** This creates a smoother decrease than standard sc2tog. Insert hook under front loop only of next stitch, then under front loop only of following stitch (2 loops on hook), yarn over and pull through both front loops (2 loops on hook), yarn over and pull through both loops.

**Continuous Rounds:** Work in a spiral without joining rounds. Use a stitch marker to track the beginning of each round, moving it up as you work.

## Pattern Notes

- All pieces are worked in continuous rounds (spiral) unless otherwise noted
- Use stitch marker to track beginning of rounds
- Stuff pieces firmly as you go - it's difficult to add more stuffing after closing
- When fastening off for assembly, leave a long tail (12-15 inches) for sewing pieces together

---

## HEAD

Using MC (white/cream):

**Rnd 1:** 6 sc in magic ring [6]

**Rnd 2:** inc in each st around [12]
*Math check: 6 × 2 = 12 ✓*

**Rnd 3:** (sc, inc) around [18]
*Math check: 12 ÷ 2 = 6 repeats; 6 × 3 = 18 ✓*

**Rnd 4:** (2 sc, inc) around [24]
*Math check: 18 ÷ 3 = 6 repeats; 6 × 4 = 24 ✓*

**Rnd 5:** (3 sc, inc) around [30]
*Math check: 24 ÷ 4 = 6 repeats; 6 × 5 = 30 ✓*

**Rnds 6-11:** sc around [30]
*(6 rounds even - creates sphere shape)*

**Rnd 12:** (3 sc, dec) around [24]
*Math check: 30 ÷ 5 = 6 repeats; 6 × 4 = 24 ✓*

**Rnd 13:** (2 sc, dec) around [18]
*Math check: 24 ÷ 4 = 6 repeats; 6 × 3 = 18 ✓*

If using safety eyes, insert them now between Rnds 9 and 10, spaced approximately 6-7 stitches apart. Secure backings.

**Begin stuffing head firmly.**

**Rnd 14:** (sc, dec) around [12]
*Math check: 18 ÷ 3 = 6 repeats; 6 × 2 = 12 ✓*

**Rnd 15:** dec around [6]
*Math check: 12 ÷ 2 = 6 ✓*

Fasten off, leaving long tail. Finish stuffing firmly. Use yarn needle to weave through remaining 6 stitches and pull tight to close. Weave in end securely.

---

## BODY

Using MC (white/cream):

**Rnd 1:** 6 sc in magic ring [6]

**Rnd 2:** inc in each st around [12]
*Math check: 6 × 2 = 12 ✓*

**Rnd 3:** (sc, inc) around [18]
*Math check: 12 ÷ 2 = 6 repeats; 6 × 3 = 18 ✓*

**Rnd 4:** (2 sc, inc) around [24]
*Math check: 18 ÷ 3 = 6 repeats; 6 × 4 = 24 ✓*

**Rnd 5:** (3 sc, inc) around [30]
*Math check: 24 ÷ 4 = 6 repeats; 6 × 5 = 30 ✓*

**Rnds 6-12:** sc around [30]
*(7 rounds even - creates oval/egg shape)*

**Rnd 13:** (3 sc, dec) around [24]
*Math check: 30 ÷ 5 = 6 repeats; 6 × 4 = 24 ✓*

**Rnd 14:** (2 sc, dec) around [18]
*Math check: 24 ÷ 4 = 6 repeats; 6 × 3 = 18 ✓*

**Begin stuffing body very firmly.**

**Rnd 15:** (sc, dec) around [12]
*Math check: 18 ÷ 3 = 6 repeats; 6 × 2 = 12 ✓*

**Rnd 16:** dec around [6]
*Math check: 12 ÷ 2 = 6 ✓*

Fasten off, leaving long tail for assembly. Finish stuffing firmly. Close opening with yarn needle as for head.

---

## LEGS (Make 4)

Using MC (white/cream):

**Rnd 1:** 6 sc in magic ring [6]

**Rnd 2:** inc in each st around [12]
*Math check: 6 × 2 = 12 ✓*

**Rnds 3-8:** sc around [12]
*(6 rounds even - creates cylinder)*

Stuff leg firmly (this helps unicorn stand).

Fasten off, leaving long tail for assembly. Do not close top of leg - leave opening for attaching to body.

**Repeat to make 3 more legs (4 total).**

---

## HORN

Using yellow/gold yarn:

**Rnd 1:** 4 sc in magic ring [4]

**Rnd 2:** sc around [4]

**Rnd 3:** (sc, inc) around [6]
*Math check: 4 ÷ 2 = 2 repeats; 2 × 3 = 6 ✓*

**Rnd 4:** sc around [6]

**Rnd 5:** (2 sc, inc) around [8]
*Math check: 6 ÷ 3 = 2 repeats; 2 × 4 = 8 ✓*

**Rnd 6:** sc around [8]

Stuff lightly (horn should be somewhat firm but not rock-hard).

Fasten off, leaving long tail for assembly.

**Optional:** For a twisted horn effect, gently twist the horn as you stuff it, or work a spiral of surface slip stitches around the horn after assembly.

---

## EARS (Make 2)

Using MC (white/cream):

**Row 1:** Ch 4, sc in 2nd ch from hook and in each ch across [3]

**Row 2:** Ch 1, turn, inc, sc, inc [5]

**Row 3:** Ch 1, turn, sc across [5]

**Row 4:** Ch 1, turn, dec, sc, dec [3]
*Math check: 5 - 2 = 3 ✓*

**Row 5:** Ch 1, turn, dec over first 2 sts, sc in last st [2]

Fasten off, leaving long tail for assembly.

**Optional:** Fold ear in half lengthwise and make a small stitch at the base to create a curved ear shape.

**Repeat to make second ear.**

---

## MANE

The mane is made with loops of yarn in rainbow colors. You can use pink, purple, and blue, or any pastel colors you prefer.

**Method 1 - Simple Fringe:**

Cut 12-15 pieces of yarn in assorted mane colors, each approximately 4-5 inches (10-13 cm) long.

Working along the top of the head between the ears, use your crochet hook to pull folded strands through stitches to create fringe loops. Trim to desired length.

**Method 2 - Crocheted Mane Pieces (Make 3-5):**

Using mane colors:

Ch 8-10, fasten off, leaving long tail for sewing.

Create several of these in different colors and sew them to the top of the head in a cascading arrangement from between the ears down toward the neck.

---

## TAIL

**Method 1 - Simple Tassel:**

Cut 8-10 strands of mane colors, each approximately 5-6 inches (13-15 cm) long. Gather together, fold in half, and tie securely at the fold. Attach to back of body and trim to desired length.

**Method 2 - Crocheted Tail:**

Using first mane color:

**Rnd 1:** 4 sc in magic ring [4]

**Rnds 2-3:** sc around [4]

Change to second mane color:

**Rnds 4-5:** sc around [4]

Change to third mane color:

**Rnds 6-7:** sc around [4]

Fasten off, leaving long tail. Attach to back of body.

Cut several 3-inch (7.5 cm) strands and attach as fringe to the end of the tail for a flowing effect.

---

## ASSEMBLY

**Preparation:**
Weave in all ends except those you'll use for assembly. Lay out all pieces and plan placement before sewing.

**Step 1 - Attach Head to Body:**
Position head on top of body. The decrease rounds of the head should sit against the top of the body. Pin in place. Using the long tail from the body (or a fresh strand of MC), whip stitch or mattress stitch around the entire circumference where head and body meet. Stitch securely and weave in end.

**Step 2 - Attach Legs:**
Position legs on the bottom of the body:
- Front legs: Attach to front bottom of body, spaced approximately 5-6 stitches apart
- Back legs: Attach to back bottom of body, spaced approximately 5-6 stitches apart
- For sitting unicorn: Angle legs slightly outward
- For standing unicorn: Position legs directly underneath body for stability

Using long tails from legs, sew the open top of each leg to the body using whip stitch. Stitch around the entire opening of each leg to secure. Weave in ends.

**Step 3 - Attach Horn:**
Position horn at center top of head, slightly forward between where ears will go. Using long tail from horn, sew securely in place by stitching around the base of the horn. Weave in end.

**Step 4 - Attach Ears:**
Position ears on either side of horn, approximately Rnd 8-9 of the head. Fold the base of each ear slightly to create dimension. Sew securely in place. Weave in ends.

**Step 5 - Attach Mane:**
Using whichever mane method you chose, attach mane pieces between the ears, cascading down the back of the neck. For fringe method, add 3-5 pieces between ears, then 2-3 pieces behind ears. Trim to even lengths if desired.

**Step 6 - Attach Tail:**
Position tail at center back of body, approximately Rnd 11-12 of the body. Sew securely in place. Weave in end.

**Step 7 - Add Face Details:**

If you didn't use safety eyes, embroider eyes now:
- Using black yarn, make 2 French knots or small circles between Rnds 9-10, spaced approximately 6-7 stitches apart

Add nostrils (optional):
- Using black yarn, make 2 small vertical stitches on front of muzzle area (Rnd 6-7), spaced 3-4 stitches apart

Add smile (optional):
- Using pink yarn, embroider a small curved line below the eyes

---

## FINISHING

**Final Checks:**
- Ensure all ends are woven in securely
- Check that all pieces are firmly attached
- Verify stuffing is even and firm throughout
- Trim any uneven mane or tail pieces

**Optional Embellishments:**
- Add small pink inner ears using felt or embroidery
- Embroider closed eyes with eyelashes for a sleepy look
- Add small embroidered stars or hearts to the body
- Wrap metallic embroidery thread around horn for sparkle
- Add tiny flowers to mane using French knots

---

## Care Instructions

- Spot clean only with damp cloth
- Do not machine wash or dry
- Keep away from water if using safety eyes
Disclaimer: This pattern was generated by AI and should be reviewed for accuracy before use. While we strive for quality, AI-generated content may contain errors. Please verify measurements, stitch counts, and instructions before beginning your project. Generated by purlJam.uk
Access your pattern anytime
Bookmark this page to access your pattern anytime