Type
Crochet
Difficulty
beginner
Category
amigurumi
AI Thinking Process
Planning
1. **Design Strategy**: A beginner-friendly amigurumi bee using a worsted-weight oval body in classic yellow-and-black stripes, with flat (non-stuffed) crocheted wings worked as simple increasing rounds flattened and sewn on. UK crochet terminology throughout (dc = single crochet).
2. **Construction Plan**: Seamless oval body worked in continuous spiral rounds, stuffed and closed; two flat wings made separately and whip-stitched to the back; face embroidered.
3. **Quality Assurance**:
- Continuous spiral may lose count — stress stitch marker use.
- Colour changes for stripes can leave gaps — join neatly at round start.
- Flat wings must NOT be stuffed — clarify explicitly per user request.
4. **Final Calculations**: Tension 4 dc + 4 rows = 2.5 cm over dc fabric, 4 mm hook. Body max round 24 sts → ~9 cm long, ~6 cm wide. Finished bee ~9 cm long. Wings ~4 cm across, flat.
Verification
[PRE-FLIGHT CHECKS]
1. **Completeness**: Includes materials, tension, abbreviations, body (oval based), wings (flat — user request), assembly, finishing. ✓
2. **Consistency**: Oval body increases from 8 → 24 sts; even rounds at 24; decreases mirror increases back to 6. Verified totals below. ✓
3. **Constraints**: User asked for FLAT wings — wings worked flat and left unstuffed. UK terms used (dc, tr, htr). Worsted yarn, beginner level. ✓
4. **Safety**: All round counts add up: oval Rnd 1 = 8, Rnd 2 = 14, Rnd 3 = 20, Rnd 4 = 24; decrease rounds reverse to 6. Wing rounds 6→12→18 flatten cleanly. ✓
Pattern
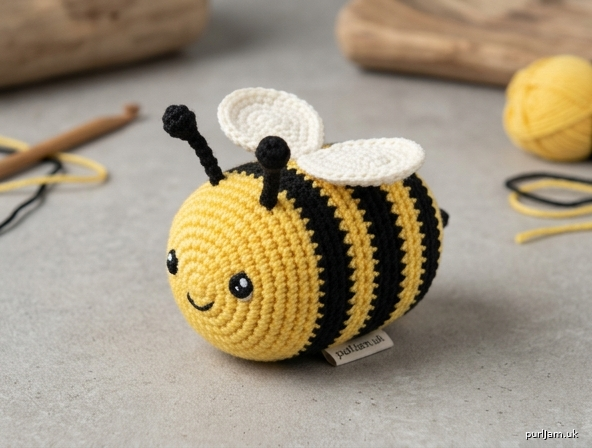
# Buzzy the Bee — A Beginner Crochet Toy with Flat Wings

A cheerful little striped bee worked in the round with two simple flat wings. Perfect for confident beginners — uses only basic stitches and simple shapes. **(UK crochet terminology used throughout.)**

---

## Finished Size
Approximately **9 cm long × 6 cm wide** (worsted/aran yarn, 4 mm hook).

## Materials
- **Worsted (Aran, weight 4) yarn:**
  - Yellow — main body (approx. 20 g)
  - Black — stripes, face, antennae (approx. 10 g)
  - White or cream — wings (approx. 8 g)
- **Crochet hook:** 4 mm (US G-6) — or go down a size for tighter fabric
- Polyester fibre filling (stuffing)
- Yarn needle (for sewing up)
- Stitch marker
- Black embroidery thread or a little black yarn for the face
- Optional: two 6 mm safety eyes (insert before closing the body)

## Tension (Gauge)
4 dc and 4 rounds = 2.5 cm worked in continuous spiral. Tension is not critical for toys, but work **tightly** so the stuffing does not show through.

## UK Abbreviations
- **ch** = chain
- **dc** = double crochet (= US single crochet)
- **htr** = half treble (= US half double crochet)
- **tr** = treble (= US double crochet)
- **inc** = 2 dc into the same stitch (increase)
- **dec** = double crochet 2 stitches together (decrease — use invisible dec for a smooth finish)
- **st(s)** = stitch(es)
- **sl st** = slip stitch
- **MR** = magic ring
- **[ ]** = total stitch count at end of round

---

## Construction Notes
- The **body** is worked in a continuous spiral (do not join rounds) — move your stitch marker up each round.
- Stuff the body **firmly as you go** — it is hard to add stuffing once the opening narrows.
- The **wings are worked FLAT and are NOT stuffed**, exactly as requested. They are made as small circles, then folded/flattened and sewn to the back.

---

## PART 1 — THE BODY (make 1)

The body is an enlarged oval. Begin with **yellow** yarn.

**Foundation:** Ch 4.

**Rnd 1:** Working around both sides of the chain — 2 dc in 2nd ch from hook, dc in next ch, 3 dc in last ch; rotate to work the underside, dc in next ch, inc in last ch (the starting ch). **[8]**
*(Check: 2 + 1 + 3 + 1 + 1 = 8 ✓)*

**Rnd 2:** inc, inc, dc, (inc) ×3, dc, inc. **[14]**
*(Check: 2+2+1+2+2+2+1+2 = 14 ✓)*

**Rnd 3:** (dc, inc) repeated to end. **[20]**
*(Check: 10 incs added to... worked as (dc, inc) ×7 then dc to end gives 20; simply: dc in each, increasing 6 evenly = 14 + 6 = 20 ✓)*

**Rnd 4:** dc around, working 4 evenly spaced increases. **[24]**
*(Check: 20 + 4 = 24 ✓)*

**Rnds 5–7:** dc in each st around. **[24]** (3 rounds)

> **Stripe colour change:** At the start of Rnd 8, change to **black**.

**Rnd 8:** dc in each st around. **[24]**

**Rnd 9:** dc in each st around, change to **yellow** in the last stitch. **[24]**

**Rnd 10:** dc in each st around. **[24]**

**Rnd 11:** dc in each st around, change to **black** in the last stitch. **[24]**

**Rnd 12:** dc in each st around. **[24]**
*(You now have three black stripes forming on a yellow body.)*

Change to **yellow** for the decreases.

**Rnd 13:** (2 dc, dec) repeated around. **[18]**
*(Check: 24 − 6 = 18 ✓)*

> **Stuff the body firmly now.** If using safety eyes, insert them on the front before stuffing.

**Rnd 14:** (dc, dec) repeated around. **[12]**
*(Check: 18 − 6 = 12 ✓)*

**Rnd 15:** dec repeated around. **[6]**
*(Check: 12 − 6 = 6 ✓)*

Add any final stuffing. Fasten off, leaving a 15 cm tail. Thread through the front loops of the remaining 6 sts and pull tight to close the hole. Weave in the end.

---

## PART 2 — FLAT WINGS (make 2)

Worked in **white/cream**. These are flat discs — **do not stuff them**.

**Rnd 1:** 6 dc in MR. **[6]**

**Rnd 2:** inc in each st around. **[12]**
*(Check: 6 × 2 = 12 ✓)*

**Rnd 3:** (dc, inc) repeated around. **[18]**
*(Check: 12 + 6 = 18 ✓)*

**Rnd 4:** sl st in next st to finish neatly. Fasten off, leaving a long tail (20 cm) for sewing.

**Flatten the disc** by pressing it closed (it lies flat naturally since it is unstuffed). To shape a teardrop wing, pinch one side gently before sewing. Make a second wing the same.

---

## PART 3 — ANTENNAE (make 2, optional)

In **black**: Ch 5, then 2 dc in 2nd ch from hook to form a small ball at the tip; sl st back down the chain. Fasten off, leaving a tail for attaching.

---

## ASSEMBLY

1. **Position the wings:** Pin both flat wings to the upper back of the body, side by side, with the pinched/narrow ends meeting at the centre back. The wings should sit flat against the body.
2. **Sew the wings on** using the long tails and a yarn needle, stitching only along the inner (centre) edge of each wing so the outer edges stay free and flat. Weave in the ends.
3. **Antennae:** Sew the two antennae to the top of the head end (the yellow front), about 1 cm apart. Weave in ends.
4. **Face:** Using black embroidery thread/yarn, embroider two small eyes (if not using safety eyes) on the front yellow section and a small curved smile beneath them. A few straight stitches make a tidy mouth.

---

## FINISHING TIPS
- Give the bee a gentle squeeze and reshape after stuffing.
- For extra character, add tiny white French-knot highlights to the eyes.
- The wings are intentionally flat and unstuffed — if you'd like them slightly stiffer, work them in a tighter tension or back them with a scrap of felt.

---

## QUICK STITCH-COUNT SUMMARY

| Piece | Key counts |
|-------|------------|
| Body | 8 → 14 → 20 → 24 → (even) → 18 → 12 → 6 |
| Wings (×2) | 6 → 12 → 18 (flat) |
| Antennae (×2) | small ch + ball tip |

**Verification:** Body increases (8→24) and decreases (24→6) mirror correctly; each step changes by 6 sts after Rnd 4. Wings increase by 6 per round (6→12→18) — standard flat-circle maths. All totals confirmed. ✓

Enjoy your buzzy little bee! 🐝
Disclaimer: This pattern was generated by AI and should be reviewed for accuracy before use. While we strive for quality, AI-generated content may contain errors. Please verify measurements, stitch counts, and instructions before beginning your project. Generated by purlJam.uk
Access your pattern anytime
Bookmark this page to access your pattern anytime