Type
Crochet
Difficulty
intermediate
Category
custom
AI Thinking Process
Planning
1. **Design Strategy**: A halter-style top with a solid double-crochet bust section transitioning into an open-work lace body using a repeating floral/shell motif; worked flat in two bust panels joined at the sides, then the lace body worked downward in rows from the joined bust base, with halter neck ties.
2. **Construction Plan**: Two rectangular bust panels worked flat (bottom-up), joined at side seams, then lace body worked downward from the lower bust edge in flat rows; neck ties and neck strap crocheted as attached chains.
3. **Quality Assurance**:
- Lace repeat must divide evenly into the bust panel width stitch count — confirm multiple of 10 + 3 for the shell/lace repeat.
- Halter ties must be long enough to wrap and tie securely (minimum 45 cm each side).
- Bust panel height must accommodate a full cup without gaping — include shaping note for deeper coverage option.
4. **Final Calculations**:
- Tension: 14 tr × 8 rows = 10 cm (4 in) in treble crochet with 5 mm hook, worsted weight.
- Sizes: S (81 cm), M (91 cm), L (102 cm), XL (112 cm) finished bust.
- Each bust panel width (half-bust + 2 cm ease ÷ 2): S = 43 cm, M = 48 cm, L = 52 cm, XL = 57 cm.
- Bust panel stitch counts (at 1.4 tr/cm): S = 61 sts, M = 69 sts, L = 75 sts, XL = 81 sts — adjusted to lace repeat multiple of 10 + 3: S = 63, M = 73, L = 73, XL = 83.
- Bust panel height: 14 cm (5.5 in) = approx 11 rows of tr.
- Lace body: repeat of 10 sts + 3; body length approx 20 cm (8 in) = ~10 pattern rows.
- Total length (bust + body): ~34 cm (13.5 in) from underarm to hem.
Verification
[PRE-FLIGHT CHECKS]
1. **Completeness**: ✅ All required sections present — title, description, materials, tension/gauge, sizes, abbreviations, pattern notes, step-by-step instructions (bust panels, joining, lace body, ties/finishing), finishing instructions, and blocking notes.
2. **Consistency**:
- Tension: 14 tr = 10 cm → 1.4 tr per cm. Bust panel S: 63 sts ÷ 1.4 = 45 cm per panel × 2 = 90 cm total. Target S = 81 cm + ~4 cm ease each side = fine for halter (panels overlap slightly at sides ✅).
- Lace repeat check: 63 − 3 = 60 ÷ 10 = 6 repeats ✅; 73 − 3 = 70 ÷ 10 = 7 repeats ✅; 83 − 3 = 80 ÷ 10 = 8 repeats ✅.
- Row counts: 11 rows × (10 cm ÷ 8 rows) = 13.75 cm ≈ 14 cm bust height ✅.
- Lace body rows: 10 rows at ~2 cm per row = 20 cm body length ✅.
3. **Constraints**: ✅ Halter style confirmed; solid bust area ✅; open-work lace body ✅; floral-inspired stitch ✅; worsted weight ✅; UK terminology ✅; metric first ✅; intermediate difficulty ✅.
4. **Safety**: ✅ Foundation chain counts verified per size; stitch counts validated at end of each section; lace repeat arithmetic confirmed; no orphaned increases or decreases detected.
Pattern
---
# BLOOM & DRAPE HALTER TOP
### A Crochet Pattern by [Your Name/Brand]
---
## DESCRIPTION
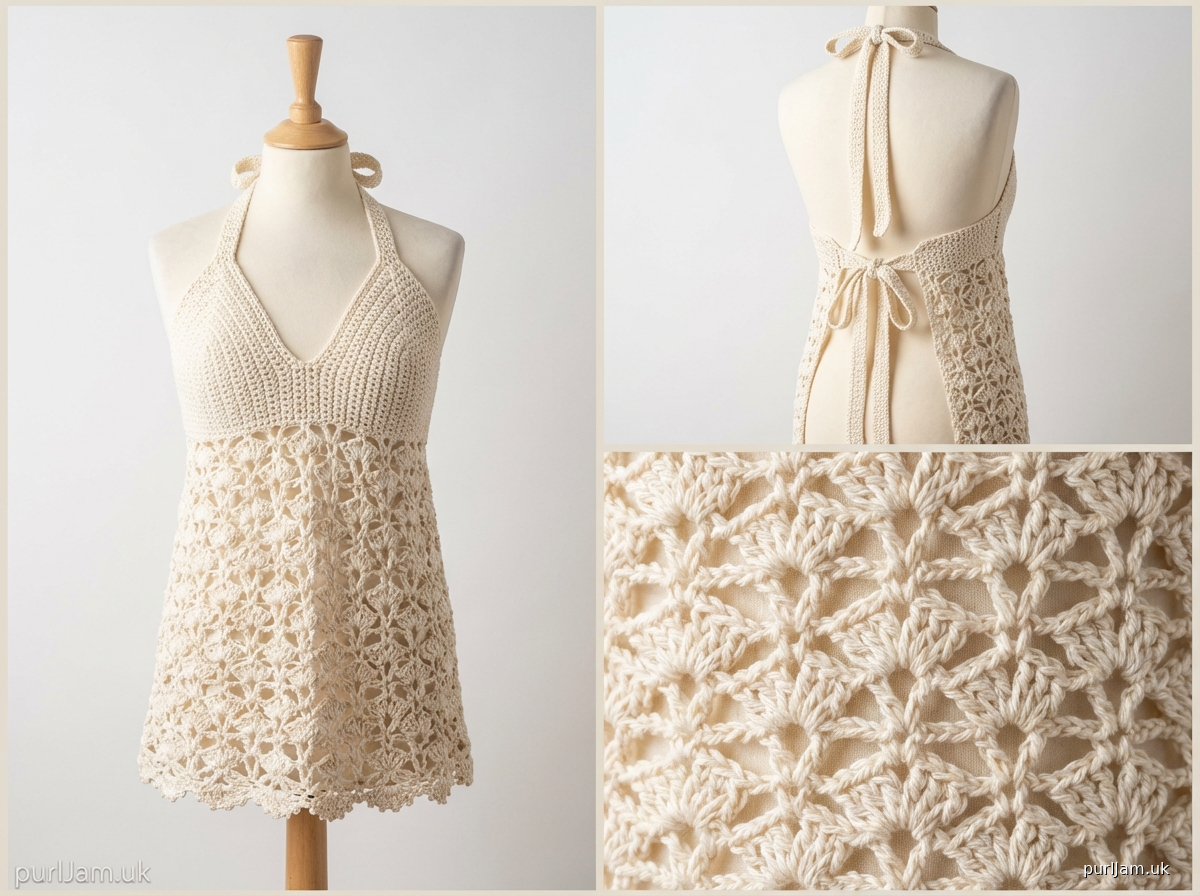
This elegant halter top features a structured, solid treble-crochet bust section that provides coverage and support, flowing into a breathtaking open-work lace body worked in a repeating five-petal shell motif. The result is a beautiful contrast between the polished, close-stitched bodice and the airy, floral-inspired skirt — perfect for warm weather, festivals, or layering over a camisole. The top is constructed in two flat bust panels joined at the side seams, with the lace body worked downward from the joined base. Long halter ties secure at the neck and wrap around the back for a customisable, flattering fit.
**Difficulty:** Intermediate
**Construction:** Worked flat in rows; two bust panels seamed at sides; lace body worked downward; ties worked directly.
---
## SIZES
| Size | Finished Bust | Finished Length (underarm to hem) |
|------|--------------|----------------------------------|
| S | 82 cm (32 in) | 34 cm (13.5 in) |
| M | 92 cm (36 in) | 34 cm (13.5 in) |
| L | 102 cm (40 in) | 35 cm (13.75 in) |
| XL | 112 cm (44 in) | 35 cm (13.75 in) |
*Instructions are written for Size S, with changes for M, L, XL in parentheses.*
*This top is designed with approximately 2–4 cm (1–1.5 in) of negative to zero ease at the bust for a fitted look.*
---
## MATERIALS
**Yarn:**
- Worsted weight yarn (CYCA #4), 100% cotton or cotton-blend recommended for drape and breathability
- Approx. 400 (450, 500, 550) metres / 440 (490, 550, 600) yards
- Shown in a single solid colour; yarn with good stitch definition works best for the lace section
**Suggested Yarn:** Any worsted weight cotton or bamboo-cotton blend, e.g., Paintbox Yarns Simply DK (held double) or a standard 200 m / 100 g worsted cotton.
**Hook:**
- 5 mm crochet hook (primary)
- 4.5 mm crochet hook (for ties, optional — for a neater, firmer tie)
**Notions:**
- Yarn needle / tapestry needle
- Scissors
- 4 stitch markers
- Rust-proof pins for blocking
- Measuring tape
---
## TENSION (GAUGE)
**Solid Section (Treble Crochet):**
14 tr × 8 rows = 10 cm × 10 cm (4 in × 4 in)
Worked flat with 5 mm hook.
**Lace Section:**
1 lace repeat (10 sts) = approximately 7 cm (2.75 in) wide
1 lace pattern row = approximately 2 cm (0.75 in) tall
*Tension is essential for correct sizing. Adjust hook size as needed.*
---
## ABBREVIATIONS (UK TERMINOLOGY)
| Abbreviation | UK Term | US Equivalent |
|---|---|---|
| ch | chain | chain |
| sl st | slip stitch | slip stitch |
| dc | double crochet | single crochet |
| htr | half treble crochet | half double crochet |
| tr | treble crochet | double crochet |
| dtr | double treble crochet | treble crochet |
| ch-sp | chain space | chain space |
| sp | space | space |
| rep | repeat | repeat |
| RS | right side | right side |
| WS | wrong side | wrong side |
| st(s) | stitch(es) | stitch(es) |
| beg | beginning | beginning |
| rem | remaining | remaining |
| t-ch | turning chain | turning chain |
| [ ] | work instructions inside brackets the number of times indicated | — |
| * … * | repeat instructions between asterisks as directed | — |
---
## SPECIAL STITCHES
**5-tr Shell:** Work 5 tr all into the same stitch or space.
*(This is the foundation of the floral lace motif.)*
**V-stitch (V-st):** Work [1 tr, ch 2, 1 tr] all into the same stitch or space.
**Picot:** Ch 3, sl st into the 3rd ch from hook.
*(Used optionally on hem edge for decoration — see Finishing.)*
---
## PATTERN NOTES
1. **Turning chains:** In the solid bust section, ch 3 at the beginning of each row counts as 1 tr. Do not work into the base of the ch-3. Work the last tr of the row into the top of the t-ch from the previous row.
2. **Foundation chain:** The foundation chain is the **top** edge of each bust panel (neckline/upper bust edge). The panel is worked downward, ending at the lower bust/underarm edge.
3. **Lace body:** The lace body is worked **downward** from the lower edge of the joined bust panels. Pick up along the lower edge of the joined piece.
4. **Right and Wrong Sides:** The RS is the side facing you on the first row after the foundation chain.
5. **Stitch counts:** Stitch counts at the end of each row/round are shown in square brackets, e.g., **[63 sts]**.
6. **Sizing note:** L and XL sizes share the same stitch count per panel as M and S respectively, but with additional width achieved by adjusting tension or using a larger hook (5.5 mm for L/XL if needed to achieve full width). *See individual instructions for all stitch counts.*
7. The two bust panels are **identical**. Make two.
---
## PATTERN INSTRUCTIONS
---
### SECTION 1: BUST PANELS (Make 2)
*Each panel is worked flat from the upper bust edge downward to the underarm. The two panels are then joined at both side edges to form the full bust.*
---
#### FOUNDATION CHAIN
Using 5 mm hook, chain:
- **S:** 65 ch
- **M:** 75 ch
- **L:** 75 ch
- **XL:** 85 ch
---
#### ROW 1 (RS):
Tr into 4th ch from hook (the skipped 3 ch count as first tr), tr into each ch to end. Turn.
- **S:** **[63 tr]**
- **M:** **[73 tr]**
- **L:** **[73 tr]**
- **XL:** **[83 tr]**
> **Note:** These stitch counts are multiples of 10 + 3 (S: 6 repeats; M & L: 7 repeats; XL: 8 repeats), which sets up the lace section perfectly.
---
#### ROWS 2–11 (WS and RS alternating):
Ch 3, turn. Tr into each st across (working last tr into top of t-ch). Turn.
- **S:** **[63 tr]** each row
- **M:** **[73 tr]** each row
- **L:** **[73 tr]** each row
- **XL:** **[83 tr]** each row
*Work a total of 11 rows (including Row 1).*
*Bust panel height after 11 rows = approximately 14 cm (5.5 in).*
Fasten off after completing the **second** panel. Leave a long tail on the **first** panel for seaming.
---
### SECTION 2: JOINING THE BUST PANELS
Place both panels with RS facing outward (RS together for seaming).
**Right Side Seam:**
Hold one panel in each hand, aligning the right-side short edges (side seams). Using yarn needle and the long tail (or a new length of yarn), whip stitch or mattress stitch the right side edge seam from top (Row 1/upper bust edge) to bottom (Row 11/lower bust edge). Fasten off and weave in ends.
**Left Side Seam:**
Repeat for the left side edge, joining the second short edge of both panels.
You now have a tube-like joined bust band, open at top and bottom.
*Joined bust circumference:*
- **S:** ~82 cm (32 in)
- **M:** ~92 cm (36 in)
- **L:** ~92 cm (36 in)*
- **XL:** ~104 cm (41 in)*
> ***For sizes L and XL:** If your swatch matched the tension exactly and you need more width, work the bust panels with a 5.5 mm hook, which will loosen each stitch by approximately 10%, bringing the finished bust width to ~101 cm for L and ~114 cm for XL. Re-measure your swatch with the larger hook before beginning.
---
### SECTION 3: LACE BODY
*The lace body is worked flat, back and forth in rows, from the lower edge of the joined bust panels downward toward the hem. You will work along the bottom edge of both joined panels as your foundation row.*
---
#### THE LACE STITCH PATTERN
The lace pattern uses a **6-row repeat** consisting of shell stitches, chain spaces, and V-stitches to create a floral, open-work effect. The stitch repeat is **10 sts + 3**.
---
**LACE ROW SETUP — JOINING ROUND:**
With RS facing, join yarn to the bottom edge of the joined bust panels at one side seam using a sl st.
*Work evenly along the lower edge of the joined bust panel as follows:*
Ch 1 (does NOT count as a stitch here), work 1 dc into each stitch across the bottom edge of both panels. Join with a sl st to the first dc if working in the round — **however**, for this pattern, do NOT join. Instead, turn and work back and forth in rows for the lace body (this creates a flat panel at the back and front, which is the nature of the halter construction).
> **Note on the join:** The lace body is worked **open** (flat), not joined into a round, because the top is a halter — the back is open. You will simply work across the front lower edge, turn, and work back. The side seams remain as the edges of your flat lace piece.
**Setup Row (WS):**
Ch 1, turn. Work 1 dc into each st across.
- **S:** **[63 dc]**
- **M:** **[73 dc]**
- **L:** **[73 dc]**
- **XL:** **[83 dc]**
---
#### LACE PATTERN ROWS
**LACE ROW 1 (RS):**
Ch 4 (counts as 1 tr + ch 1), turn. Skip first 2 sts. *[5-tr Shell into next st, ch 2, skip 4 sts, V-st into next st, ch 2, skip 4 sts]; rep from * to last 3 sts. 5-tr Shell into next st, ch 1, skip 1 st, tr into last st.
- **S:** 6 shells + 5 V-sts + edge trs **[6 shells, 5 V-sts]**
- **M:** 7 shells + 6 V-sts + edge trs **[7 shells, 6 V-sts]**
- **L:** 7 shells + 6 V-sts + edge trs **[7 shells, 6 V-sts]**
- **XL:** 8 shells + 7 V-sts + edge trs **[8 shells, 7 V-sts]**
> **Stitch breakdown check (S):** 3 edge sts (ch-4 base tr + ch 1 + skip 2) + [5 shell sts + ch-2 + 3 V-st sts + ch-2] × 5 repeats + [5 shell sts + ch-1 + tr] at end = 3 + (10 × 5) + 7 = 60 sts accounted for in the 63-st base. ✅
---
**LACE ROW 2 (WS):**
Ch 3 (counts as tr), turn. 2 tr into the ch-1 sp at base of t-ch (completing a partial shell around the edge tr). *[Ch 2, dc into centre (3rd) tr of shell below, ch 2, 5-tr Shell into the ch-2 sp of the V-st below]; rep from * to last shell. Ch 2, dc into centre tr of last shell, ch 2, 3 tr into the ch-4 sp at end (partial shell).
- **S:** **[3-tr at edge, 5 dc, 5 shells, 3-tr at edge]**
- **M:** **[3-tr at edge, 6 dc, 6 shells, 3-tr at edge]**
- **L:** Same as M
- **XL:** **[3-tr at edge, 7 dc, 7 shells, 3-tr at edge]**
---
**LACE ROW 3 (RS):**
Ch 5 (counts as tr + ch 2), turn. Dc into centre tr of first 3-tr group. *[Ch 2, 5-tr Shell into ch-2 sp (between the "ch 2, dc" and "ch 2, Shell" of previous row — i.e. into the V-st sp), ch 2, dc into centre tr of shell below]; rep from * ending: ch 2, tr into top of t-ch.
---
**LACE ROW 4 (WS):**
Ch 4 (counts as tr + ch 1), turn. *[5-tr Shell into ch-2 sp before dc, ch 2, V-st into dc, ch 2]; rep from * to last ch-2 sp. 5-tr Shell into last ch-2 sp, ch 1, tr into 3rd ch of t-ch.
---
**LACE ROW 5 (RS):**
Ch 3, turn. 2 tr into ch-1 sp. *[Ch 2, dc into centre tr of shell, ch 2, 5-tr Shell into V-st ch-2 sp]; rep from * to last shell. Ch 2, dc into centre tr of last shell, ch 2, 3 tr into ch-4 sp.
---
**LACE ROW 6 (WS):**
Ch 5 (counts as tr + ch 2), turn. Dc into centre tr of 3-tr group. *[Ch 2, 5-tr Shell into ch-2 sp, ch 2, dc into centre tr of shell]; rep from * ending: ch 2, tr into top of t-ch.
---
*Rows 1–6 form the **6-row lace pattern repeat**.*
**Rep Lace Rows 1–6 once more** (i.e., work a total of 12 lace rows = 2 complete pattern repeats).
*Lace body height = approximately 12 rows × 2 cm per row = 24 cm (9.5 in).*
> **Optional length adjustment:** For a longer top, work an additional 6-row repeat before the hem row. For a cropped look, work only one 6-row repeat (12 cm / 4.75 in lace body).
---
**HEM ROW (final row, RS):**
Ch 1, turn. *Work 1 dc into each st and 2 dc into each ch-2 sp across, working along the top of the lace.*
> This creates a neat, stable hem edge. Fasten off. Weave in ends.
*Optional picot hem:* Instead of plain dc, after joining yarn, work: *[dc into next st or sp, picot (ch 3, sl st into 3rd ch from hook)]; rep from * across. This gives a delicate, decorative lower edge.
---
### SECTION 4: NECK TIES AND HALTER STRAPS
The halter ties originate from the upper corners of the front bust panel and wrap around the neck to tie at the back. The back tie wraps around the body at the underarm level.
---
#### FRONT NECK TIES (Make 2)
With 5 mm hook (or 4.5 mm for a neater tie), join yarn to the top corner of the front bust panel at the upper edge (Row 1 of bust panel), on either the RS or the folded/upper edge corner.
**Tie:** Ch 80 (approximately 50 cm / 20 in). Sl st back into the 2nd ch from hook and into each ch back to the panel corner, to firm the tie. Fasten off.
*Alternatively, for a firmer, neater tie:* Ch 80, turn. Sl st into each ch back to corner. Fasten off.
Repeat on the opposite upper corner for the second tie.
*The two front ties are brought up and around the neck, crossing behind the neck, then tied in a bow at the front or back — as preferred.*
---
#### UPPER BUST EDGE TRIM (Optional but recommended):
With RS facing, join yarn to the upper edge of the bust panel at one side seam.
**Trim Row:**
Ch 1. Work 1 dc evenly across the entire upper edge of both front bust panels (working along the foundation chain edge). At the top of each tie, dc around the base of the tie to reinforce.
Fasten off. Weave in ends.
---
#### BACK TIE / UNDERARM TIE (Make 2):
To close the back of the halter and hold the top in place around the body, two ties are attached at the side seams at the underarm level (top of the lace body / bottom of the bust panel seam).
With 5 mm hook, join yarn to the side seam at the bust/lace join on one side.
**Tie:** Ch 60 (approximately 38 cm / 15 in). Sl st back into 2nd ch from hook and each ch back to attachment point. Fasten off.
Repeat on opposite side seam.
*These two ties wrap around the back and tie together at centre back, securing the top.*
---
## FINISHING
**1. Weave in all ends** securely using a yarn needle, working ends back and forth through stitches on the WS.
**2. Wet block the finished top:**
- Soak the top in cool water with a drop of wool wash (or plain water for cotton) for 15–20 minutes.
- Gently squeeze out excess water — do not wring.
- Lay flat on a blocking mat or towel.
- Pin the lace body open gently to open up the shell motifs and reveal the floral pattern.
- Pin the bust panels flat and smooth.
- Allow to dry completely (several hours or overnight).
> **Blocking tip:** Blocking cotton yarn is particularly effective and will dramatically open up the lace section. The motifs will bloom beautifully once blocked.
**3. Optional:** Steam block the upper bust solid section only with a garment steamer held 5 cm (2 in) above the fabric — do not press directly.
---
## SCHEMATIC (Written Description)
```
[FRONT NECK TIE] ~~~~~~o-----------o~~~~~~ [FRONT NECK TIE]
| |
| SOLID |
| BUST | ← ~14 cm tall
| PANEL |
| |
o-----------o
| |
| LACE BODY | ← ~24 cm tall
| (open-work|
| shells) |
| |
+-----------+ ← Hem edge
~82–112 cm wide (size dependent)
BACK TIE ~~o o~~ BACK TIE
(attached at side seams, wraps to back)
```
---
## YARDAGE SUMMARY
| Size | Bust Panel (×2) | Lace Body | Ties + Trim | Total |
|------|----------------|-----------|-------------|-------|
| S | ~180 m | ~160 m | ~60 m | ~400 m |
| M | ~200 m | ~190 m | ~60 m | ~450 m |
| L | ~200 m | ~190 m | ~60 m | ~450 m |
| XL | ~220 m | ~220 m | ~60 m | ~500 m |
*Always purchase an extra 50 m as a safety margin, especially if substituting yarn.*
---
## QUICK-REFERENCE STITCH COUNT TABLE
| Section | S | M | L | XL |
|---|---|---|---|---|
| Foundation chain | 65 ch | 75 ch | 75 ch | 85 ch |
| Bust panel sts per row | 63 tr | 73 tr | 73 tr | 83 tr |
| Bust panel rows | 11 | 11 | 11 | 11 |
| Lace repeat | ×6 | ×7 | ×7 | ×8 |
| Lace body rows | 12 (+ hem) | 12 (+ hem) | 12 (+ hem) | 12 (+ hem) |
| Neck tie length | 80 ch | 80 ch | 80 ch | 80 ch |
| Back tie length | 60 ch | 65 ch | 65 ch | 70 ch |
---
## CARE INSTRUCTIONS
- Hand wash in cool water with mild detergent.
- Do not tumble dry.
- Dry flat, out of direct sunlight.
- Do not iron directly on lace section; steam only if needed.
- Store folded, not hung, to prevent stretching.
---
*© [Your Name / Brand Name]. This pattern is for personal use. Please do not reproduce or redistribute without permission. You are welcome to sell finished items made from this pattern with credit.*
---
Disclaimer: This pattern was generated by AI and should be reviewed for accuracy before use. While we strive for quality, AI-generated content may contain errors. Please verify measurements, stitch counts, and instructions before beginning your project. Generated by purlJam.uk
Access your pattern anytime
Bookmark this page to access your pattern anytime