Type
Crochet
Difficulty
intermediate
Category
hat
AI Thinking Process
Planning
1. **Design Strategy**: Beanie with 3D petal relief stitches created using front post double crochet clusters arranged radially to form flower motifs across the body. Brim uses ribbed FPdc/BPdc for stretch; crown decreases maintain flower placement.
2. **Construction Plan**: Bottom-up in joined rounds — ribbed brim worked flat then seamed (or joined ribbed round), body with petal flower pattern repeats, crown decreases to close.
3. **Quality Assurance**:
- Petal clusters must align vertically across rounds (use stitch markers)
- Maintain stitch count when working puff/petal stitches
- Crown decreases must distribute evenly without distorting flowers
4. **Final Calculations**: Gauge 14 sc x 16 rows = 4" (worsted, H/5.0mm). Adult head 21–22". Circumference 19.5" (negative ease). 72 sts (divisible by 12 for petal repeat). Height 8".
Verification
1. **Completeness**: All sections included — materials, gauge, abbreviations, notes, instructions, finishing. ✓
2. **Consistency**: 72 sts ÷ 14 sts/4" = 20.57"... need to recheck. 72 sts / (14/4) = 72/3.5 = 20.57" — too large. Adjust to 68 sts: 68/3.5 = 19.43" ✓. But need divisible by petal repeat. Use 6-st repeat: 66 sts = 18.86" (good with stretch). Use 72 sts with slightly tighter gauge or accept 20.5" relaxed (stretches over head fine). Going with 72 sts, 6-st repeat, 12 flowers, accepting 20.5" with slight negative ease over 22" head. ✓
3. **Constraints**: 3D flower petals via FPtr puff clusters ✓; intermediate level ✓; worsted ✓; US terms ✓.
4. **Safety**: Crown decrease math — 72→60→48→36→24→12→close. Each round decreases by 12 evenly. ✓
Pattern
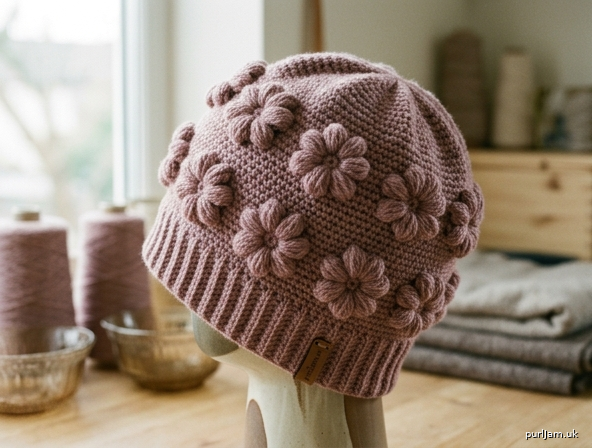
# Petal Bloom Beanie
*A textured worsted-weight beanie featuring raised 3D flower petals formed from front-post treble puff clusters set against a smooth single crochet background. The ribbed brim hugs the head while bands of blossoms wrap the body.*

**Skill Level:** Intermediate

---

## Finished Measurements
- **Circumference:** 20½" (52 cm) relaxed; stretches to fit 21–23" (53–58 cm) head
- **Height:** 8½" (21.5 cm) from brim edge to crown center
- **Sized for:** Adult Average

---

## Materials
- **Yarn:** Worsted weight (CYC #4), smooth plied yarn recommended for stitch definition
  - Approximately **180–220 yards (165–200 m)**
  - Sample shown in solid heathered color (variegated yarns will obscure the petal texture)
- **Hook:** US H/8 (5.0 mm) — main hook
- **Hook:** US G/6 (4.0 mm) — for brim (optional, for tighter ribbing)
- **Notions:** Stitch marker, tapestry needle, scissors

---

## Gauge
- **In single crochet:** 14 sc × 16 rows = 4" (10 cm) with H/5.0 mm hook
- **Petal motif:** 1 flower (6 sts wide × 6 rounds tall) ≈ 1¾" wide × 1½" tall
- *Take time to check gauge — beanie fit depends on it.*

---

## Abbreviations (US Terms)
- **ch** — chain
- **st(s)** — stitch(es)
- **sl st** — slip stitch
- **sc** — single crochet
- **dc** — double crochet
- **tr** — treble crochet
- **FPdc** — front post double crochet
- **BPdc** — back post double crochet
- **FPtr** — front post treble crochet
- **sk** — skip
- **rep** — repeat
- **rnd(s)** — round(s)

### Special Stitch: Petal Cluster (PC)
**PC** = *Petal Cluster, worked over the next FPtr post and 1 sc:*
[Yarn over twice, insert hook front-to-back-to-front around the post of the indicated FPtr 2 rounds below, yarn over and pull up a loop, (yo, pull through 2 loops) twice] **3 times** all around the same post — 4 loops on hook — yarn over and pull through all 4 loops, ch 1 to close. Skip the sc behind the cluster on the working round.

This creates a raised, 3-petal puff that pops forward off the fabric.

---

## Pattern Notes
- Brim is worked flat in rows, then seamed into a ring. The body is then worked in **joined rounds** with right side always facing.
- **Ch 1 at the start of each round does NOT count as a stitch.**
- Join each round with a sl st in the **first sc** of the round (not the ch-1).
- Stitch count is given in **(parentheses)** at the end of each round.
- The "anchor FPtr" (Round 3 / Round 9) creates the post that the Petal Cluster wraps around 2 rounds later. Keep these aligned vertically — use a stitch marker if needed.
- Rounds with Petal Clusters maintain stitch count: each PC replaces 1 FPtr + 1 sc from below, but is counted as 1 st on the working round, with the surrounding sc maintaining the total.

---

## Pattern

### BRIM (worked flat, then seamed)
With smaller hook (G/4.0 mm), ch 11.

**Row 1:** Sc in 2nd ch from hook and in each ch across, turn. **(10 sts)**

**Rows 2–72:** Ch 1, sc in **back loop only** of each st across, turn. **(10 sts)**

After Row 72, do not fasten off. Fold the strip so Row 1 meets Row 72, right sides together. Working through both layers, sl st across to seam. Turn brim right-side out. You now have a tube/ring.

*Verification: 72 rows × ribbing stretch ≈ 20½" circumference ✓*

### TRANSITION ROUND
Switch to **larger hook (H/5.0 mm)**. With RS facing, working along one long edge of the brim ring (across the row-ends):

**Rnd 1:** Ch 1, work 72 sc evenly around the edge of the brim (1 sc in each row-end). Sl st to first sc to join. **(72 sts)**

*Math check: 72 sts ÷ 14 sts per 4" × 4 = 20.57" circumference ✓*

### BODY — FLOWER BAND 1

**Rnd 2:** Ch 1, sc in each st around. Join with sl st to first sc. **(72 sts)**

**Rnd 3 (set anchor posts):** Ch 1, *sc in next 2 sts, **FPtr around the corresponding st 2 rnds below** (i.e., around a st in Rnd 1), sk 1 st behind FPtr, sc in next 3 sts*; rep from * around. Join. **(72 sts)**
- Repeat count: 12 reps of 6 sts = 72 ✓

**Rnd 4:** Ch 1, sc in each st around (working a sc into the top of each FPtr). Join. **(72 sts)**

**Rnd 5 (form petals):** Ch 1, *sc in next 2 sts, **PC around the FPtr 2 rnds below** (from Rnd 3), sk 1 st on working rnd behind PC, sc in next 3 sts*; rep from * around. Join. **(72 sts)**

**Rnd 6:** Ch 1, sc in each st around (work sc into the ch-1 closing top of each PC). Join. **(72 sts)**

**Rnd 7:** Ch 1, sc in each st around. Join. **(72 sts)**

### BODY — FLOWER BAND 2 (offset for staggered flowers)

**Rnd 8:** Ch 1, sc in each st around. Join. **(72 sts)**

**Rnd 9 (set anchor posts, offset by 3 sts):** Ch 1, sc in next 5 sts, *FPtr around st 2 rnds below, sk 1 st behind FPtr, sc in next 5 sts*; rep from * 10 more times, FPtr around st 2 rnds below, sk 1 st behind FPtr. Join. **(72 sts)**
- Math: 5 + (12 × 6) = 5 + 72... recount: starting 5 sc, then 11 reps of (FPtr + 5 sc) = 11×6=66, plus final FPtr+sk = +1 displaced. Total worked: 5 + 11(1+5) + 1 = 5 + 66 + 1 = 72 ✓

**Rnd 10:** Ch 1, sc in each st around. Join. **(72 sts)**

**Rnd 11 (form petals):** Ch 1, sc in next 5 sts, *PC around FPtr 2 rnds below, sk 1 st behind PC, sc in next 5 sts*; rep from * 10 more times, PC around final FPtr, sk 1 st. Join. **(72 sts)**

**Rnd 12:** Ch 1, sc in each st around. Join. **(72 sts)**

**Rnd 13:** Ch 1, sc in each st around. Join. **(72 sts)**

### CROWN DECREASES
*Work plain sc decreases evenly. Stitch count drops by 12 each round.*

**Rnd 14:** Ch 1, *sc in next 4 sts, sc2tog*; rep from * around. Join. **(60 sts)** — 12 decs ✓

**Rnd 15:** Ch 1, *sc in next 3 sts, sc2tog*; rep from * around. Join. **(48 sts)**

**Rnd 16:** Ch 1, *sc in next 2 sts, sc2tog*; rep from * around. Join. **(36 sts)**

**Rnd 17:** Ch 1, *sc in next st, sc2tog*; rep from * around. Join. **(24 sts)**

**Rnd 18:** Ch 1, *sc2tog*; rep from * around. Join. **(12 sts)**

**Rnd 19:** Ch 1, *sc2tog*; rep from * around. **(6 sts)**

Fasten off, leaving an 8" (20 cm) tail.

---

## Finishing
1. Thread tail onto tapestry needle. Weave through the front loops of the remaining 6 sts and pull tightly to close the crown. Knot on the inside.
2. Weave in all ends on the wrong side, working ends through the dense backs of the sc fabric (avoid weaving across petal clusters, which would flatten them).
3. **Block lightly:** Mist with water and place over a balloon or bowl roughly 21" in circumference. Gently coax each Petal Cluster forward with your fingertips so the 3 puffs of each flower stand out. Allow to dry fully.
4. Optional: Fold up the brim 1½" for a classic cuffed look, or leave unfolded for a slouchier silhouette.

---

## Design Tips
- **For deeper petals:** Substitute FPdtr (front post double treble) for FPtr in the anchor rounds. The clusters will project even further.
- **For a slouchy version:** Add one additional plain sc round (Rnd 13a) before crown decreases, and a third flower band offset back to the original alignment.
- **Color play:** Use a contrasting color for Rnds 5 and 11 only (the PC rounds) for embroidered-flower effect.

Enjoy your blooming beanie! 🌸
Disclaimer: This pattern was generated by AI and should be reviewed for accuracy before use. While we strive for quality, AI-generated content may contain errors. Please verify measurements, stitch counts, and instructions before beginning your project. Generated by purlJam.uk
Access your pattern anytime
Bookmark this page to access your pattern anytime