Type
Crochet
Difficulty
beginner
Category
kimono
AI Thinking Process
Planning
1. **Design Strategy**: A T-shaped, open-front mesh cardigan worked flat in rectangles using a simple dc-ch1 mesh stitch for an airy, drapey blush-pink layer. The user requested "mesh," so I'm honoring the lacy stitch despite the template's caution, with a sc border for stability. Easy difficulty: minimal shaping, full-length wide sleeves.
2. **Construction Plan**: Worked flat in five rectangular pieces (back, two fronts, two sleeves), seamed at shoulders/sides/sleeves, then finished with a sc edging.
3. **Quality Assurance**:
- Mesh stitch can stretch — recommend blocking lightly and a firm sc border to stabilize edges.
- Keep stitch counts even so the [dc, ch 1, skip 1] repeat aligns at row ends.
- Sleeves must NOT taper (kimono rule) — same count top to bottom.
4. **Final Calculations**:
- Gauge: 14 dc-mesh units (1 dc + 1 ch) = 4" wide; 9 rows = 4" tall in pattern → 3.5 units/inch, 2.25 rows/inch.
- Size M/L finished bust ≈ 44". Back width 22" → 77 units. Each front 11" → 38 units (approx).
- Body length 26"; sleeve length 18"; sleeve width 16".
Verification
[PRE-FLIGHT CHECKS]
1. **Completeness**: Includes materials, gauge, sizing, all 5 pieces, assembly, border, blocking. ✓
2. **Consistency**: Back 77 mesh units; mesh unit = dc + ch1 → foundation chain math verified below. Each mesh unit = 2 base stitches. ✓
3. **Constraints**: Honors "mesh" (lacy openwork), worsted yarn, easy level, T-shape kimono construction with full sleeves, open front. ✓
4. **Safety**: Foundation chain = (units × 2) + turning. Re-verified each piece's chain count in pattern. ✓
Pattern
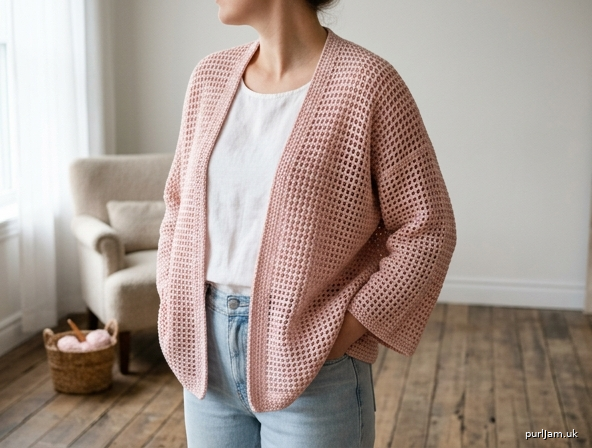
# Blush Blossom Mesh Cardigan

*An airy, open-front mesh cardigan worked flat in five simple rectangles — perfect easy layering for warm days. The light dc-mesh stitch gives gorgeous drape, while a firm single crochet border keeps every edge crisp.*

**Skill Level:** Easy
**Construction:** T-shaped kimono — worked flat in rectangles, seamed, with minimal shaping (no armhole, shoulder, sleeve, or waist shaping).

---

## Materials

- **Yarn:** Worsted weight (#4), drapey fiber recommended — cotton, cotton/bamboo, or a soft acrylic blend, in **Blush Pink**.
  - Approx. yardage by size:
    - S/M: 1000 yds
    - L/XL: 1250 yds
    - 2XL/3XL: 1500 yds
- **Hook:** US I/9 (5.5 mm) main hook; US H/8 (5.0 mm) for border (optional, for tidier edge)
- **Notions:** Tapestry needle, stitch markers, scissors
- **Optional closure:** Two coordinating ribbon ties or one shawl pin

---

## Gauge

In mesh pattern, using I/9 (5.5 mm) hook:
- **14 mesh units = 4" (10 cm) wide** (1 mesh unit = 1 dc + ch 1)
- **9 rows = 4" (10 cm) tall**

That equals **3.5 mesh units per inch** and **2.25 rows per inch**.

> **Gauge check:** Make a swatch at least 5" square. Mesh fabric stretches; block your swatch before measuring. Gauge is forgiving thanks to the oversized fit.

---

## Mesh Pattern Stitch (worked over an even number of base chains)

**Set-up row (RS):** Ch 4 (counts as dc + ch 1), skip first 2 ch/sts, *dc in next st, ch 1, skip 1; repeat from * across, ending dc in last st. Turn.

**Pattern row:** Ch 4 (counts as dc + ch 1), skip first dc + ch-1 space, *dc in next dc, ch 1, skip ch-1 space; repeat from * across, dc in top of turning ch. Turn.

Each "mesh unit" = 1 dc + 1 ch-1 space.

---

## Finished Measurements

| Size | Bust Circumference | Body Length | Sleeve Length | Sleeve Width |
|------|--------------------|-------------|---------------|--------------|
| S/M | 44" | 25" | 17" | 14" |
| L/XL | 50" | 26" | 18" | 16" |
| 2XL/3XL | 56" | 27" | 18" | 16" |

*Designed with 8–12" positive ease for a relaxed, open drape. Choose by desired length first; bust is generous.*

Instructions are written for **S/M**, with **L/XL** and **2XL/3XL** in parentheses: S/M (L/XL, 2XL/3XL).

---

## Stitch Count Reference (mesh units)

- **Back width:** 77 (87, 98) mesh units → 22" (25", 28")
- **Each Front width:** 38 (43, 49) mesh units → 11" (12.5", 14")
- **Sleeve width:** 49 (56, 56) mesh units → 14" (16", 16")
- **Body rows:** 56 (58, 60) rows → 25" (26", 27")
- **Sleeve rows:** 38 (40, 40) rows → 17" (18", 18")

> **Foundation math:** 1 mesh unit needs 2 base chains. Foundation chain = (mesh units × 2) + 2 for the turning ch.

---

## BACK (make 1)

**Foundation:** Ch **156 (176, 198)**.
- *Verify:* 77 (87, 98) units × 2 = 154 (174, 196); + 2 turning = 156 (176, 198). ✓

**Row 1 (RS):** Dc in 4th ch from hook (skipped 3 ch count as first dc + ch 1... see note), ch 1, skip 1 ch, *dc in next ch, ch 1, skip 1 ch; repeat from * to last ch, dc in last ch. Turn.
> *Tip:* You should have 77 (87, 98) dc posts with ch-1 spaces between. Count units before continuing.

**Rows 2–56 (2–58, 2–60):** Work **Pattern row**. Turn at end of each row.

Fasten off after row **56 (58, 60)**.
- *Verify length:* 56 (58, 60) rows ÷ 2.25 rows/in = 24.9" (25.8", 26.7") ≈ 25" (26", 27"). ✓

---

## FRONTS (make 2 — they are mirror images, but identical rectangles in mesh)

**Foundation:** Ch **78 (88, 100)**.
- *Verify:* 38 (43, 49) units × 2 = 76 (86, 98); + 2 = 78 (88, 100). ✓

**Row 1 (RS):** Work as Back Row 1 → 38 (43, 49) mesh units. Turn.

**Rows 2–56 (2–58, 2–60):** Work **Pattern row**.

Fasten off. Make a second front identically.

> **Open front note:** This kimono has an open front with no neckline decreases — the straight inner edges form the front opening and a soft V when worn. The border will neaten these edges.

---

## SLEEVES (make 2 — wide rectangles, NO tapering)

**Foundation:** Ch **100 (114, 114)**.
- *Verify:* 49 (56, 56) units × 2 = 98 (112, 112); + 2 = 100 (114, 114). ✓

**Row 1 (RS):** Work as Back Row 1 → 49 (56, 56) mesh units. Turn.

**Rows 2–38 (2–40, 2–40):** Work **Pattern row**. Keep the same width every row — do not increase or decrease.

Fasten off.
- *Verify width:* 49 (56, 56) ÷ 3.5 = 14" (16", 16"). ✓
- *Verify length:* 38 (40, 40) ÷ 2.25 = 16.9" (17.8", 17.8") ≈ 17" (18", 18"). ✓

---

## ASSEMBLY

Block all pieces flat to listed measurements before seaming; mesh opens up beautifully when blocked.

**1. Shoulder seams (straight, horizontal):**
Lay the Back flat (RS up). Place a Front on each side, RS together with Back at the top edge. The shoulder seam spans from the outer (armhole) edge inward.
- Seam **18 (20, 22) mesh units** from each outer edge along the top edge for each shoulder, using mattress stitch or slip stitch.
- This leaves the **center 41 (47, 54) units** of the Back top edge open for the back neck.
  - *Verify:* 18 + 18 + 41 = 77 ✓ | 20 + 20 + 47 = 87 ✓ | 22 + 22 + 54 = 98 ✓

**2. Attach sleeves (perpendicular — dropped shoulder):**
Find the shoulder seam point. Measure down **7 (8, 8)"** from the shoulder seam on both Back and Front along the outer edge — mark this. Center the top edge of each Sleeve at the shoulder seam and pin its top edge to the body between the marks. Sew the sleeve top edge to the body edge.
- *Sleeve top span check:* 14" (16", 16") sleeve width = 7" (8", 8") onto front + 7" (8", 8") onto back. ✓ This creates the right-angle T-shape with a dropped shoulder.

**3. Side seams:**
Seam each side from the hem up to the underarm point (where the sleeve attachment begins).

**4. Sleeve underside seams:**
Seam each sleeve from underarm to cuff.

---

## BORDER

Using H/8 (5.0 mm) hook and RS facing, join yarn at a lower side seam.

**Round 1 (sc):** Work sc evenly around the entire opening — up the right front, around the back neck, down the left front, and across the hem. Work approximately **3 sc per 2 mesh units** along vertical edges and **1 sc per ch-1 space / dc** along horizontal edges, placing 3 sc in each outer corner. Join with sl st to first sc.

**Round 2 (crab stitch / reverse sc):** Ch 1, work reverse single crochet (sc worked left to right) in each st around for a tidy, slightly beaded edge. Join, fasten off.

> **Cuff edging (optional):** Work 1 round of sc around each sleeve cuff, then a round of reverse sc, to firm up the open mesh ends.

---

## CLOSURE (optional)

This cardigan is designed to be worn **open**. If you'd like a closure:
- **Ribbon ties:** Sew a 10" length of coordinating ribbon to each front edge at bust level; tie in a bow.
- **Shawl pin:** Simply pin the fronts together at the bust — no sewing required.

---

## FINISHING

1. Weave in all ends with a tapestry needle.
2. **Block again gently** — pin to final measurements and steam or wet-block. Blocking is essential for mesh to relax, drape, and even out.
3. Allow to dry fully before wearing.

---

## Designer Notes

- **Why a firm border on mesh:** Openwork edges curl and stretch; the sc + reverse-sc border stabilizes the fronts and neck so the cardigan hangs neatly.
- **Customizing length:** Add or remove rows in multiples of any number to adjust body length — every **2.25 rows ≈ 1 inch**. Adjust yarn amounts accordingly.
- **Customizing sleeves:** For 3/4 sleeves, work to 13 (14, 14)" instead of full length. Keep the width constant — never taper (this is what makes it a kimono).
- **Stitch-count integrity:** All counts use even foundation chains so the [dc, ch 1, skip 1] repeat begins and ends on a dc, giving clean, symmetrical edges.

Enjoy your **Blush Blossom Mesh Cardigan** — light, breezy, and effortlessly elegant! 🌸
Disclaimer: This pattern was generated by AI and should be reviewed for accuracy before use. While we strive for quality, AI-generated content may contain errors. Please verify measurements, stitch counts, and instructions before beginning your project. Generated by purlJam.uk
Access your pattern anytime
Bookmark this page to access your pattern anytime