Type
Crochet
Difficulty
intermediate
Category
tank
AI Thinking Process
Planning
Verification
Pattern
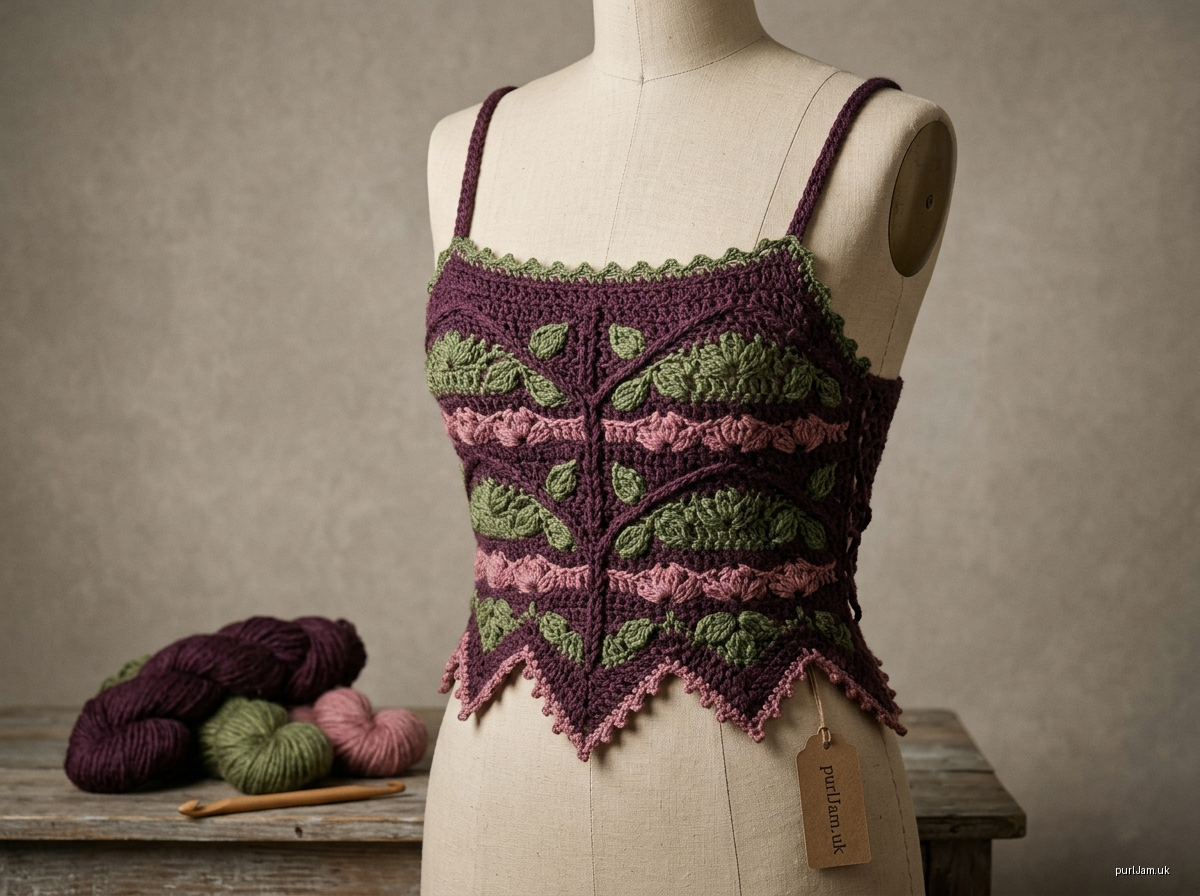
BRAMBLE WITCH CORSET CAMI
An advanced crochet lace crop top in bulky yarn with US terminology.
Overview
This is a cropped camisole with a square neckline. The front is worked in a botanical leaf-and-vine lace, and the back is a light filet mesh that closes with corset lacing through reinforced eyelets. The hem is pointed and scalloped like an elven tunic, the straps are thin adjustable cords, and the top edge has a picot lace edging. It is designed to be worn every day, layered over a camisole or bralette.
Construction (Route A, adapted):
- The front and the two back halves are worked flat and bottom-up.
- The pieces are seamed at the sides.
- The finishing is worked last: eyelet bands, hem, edging, straps and lacing.
Difficulty: Advanced. You will be reading lace and color charts, changing colors every row, keeping a stitch repeat intact through shaping, and fitting the top yourself.
Open fabric note: This top is openwork and is see-through. Wear it over a camisole, bralette or slip, or sew in a lining as described under Finishing.
Bulky yarn note: Lace in bulky yarn gives a bold, rustic, forest-witch look. Choose a light, airy bulky yarn (a cotton or wool-blend chainette or brushed yarn) and block firmly. A dense, firmly spun bulky yarn will make the top heavy.
Sizes
XS (S, M, L, XL, XXL)
| XS | S | M | L | XL | XXL | |
|---|---|---|---|---|---|---|
| To fit body bust | 29–30" | 33–34" | 37–38" | 41–42" | 45–46" | 49–50" |
| Finished bust (bands closed) | 28.5" | 33" | 36.5" | 41" | 44.5" | 49" |
| Lacing adjustment | +0 to 2" | +0 to 2" | +0 to 2" | +0 to 2" | +0 to 2" | +0 to 2" |
| Length (hem point to top edge) | 11" | 11" | 11" | 11" | 13.3" | 13.3" |
Ease: About −1 to +1", fitted. You set the exact fit with the lacing.
Materials
Yarn: Bulky (5), in a cotton blend or a light wool blend.
| Color | XS | S | M | L | XL | XXL |
|---|---|---|---|---|---|---|
| MC Deep Plum | 210 yd | 240 yd | 270 yd | 300 yd | 350 yd | 390 yd |
| CC1 Moss (leaves) | 40 yd | 45 yd | 50 yd | 55 yd | 65 yd | 70 yd |
| CC2 Dusty Rose (flowers) | 30 yd | 35 yd | 40 yd | 45 yd | 50 yd | 55 yd |
These amounts include about 60" of MC for the lacing cord.
Hooks:
- US K-10½ (6.5 mm), the main hook.
- US I-9 (5.5 mm), used for the waist rows and the edgings.
Notions:
- Stitch markers.
- 4 removable markers for strap placement.
- Tapestry needle and scissors.
- Optional: 1.5 yd of ¼" velvet ribbon to use as lacing instead of the cord.
Gauge
In Leaf & Vine Lace with the 6.5 mm hook, after blocking: 12 sts × 7 rows = 4" (10 cm). One lace repeat (6 sts) measures 2", and one 4-row repeat measures about 2.3".
The filet mesh uses the same gauge: 12 sts (6 mesh spaces) × 7 rows = 4".
Swatch:
- Ch 26.
- Work a foundation row of sc (25 sts).
- Work Rows 1–4 of the lace twice.
- Block, then measure.
If your swatch has too many stitches per inch, go up a hook size; if too few, go down.
Stitch Guide (US)
- ch: chain.
- sl st: slip stitch.
- sc: single crochet.
- dc: double crochet.
- tr: treble crochet.
- sc2tog: insert hook in the next st and pull up a loop, repeat in the following st, then yo and draw through all 3 loops.
- ch-sp: the space under a chain.
- Shell: (dc, ch 1, dc, ch 1, dc) in the same st. This counts as 5 sts.
- V-st: (dc, ch 1, dc) in the same st or space. This counts as 3 sts.
- 3-dc cl (cluster): [yo, insert hook in the stated space and pull up a loop, yo and draw through 2 loops] 3 times, then yo and draw through all 4 loops. This counts as 1 st.
- Picot: ch 3, sl st in the 3rd ch from the hook.
Counting: Every dc, sc, cluster and ch-1 counts as 1 st, and a ch-2 counts as 2 sts. A turning ch-3 counts as a dc.
Stitch Patterns
Leaf & Vine Lace (multiple of 6 + 1)
This pattern is worked on a solid row of sc or dc.
Row 1 (RS) – Flowers:
- Ch 3 (counts as dc).
- Sk 2 sts, Shell in next st, sk 2 sts, dc in next st. Rep from * across.
- Stitch count: 1 + 6 per repeat = 6k+1.
Row 2 (WS) – Stems:
- Ch 4 (counts as dc, ch 1).
- V-st in the center dc of the next Shell, ch 1, dc in the next single dc, ch 1. Rep from * across.
- End the last repeat with a dc in the top of the turning ch, omitting the final ch 1.
- Stitch count: 2 + 6k − 1 = 6k+1 ✓.
Row 3 (RS) – Leaves:
- Ch 3.
- Ch 2, 3-dc cl in the ch-1 sp of the next V-st, ch 2, dc in the next single dc. Rep from * across, ending with a dc in the 3rd ch of the turning ch.
- Stitch count: 1 + 6k ✓.
Row 4 (WS) – Vine band:
- Ch 3.
- 2 dc in the next ch-2 sp, dc in the cluster, 2 dc in the next ch-2 sp, dc in the next dc. Rep from * across.
- Stitch count: 1 + 6k ✓. This row is solid.
Repeat Rows 1–4.
Filet Mesh (odd number of sts)
Every row:
- Ch 4 (counts as dc, ch 1).
- Sk the next st, dc in the next st.
- Ch 1, sk the next st, dc in the next st. Rep from * across, working the last dc in the 3rd ch of the turning ch.
Each row keeps the same odd stitch count.
Charts
How to read the charts:
- RS rows (odd numbers) are read right to left; WS rows (even numbers) are read left to right.
- Rows are numbered from bottom to top.
- Work the bracketed repeat [ ] across, then work the final edge stitch.
Chart A: Leaf & Vine Lace (stitch symbols, 6+1 sts × 4 rows)
4: [ │ │ │ ┃ │ │ ] │     WS  solid vine band
3: [ │ ─ ─ ♣ ─ ─ ] │     RS  leaves
2: [ │ ∘ V ∘ V ∘ ] │     WS  stems
1: [ │ ∘ ∘ ∨ ∘ ∘ ] │     RS  flowers
   (6-st repeat)  edge
Key:
- │ = dc.
- ┃ = dc worked into the cluster.
- ─ = ch.
- ♣ = 3-dc cl.
- ∨ = Shell worked into this st.
- V = a dc of the V-st.
- ∘ = skipped st or ch-1.
Each row of Chart A has 6 sts per repeat + 1 edge st.
Chart B: Color placement (6+1 sts × 4 rows, Front only)
4: [□ □ □ □ □ □] □     MC
3: [■ ■ ■ ■ ■ ■] ■     CC1  leaves
2: [□ □ □ □ □ □] □     MC
1: [● ● ● ● ● ●] ●     CC2  flowers
Key: □ = MC (Plum), ■ = CC1 (Moss), ● = CC2 (Rose).
Exception: The first repeat (Front Rows 1–4, the waist band) is worked entirely in MC.
Chart C: Filet Mesh with eyelet band (Back halves)
Mesh row: │ ─ │ ─ │ ─ │ ─ │      □ all MC
Eyelet band Row 2:  □ □ □ ○ ○ □ □ □ ○ ○ □ □ □
Key: │ = dc, ─ = ch-1, ○ = ch-2 eyelet, □ = sc. All in MC.
Color Management
- Each row is worked in a single color, so there are no floats.
- Change color in the final yo of the last st of the previous row.
- Because CC rows begin on alternating sides, cut CC1 and CC2 after each use, leaving 4" tails.
- MC may be carried up the side edge when it is used on consecutive alternate rows; catch it every 2 rows. These carries are later hidden in the side seams.
- Weave CC tails into the solid MC Row 4 bands, never across a ch-sp.
- Colorwork blocking: Pin each repeat open so the Shells spread and the clusters point upward. Steam or wet block, and check that the colors do not bleed before you wet the whole piece.
Waist Shaping
- Front Rows 1–4 and Back Rows 1–4 are worked with the 5.5 mm hook. This draws in the waist by about 8% (roughly 2.5–4" overall).
- Work all following rows with the 6.5 mm hook.
- The back lacing gives further corset-style hourglass cinching.
- Shaping stays outside the stitch repeat, so all stitch counts remain unchanged.
FRONT
Foundation:
- With MC and the 5.5 mm hook, ch 44 (50, 56, 62, 68, 74).
- Foundation row (WS): sc in the 2nd ch from the hook and in each ch across. You now have 43 (49, 55, 61, 67, 73) sts (6×7+1 = 43 ✓).
Rows 1–4: Work Leaf & Vine Lace Rows 1–4 in MC only, with the 5.5 mm hook. 43 (49, 55, 61, 67, 73) sts.
Rows 5–12 (5–12, 5–12, 5–12, 5–16, 5–16):
- Change to the 6.5 mm hook.
- Work Lace Rows 1–4 following Chart B colors: 2 (2, 2, 2, 3, 3) more repeats.
- 43 (49, 55, 61, 67, 73) sts.
- The body measures about 7 (7, 7, 7, 9, 9)" including the foundation row.
Armhole shaping – next row (RS, Lace Row 1, CC2):
- Turn. Do not work the first 6 sts.
- Join CC2 in the 7th st.
- Work Row 1, ending with a dc in the 7th st from the end.
- You now have 31 (37, 43, 49, 55, 61) sts (43 − 12 = 31 ✓, 6×5+1).
Next 3 rows: Work Lace Rows 2–4 in Chart B colors. 31 (37, 43, 49, 55, 61) sts.
Total: 16 (16, 16, 16, 20, 20) lace rows. The top edge is straight, forming the square neckline. Fasten off.
BACK HALVES (make 2, mirrored)
Foundation:
- With MC and the 5.5 mm hook, ch 20 (24, 26, 30, 32, 36).
- Foundation row: sc in the 2nd ch from the hook and in each ch across. 19 (23, 25, 29, 31, 35) sts.
Rows 1–4: Work Filet Mesh with the 5.5 mm hook. 19 (23, 25, 29, 31, 35) sts.
Rows 5–12 (5–12, 5–12, 5–12, 5–16, 5–16): Work Filet Mesh with the 6.5 mm hook. 19 (23, 25, 29, 31, 35) sts.
Armhole – next row:
- Mark the side edge, which is the outer edge (for the Right Back this is the left edge as viewed from the RS, mirrored for the Left Back).
- If the row begins at the side edge: sl st across 6 sts, then ch 4 in the 7th st, which is a dc, and continue the mesh.
- If the row ends at the side edge: stop after the dc that is 7th from the end.
- You now have 13 (17, 19, 23, 25, 29) sts (19 − 6 = 13 ✓, still odd).
Next row: Work Filet Mesh. 13 (17, 19, 23, 25, 29) sts.
Total: 14 (14, 14, 14, 18, 18) rows, matching the Front at the armhole. The back sits about 2 rows lower than the front. Fasten off.
Eyelet Bands (each back half, center edge)
Use MC and the 5.5 mm hook. With the RS facing, work along the center-back row ends.
Row 1:
- Work 2 sc per mesh row end.
- 28 (28, 28, 28, 36, 36) sc. The foundation row is eased into the first 2 sc.
Row 2 (eyelets):
- XS–L: sc 3, ch 2, sk 2, sc 3. Rep from * 5 times. 3 + 25 = 28 ✓, giving 5 eyelets.
- XL–XXL: sc 3, ch 2, sk 2, sc 3. Rep from * 6 times, then sc 3. 3 + 30 + 3 = 36 ✓, giving 6 eyelets.
Row 3 (reinforcing):
- Work sc in each sc and 2 sc in each ch-2 sp.
- 28 (28, 28, 28, 36, 36) sts.
Second half: Work the band on the second half so that its eyelets align with the first.
Each band adds about 0.75"; this is already included in the finished bust.
Assembly
- Block all pieces to the measurements before seaming.
- Seam each back half to the Front at the side with a sl st seam on the WS, using MC and matching row ends.
Hem: Pointed Scallop
Work into the foundation chains with the 5.5 mm hook, starting at the left center-back band.
Row 1 (RS, MC):
- Work sc evenly across the whole bottom edge to a total of 79 (97, 103, 121, 127, 145) sts.
- Raw edge totals are 81 (95, 105, 119, 129, 143). To reach the target, sc2tog twice (XS, M, XL) or work 2 sc in one st twice (S, L, XXL), spacing these at the side seams.
Row 2 (WS, CC2):
- Sc across.
Row 3 (RS, MC) – points:
- Ch 1, sc in the first st.
- Sk 2, then work (dc, tr, picot, tr, dc) in the next st, sk 2, sc in the next st. Rep from * across.
- This gives 13 (16, 17, 20, 21, 24) pointed scallops. (79 − 1)/6 = 13 ✓.
Fasten off.
Top Edging (neckline, armholes and back)
Use the 5.5 mm hook.
Rnd 1 (MC):
- Join at a side seam underarm.
- Work sc evenly around the entire top opening: back, armhole, front square neckline and the other armhole.
- Work 1 sc per st, 2 sc per row end, and 3 sc in each front neckline corner.
- Adjust to an even number of sts.
Rnd 2 (CC1) – leaf picot:
- Sc in the next st, sk 1, (sc, picot, sc) in the next st. Rep from * around. Odd leftover sts are simply worked as sc.
- Sl st to join and fasten off.
Optional: Work a 3rd round of sc in MC on the front neckline only for a firmer square line.
Straps (make 2, adjustable)
- With MC and the 6.5 mm hook, ch 50 (52, 54, 56, 58, 60), which is about 14–16".
- Sl st in the back bump of each ch for a firm cord.
- Sew one end securely to the top corner of the front armhole, at a removable marker.
- Try the top on. Thread the other end down through the back edging at the marker, about 1.5" in from the armhole, and tie a knot or bow.
- Re-tie to adjust the length. Add or remove chains as needed before finishing.
Lacing
- With MC and the 6.5 mm hook, ch 160 (about 60"), then sl st back along the chain. Alternatively, use ribbon.
- Lace criss-cross through the eyelets, bottom to top, like a corset.
- Draw in to fit and tie at the top. Leave a 0–2" gap as desired.
Finishing
- Weave in all ends along solid dc columns or the Row 4 vine bands.
- Re-block the hem points and the neckline picots, pinning each point.
- Lining (optional): Cut lightweight cotton or mesh to the blocked Front and Back shapes plus a ½" allowance. Hem it, then whipstitch it to the WS behind the Row 1 sc and top edging, keeping the lining 1" clear of the eyelets.
Tech Edit Summary
- Front: 43/49/55/61/67/73 → 31/37/43/49/55/61 ✓ (−12, keeps 6k+1).
- Back halves: 19/23/25/29/31/35 → 13/17/19/23/25/29 ✓.
- Hem: 79/97/103/121/127/145 = 6k+1 → 13/16/17/20/21/24 points ✓.
- Eyelets: 5/5/5/5/6/6 per band ✓.
- Finished bust: Front + 2 back halves + bands = 28.5/33/36.5/41/44.5/49" ✓.
Disclaimer: This pattern was generated by AI and should be reviewed for accuracy before use. While we strive for quality, AI-generated content may contain errors. Please verify measurements, stitch counts, charts, and instructions before beginning your project. Generated by purlJam.uk
Love this pattern?
Save this pattern to your free PurlJam libraryAccess your pattern anytime
Bookmark this page to access your pattern anytime