Type
Crochet
Difficulty
beginner
Category
kimono
AI Thinking Process
Planning
Pattern
Breezy Bloom Cropped Granny Sweater
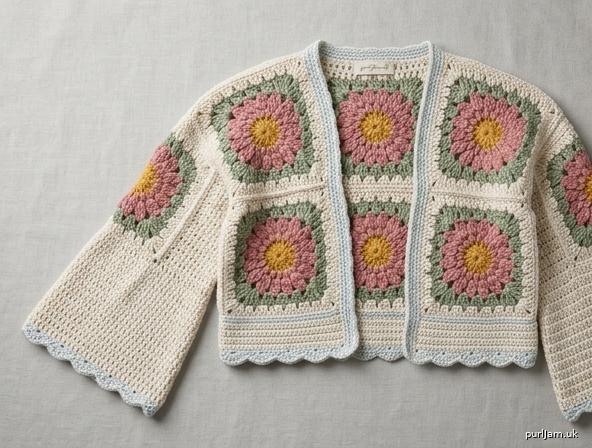
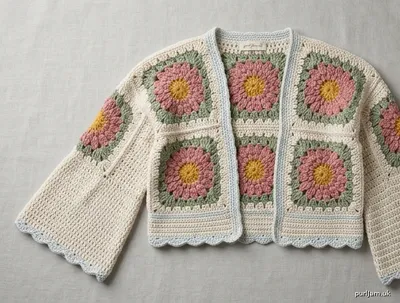
A beginner-friendly, oversized, open-front cropped kimono sweater made from 6 large floral granny squares. Dropped T-shaped shoulders, wide bell sleeves, and a scalloped hem. Worked in US terms.
Difficulty: Beginner
Sizes
S/M (L/XL, 2XL/3XL)
Shown in size S/M. To choose a size, pick finished bust 6–12" (15–30.5 cm) larger than your actual bust.
Finished Measurements
| S/M | L/XL | 2XL/3XL | |
|---|---|---|---|
| Bust (fronts meeting) | 44" (112 cm) | 52" (132 cm) | 60" (152.5 cm) |
| Back width | 22" (56 cm) | 26" (66 cm) | 30" (76 cm) |
| Body length (with scallop) | 16" (40.5 cm) | 18" (45.5 cm) | 20" (51 cm) |
| Granny square | 11" (28 cm) | 13" (33 cm) | 15" (38 cm) |
| Shoulder seam | 6" (15 cm) | 7" (18 cm) | 8" (20.5 cm) |
| Back neck (before edging) | 10" (25.5 cm) | 12" (30.5 cm) | 14" (35.5 cm) |
| Sleeve length (with bell + scallop) | 17" (43 cm) | 19" (48.5 cm) | 21" (53.5 cm) |
| Upper sleeve circumference | 18" (45.5 cm) | 21" (53.5 cm) | 24" (61 cm) |
| Bell cuff circumference | 26" (66 cm) | 32" (81.5 cm) | 36" (91.5 cm) |
Ease is generous and boxy. Length is cropped (high hip). No waist shaping.
Yarn
Worsted weight (CYC 4), cotton, bamboo, Tencel, or a cotton blend for drape. Acrylic is workable but less breezy.
Sample yardage (includes 10% extra):
| Color | Role | S/M | L/XL | 2XL/3XL |
|---|---|---|---|---|
| A | Flower center | 70 yd / 64 m | 90 yd / 82 m | 110 yd / 101 m |
| B | Petals | 140 yd / 128 m | 180 yd / 165 m | 230 yd / 210 m |
| C | Inner square frame | 200 yd / 183 m | 280 yd / 256 m | 360 yd / 329 m |
| D (MC) | Outer granny, joining, sleeves, borders | 550 yd / 503 m | 750 yd / 686 m | 1000 yd / 914 m |
Suggested palette: A gold, B rose, C sage, D natural or sky.
Hook & Notions
- US J/10 (6.0 mm), or size needed to obtain gauge
- US I/9 (5.5 mm) for edging only (optional, slightly firmer edge)
- Tapestry needle
- 8 stitch markers
- Scissors
- Blocking mats and pins (or wires)
Gauge
Blocked floral granny square = 11 (13, 15)" / 28 (33, 38) cm across.
Also: 12 dc × 7 rows = 4" (10 cm) in dc with US J/10 (6.0 mm), blocked.
Make one full square as your swatch. If it is too small, go up a hook; too large, go down a hook. Oversized fit is forgiving, but all 6 squares must match each other.
Abbreviations (US)
- beg — beginning
- ch — chain
- ch-sp — chain space
- cl — 3-dc granny cluster (3 dc in the same space)
- dc — double crochet
- hdc — half double crochet
- MC — main color (Color D)
- pm — place marker
- rep — repeat
- rnd(s) — round(s)
- RS — right side
- sc — single crochet
- sk — skip
- sl st — slip stitch
- sp(s) — space(s)
- st(s) — stitch(es)
- WS — wrong side
- yo — yarn over
Special Stitches
Magic ring: Wrap yarn around a finger to form a loop, work Rnd 1 into the loop, then pull the tail to close.
Beginner alternative: Ch 4, sl st in first ch to form a ring; work Rnd 1 into the ring.
Granny cluster (cl): 3 dc in the same stitch or space.
Shell (scallop): 5 dc in the same stitch.
3-dc cluster (optional, not required in this pattern): Yo, insert hook, yo, pull up a loop, yo, draw through 2 loops, [yo, insert in same st, yo, pull up a loop, yo, draw through 2 loops] twice, yo, draw through all 4 loops on hook.
Pattern Notes
- US crochet terminology throughout. Ch 3 at the start of a round counts as 1 dc unless stated otherwise.
- Join rounds with a sl st in the top of the beg ch-3.
- Work with the RS facing unless a row says “turn.”
- This is motif colorwork, not stranded Fair Isle. Do not carry floats. Fasten off at each color change. Weaving ends into the same-color round as you go will save a large finishing session.
- The kimono is a T: no armhole decreases, no waist shaping, no tapered set-in sleeves. Bell flare is added after the sleeve square, at the cuff only.
- Block every square to size before joining.
Colorwork & Charts
The floral motif is worked in the round from the written instructions below. Charts are the color map of that motif (and the hem repeat). Do not work Chart A as stranded rows.
How to read Chart A: Row 1 is the bottom of the chart. Odd (RS) rows read right to left; even (WS) rows read left to right. Use it only as a picture of the finished flower: gold center, petal ring, inner frame, then Color D background.
How to read Chart B: Concentric rounds from the center out. One symbol = one round’s color. Stitch counts follow the written motif (not a 1-st-per-square grid).
Color key (all charts)
| Symbol | Color | Role |
|---|---|---|
| ◆ | A | Flower center |
| ● | B | Petals |
| ■ | C | Inner frame |
| □ | D (MC) | Outer granny, joining, sleeves, borders |
Yardage by color is listed under Yarn. Change color at the joining sl st: finish the last yarn-over of the last st with the new color, or fasten off and join the new color in any corner (or any petal space). Never strand an unused color across an open granny space — the float would show on both sides. Weave each tail along the back of its own color ring for at least 2" (5 cm).
Colorwork blocking: Pin each square to a true square. Open the ch-sps so petal and frame colors sit flat. Do not stretch one color more than another or the flower will oval. Steam (or wet-block cotton) and let dry fully before seaming; color junctions settle as the fabric relaxes.
CHART A: Flower Motif (13 sts × 15 rows)
Visual color map of the floral center (not a stranded knitting chart). Repeat is the full 13-st panel.
15: □ □ □ □ □ □ □ □ □ □ □ □ □
14: □ □ □ ■ ■ ■ ■ ■ ■ ■ □ □ □
13: □ □ ■ ■ ● ● ● ● ● ■ ■ □ □
12: □ ■ ■ ● ● ● ● ● ● ● ■ ■ □
11: □ ■ ● ● ● ◆ ◆ ◆ ● ● ● ■ □
10: □ ■ ● ● ◆ ◆ ◆ ◆ ◆ ● ● ■ □
 9: □ ■ ● ● ◆ ◆ ◆ ◆ ◆ ● ● ■ □
 8: □ ■ ● ● ◆ ◆ ◆ ◆ ◆ ● ● ■ □
 7: □ ■ ● ● ◆ ◆ ◆ ◆ ◆ ● ● ■ □
 6: □ ■ ● ● ● ◆ ◆ ◆ ● ● ● ■ □
 5: □ ■ ■ ● ● ● ● ● ● ● ■ ■ □
 4: □ □ ■ ■ ● ● ● ● ● ■ ■ □ □
 3: □ □ □ ■ ■ ■ ■ ■ ■ ■ □ □ □
 2: □ □ □ □ □ □ □ □ □ □ □ □ □
 1: □ □ □ □ □ □ □ □ □ □ □ □ □
Chart A = 13 sts; 1 motif = 1 granny square center. Outer □ area continues in granny rounds with Color D until the square measures 11 (13, 15)".
CHART B: Granny Square Color Rounds
Worked in the round from the center. Each ring is one round (Rnd 2 is the petal ring).
        □ □ □ □ □ □ □
      □ ■ ■ ■ ■ ■ ■ □
    □ ■ ● ● ● ● ● ■ □
  □ ■ ● ● ◆ ◆ ◆ ● ● ■ □
  □ ■ ● ◆ ◆ ◆ ◆ ◆ ● ■ □
  □ ■ ● ● ◆ ◆ ◆ ● ● ■ □
    □ ■ ● ● ● ● ● ■ □
      □ ■ ■ ■ ■ ■ ■ □
        □ □ □ □ □ □ □
- Rnd 1 ◆ Color A — 12 dc
- Rnd 2 ● Color B — 12 petals (12 cl + 12 ch-1)
- Rnds 3–4 ■ Color C — square-off + 1 granny round
- Rnds 5+ □ Color D — even granny rounds to size
CHART C: Scallop Hem Repeat (6 sts)
 5:     ■ ■ ■ ■ ■
 4:   ■           ■
 3: ■               ■
 2: □ □     ●     □ □
 1: □ □ □ ● □ □ □
Key for Chart C: ● = sc into the hem, ■ = dc of the 5-dc shell, □ = skipped sts (sk 2 each side of the sc).
Repeat = sk 2, 5 dc in next st, sk 2, sc in next st (6 sts consumed per shell).
Work Chart C on RS only, along the lower edge, after the hem band.
Floral Granny Square (make 6)
Colors A, B, C, then D. All 6 squares are identical.
Rnd 1 (Color A, RS): Magic ring (or ch-4 ring), ch 3 (counts as dc), 11 dc in ring, join. Fasten off A. (12 dc)
Rnd 2 (Color B — petals): Join B in any dc. Ch 3, 2 dc in same st (counts as first cl), ch 1, *3 dc in next dc, ch 1; rep from * around, join in top of beg ch-3. Fasten off B. (12 petals, 12 ch-1 sps)
Rnd 3 (Color C — square off): Join C in any ch-1 sp.
Ch 3, (2 dc, ch 2, 3 dc) in same sp (first corner), ch 1,
[3 dc in next ch-1 sp, ch 1] twice,
*(3 dc, ch 2, 3 dc) in next ch-1 sp, ch 1, [3 dc in next ch-1 sp, ch 1] twice; rep from * twice more, join.
(4 corners + 2 side clusters on each side; 12 ch-1 sps + 4 corner ch-2 sps)
Check: 12 petal spaces used → 4 corners + 8 side spaces (2 per side) ✓
Rnd 4 (Color C): Sl st to first corner ch-2 sp. Ch 3, (2 dc, ch 2, 3 dc) in corner, ch 1,
*[3 dc in next ch-1 sp, ch 1] to next corner, (3 dc, ch 2, 3 dc) in corner ch-2, ch 1; rep from * twice more, [3 dc in next ch-1 sp, ch 1] to end, join. Fasten off C.
(3 side clusters between corner clusters on each side)
Rnd 5 (Color D): Join D in any corner ch-2. Work as Rnd 4 (granny in every ch-1 sp, (3 dc, ch 2, 3 dc) in each corner).
Rnds 6+: Continue even granny rounds in D until the square measures 11 (13, 15)" / 28 (33, 38) cm after a light steam, or until you have about 10 (12, 14) rounds total. Fasten off, leaving a 24" (61 cm) tail if you plan to whipstitch with D.
Each additional round adds 1 cluster per side. Do not increase extra and do not skip spaces — sides must stay straight.
Make 6. Weave center tails now. Block all 6 to the same measurement, pinning corners first, then mid-sides.
Assembly Overview (T-shape)
                    cuff
              ┌─────────────┐     ┌─────────────┐
              │   SLEEVE    │     │   SLEEVE    │
              │  (widened   │     │  (widened   │
              │   square)   │     │   square)   │
   hem    ────┤             ├─────┤             ├──── hem
   ┌──────────┤   FRONT L   │ B L │ B R │ FRONT R├──────────┐
   │ scallop  │             │     │     │        │ scallop  │
   └──────────┴─────────────┴─────┴─────┴────────┴──────────┘
                    open front          open front
Body uses 4 squares (2 back, 1 left front, 1 right front).
Sleeves use 2 squares, each widened on two opposite sides, then belled at the cuff.
Body
Back
With WS together (RS outside when worn), join 2 squares along one side edge using Color D and whipstitch through back loops, or sl st loosely from the WS. This seam is center back. Back measures 22 (26, 30)" / 56 (66, 76) cm wide × 11 (13, 15)" / 28 (33, 38) cm tall. (11+11 = 22 ✓; 13+13 = 26 ✓; 15+15 = 30 ✓)
Hem band (Color D): With RS facing, join D at the lower-left corner of the back. Ch 3, work 66 (78, 90) dc evenly across the full lower edge (3 dc per inch × 22 (26, 30)" = 66 (78, 90) ✓), turn.
Rows 2–6: Ch 3 (counts as dc), dc in each dc across, turn. (66 (78, 90) dc; 6 rows ≈ 3.5" / 9 cm)
Fasten off.
Left Front and Right Front
Keep 2 squares as fronts (do not join them to each other).
On each front, work the same 6-row dc hem band along the lower edge: 33 (39, 45) dc evenly (3 dc per inch × 11 (13, 15)" = 33 (39, 45) ✓). Fasten off.
Mark the inner (center-front) edge and the outer (armhole/side) edge of each front.
Shoulder seams
Lay back flat, RS up. Place fronts on the back, RS together, outer top corners matching the back’s outer top corners.
Seam each shoulder with Color D for 6 (7, 8)" / 15 (18, 20.5) cm starting at the outer edge and working inward. Leave the inner top of each front unseamed.
- Front top used: 6 (7, 8)" seamed + 5 (6, 7)" open = 11 (13, 15)" ✓
- Back neck left open: 22 − 6 − 6 = 10" (26 − 7 − 7 = 12"; 30 − 8 − 8 = 14") ✓
This is a straight dropped shoulder — do not slope or decrease.
Sleeves (make 2)
Widen the sleeve squares
Take the remaining 2 blocked squares. The flower stays centered.
On two opposite edges of each square, work Color D in rows to add width (this becomes armhole-to-cuff circumference). Leave the other pair of edges untouched (this stays the sleeve length).
First side: With RS facing, join D at one corner of an edge. Ch 3, work 33 (39, 45) dc evenly across that edge, turn.
Rows 2–6 (2–7, 2–8): Ch 3, dc in each dc across, turn.
6 (7, 8) rows ≈ 3.5 (4, 4.5)" / 9 (10, 11.5) cm. Fasten off.
Opposite side: Repeat so both sides are widened the same amount.
Sleeve rectangle is now:
- Length (flower-to-cuff direction): 11 (13, 15)" / 28 (33, 38) cm
- Width (armhole/cuff edge): 11 + 3.5 + 3.5 = 18" (13 + 4 + 4 = 21"; 15 + 4.5 + 4.5 = 24") ✓
Attach sleeves (perpendicular T)
Fold the body at the shoulders. The outer side of the left front and left back now sit stacked; same on the right.
The 18 (21, 24)" edge of the sleeve is the armhole edge. Center that edge on the shoulder seam and pin:
- 9 (10.5, 12)" down the front side
- 9 (10.5, 12)" down the back side
(9+9 = 18 ✓; 10.5+10.5 = 21 ✓; 12+12 = 24 ✓)
Sew this edge to the body with Color D (whipstitch or loose sl st). The sleeve sticks out at a right angle. Do not shape an armscye.
Repeat for the second sleeve.
Side seams and sleeve undersides
Side seam: From the hem, sew front to back up to the underarm (the lower end of the sleeve attachment). Seam length ≈ 5 (5.5, 6)" / 12.5 (14, 15 cm) of hem-band + lower square — whatever remains below the sleeve. Do not sew into the sleeve attachment.
Sleeve underside: Fold the sleeve in half with RS together. Sew from the underarm to the cuff along the 11 (13, 15)" length. Upper fold is the dropped shoulder line; this seam is the underarm. Sleeve is a wide tube: 18 (21, 24)" circumference. (No taper. ✓)
Bell Sleeve Extension
Worked in joined rounds on the cuff (the remaining 18 (21, 24)" edge), Color D, RS facing.
Set-up rnd: Join D at the underarm seam. Ch 3 (counts as dc), work 53 (62, 71) more dc evenly around the cuff, join. (54 (63, 72) dc)
3 dc per inch × 18 (21, 24)" = 54 (63, 72) ✓
Rnd 2 (increase): Ch 3, dc in next sts increasing 6 (8, 9) sts evenly around, join. (60 (71, 81) dc)
54+6 = 60 ✓; 63+8 = 71 ✓; 72+9 = 81 ✓
To increase evenly: place 6 (8, 9) markers equally around and work 2 dc in each marked st.
Rnd 3 (even): Ch 3, dc in each dc around, join.
Rnd 4 (increase): Inc 6 (8, 9) sts evenly. (66 (79, 90) dc)
60+6 = 66 ✓; 71+8 = 79 ✓; 81+9 = 90 ✓
Rnd 5 (even): Dc around.
Rnd 6 (increase): Inc 6 (8, 9) sts evenly. (72 (87, 99) dc)
66+6 = 72 ✓; 79+8 = 87 ✓; 90+9 = 99 ✓
Rnd 7 (even): Dc around.
Rnd 8 (increase): Inc 6 (8, 9) sts evenly. (78 (95, 108) dc)
72+6 = 78 ✓; 87+8 = 95 ✓; 99+9 = 108 ✓
Circumference ≈ 26 (32, 36)" / 66 (81.5, 91.5) cm at 3 dc per inch. ✓
Cuff scallop (Chart C): Ch 1, *sk 2 dc, 5 dc in next dc, sk 2 dc, sc in next dc; rep from * around, adjusting 1–2 skipped sts if needed so a sc sits at the underarm. Join, fasten off.
Repeat for the second sleeve.
Scalloped Hem (Chart C)
With RS facing, join Color D at the lower center-front corner of the Right Front (as worn). Work across Right Front hem, Back hem, then Left Front hem as one edge.
Ch 1, sc in first st, *sk 2 dc, 5 dc in next dc, sk 2 dc, sc in next dc; rep from * across, ending with sc in the last st. If the last repeat does not land exactly, sk 1 or 3 once — never add extra shells in a way that ruffles the front corners.
Shell height ≈ 1.5" (4 cm).
Total length from shoulder: 11 (13, 15)" square + 3.5" hem + 1.5" scallop = 16 (18, 20)" / 40.5 (45.5, 51) cm ✓
Do not scallop the center-front vertical edges; those are worked in the next section.
Front, Neck, and Collar Edging
With RS facing, join Color D at the lower Right Front corner (bottom of the scallop). Work up Right Front, around the neck, and down Left Front.
Rnd/Row 1 (sc): Ch 1, sc evenly — about 3 sc per 2 rows on dc bands, 1 sc in each dc or 2 sc per cluster + 1 sc in each ch-1 along square edges. At the inner shoulder corners (where the front becomes the back neck), work 3 sc in the corner st so the neck does not cup. Across the back neck, sc in each st/space. Do not turn if you prefer a continuous look; or turn for a slightly thicker band.
Rows 2–3: Ch 1, sc in each sc, working 3 sc in each inner-shoulder corner on Row 2 only if the neck still wants to pull. Fasten off after Row 3.
Optional firmer edge: use US I/9 (5.5 mm) for these 3 rows only.
Optional ties (kimono closure): With D, ch 50, sc in 2nd ch from hook and in each ch across. Make 2. Sew one to each front at about 1" (2.5 cm) below the inner shoulder. Or weave a 60" (152.5 cm) chain-sash through the front edging at the underbust.
No buttons required; wear open.
Finishing
- Weave all remaining ends, matching color to color.
- Steam- or wet-block the whole sweater to the finished measurements. Pin the bell cuffs in a smooth flare (not a ruffle) and the hem shells so they lie in a straight line.
- Let dry completely.
- Check shoulder and underarm seams; reinforce with a second pass of whipstitch if any gap appears at the T junction.
Schematic (inches)
Bust (fronts meeting)     44 (52, 60)"
Back width                22 (26, 30)"
Each front width          11 (13, 15)"
Body length               16 (18, 20)"  (square + hem + scallop)
Shoulder seam             6 (7, 8)"
Back neck                 10 (12, 14)"
Sleeve length             17 (19, 21)"  (square + 8 dc rnds + scallop)
Upper sleeve circ.        18 (21, 24)"
Bell cuff circ.           26 (32, 36)"
Square                    11 (13, 15)" × 11 (13, 15)"
Side view is a T: body rectangle, sleeve rectangle attached at 90°, then a flared cuff. Shoulders are a straight horizontal seam. Sleeves are not set-in and not tapered; they only widen at the bell.
Beginner Tips
- Count clusters on each side every round; all four sides of a square must have the same cluster count.
- If a square ruffles, your hook is large or you added extra chains — block firmly. If it cups, add the ch-1 between clusters (do not omit them).
- Join squares with a loose seam so the T still drapes. A tight sl-st seam will pull the dropped shoulder up.
- Weave Color A and B tails before blocking; they are hard to reach after the outer rounds close.
Wear open over a tank or dress. The six flowers sit: two across the back, one on each front, one on each upper sleeve.
Disclaimer: This pattern was generated by AI and should be reviewed for accuracy before use. While we strive for quality, AI-generated content may contain errors. Please verify measurements, stitch counts, charts, and instructions before beginning your project. Generated by purlJam.uk
Love this pattern?
Save this pattern to your free PurlJam libraryAccess your pattern anytime
Bookmark this page to access your pattern anytime